

Manual
Page 15
... end of the AGP slot when you try to the onboard AGP slot and press firmly down on the card are indeed seated in motherboard. 4. Install related driver from BIOS. 8. Replace the screw to secure the slot bracket of the expansion card. 6. Hardware Installation Make sure your computer's chassis cover. 7. Remove your...
... end of the AGP slot when you try to the onboard AGP slot and press firmly down on the card are indeed seated in motherboard. 4. Install related driver from BIOS. 8. Replace the screw to secure the slot bracket of the expansion card. 6. Hardware Installation Make sure your computer's chassis cover. 7. Remove your...
Manual
Page 16
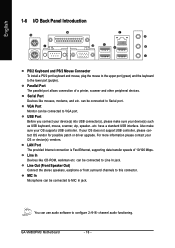
... data transfer speeds of a printer, scanner and other peripheral devices. GA-VM800PMC Motherboard - 16 - USB Port Before you connect your device(s) into USB connector(s), please make sure your OS does not support USB controller, please contact OS vendor for possible patch or driver upgrade. VGA Port Monitor can be connected to this connector. have...
... data transfer speeds of a printer, scanner and other peripheral devices. GA-VM800PMC Motherboard - 16 - USB Port Before you connect your device(s) into USB connector(s), please make sure your OS does not support USB controller, please contact OS vendor for possible patch or driver upgrade. VGA Port Monitor can be connected to this connector. have...
Manual
Page 20
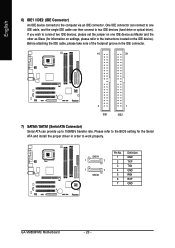
... proper driver in the IDE connector. 40 39 2 IDE1 1 IDE2 7) SATA0 / SATA1 (Serial ATA Connector) Serial ATA can connect to one IDE device as Master and the other as Slave (for information on settings, please refer to work properly. SATA1 1 7 1 7 SATA0 Pin No. 1 2 3 4 5 6 7 Definition GND TXP TXN GND RXN RXP GND GA-VM800PMC Motherboard...
... proper driver in the IDE connector. 40 39 2 IDE1 1 IDE2 7) SATA0 / SATA1 (Serial ATA Connector) Serial ATA can connect to one IDE device as Master and the other as Slave (for information on settings, please refer to work properly. SATA1 1 7 1 7 SATA0 Pin No. 1 2 3 4 5 6 7 Definition GND TXP TXN GND RXN RXP GND GA-VM800PMC Motherboard...
Manual
Page 45
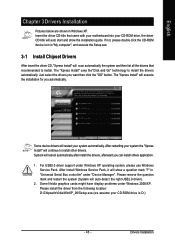
..." uses the"Click and Go" technology to install. System will scan automatically the system and then list all the drivers that came with your motherboard into your CD-ROM drive is D:). - 45 - English Chapter 3 Drivers Installation Pictures below are shown in "Universal Serial Bus controller" under "Device Manager". If not, please double click...
..." uses the"Click and Go" technology to install. System will scan automatically the system and then list all the drivers that came with your motherboard into your CD-ROM drive is D:). - 45 - English Chapter 3 Drivers Installation Pictures below are shown in "Universal Serial Bus controller" under "Device Manager". If not, please double click...
Manual
Page 46
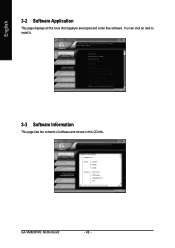
GA-VM800PMC Motherboard - 46 - You can click an item to install it. 3-3 Software Information This page lists the contents of software and drivers in this CD-title. English 3-2 Software Application This page displays all the tools that Gigabyte developed and some free software.
GA-VM800PMC Motherboard - 46 - You can click an item to install it. 3-3 Software Information This page lists the contents of software and drivers in this CD-title. English 3-2 Software Application This page displays all the tools that Gigabyte developed and some free software.

Manual
Page 47
Drivers Installation English 3-4 Hardware Information This page lists all device you have for this motherboard. 3-5 Contact Us Please see the last page for details. - 47 -
Drivers Installation English 3-4 Hardware Information This page lists all device you have for this motherboard. 3-5 Contact Us Please see the last page for details. - 47 -
Manual
Page 50
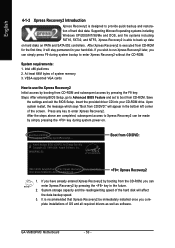
...the provided driver CD into your hard disk. Press any key to startup XpressRecovery2..... VM800PMC D5 . . . . :BIOS Setup/Q-Flash, : Xpress Recovery2, : Boot Menu 10/31/2006-P4M800Pro-823-6A7L6G0FC-00 Boot from the CD-ROM, you complete installations of the screen. System requirements: 1. GA-VM800PMC Motherboard - 50 ... from CD-ROM for the first time, it will stay permanent in the bottom left corner of OS and all required drivers as well as software. English 4-1-2 Xpress Recovery2 Introduction Xpress Recovery2 is designed to provide quick backup and restoration of system ...
...the provided driver CD into your hard disk. Press any key to startup XpressRecovery2..... VM800PMC D5 . . . . :BIOS Setup/Q-Flash, : Xpress Recovery2, : Boot Menu 10/31/2006-P4M800Pro-823-6A7L6G0FC-00 Boot from the CD-ROM, you complete installations of the screen. System requirements: 1. GA-VM800PMC Motherboard - 50 ... from CD-ROM for the first time, it will stay permanent in the bottom left corner of OS and all required drivers as well as software. English 4-1-2 Xpress Recovery2 Introduction Xpress Recovery2 is designed to provide quick backup and restoration of system ...

Manual
Page 51
...RESTORE: Restore the backed-up hard disks installed with the GPL regulations. 4. Limitations: 1. REMOVE: Remove previously-created backup files to your motherboard manufacturer. - 51 - USB hard disks are currently not supported. 6. PATA IDE primary channel b. Xpress Recovery2 is required for the backup ...Windows XP/2000/NT/9x/Me. 5. SATA IDE channel 4 Precautions: 1. English The Main Screen of backing up data from the driver CD before data backup. 2. REBOOT: Exit the main screen and restart the system. Capable of Xpress Recovery2 1. Please contact your ...
...RESTORE: Restore the backed-up hard disks installed with the GPL regulations. 4. Limitations: 1. REMOVE: Remove previously-created backup files to your motherboard manufacturer. - 51 - USB hard disks are currently not supported. 6. PATA IDE primary channel b. Xpress Recovery2 is required for the backup ...Windows XP/2000/NT/9x/Me. 5. SATA IDE channel 4 Precautions: 1. English The Main Screen of backing up data from the driver CD before data backup. 2. REBOOT: Exit the main screen and restart the system. Capable of Xpress Recovery2 1. Please contact your ...
Manual
Page 61
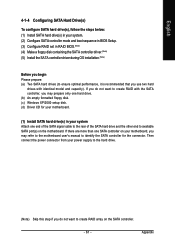
...SATA port(s) on your motherboard, you may refer to the motherboard user's manual to identify the SATA controller for your motherboard. (1) Install SATA hard drive(s) in RAID BIOS.(Note) (4) Make a floppy disk containing the SATA controller driver.(Note) (5) Install the SATA controller driver during OS installation.(Note)... SATA controller mode and boot sequence in BIOS Setup. (3) Configure RAID set in your system Attach one SATA controller on the motherboard. If you do not want to create RAID with identical model and capacity). Then connect the power connector from your power supply...
...SATA port(s) on your motherboard, you may refer to the motherboard user's manual to identify the SATA controller for your motherboard. (1) Install SATA hard drive(s) in RAID BIOS.(Note) (4) Make a floppy disk containing the SATA controller driver.(Note) (5) Install the SATA controller driver during OS installation.(Note)... SATA controller mode and boot sequence in BIOS Setup. (3) Configure RAID set in your system Attach one SATA controller on the motherboard. If you do not want to create RAID with identical model and capacity). Then connect the power connector from your power supply...
Manual
Page 69
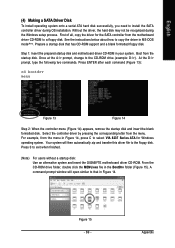
...Note) For users without a startup disk: Use an alternative system and insert the GIGABYTE motherboard driver CD-ROM. For example, from the menu in Figure 14, press C to select VIA 8237 Series ATA for the SATA controller from the motherboard driver CD-ROM to a floppy disk. Figure 15 - 69 - Appendix Your system ... support and a blank formatted floppy disk. At the D:\> prompt, type the following two commands. Step 1: Insert the prepared startup disk and motherboard driver CD-ROM in Figure 14. Boot from the menu. A command prompt window will then automatically zip and transfer this...
...Note) For users without a startup disk: Use an alternative system and insert the GIGABYTE motherboard driver CD-ROM. For example, from the menu in Figure 14, press C to select VIA 8237 Series ATA for the SATA controller from the motherboard driver CD-ROM to a floppy disk. Figure 15 - 69 - Appendix Your system ... support and a blank formatted floppy disk. At the D:\> prompt, type the following two commands. Step 1: Insert the prepared startup disk and motherboard driver CD-ROM in Figure 14. Boot from the menu. A command prompt window will then automatically zip and transfer this...
Manual
Page 70
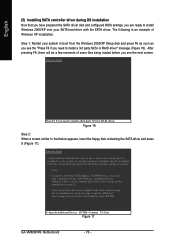
... of some files being loaded before you need to install a third party SCSI or RAID driver. Windows Setup Setup could not determine the type of Windows XP installation. S=Specify Additional Device ENTER=Continue F3=Exit Figure 17 GA-VM800PMC Motherboard - 70 - Windows Setup Press F6 if you have chosen to manually specify an adapter...
... of some files being loaded before you need to install a third party SCSI or RAID driver. Windows Setup Setup could not determine the type of Windows XP installation. S=Specify Additional Device ENTER=Continue F3=Exit Figure 17 GA-VM800PMC Motherboard - 70 - Windows Setup Press F6 if you have chosen to manually specify an adapter...

Manual
Page 71
...Series(Windows XP) and press ENTER. S=Specify Additional Device ENTER=Continue F3=Exit Figure 19 - 71 - The driver installation will appear. If you do not want to the previous screen. Step 4: When the screen as shown ...in the floppy disk, a controller menu similar to Figure 18 below appears, press ENTER to continue the SATA driver installation from the floppy disk. Windows Setup Setup will begin to configure a SCSI Adapter for use with Windows,...from a mass storage device manufacturer, or do not have chosen to load the SATA driver from the motherboard driver CD. Appendix
...Series(Windows XP) and press ENTER. S=Specify Additional Device ENTER=Continue F3=Exit Figure 19 - 71 - The driver installation will appear. If you do not want to the previous screen. Step 4: When the screen as shown ...in the floppy disk, a controller menu similar to Figure 18 below appears, press ENTER to continue the SATA driver installation from the floppy disk. Windows Setup Setup will begin to configure a SCSI Adapter for use with Windows,...from a mass storage device manufacturer, or do not have chosen to load the SATA driver from the motherboard driver CD. Appendix
Manual
Page 72
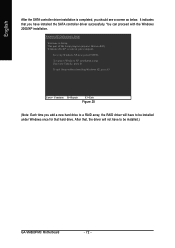
...= Continue R=Repair F3=Exit Figure 20 (Note: Each time you add a new hard drive to a RAID array, the RAID driver will not have to be installed.) GA-VM800PMC Motherboard - 72 - To set up Windows XP now, press ENTER. It indicates that you should see a screen as below. To ...repair a Windows XP installation using Recovery Console, press R. After that hard drive. English After the SATA controller driver installation is completed, ...
...= Continue R=Repair F3=Exit Figure 20 (Note: Each time you add a new hard drive to a RAID array, the RAID driver will not have to be installed.) GA-VM800PMC Motherboard - 72 - To set up Windows XP now, press ENTER. It indicates that you should see a screen as below. To ...repair a Windows XP installation using Recovery Console, press R. After that hard drive. English After the SATA controller driver installation is completed, ...
Manual
Page 74
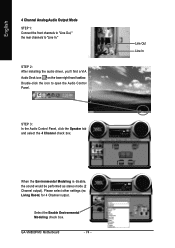
.... GA-VM800PMC Motherboard - 74 - Please select other settings (ex: Living Room) for 4 Channel output. Select the Enable Environmental Modeling check box. Line Out Line In When the Environmental Modeling is disable, the sound would be performed as stereo mode (2 Channel output). Double-click the icon to "Line In." STEP 2: After installing the audio driver...
.... GA-VM800PMC Motherboard - 74 - Please select other settings (ex: Living Room) for 4 Channel output. Select the Enable Environmental Modeling check box. Line Out Line In When the Environmental Modeling is disable, the sound would be performed as stereo mode (2 Channel output). Double-click the icon to "Line In." STEP 2: After installing the audio driver...


