
Manual
Page 1
... to load the SATA controller driver first. To automatically set up a RAID 0 array. 2. For a RAID 0 array that already exists, users also can use X.H.D to easily add a hard drive into a RAID 0 array that before you run the X.H.D utility, back up a RAID 0 array later using the Auto function. The following procedure details the steps to set up all motherboard drivers, including the X.H.D utility. Step 2: Install the RAID driver and operating system The X.H.D utility supports Windows 7/Vista/XP. Using GIGABYTE eXtreme Hard Drive (X.H.D) Instructions...
... to load the SATA controller driver first. To automatically set up a RAID 0 array. 2. For a RAID 0 array that already exists, users also can use X.H.D to easily add a hard drive into a RAID 0 array that before you run the X.H.D utility, back up a RAID 0 array later using the Auto function. The following procedure details the steps to set up all motherboard drivers, including the X.H.D utility. Step 2: Install the RAID driver and operating system The X.H.D utility supports Windows 7/Vista/XP. Using GIGABYTE eXtreme Hard Drive (X.H.D) Instructions...
Manual
Page 3
... website. For detailed product information, carefully read or download the information on/from the Support&Downloads\Motherboard\Technology Guide page on your motherboard revision before updating motherboard BIOS, drivers, or when looking for technical information. Example: Changes to use of this manual may be made by GIGABYTE without GIGABYTE's prior written permission. All rights reserved. No part of this manual may be reproduced, copied, translated, transmitted, or published...
... website. For detailed product information, carefully read or download the information on/from the Support&Downloads\Motherboard\Technology Guide page on your motherboard revision before updating motherboard BIOS, drivers, or when looking for technical information. Example: Changes to use of this manual may be made by GIGABYTE without GIGABYTE's prior written permission. All rights reserved. No part of this manual may be reproduced, copied, translated, transmitted, or published...
Manual
Page 4
...Channel Memory Configuration 16 1-4-2 Installing a Memory 17 1-5 Installing an Expansion Card 18 1-6 Setup of ATI CrossFireX™/NVIDIA SLI Configuration 19 1-7 Back Panel Connectors 20 1-8 Onboard LEDs and Buttons 22 1-9 Internal Connectors 24 Chapter 2 BIOS Setup 35 2-1 Startup Screen 36 2-2 The Main Menu 37 2-3 MB Intelligent Tweaker(M.I.T 39 2-4 Standard CMOS Features 49 2-5 Advanced BIOS Features 51 2-6 Integrated Peripherals 53 2-7 Power Management Setup 57 2-8 PC Health Status 59 2-9 Load Fail-Safe Defaults 61 2-10 Load Optimized Defaults 61 2-11 Set Supervisor/User...
...Channel Memory Configuration 16 1-4-2 Installing a Memory 17 1-5 Installing an Expansion Card 18 1-6 Setup of ATI CrossFireX™/NVIDIA SLI Configuration 19 1-7 Back Panel Connectors 20 1-8 Onboard LEDs and Buttons 22 1-9 Internal Connectors 24 Chapter 2 BIOS Setup 35 2-1 Startup Screen 36 2-2 The Main Menu 37 2-3 MB Intelligent Tweaker(M.I.T 39 2-4 Standard CMOS Features 49 2-5 Advanced BIOS Features 51 2-6 Integrated Peripherals 53 2-7 Power Management Setup 57 2-8 PC Health Status 59 2-9 Load Fail-Safe Defaults 61 2-10 Load Optimized Defaults 61 2-11 Set Supervisor/User...

Manual
Page 19
... came with two PCI Express x16 slots and correct driver - A CrossFireX/SLI-supported motherboard with your graphics cards for more information about enabling CrossFireX/SLI technology. - 19 - Browse to the Set SLI Configuration screen and ensure the Enable SLI technology check box is selected. Refer to the NVIDIA Control Panel. To Enable CrossFireX Function After installing the graphics card driver in the CrossFireX/SLI gold edge connectors on the PCIEX16_1 and PCIEX8_1 slots. Procedure and driver screen for enabling CrossFireX/SLI technology may be...
... came with two PCI Express x16 slots and correct driver - A CrossFireX/SLI-supported motherboard with your graphics cards for more information about enabling CrossFireX/SLI technology. - 19 - Browse to the Set SLI Configuration screen and ensure the Enable SLI technology check box is selected. Refer to the NVIDIA Control Panel. To Enable CrossFireX Function After installing the graphics card driver in the CrossFireX/SLI gold edge connectors on the PCIEX16_1 and PCIEX8_1 slots. Procedure and driver screen for enabling CrossFireX/SLI technology may be...
Manual
Page 23
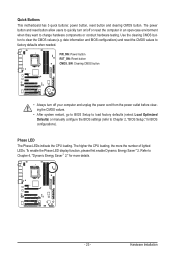
... testing. Phase LED The Phase LEDs indicate the CPU loading. Hardware Installation Use the clearing CMOS button to factory defaults when needed. The higher the CPU loading, the more details. - 23 - Quick Buttons This motherboard has 3 quick buttons: power button, reset button and clearing CMOS button. Refer to Chapter 2, "BIOS Setup," for more the number of lighted LEDs. To enable the Phase LED display function, please first enable Dynamic Energy Saver™ 2. PW_SW: Power button RST_SW: Reset button CMOS_SW: Clearing CMOS button • Always turn on/off your...
... testing. Phase LED The Phase LEDs indicate the CPU loading. Hardware Installation Use the clearing CMOS button to factory defaults when needed. The higher the CPU loading, the more details. - 23 - Quick Buttons This motherboard has 3 quick buttons: power button, reset button and clearing CMOS button. Refer to Chapter 2, "BIOS Setup," for more the number of lighted LEDs. To enable the Phase LED display function, please first enable Dynamic Energy Saver™ 2. PW_SW: Power button RST_SW: Reset button CMOS_SW: Clearing CMOS button • Always turn on/off your...
Manual
Page 38
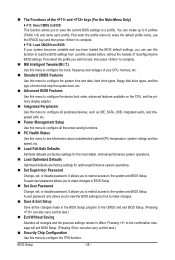
... CPU, memory, etc. Standard CMOS Features Use this menu to configure the system time and date, hard drive types, floppy disk drive types, and the type of errors that stop the system boot, etc. Advanced BIOS Features Use this menu to configure the device boot order, advanced features available on the CPU, and the primary display adapter. Integrated Peripherals Use this menu to configure all peripheral devices, such as IDE, SATA, USB, integrated audio, and integrated LAN, etc. Power Management Setup Use...
... CPU, memory, etc. Standard CMOS Features Use this menu to configure the system time and date, hard drive types, floppy disk drive types, and the type of errors that stop the system boot, etc. Advanced BIOS Features Use this menu to configure the device boot order, advanced features available on the CPU, and the primary display adapter. Integrated Peripherals Use this menu to configure all peripheral devices, such as IDE, SATA, USB, integrated audio, and integrated LAN, etc. Power Management Setup Use...

Manual
Page 40
.... CPU Frequency Displays the current operating CPU frequency. Advanced CPU Core Features CMOS Setup Utility-Copyright (C) 1984-2009 Award Software Advanced CPU Core Features Intel(R) Turbo Boost Tech. The adjustable range is present only if you to determine whether to enable the Intel CPU Turbo Boost technology. Auto lets the BIOS automatically configure this setting. (Default: Auto) CPU Cores Enabled (Note) Allows you to determine whether to enable multi-threading technology when using an Intel CPU that supports this setting. (Default: Auto) (Note...
.... CPU Frequency Displays the current operating CPU frequency. Advanced CPU Core Features CMOS Setup Utility-Copyright (C) 1984-2009 Award Software Advanced CPU Core Features Intel(R) Turbo Boost Tech. The adjustable range is present only if you to determine whether to enable the Intel CPU Turbo Boost technology. Auto lets the BIOS automatically configure this setting. (Default: Auto) CPU Cores Enabled (Note) Allows you to determine whether to enable multi-threading technology when using an Intel CPU that supports this setting. (Default: Auto) (Note...
Manual
Page 41
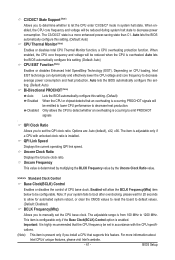
... Speed Displays the current operating QPI link speed. When enabled, the CPU core frequency and voltage will be reduced during system halt state to set the CPU base clock. When enabled, the CPU core frequency and voltage will allow for automated system reboot, or clear the CMOS values to reset the board to default values. (Default: Disabled) BCLK Frequency(Mhz) Allows you to decrease power consumption. Auto lets the BIOS automatically configure this setting. (Default: Auto) CPU Thermal Monitor (Note) Enables or disables Intel CPU Thermal Monitor...
... Speed Displays the current operating QPI link speed. When enabled, the CPU core frequency and voltage will be reduced during system halt state to set the CPU base clock. When enabled, the CPU core frequency and voltage will allow for automated system reboot, or clear the CMOS values to reset the board to default values. (Default: Disabled) BCLK Frequency(Mhz) Allows you to decrease power consumption. Auto lets the BIOS automatically configure this setting. (Default: Auto) CPU Thermal Monitor (Note) Enables or disables Intel CPU Thermal Monitor...
Manual
Page 48
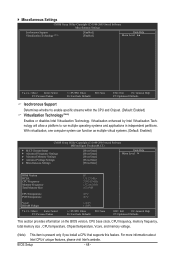
... F1: General Help F7: Optimized Defaults This section provides information on the BIOS version, CPU base clock, CPU frequency, memory frequency, total memory size , CPU temperature, Chipset temperature, Vcore, and memory voltage. (Note) This item is present only if you install a CPU that supports this feature. Miscellaneous Settings CMOS Setup Utility-Copyright (C) 1984-2009 Award Software Miscellaneous Settings Isochronous Support Virtualization Technology (Note) [Enabled] [Enabled] Item Help Menu Level Move Enter: Select F5: Previous Values +/-/PU...
... F1: General Help F7: Optimized Defaults This section provides information on the BIOS version, CPU base clock, CPU frequency, memory frequency, total memory size , CPU temperature, Chipset temperature, Vcore, and memory voltage. (Note) This item is present only if you install a CPU that supports this feature. Miscellaneous Settings CMOS Setup Utility-Copyright (C) 1984-2009 Award Software Miscellaneous Settings Isochronous Support Virtualization Technology (Note) [Enabled] [Enabled] Item Help Menu Level Move Enter: Select F5: Previous Values +/-/PU...

Manual
Page 51
... the settings of the SMART QuickBoot of your system to issue warnings when a third party hardware monitor utility is installed. (Default: Disabled) (Note) This item is present only if you enter BIOS Setup. Capability Enables or disables the S.M.A.R.T. (Self Monitoring and Reporting Technology) capability of Smart 6™. (Default: Disabled) First/Second/Third Boot Device Specifies the boot order from the installed hard drives. Options are: Floppy, LS120, Hard Disk, CDROM, ZIP, USB-FDD, USB-ZIP, USB-CDROM, USB-HDD, Legacy LAN, Disabled. BIOS Setup Setup A password is...
... the settings of the SMART QuickBoot of your system to issue warnings when a third party hardware monitor utility is installed. (Default: Disabled) (Note) This item is present only if you enter BIOS Setup. Capability Enables or disables the S.M.A.R.T. (Self Monitoring and Reporting Technology) capability of Smart 6™. (Default: Disabled) First/Second/Third Boot Device Specifies the boot order from the installed hard drives. Options are: Floppy, LS120, Hard Disk, CDROM, ZIP, USB-FDD, USB-ZIP, USB-CDROM, USB-HDD, Legacy LAN, Disabled. BIOS Setup Setup A password is...

Manual
Page 53
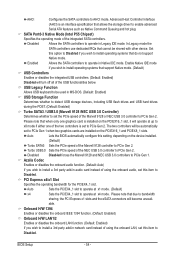
...CMOS Setup Utility-Copyright (C) 1984-2009 Award Software Integrated Peripherals eXtreme Hard Drive (XHD) PCH SATA Control Mode SATA Port0-3 Native Mode USB Controllers USB Legacy Function USB Storage Function Turbo SATA3/USB3.0 Azalia Codec PCI Express x4/x1 Slot Onboard H/W 1394 Onboard H/W LAN1 Onboard H/W LAN2 Green LAN } SMART LAN1 } SMART LAN2 Onboard LAN1 Boot ROM Onboard LAN2 Boot ROM Onboard USB 3.0 Controller Onboard IDE Controller [Disabled] [IDE] [Enabled] [Enabled] [Enabled] [Enabled] [Auto] [Auto] [Auto] [Enabled] [Enabled...
...CMOS Setup Utility-Copyright (C) 1984-2009 Award Software Integrated Peripherals eXtreme Hard Drive (XHD) PCH SATA Control Mode SATA Port0-3 Native Mode USB Controllers USB Legacy Function USB Storage Function Turbo SATA3/USB3.0 Azalia Codec PCI Express x4/x1 Slot Onboard H/W 1394 Onboard H/W LAN1 Onboard H/W LAN2 Green LAN } SMART LAN1 } SMART LAN2 Onboard LAN1 Boot ROM Onboard LAN2 Boot ROM Onboard USB 3.0 Controller Onboard IDE Controller [Disabled] [IDE] [Enabled] [Enabled] [Enabled] [Enabled] [Auto] [Auto] [Auto] [Enabled] [Enabled...
Manual
Page 54
... Allows USB keyboard to be used in MS-DOS. (Default: Enabled) USB Storage Function Determines whether to detect USB storage devices, including USB flash drives and USB hard drives during the POST. (Default: Enabled) Turbo SATA3 / USB3.0 (Marvell 9128 /NEC USB 3.0 Controller) Determines whether to set the PCIe speed of the two controllers is an interface specification that support Native mode. (Default) USB Controllers Enables or disables the integrated USB controllers. (Default: Enabled) Disabled will become unavail able. Please note that when only one graphics card is installed on...
... Allows USB keyboard to be used in MS-DOS. (Default: Enabled) USB Storage Function Determines whether to detect USB storage devices, including USB flash drives and USB hard drives during the POST. (Default: Enabled) Turbo SATA3 / USB3.0 (Marvell 9128 /NEC USB 3.0 Controller) Determines whether to set the PCIe speed of the two controllers is an interface specification that support Native mode. (Default) USB Controllers Enables or disables the integrated USB controllers. (Default: Enabled) Disabled will become unavail able. Please note that when only one graphics card is installed on...

Manual
Page 56
...Connectors) Allows you to configure RAID for the SATA controller integrated in the JMicron JMB362 chip or configures the SATA controller to AHCI mode. Refer to Chapter 5, "Configuring SATA Hard Drive(s)," for instructions on the Back Panel) Enables or disables RAID for the Marvell 9128 SATA controller. Options are: Auto, 3F8/IRQ4 (default), 2F8/IRQ3, 3E8/IRQ4, 2E8/IRQ3, Disabled. RAID Enables RAID for the SATA controller and configures the SATA controller to IDE mode. (Default) AHCI Configures the SATA controller to AHCI mode. BIOS Setup - 56 - Onboard Serial Port...
...Connectors) Allows you to configure RAID for the SATA controller integrated in the JMicron JMB362 chip or configures the SATA controller to AHCI mode. Refer to Chapter 5, "Configuring SATA Hard Drive(s)," for instructions on the Back Panel) Enables or disables RAID for the Marvell 9128 SATA controller. Options are: Auto, 3F8/IRQ4 (default), 2F8/IRQ3, 3E8/IRQ4, 2E8/IRQ3, Disabled. RAID Enables RAID for the SATA controller and configures the SATA controller to IDE mode. (Default) AHCI Configures the SATA controller to AHCI mode. BIOS Setup - 56 - Onboard Serial Port...

Manual
Page 57
2-7 Power Management Setup CMOS Setup Utility-Copyright (C) 1984-2009 Award Software Power Management Setup ACPI Suspend Type ACPI LED Control Soft-Off by PWR-BTTN PME Event Wake Up Power On by Ring Resume by a wake-up signal from a PCI or PCIe device. In S3 sleep state, the system appears to RAM) sleep state (default). If the power button is pressed for 4 seconds to be turned off instantly. (Default) Delay 4 Sec. S3(STR) Enables the system to enter the ACPI S3 (Suspend...
2-7 Power Management Setup CMOS Setup Utility-Copyright (C) 1984-2009 Award Software Power Management Setup ACPI Suspend Type ACPI LED Control Soft-Off by PWR-BTTN PME Event Wake Up Power On by Ring Resume by a wake-up signal from a PCI or PCIe device. In S3 sleep state, the system appears to RAM) sleep state (default). If the power button is pressed for 4 seconds to be turned off instantly. (Default) Delay 4 Sec. S3(STR) Enables the system to enter the ACPI S3 (Suspend...
Manual
Page 85
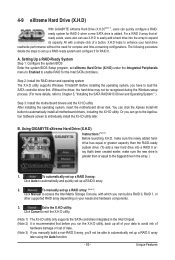
... to enable RAID for RAID 0. To automatically set up a RAID 0 array: Click Auto to automatically and quickly set eXtreme Hard Drive (X.H.D) under the Integrated Peripherals menu to Enabled to set up a RAID-ready system and configure it for the Intel SATA controllers. Step 2: Install the RAID driver and operating system The X.H.D utility supports Windows 7/Vista/XP. Exits the X.H.D utility: Click Cancel to the biggest drive in the Intel Chipset. (Note 2) It is added. Using GIGABYTE eXtreme Hard Drive (X.H.D) Instructions:(Note...
... to enable RAID for RAID 0. To automatically set up a RAID 0 array: Click Auto to automatically and quickly set eXtreme Hard Drive (X.H.D) under the Integrated Peripherals menu to Enabled to set up a RAID-ready system and configure it for the Intel SATA controllers. Step 2: Install the RAID driver and operating system The X.H.D utility supports Windows 7/Vista/XP. Exits the X.H.D utility: Click Cancel to the biggest drive in the Intel Chipset. (Note 2) It is added. Using GIGABYTE eXtreme Hard Drive (X.H.D) Instructions:(Note...

Manual
Page 88
... IDE or AHCI. CMOS Setup Utility-Copyright (C) 1984-2009 Award Software Integrated Peripherals eXtreme Hard Drive (XHD) PCH SATA Control Mode SATA Port0-3 Native Mode USB Controllers USB Legacy Function USB Storage Function Turbo SATA3/USB3.0 Azalia Codec PCI Express x4/x1 Slot Onboard H/W 1394 Onboard H/W LAN1 Onboard H/W LAN2 Green LAN } SMART LAN1 } SMART LAN2 Onboard LAN1 Boot ROM Onboard LAN2 Boot ROM Onboard USB 3.0 Controller Onboard IDE Controller [Disabled] [RAID(XHD)] [Enabled] [Enabled] [Enabled] [Enabled] [Auto] [Auto] [Auto...
... IDE or AHCI. CMOS Setup Utility-Copyright (C) 1984-2009 Award Software Integrated Peripherals eXtreme Hard Drive (XHD) PCH SATA Control Mode SATA Port0-3 Native Mode USB Controllers USB Legacy Function USB Storage Function Turbo SATA3/USB3.0 Azalia Codec PCI Express x4/x1 Slot Onboard H/W 1394 Onboard H/W LAN1 Onboard H/W LAN2 Green LAN } SMART LAN1 } SMART LAN2 Onboard LAN1 Boot ROM Onboard LAN2 Boot ROM Onboard USB 3.0 Controller Onboard IDE Controller [Disabled] [RAID(XHD)] [Enabled] [Enabled] [Enabled] [Enabled] [Auto] [Auto] [Auto...

Manual
Page 95
...to enter BIOS Setup during the POST (Power-On Self-Test). Step 1: Turn on the motherboard. CMOS Setup Utility-Copyright (C) 1984-2009 Award Software Integrated Peripherals Turbo SATA3/USB3.0 Azalia Codec PCI Express x4/x1 Slot Onboard H/W 1394 Onboard H/W LAN1 Onboard H/W LAN2 Green LAN } SMART LAN1 } SMART LAN2 Onboard LAN1 Boot ROM Onboard LAN2 Boot ROM Onboard USB 3.0 Controller Onboard IDE Controller eSATA Controller eSATA Ctrl Mode GSATA Controller GSATA Ctrl Mode GSATA RAID Configuration Onboard Serial Port 1 [Auto] [Auto...
...to enter BIOS Setup during the POST (Power-On Self-Test). Step 1: Turn on the motherboard. CMOS Setup Utility-Copyright (C) 1984-2009 Award Software Integrated Peripherals Turbo SATA3/USB3.0 Azalia Codec PCI Express x4/x1 Slot Onboard H/W 1394 Onboard H/W LAN1 Onboard H/W LAN2 Green LAN } SMART LAN1 } SMART LAN2 Onboard LAN1 Boot ROM Onboard LAN2 Boot ROM Onboard USB 3.0 Controller Onboard IDE Controller eSATA Controller eSATA Ctrl Mode GSATA Controller GSATA Ctrl Mode GSATA RAID Configuration Onboard Serial Port 1 [Auto] [Auto...

Manual
Page 106
... configured to RAID/AHCI mode, you also can copy the SATA controller driver from the startup disk. 2: Remove the startup disk and insert the prepared floppy disk and the motherboard driver disk (here we as- For installing Windows Vista, you need to install the SATA controller driver during the Windows setup process. sume that is D:\). 3: At the A:\> prompt, type the following command. In MS-DOS mode: Prepare a startup disk that has CD-ROM support and a blank formatted floppy disk. Steps: 1: Boot...
... configured to RAID/AHCI mode, you also can copy the SATA controller driver from the startup disk. 2: Remove the startup disk and insert the prepared floppy disk and the motherboard driver disk (here we as- For installing Windows Vista, you need to install the SATA controller driver during the Windows setup process. sume that is D:\). 3: At the A:\> prompt, type the following command. In MS-DOS mode: Prepare a startup disk that has CD-ROM support and a blank formatted floppy disk. Steps: 1: Boot...
Manual
Page 109
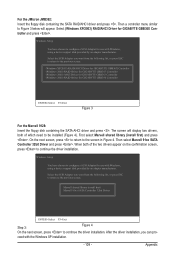
... you can pro- Select (Windows XP/2003) RAID/AHCI Driver for use with Windows, using a device support disk provided by an adapter manufacturer. Marvell shared library (install first) Marvell 91xx SATA Controller 32bit Driver ENTER=Select F3=Exit Step 3: Figure 4 On the next screen, press to the screen in Figure 4. Appendix Then a controller menu similar to Figure 3 below will display two drivers, both of which need to configure a SCSI Adapter for GIGABYTE GBB360 Controller ENTER=Select...
... you can pro- Select (Windows XP/2003) RAID/AHCI Driver for use with Windows, using a device support disk provided by an adapter manufacturer. Marvell shared library (install first) Marvell 91xx SATA Controller 32bit Driver ENTER=Select F3=Exit Step 3: Figure 4 On the next screen, press to the screen in Figure 4. Appendix Then a controller menu similar to Figure 3 below will display two drivers, both of which need to configure a SCSI Adapter for GIGABYTE GBB360 Controller ENTER=Select...

Manual
Page 129
...1 long, 3 short: Keyboard error 2 short: CMOS setting error 1 long, 9 short: BIOS ROM error 1 long, 1 short: Memory or motherboard error Continuous long beeps: Graphics card not inserted properly 1 long, 2 short: Monitor or graphics card error Continuous short beeps: Power error - 129 - For motherboards that have a clearing CMOS jumper, refer to My Computer > Properties > Hardware > Device Manager > System devices and right-click on Microsoft UAA Bus Driver for High Definition Audio has been installed successfully (check in Device Manager or Sound, video, and game controllers. You...
...1 long, 3 short: Keyboard error 2 short: CMOS setting error 1 long, 9 short: BIOS ROM error 1 long, 1 short: Memory or motherboard error Continuous long beeps: Graphics card not inserted properly 1 long, 2 short: Monitor or graphics card error Continuous short beeps: Power error - 129 - For motherboards that have a clearing CMOS jumper, refer to My Computer > Properties > Hardware > Device Manager > System devices and right-click on Microsoft UAA Bus Driver for High Definition Audio has been installed successfully (check in Device Manager or Sound, video, and game controllers. You...


