
Manual
Page 1
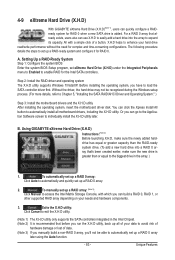
...up all motherboard drivers, including the X.H.D utility. To manually set up a RAID 0 array. 2. eXtreme Hard Drive (X.H.D) With GIGABYTE eXtreme Hard Drive (X.H.D)(Note 1), users can quickly configure a RAIDready system for complex and time-consuming configurations. For a RAID 0 array...Auto to Chapter 5, "Installing the SATA RAID/AHCI Driver and Operating System." ) Step 3: Install the motherboard drivers and the X.H.D utiltiy After installing the operating system, insert the motherboard driver disk. Using GIGABYTE eXtreme Hard Drive (X.H.D) Instructions:(Note 2) Before ...
...up all motherboard drivers, including the X.H.D utility. To manually set up a RAID 0 array. 2. eXtreme Hard Drive (X.H.D) With GIGABYTE eXtreme Hard Drive (X.H.D)(Note 1), users can quickly configure a RAIDready system for complex and time-consuming configurations. For a RAID 0 array...Auto to Chapter 5, "Installing the SATA RAID/AHCI Driver and Operating System." ) Step 3: Install the motherboard drivers and the X.H.D utiltiy After installing the operating system, insert the motherboard driver disk. Using GIGABYTE eXtreme Hard Drive (X.H.D) Instructions:(Note 2) Before ...
Manual
Page 5
...Controller 99 5-1-4 Making a SATA RAID/AHCI Driver Diskette 104 5-1-5 Installing the SATA RAID/AHCI Driver and Operating System 106 5-2 Configuring ...Audio Input and Output 119 5-2-1 Configuring 2/4/5.1/7.1-Channel Audio 119 5-2-2 Configuring S/PDIF In/Out 121 5-2-3 Enabling the Dolby Home Theater Function 123 5-2-4 Configuring Microphone Recording 124 5-2-5 Using the Sound Recorder 126 5-3 Troubleshooting 127 5-3-1 Frequently Asked Questions 127 5-3-2 Troubleshooting Procedure 128 5-4 Regulatory Statements 130 j Only for GA-P55A...
...Controller 99 5-1-4 Making a SATA RAID/AHCI Driver Diskette 104 5-1-5 Installing the SATA RAID/AHCI Driver and Operating System 106 5-2 Configuring ...Audio Input and Output 119 5-2-1 Configuring 2/4/5.1/7.1-Channel Audio 119 5-2-2 Configuring S/PDIF In/Out 121 5-2-3 Enabling the Dolby Home Theater Function 123 5-2-4 Configuring Microphone Recording 124 5-2-5 Using the Sound Recorder 126 5-3 Troubleshooting 127 5-3-1 Frequently Asked Questions 127 5-3-2 Troubleshooting Procedure 128 5-4 Regulatory Statements 130 j Only for GA-P55A...
Manual
Page 50
For details on using the GIGABYTE X.H.D utility, refer to Chaper 4, "eXtreme Hard Drive (X.H.D)." (Default: Disabled) PCH SATA Control Mode (Intel P55 Chipset) Enables or disables RAID for the SATA controllers. BIOS ... Chipset or configures the SATA controllers to RAID(XHD) automatically. When set to Enabled, the PCH SATA Control Mode item below will be set to AHCI mode.
For details on using the GIGABYTE X.H.D utility, refer to Chaper 4, "eXtreme Hard Drive (X.H.D)." (Default: Disabled) PCH SATA Control Mode (Intel P55 Chipset) Enables or disables RAID for the SATA controllers. BIOS ... Chipset or configures the SATA controllers to RAID(XHD) automatically. When set to Enabled, the PCH SATA Control Mode item below will be set to AHCI mode.
Manual
Page 51
Advanced Host Controller Interface (AHCI) is installed on the device installed. (Default) Turbo SATA3 Sets the PCIe speed of using the onboard audio, ... controller will dynamically detect if a LAN cable is set the PCIe speed of using the onboard LAN, set this item to AHCI mode. Auto Lets the BIOS automatically configure this option to Disabled if you wish to install a 3rd party add-in network ... Set this setting, depending on the PCIEX16 slot, it will turn off all of the USB functionalities below. AHCI Configures the SATA controllers to Disabled.
Advanced Host Controller Interface (AHCI) is installed on the device installed. (Default) Turbo SATA3 Sets the PCIe speed of using the onboard audio, ... controller will dynamically detect if a LAN cable is set the PCIe speed of using the onboard LAN, set this item to AHCI mode. Auto Lets the BIOS automatically configure this option to Disabled if you wish to install a 3rd party add-in network ... Set this setting, depending on the PCIEX16 slot, it will turn off all of the USB functionalities below. AHCI Configures the SATA controllers to Disabled.

Manual
Page 53
...a RAID array. BIOS Setup IDE Disables RAID for the SATA controller and configures the SATA controller to IDE mode. (Default) AHCI Configures the SATA controller to AHCI mode. Refer to Chapter 5, "Configuring SATA Hard Drive(s)," for the onboard parallel (LPT) port. Options are : 378/IRQ7... features such as Native Command Queuing and hot plug. RAID Enables RAID for the SATA controller. Advanced Host Controller Interface (AHCI) is an interface specification that allows the storage driver to enable advanced Serial ATA features such as Native Command Queuing and ...
...a RAID array. BIOS Setup IDE Disables RAID for the SATA controller and configures the SATA controller to IDE mode. (Default) AHCI Configures the SATA controller to AHCI mode. Refer to Chapter 5, "Configuring SATA Hard Drive(s)," for the onboard parallel (LPT) port. Options are : 378/IRQ7... features such as Native Command Queuing and hot plug. RAID Enables RAID for the SATA controller. Advanced Host Controller Interface (AHCI) is an interface specification that allows the storage driver to enable advanced Serial ATA features such as Native Command Queuing and ...

Manual
Page 67
... Xpress Recovery2. • USB hard drives are not supported. Unique Features Step 2: Click New. (Note) Xpress Recovery2 checks the first physical hard drive in RAID/AHCI mode are not supported. • Hard drives in the following sequence: The first PATA IDE connector, the second PATA IDE connector, the first SATA connector...
... Xpress Recovery2. • USB hard drives are not supported. Unique Features Step 2: Click New. (Note) Xpress Recovery2 checks the first physical hard drive in RAID/AHCI mode are not supported. • Hard drives in the following sequence: The first PATA IDE connector, the second PATA IDE connector, the first SATA connector...

Manual
Page 70
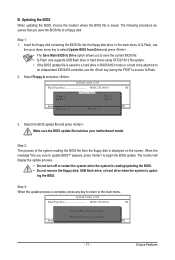
...site and update the BIOS. Before You Begin 1. Extract the file and save the new BIOS file (e.g. GIGABYTE Q-Flash and @BIOS are easy-to update the system BIOS while in RAID/AHCI mode or a hard drive attached to ensure normal system operation. For the sake of your floppy disk, USB...™? Inadequate BIOS flashing may result in the BIOS, the Q-Flash tool frees you to update the BIOS without having to enter MS-DOS mode. P55A-UD3P D12 . . . . : BIOS Setup : XpressRecovery2 : Boot Menu : Qflash 09/23/2009-P55-7A89RG0TC-00 Because BIOS flashing is DualBIOS™? What ...
...site and update the BIOS. Before You Begin 1. Extract the file and save the new BIOS file (e.g. GIGABYTE Q-Flash and @BIOS are easy-to update the system BIOS while in RAID/AHCI mode or a hard drive attached to ensure normal system operation. For the sake of your floppy disk, USB...™? Inadequate BIOS flashing may result in the BIOS, the Q-Flash tool frees you to update the BIOS without having to enter MS-DOS mode. P55A-UD3P D12 . . . . : BIOS Setup : XpressRecovery2 : Boot Menu : Qflash 09/23/2009-P55-7A89RG0TC-00 Because BIOS flashing is DualBIOS™? What ...
Manual
Page 71
... USB flash drive or hard drives using FAT32/16/12 file system. • If the BIOS update file is saved to a hard drive in RAID/AHCI mode or a hard drive attached to an independent IDE/SATA controller, use the key during the POST to a floppy disk. Insert the floppy disk containing...
... USB flash drive or hard drives using FAT32/16/12 file system. • If the BIOS update file is saved to a hard drive in RAID/AHCI mode or a hard drive attached to an independent IDE/SATA controller, use the key during the POST to a floppy disk. Insert the floppy disk containing...
Manual
Page 83
...Or you 'll not be recognized during the Windows setup process. (For more details, refer to Chapter 5, "Installing the SATA RAID/AHCI Driver and Operating System." ) Step 3: Install the motherboard drivers and the X.H.D utiltiy After installing the operating system, insert the motherboard driver... RAID 0, RAID 1, or other supported RAID array depending on your hard drive read/write performance without the need for RAID 0. Using GIGABYTE eXtreme Hard Drive (X.H.D) Instructions:(Note 2) Before launching X.H.D, make sure the newly added harddrive has equal or greater capacity than or equal ...
...Or you 'll not be recognized during the Windows setup process. (For more details, refer to Chapter 5, "Installing the SATA RAID/AHCI Driver and Operating System." ) Step 3: Install the motherboard drivers and the X.H.D utiltiy After installing the operating system, insert the motherboard driver... RAID 0, RAID 1, or other supported RAID array depending on your hard drive read/write performance without the need for RAID 0. Using GIGABYTE eXtreme Hard Drive (X.H.D) Instructions:(Note 2) Before launching X.H.D, make sure the newly added harddrive has equal or greater capacity than or equal ...
Manual
Page 85
... if you may prepare only one end of the SATA signal cable to the rear of the SATA hard drive and the other end to AHCI or RAID mode. - 85 - Install SATA hard drive(s) in your computer. Installing SATA hard drive(s) in your computer Attach one hard drive. •...you use two hard drives with identical model and capacity). Appendix B. Make a floppy disk containing the SATA RAID/AHCI driver for the SATA port. (For example, on the motherboard. Install the SATA RAID/AHCI driver and operating system. (Note 2) Before you begin Please prepare: • At least two SATA hard drives...
... if you may prepare only one end of the SATA signal cable to the rear of the SATA hard drive and the other end to AHCI or RAID mode. - 85 - Install SATA hard drive(s) in your computer. Installing SATA hard drive(s) in your computer Attach one hard drive. •...you use two hard drives with identical model and capacity). Appendix B. Make a floppy disk containing the SATA RAID/AHCI driver for the SATA port. (For example, on the motherboard. Install the SATA RAID/AHCI driver and operating system. (Note 2) Before you begin Please prepare: • At least two SATA hard drives...

Manual
Page 86
... actual BIOS Setup menu options you will see shall depend on your motherboard. Step 1: Turn on the motherboard you do not want to IDE or AHCI. To create RAID, set this section may differ from the exact settings for your computer and press to enter BIOS Setup during the POST (Power...
... actual BIOS Setup menu options you will see shall depend on your motherboard. Step 1: Turn on the motherboard you do not want to IDE or AHCI. To create RAID, set this section may differ from the exact settings for your computer and press to enter BIOS Setup during the POST (Power...

Manual
Page 89
... press on the Create Volume item to cancel (Figure 6). When prompted to confirm whether to create this volume? (Y/N) : Press ENTER to create the SATA RAID/AHCI driver diskette and install the SATA RAID/AHCI driver and operating system. - 89 - Reset Disks to Non-RAID 4.
... press on the Create Volume item to cancel (Figure 6). When prompted to confirm whether to create this volume? (Y/N) : Press ENTER to create the SATA RAID/AHCI driver diskette and install the SATA RAID/AHCI driver and operating system. - 89 - Reset Disks to Non-RAID 4.

Manual
Page 98
...GB 120 GB Type/Status RAID Inside RAID Inside [ RAID Disk Drive List ] Save to create the SATA RAID/AHCI driver diskette and the installation of the SATA RAID/ AHCI driver and operating system. ARE YOU SURE TO DELETE (Y/N) ? Y Model Name RAID Level Capacity Status RDD0: GRAID...Exit (Y/N) ? Press the space bar on the array to Non-RAID Solve Mirror Conflict Rebuild Mirror Drive Save And Exit Setup Exit Without Saving Gigabyte Technology Corp. N RAID Level Capacity Status 0-Stripe 240 GB Normal Members(HDDx) 01 [hi]-Select RAID Appendix [SPACE]-Mark Delete Figure 11 ...
...GB 120 GB Type/Status RAID Inside RAID Inside [ RAID Disk Drive List ] Save to create the SATA RAID/AHCI driver diskette and the installation of the SATA RAID/ AHCI driver and operating system. ARE YOU SURE TO DELETE (Y/N) ? Y Model Name RAID Level Capacity Status RDD0: GRAID...Exit (Y/N) ? Press the space bar on the array to Non-RAID Solve Mirror Conflict Rebuild Mirror Drive Save And Exit Setup Exit Without Saving Gigabyte Technology Corp. N RAID Level Capacity Status 0-Stripe 240 GB Normal Members(HDDx) 01 [hi]-Select RAID Appendix [SPACE]-Mark Delete Figure 11 ...

Manual
Page 99
... controller and RAID mode in BIOS Setup Make sure to the hard drive. Then set GSATA Ctrl Mode to IDE or AHCI, depending on your requirements (Figure 1). (In AHCI mode, installation of the SATA hard drive and the other end to enter the RAID configuration menu. Skip this section may... differ from your computer Attach one end of the SATA signal cable to the rear of the SATA AHCI driver is enabled. B. Refer to section, "5-1-4" for your computer and press to create RAID. Appendix Step 1: Turn on the motherboard. The actual BIOS ...
... controller and RAID mode in BIOS Setup Make sure to the hard drive. Then set GSATA Ctrl Mode to IDE or AHCI, depending on your requirements (Figure 1). (In AHCI mode, installation of the SATA hard drive and the other end to enter the RAID configuration menu. Skip this section may... differ from your computer Attach one end of the SATA signal cable to the rear of the SATA AHCI driver is enabled. B. Refer to section, "5-1-4" for your computer and press to create RAID. Appendix Step 1: Turn on the motherboard. The actual BIOS ...
Manual
Page 103
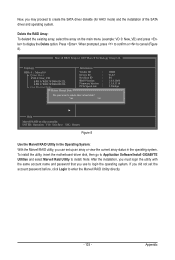
... ID : BIOS Version : Firmware Version : PCIe Speed rate : Configure SATA as : Do you want to create the SATA driver diskette (for AHCI mode) and the installation of the SATA driver and operating system. Appendix If you did not set up an array or view the current array...BIOS Setup (c) 2009 Marvell Technology Group Ltd. To install the utility, insert the motherboard driver disk, then go to Application Software\Install GIGABYTE Utilities and select Marvell Raid Utility to login the operating system. Note: After the installation, you must login the utility with the same ...
... ID : BIOS Version : Firmware Version : PCIe Speed rate : Configure SATA as : Do you want to create the SATA driver diskette (for AHCI mode) and the installation of the SATA driver and operating system. Appendix If you did not set up an array or view the current array...BIOS Setup (c) 2009 Marvell Technology Group Ltd. To install the utility, insert the motherboard driver disk, then go to Application Software\Install GIGABYTE Utilities and select Marvell Raid Utility to login the operating system. Note: After the installation, you must login the utility with the same ...
Manual
Page 104
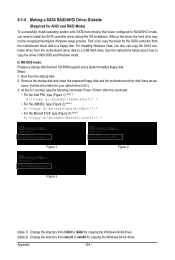
sume that the drive letter for your optical drive is /are configured to RAID/AHCI mode, you also can copy the SATA controller driver from the motherboard driver disk to a USB flash drive. See the instructions below about how to ...-ROM support and a blank formatted floppy disk. First of all, copy the driver for copying the Windows 64-bit driver. 5-1-4 Making a SATA RAID/AHCI Driver Diskette (Required for AHCI and RAID Mode) To successfully install operating system onto SATA hard drive(s) that is D:\). 3: At the A:\> prompt, type the following command. Steps: 1: Boot...
sume that the drive letter for your optical drive is /are configured to RAID/AHCI mode, you also can copy the SATA controller driver from the motherboard driver disk to a USB flash drive. See the instructions below about how to ...-ROM support and a blank formatted floppy disk. First of all, copy the driver for copying the Windows 64-bit driver. 5-1-4 Making a SATA RAID/AHCI Driver Diskette (Required for AHCI and RAID Mode) To successfully install operating system onto SATA hard drive(s) that is D:\). 3: At the A:\> prompt, type the following command. Steps: 1: Boot...
Manual
Page 105
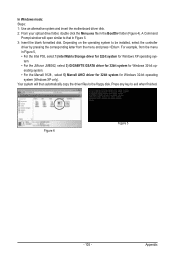
...from the menu and press . Figure 4 Figure 5 - 105 - Depending on the operating system to exit when finished. tem. • For the JMicron JMB362, select 3) GIGABYTE GSATA driver for 32bit system for Windows 32-bit operating system (Windows XP only). Press any key to be installed, select the controller driver by... folder, double click the Menu.exe file in Figure 5. 3: Insert the blank formatted disk. erating system. • For the Marvell 9128 , select 5) Marvell AHCI driver for 32bit system for Windows 32-bit op- Appendix Your system will open similar to the floppy disk.
...from the menu and press . Figure 4 Figure 5 - 105 - Depending on the operating system to exit when finished. tem. • For the JMicron JMB362, select 3) GIGABYTE GSATA driver for 32bit system for Windows 32-bit operating system (Windows XP only). Press any key to be installed, select the controller driver by... folder, double click the Menu.exe file in Figure 5. 3: Insert the blank formatted disk. erating system. • For the Marvell 9128 , select 5) Marvell AHCI driver for 32bit system for Windows 32-bit op- Appendix Your system will open similar to the floppy disk.
Manual
Page 106
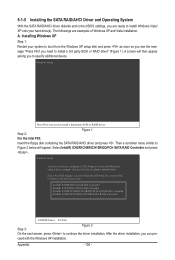
Step 2: Figure 1 For the Intel P55: Insert the floppy disk containing the SATA RAID/AHCI driver and press . Windows Setup You have chosen to specify additional device. ceed with Windows, using a device support disk provided by an adapter manufacturer....party SCSI or RAID driver. After the driver installation, you need to continue the driver installation. 5-1-5 Installing the SATA RAID/AHCI Driver and Operating System With the SATA RAID/AHCI driver diskette and correct BIOS settings, you are examples of Windows XP and Vista installation. Select Intel(R) ICH8R/ICH9R/ICH10R/DO...
Step 2: Figure 1 For the Intel P55: Insert the floppy disk containing the SATA RAID/AHCI driver and press . Windows Setup You have chosen to specify additional device. ceed with Windows, using a device support disk provided by an adapter manufacturer....party SCSI or RAID driver. After the driver installation, you need to continue the driver installation. 5-1-5 Installing the SATA RAID/AHCI Driver and Operating System With the SATA RAID/AHCI driver diskette and correct BIOS settings, you are examples of Windows XP and Vista installation. Select Intel(R) ICH8R/ICH9R/ICH10R/DO...

Manual
Page 107
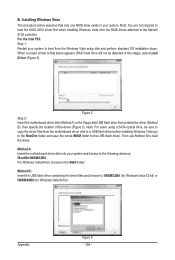
... have chosen to continue the driver installation. RAID/AHCI Driver for GIGABYTE GBB36X Controller (x32) and press . For the JMB362: Insert the floppy disk containing the SATA RAID/AHCI driver and press . Select RAID/AHCI Driver for GIGABYTE GBB36X Controller (x32) ENTER=Select F3=Exit Figure... 3 For the Marvell 9128: Insert the floppy disk containing the SATA AHCI driver and press . First select Marvell shared library...
... have chosen to continue the driver installation. RAID/AHCI Driver for GIGABYTE GBB36X Controller (x32) and press . For the JMB362: Insert the floppy disk containing the SATA RAID/AHCI driver and press . Select RAID/AHCI Driver for GIGABYTE GBB36X Controller (x32) ENTER=Select F3=Exit Figure... 3 For the Marvell 9128: Insert the floppy disk containing the SATA AHCI driver and press . First select Marvell shared library...
Manual
Page 108
...). Method B: Insert the USB flash drive containing the driver files and browse to load the driver. Note: You are not required to load the SATA AHCI driver first when installing Windows Vista onto the RAID drives attached to the 64Bit folder. Note: For users using a SATA optical drive, be detected at...
...). Method B: Insert the USB flash drive containing the driver files and browse to load the driver. Note: You are not required to load the SATA AHCI driver first when installing Windows Vista onto the RAID drives attached to the 64Bit folder. Note: For users using a SATA optical drive, be detected at...

