
Manual
Page 1
The following procedure details the steps to Chapter 5, "Installing the SATA RAID/AHCI Driver and Operating System." ) Step 3: Install the motherboard drivers and the X.H.D utiltiy After installing the operating system, insert the motherboard driver disk. eXtreme Hard Drive (X.H.D) With GIGABYTE eXtreme Hard Drive (X.H.D)(Note 1), users can quickly configure a RAIDready system for complex and time-consuming...
The following procedure details the steps to Chapter 5, "Installing the SATA RAID/AHCI Driver and Operating System." ) Step 3: Install the motherboard drivers and the X.H.D utiltiy After installing the operating system, insert the motherboard driver disk. eXtreme Hard Drive (X.H.D) With GIGABYTE eXtreme Hard Drive (X.H.D)(Note 1), users can quickly configure a RAIDready system for complex and time-consuming...

Manual
Page 2
Advanced Mode...8 4. Creating a USB Key 18 4.2. Other Features...21 - 2 - Installing the Infineon TPM Driver and the Smart TPM Utility 4 2.1. Initializing the TPM chip 5 3.1. Initializing the TPM Chip with the Smart TPM Utility 5 3.2. Configuring the Smart TPM Utility 18 4.1. Installing the Infineon TPM Driver 4 2.2. Creating a Bluetooth Cell Phone Key 19 4.3. Configuring the System BIOS 3 2. Other Bluetooth Settings 21 4.4. Installing the Smart TPM Utility 4 3. Table of Contents TPM Configuration Procedure 3 1.
Advanced Mode...8 4. Creating a USB Key 18 4.2. Other Features...21 - 2 - Installing the Infineon TPM Driver and the Smart TPM Utility 4 2.1. Initializing the TPM chip 5 3.1. Initializing the TPM Chip with the Smart TPM Utility 5 3.2. Configuring the Smart TPM Utility 18 4.1. Installing the Infineon TPM Driver 4 2.2. Creating a Bluetooth Cell Phone Key 19 4.3. Configuring the System BIOS 3 2. Other Bluetooth Settings 21 4.4. Installing the Smart TPM Utility 4 3. Table of Contents TPM Configuration Procedure 3 1.
Manual
Page 3
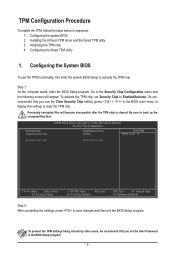
... chip. TPM Configuration Procedure To enable the TPM, follow the steps below in the BIOS Setup program. - 3 - Configuring the system BIOS 2. Installing the Infineon TPM driver and the Smart TPM utility 3. Initializing the TPM chip 4. Configuring the System BIOS To use the Clear Security Chip setting (press + in the BIOS main...
... chip. TPM Configuration Procedure To enable the TPM, follow the steps below in the BIOS Setup program. - 3 - Configuring the system BIOS 2. Installing the Infineon TPM driver and the Smart TPM utility 3. Initializing the TPM chip 4. Configuring the System BIOS To use the Clear Security Chip setting (press + in the BIOS main...
Manual
Page 4
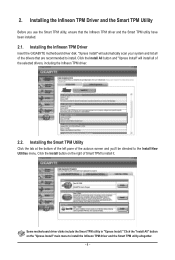
... TPM Driver Insert the GIGABYTE motherboard driver disk. Click the Install button on the "Xpress Install" main menu to install it. Some motherboard driver disks include the Smart TPM utility in "Xpress Install." Click the "Install All" button on the right of the drivers that the Infineon TPM driver and the... Smart TPM utility have been installed. 2.1. "Xpress Install" will install all of Smart TPM to install the Infineon TPM driver and the Smart TPM utility altogether. - 4 - Click the Install All button and "Xpress Install" will automatically scan your system and...
... TPM Driver Insert the GIGABYTE motherboard driver disk. Click the Install button on the "Xpress Install" main menu to install it. Some motherboard driver disks include the Smart TPM utility in "Xpress Install." Click the "Install All" button on the right of the drivers that the Infineon TPM driver and the... Smart TPM utility have been installed. 2.1. "Xpress Install" will install all of Smart TPM to install the Infineon TPM driver and the Smart TPM utility altogether. - 4 - Click the Install All button and "Xpress Install" will automatically scan your system and...
Manual
Page 5
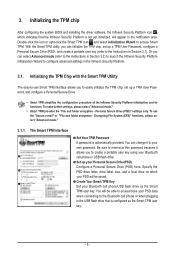
... your Bluetooth cell phone/USB flash drive as the Smart TPM user key. - 5 - 3. Initializing the TPM chip After configuring the system BIOS and installing the driver software, the Infineon Security Platform icon , which your Personal Secure Drive(PSD) Configure a Personal Secure Drive (PSD) here.
... your Bluetooth cell phone/USB flash drive as the Smart TPM user key. - 5 - 3. Initializing the TPM chip After configuring the system BIOS and installing the driver software, the Infineon Security Platform icon , which your Personal Secure Drive(PSD) Configure a Personal Secure Drive (PSD) here.
Manual
Page 3
... or download the information on/from the Support&Downloads\Motherboard\Technology Guide page on your motherboard revision before updating motherboard BIOS, drivers, or when looking for technical information. Check your motherboard looks like this manual may be made by any means without prior... notice. For product-related information, check on our website at: http://www.gigabyte.com.tw Identifying Your Motherboard Revision The revision number on our website. Documentation Classifications In order to their respective owners. The...
... or download the information on/from the Support&Downloads\Motherboard\Technology Guide page on your motherboard revision before updating motherboard BIOS, drivers, or when looking for technical information. Check your motherboard looks like this manual may be made by any means without prior... notice. For product-related information, check on our website at: http://www.gigabyte.com.tw Identifying Your Motherboard Revision The revision number on our website. Documentation Classifications In order to their respective owners. The...
Manual
Page 4
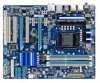
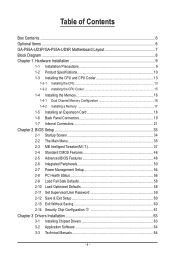
Table of Contents Box Contents...6 Optional Items...6 GA-P55A-UD3P/GA-P55A-UD3R Motherboard Layout 7 Block Diagram...8 Chapter 1 Hardware Installation 9 1-1 Installation Precautions 9 1-2 Product Specifications 10 1-3 Installing the CPU and CPU Cooler 13 1-3-1 Installing the CPU 13 1-3-2 Installing ... Optimized Defaults 58 2-11 Set Supervisor/User Password 59 2-12 Save & Exit Setup 60 2-13 Exit Without Saving 60 2-14 Security Chip Configuration j 61 Chapter 3 Drivers Installation 63 3-1 Installing Chipset Drivers 63 3-2 Application Software 64 3-3 Technical Manuals 64 - 4 -
Table of Contents Box Contents...6 Optional Items...6 GA-P55A-UD3P/GA-P55A-UD3R Motherboard Layout 7 Block Diagram...8 Chapter 1 Hardware Installation 9 1-1 Installation Precautions 9 1-2 Product Specifications 10 1-3 Installing the CPU and CPU Cooler 13 1-3-1 Installing the CPU 13 1-3-2 Installing ... Optimized Defaults 58 2-11 Set Supervisor/User Password 59 2-12 Save & Exit Setup 60 2-13 Exit Without Saving 60 2-14 Security Chip Configuration j 61 Chapter 3 Drivers Installation 63 3-1 Installing Chipset Drivers 63 3-2 Application Software 64 3-3 Technical Manuals 64 - 4 -
Manual
Page 5
... 99 5-1-4 Making a SATA RAID/AHCI Driver Diskette 104 5-1-5 Installing the SATA RAID/AHCI Driver and Operating System 106 5-2 Configuring Audio ...Input and Output 119 5-2-1 Configuring 2/4/5.1/7.1-Channel Audio 119 5-2-2 Configuring S/PDIF In/Out 121 5-2-3 Enabling the Dolby Home Theater Function 123 5-2-4 Configuring Microphone Recording 124 5-2-5 Using the Sound Recorder 126 5-3 Troubleshooting 127 5-3-1 Frequently Asked Questions 127 5-3-2 Troubleshooting Procedure 128 5-4 Regulatory Statements 130 j Only for GA-P55A-UD3P...
... 99 5-1-4 Making a SATA RAID/AHCI Driver Diskette 104 5-1-5 Installing the SATA RAID/AHCI Driver and Operating System 106 5-2 Configuring Audio ...Input and Output 119 5-2-1 Configuring 2/4/5.1/7.1-Channel Audio 119 5-2-2 Configuring S/PDIF In/Out 121 5-2-3 Enabling the Dolby Home Theater Function 123 5-2-4 Configuring Microphone Recording 124 5-2-5 Using the Sound Recorder 126 5-3 Troubleshooting 127 5-3-1 Frequently Asked Questions 127 5-3-2 Troubleshooting Procedure 128 5-4 Regulatory Statements 130 j Only for GA-P55A-UD3P...
Manual
Page 6
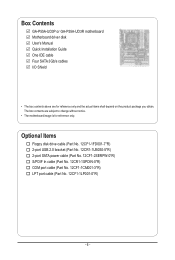
Box Contents GA-P55A-UD3P or GA-P55A-UD3R motherboard Motherboard driver disk User's Manual Quick Installation Guide One IDE cable Four SATA 3Gb/s cables I/O Shield • The box contents above are subject to change without notice. &#...
Box Contents GA-P55A-UD3P or GA-P55A-UD3R motherboard Motherboard driver disk User's Manual Quick Installation Guide One IDE cable Four SATA 3Gb/s cables I/O Shield • The box contents above are subject to change without notice. &#...
Manual
Page 18
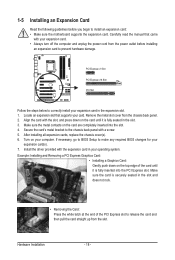
... all expansion cards, replace the chassis cover(s). 6. If necessary, go to BIOS Setup to make any required BIOS changes for your operating system. Install the driver provided with your card. Align the card with a screw. 5. Example: Installing and Removing a PCI Express Graphics Card: • Installing a Graphics Card: Gently push down on...
... all expansion cards, replace the chassis cover(s). 6. If necessary, go to BIOS Setup to make any required BIOS changes for your operating system. Install the driver provided with your card. Align the card with a screw. 5. Example: Installing and Removing a PCI Express Graphics Card: • Installing a Graphics Card: Gently push down on...
Manual
Page 34
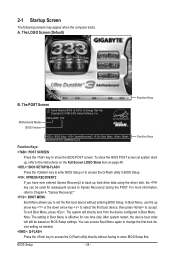
... from the device configured in Boot Menu is effective for subsequent access to Xpress Recovery2 during the POST. BIOS Setup - 34 - Motherboard Model BIOS Version P55A-UD3P D12 . . . . : BIOS Setup : XpressRecovery2 : Boot Menu : Qflash 09/23/2009-P55-7A89RG0TC-00 Function Keys Function Keys Function Keys: : POST SCREEN... RECOVERY2 If you to set the first boot device without having to accept. In Boot Menu, use the up hard drive data using the driver disk, the key can access Boot Menu again to change the first boot device setting as needed. : Q-FLASH Press the key to the...
... from the device configured in Boot Menu is effective for subsequent access to Xpress Recovery2 during the POST. BIOS Setup - 34 - Motherboard Model BIOS Version P55A-UD3P D12 . . . . : BIOS Setup : XpressRecovery2 : Boot Menu : Qflash 09/23/2009-P55-7A89RG0TC-00 Function Keys Function Keys Function Keys: : POST SCREEN... RECOVERY2 If you to set the first boot device without having to accept. In Boot Menu, use the up hard drive data using the driver disk, the key can access Boot Menu again to change the first boot device setting as needed. : Q-FLASH Press the key to the...
Manual
Page 51
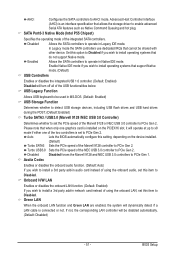
... LAN are enabled, the system will be disabled automatically. (Default: Disabled) - 51 - Advanced Host Controller Interface (AHCI) is an interface specification that allows the storage driver to install operating systems that cannot be used in Native IDE mode. Set this item to install a 3rd party add-in network card instead of...
... LAN are enabled, the system will be disabled automatically. (Default: Disabled) - 51 - Advanced Host Controller Interface (AHCI) is an interface specification that allows the storage driver to install operating systems that cannot be used in Native IDE mode. Set this item to install a 3rd party add-in network card instead of...

Manual
Page 53
... Port Mode Selects an operating mode for the SATA controller. Advanced Host Controller Interface (AHCI) is an interface specification that allows the storage driver to configure RAID for the Marvell 9128 SATA controller. Options are : 378/IRQ7 (default), 278/IRQ5, 3BC/IRQ7, Disabled. Onboard Serial... or configures the SATA controller to AHCI mode. Advanced Host Controller Interface (AHCI) is an interface specification that allows the storage driver to AHCI mode. IDE Configures the SATA controller to IDE mode. (Default) AHCI Configures the SATA controller to AHCI mode. ...
... Port Mode Selects an operating mode for the SATA controller. Advanced Host Controller Interface (AHCI) is an interface specification that allows the storage driver to configure RAID for the Marvell 9128 SATA controller. Options are : 378/IRQ7 (default), 278/IRQ5, 3BC/IRQ7, Disabled. Onboard Serial... or configures the SATA controller to AHCI mode. Advanced Host Controller Interface (AHCI) is an interface specification that allows the storage driver to AHCI mode. IDE Configures the SATA controller to IDE mode. (Default) AHCI Configures the SATA controller to AHCI mode. ...
Manual
Page 63
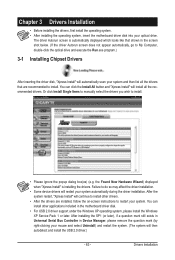
... Hardware Wizard) displayed when "Xpress Install" is automatically displayed which looks like that shown in the screen shot below. (If the driver Autorun screen does not appear automatically, go to install other applications included in Device Manager, please remove the question mark (by right-...(The system will continue to My Computer, double-click the optical drive and execute the Run.exe program.) 3-1 Installing Chipset Drivers After inserting the driver disk, "Xpress Install" will restart your system. You can click the Install All button and "Xpress Install" will install all the...
... Hardware Wizard) displayed when "Xpress Install" is automatically displayed which looks like that shown in the screen shot below. (If the driver Autorun screen does not appear automatically, go to install other applications included in Device Manager, please remove the question mark (by right-...(The system will continue to My Computer, double-click the optical drive and execute the Run.exe program.) 3-1 Installing Chipset Drivers After inserting the driver disk, "Xpress Install" will restart your system. You can click the Install All button and "Xpress Install" will install all the...

Manual
Page 64
3-2 Application Software This page displays all the utilities and applications that GIGABYTE develops and some free software. You can click the Install button on the right of an item to install it. 3-3 Technical Manuals This page provides GIGABYTE's application guides, content descriptions for this driver disk, and the motherboard manuals. Drivers Installation - 64 -
3-2 Application Software This page displays all the utilities and applications that GIGABYTE develops and some free software. You can click the Install button on the right of an item to install it. 3-3 Technical Manuals This page provides GIGABYTE's application guides, content descriptions for this driver disk, and the motherboard manuals. Drivers Installation - 64 -

Manual
Page 65
3-4 Contact For the detailed contact information of the GIGABYTE Taiwan headquarter or worldwide branch offices, click the URL on this page to link to the GIGABYTE website. 3-5 System This page provides the basic system information. - 65 - Drivers Installation
3-4 Contact For the detailed contact information of the GIGABYTE Taiwan headquarter or worldwide branch offices, click the URL on this page to link to the GIGABYTE website. 3-5 System This page provides the basic system information. - 65 - Drivers Installation

Manual
Page 66
You can click the Install button on the right of the BIOS, drivers, or applications will be displayed. 3-7 New Utilities This page provides a quick link to GIGABYTE's lately developed utilities for users to install. Drivers Installation - 66 - 3-6 Download Center To update the BIOS, drivers, or applications, click the Download Center button to link to install it. The latest version of an item to the GIGABYTE website.
You can click the Install button on the right of the BIOS, drivers, or applications will be displayed. 3-7 New Utilities This page provides a quick link to GIGABYTE's lately developed utilities for users to install. Drivers Installation - 66 - 3-6 Download Center To update the BIOS, drivers, or applications, click the Download Center button to link to install it. The latest version of an item to the GIGABYTE website.

Manual
Page 67
... SATA connectors, the hard drive on the amount of data). • It is recommended to back up your system soon after the operating system and drivers are installed. • The amount of data and hard drive access speed may affect the speed at the end of the hard drive, make sure...
... SATA connectors, the hard drive on the amount of data). • It is recommended to back up your system soon after the operating system and drivers are installed. • The amount of data and hard drive access speed may affect the speed at the end of the hard drive, make sure...
Manual
Page 68
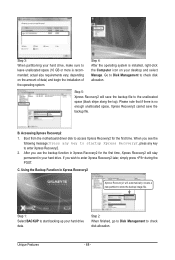
... permanent in Xpress Recovery2 Xpress Recovery2 will save the backup file. actual size requirements vary, depending on your hard drive data. Boot from the motherboard driver disk to the unallocated space (black stripe along the top).
... permanent in Xpress Recovery2 Xpress Recovery2 will save the backup file. actual size requirements vary, depending on your hard drive data. Boot from the motherboard driver disk to the unallocated space (black stripe along the top).
Manual
Page 77
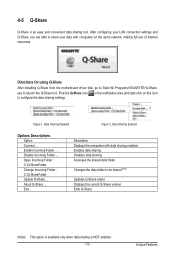
Exit... Find the Q-Share icon to Start>All Programs>GIGABYTE>Q-Share. After configuring your LAN connection settings and Q-Share, you are able to share your data with data sharing enabled Enables data...Folder : C:\Q-ShareFolder Update Q-Share ... Description Displays the computers with computers on this icon Figure 1. Directions for using Q-Share After installing Q-Share from the motherboard driver disk, go to configure the data sharing settings. Enable Incoming Folder ... 4-5 Q-Share Q-Share is NOT enabled. - 77 - in the notification area and right...
Exit... Find the Q-Share icon to Start>All Programs>GIGABYTE>Q-Share. After configuring your LAN connection settings and Q-Share, you are able to share your data with data sharing enabled Enables data...Folder : C:\Q-ShareFolder Update Q-Share ... Description Displays the computers with computers on this icon Figure 1. Directions for using Q-Share After installing Q-Share from the motherboard driver disk, go to configure the data sharing settings. Enable Incoming Folder ... 4-5 Q-Share Q-Share is NOT enabled. - 77 - in the notification area and right...


