
Manual
Page 1
...helps to enhance your needs and hardware components. 3. To automatically set up a RAID 0 array: Click Auto to automatically and quickly set up all motherboard drivers, including the X.H.D utility. Using GIGABYTE eXtreme Hard Drive (X.H.D) Instructions:(Note 2) Before launching X.H.D, make sure the new ...After installing the operating system, insert the motherboard driver disk. To manually set up a RAID-ready system and configure it for the Intel SATA controllers. The following procedure details the steps to set eXtreme Hard Drive (X.H.D) under the Integrated ...
...helps to enhance your needs and hardware components. 3. To automatically set up a RAID 0 array: Click Auto to automatically and quickly set up all motherboard drivers, including the X.H.D utility. Using GIGABYTE eXtreme Hard Drive (X.H.D) Instructions:(Note 2) Before launching X.H.D, make sure the new ...After installing the operating system, insert the motherboard driver disk. To manually set up a RAID-ready system and configure it for the Intel SATA controllers. The following procedure details the steps to set eXtreme Hard Drive (X.H.D) under the Integrated ...
Manual
Page 5
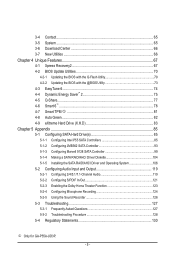
... Chapter 5 Appendix...85 5-1 Configuring SATA Hard Drive(s 85 5-1-1 Configuring Intel P55 SATA Controllers 85 5-1-2 Configuring JMB362 SATA Controller 93 5-1-3 Configuring Marvell 9128 SATA Controller 99 5-1-4 Making a SATA RAID/AHCI Driver Diskette 104 5-1-5 Installing the SATA RAID/AHCI Driver and Operating System 106 5-2 Configuring Audio Input and Output 119 5-2-1 Configuring ...124 5-2-5 Using the Sound Recorder 126 5-3 Troubleshooting 127 5-3-1 Frequently Asked Questions 127 5-3-2 Troubleshooting Procedure 128 5-4 Regulatory Statements 130 j Only for GA-P55A-UD3P. - 5 -
... Chapter 5 Appendix...85 5-1 Configuring SATA Hard Drive(s 85 5-1-1 Configuring Intel P55 SATA Controllers 85 5-1-2 Configuring JMB362 SATA Controller 93 5-1-3 Configuring Marvell 9128 SATA Controller 99 5-1-4 Making a SATA RAID/AHCI Driver Diskette 104 5-1-5 Installing the SATA RAID/AHCI Driver and Operating System 106 5-2 Configuring Audio Input and Output 119 5-2-1 Configuring ...124 5-2-5 Using the Sound Recorder 126 5-3 Troubleshooting 127 5-3-1 Frequently Asked Questions 127 5-3-2 Troubleshooting Procedure 128 5-4 Regulatory Statements 130 j Only for GA-P55A-UD3P. - 5 -
Manual
Page 24
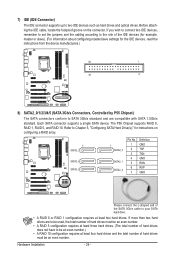
..., read the instructions from the device manufacturers.) 39 1 40 2 8) SATA2_0/1/2/3/4/5 (SATA 3Gb/s Connectors, Controlled by P55 Chipset) The SATA connectors conform to be an even number.) • A RAID 10 configuration requires at least four hard drives and the total number of hard drives must be an even...total number of hard drives does not have to SATA 3Gb/s standard and are compatible with SATA 1.5Gb/s standard. The P55 Chipset supports RAID 0, RAID 1, RAID 5, and RAID 10. If more than two hard drives are to be used, the total number of the IDE devices (for example, master or ...
..., read the instructions from the device manufacturers.) 39 1 40 2 8) SATA2_0/1/2/3/4/5 (SATA 3Gb/s Connectors, Controlled by P55 Chipset) The SATA connectors conform to be an even number.) • A RAID 10 configuration requires at least four hard drives and the total number of hard drives must be an even...total number of hard drives does not have to SATA 3Gb/s standard and are compatible with SATA 1.5Gb/s standard. The P55 Chipset supports RAID 0, RAID 1, RAID 5, and RAID 10. If more than two hard drives are to be used, the total number of the IDE devices (for example, master or ...

Manual
Page 25
... GSATA3_6 7 1 1 GND 2 TXP 3 TXN 7 1 4 GND GSATA3_7 5 RXN 6 RXP 7 GND A RAID 0 or RAID 1 configuration requires at least two hard drives. Turn off your computer and unplug the power cord before replacing the battery. • Replace the ...one minute. (Or use a metal object like a screwdriver to be used, the total number of hard drives must be lost. 9) GSATA3_6/7 (SATA 6Gb/s Connectors, Controlled by Marvell 9128) The SATA connectors conform to Chapter 5, "Configuring SATA Hard Drive(s)," for instructions on configur- Refer to SATA 6Gb/s standard and are not...
... GSATA3_6 7 1 1 GND 2 TXP 3 TXN 7 1 4 GND GSATA3_7 5 RXN 6 RXP 7 GND A RAID 0 or RAID 1 configuration requires at least two hard drives. Turn off your computer and unplug the power cord before replacing the battery. • Replace the ...one minute. (Or use a metal object like a screwdriver to be used, the total number of hard drives must be lost. 9) GSATA3_6/7 (SATA 6Gb/s Connectors, Controlled by Marvell 9128) The SATA connectors conform to Chapter 5, "Configuring SATA Hard Drive(s)," for instructions on configur- Refer to SATA 6Gb/s standard and are not...
Manual
Page 50
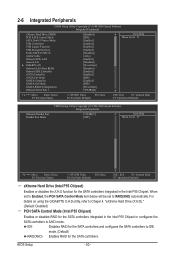
...GIGABYTE X.H.D utility, refer to Chaper 4, "eXtreme Hard Drive (X.H.D)." (Default: Disabled) PCH SATA Control Mode (Intel P55 Chipset) Enables or disables RAID for the SATA controllers. IDE Disables RAID for the SATA controllers and configures the SATA controllers to IDE mode. (Default) RAID(XHD) Enables RAID for the SATA controllers... LAN Green LAN } SMART LAN Onboard LAN Boot ROM Onboard IDE Controller eSATA Controller eSATA Ctrl Mode GSATA Controller GSATA Ctrl Mode GSATA RAID Configuration Onboard Serial Port 1 [Disabled] [IDE] [Enabled] [Enabled]...
...GIGABYTE X.H.D utility, refer to Chaper 4, "eXtreme Hard Drive (X.H.D)." (Default: Disabled) PCH SATA Control Mode (Intel P55 Chipset) Enables or disables RAID for the SATA controllers. IDE Disables RAID for the SATA controllers and configures the SATA controllers to IDE mode. (Default) RAID(XHD) Enables RAID for the SATA controllers... LAN Green LAN } SMART LAN Onboard LAN Boot ROM Onboard IDE Controller eSATA Controller eSATA Ctrl Mode GSATA Controller GSATA Ctrl Mode GSATA RAID Configuration Onboard Serial Port 1 [Disabled] [IDE] [Enabled] [Enabled]...

Manual
Page 53
... Mode (JMB362 Chip, eSATA Connectors) Enables or disables RAID for the Marvell 9128 SATA controller. Parallel Port Mode Selects an operating mode for instructions on configuring a RAID array. Advanced Host Controller Interface (AHCI) is an interface specification that allows the.../IRQ5, 3BC/IRQ7, Disabled. BIOS Setup IDE Disables RAID for the SATA controller. RAID Enables RAID for the SATA controller and configures the SATA controller to IDE mode. (Default) AHCI Configures the SATA controller to enable advanced Serial ATA features such as Native Command...
... Mode (JMB362 Chip, eSATA Connectors) Enables or disables RAID for the Marvell 9128 SATA controller. Parallel Port Mode Selects an operating mode for instructions on configuring a RAID array. Advanced Host Controller Interface (AHCI) is an interface specification that allows the.../IRQ5, 3BC/IRQ7, Disabled. BIOS Setup IDE Disables RAID for the SATA controller. RAID Enables RAID for the SATA controller and configures the SATA controller to IDE mode. (Default) AHCI Configures the SATA controller to enable advanced Serial ATA features such as Native Command...

Manual
Page 70
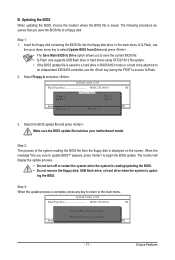
...Extract the file and save the new BIOS file (e.g. P55A-UD3P D12 . . . . : BIOS Setup : XpressRecovery2 : Boot Menu : Qflash 09/23/2009-P55-7A89RG0TC-00 Because BIOS flashing is @BIOS™? @BIOS allows you can access Q-Flash by adding one more physical BIOS chip. GIGABYTE Q-Flash and @BIOS are easy-to a hard drive...system operation. Award Modular BIOS v6.00PG, An Energy Star Ally Copyright (C) 1984-2009, Award Software, Inc. Inadequate BIOS flashing may result in RAID/AHCI mode or a hard drive attached to an independent IDE/SATA controller, use FAT32/16/12 file system. 3.
...Extract the file and save the new BIOS file (e.g. P55A-UD3P D12 . . . . : BIOS Setup : XpressRecovery2 : Boot Menu : Qflash 09/23/2009-P55-7A89RG0TC-00 Because BIOS flashing is @BIOS™? @BIOS allows you can access Q-Flash by adding one more physical BIOS chip. GIGABYTE Q-Flash and @BIOS are easy-to a hard drive...system operation. Award Modular BIOS v6.00PG, An Energy Star Ally Copyright (C) 1984-2009, Award Software, Inc. Inadequate BIOS flashing may result in RAID/AHCI mode or a hard drive attached to an independent IDE/SATA controller, use FAT32/16/12 file system. 3.
Manual
Page 71
.../Size MXIC 25L1605A 1M Keep DMI Data Enable !L! Step 3: When the update process is saved to a hard drive in RAID/AHCI mode or a hard drive attached to an independent IDE/SATA controller, use the up or down arrow key to select Update BIOS from Drive Save BIOS to update BIOS?" In the...
.../Size MXIC 25L1605A 1M Keep DMI Data Enable !L! Step 3: When the update process is saved to a hard drive in RAID/AHCI mode or a hard drive attached to an independent IDE/SATA controller, use the up or down arrow key to select Update BIOS from Drive Save BIOS to update BIOS?" In the...
Manual
Page 83
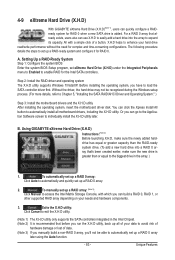
... process. (For more details, refer to automatically and quickly set up a RAID-ready system and configure it for the Intel SATA controllers. You can click the Xpress Install All button to automatically install all of ...data. (Note 3) If you manually build a non-RAID 0 array, you can build a RAID 0, RAID 1, or other supported RAID array depending on your hard drive read/write performance without the need for RAID 0 when a new SATA drive is added. 4-9 eXtreme Hard Drive (X.H.D) With GIGABYTE...
... process. (For more details, refer to automatically and quickly set up a RAID-ready system and configure it for the Intel SATA controllers. You can click the Xpress Install All button to automatically install all of ...data. (Note 3) If you manually build a non-RAID 0 array, you can build a RAID 0, RAID 1, or other supported RAID array depending on your hard drive read/write performance without the need for RAID 0 when a new SATA drive is added. 4-9 eXtreme Hard Drive (X.H.D) With GIGABYTE...
Manual
Page 85
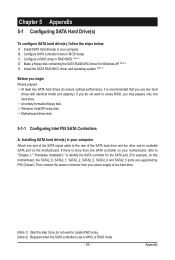
...Before you use two hard drives with identical model and capacity). If you do not want to create RAID array. (Note 2) Required when the SATA controller is recommended that you begin Please prepare: • At least two SATA hard drives (to ensure ...Chapter 5 Appendix 5-1 Configuring SATA Hard Drive(s) To configure SATA hard drive(s), follow the steps below: A. B. Configure SATA controller mode in RAID BIOS. (Note 1) D. Configure a RAID array in BIOS Setup. Install SATA hard drive(s) in your computer. Appendix Installing SATA hard drive(s) in your computer Attach ...
...Before you use two hard drives with identical model and capacity). If you do not want to create RAID array. (Note 2) Required when the SATA controller is recommended that you begin Please prepare: • At least two SATA hard drives (to ensure ...Chapter 5 Appendix 5-1 Configuring SATA Hard Drive(s) To configure SATA hard drive(s), follow the steps below: A. B. Configure SATA controller mode in RAID BIOS. (Note 1) D. Configure a RAID array in BIOS Setup. Install SATA hard drive(s) in your computer. Appendix Installing SATA hard drive(s) in your computer Attach ...

Manual
Page 86
...and the BIOS version. Step 1: Turn on the motherboard you do not want to create RAID, set PCH SATA Control Mode under the Integrated Peripherals menu to enter BIOS Setup during the POST (Power-On Self-Test). To...Turbo SATA3/USB 3.0 Azalia Codec Onboard H/W LAN Green LAN } SMART LAN Onboard LAN Boot ROM Onboard IDE Controller eSATA Controller eSATA Ctrl Mode GSATA Controller GSATA Ctrl Mode Onboard Serial Port 1 Onboard Parallel Port [Disabled] [RAID(XHD)] [Enabled] [Enabled] [Enabled] [Enabled] [Disabled] [Auto] [Enabled] [Disabled] [Press Enter...
...and the BIOS version. Step 1: Turn on the motherboard you do not want to create RAID, set PCH SATA Control Mode under the Integrated Peripherals menu to enter BIOS Setup during the POST (Power-On Self-Test). To...Turbo SATA3/USB 3.0 Azalia Codec Onboard H/W LAN Green LAN } SMART LAN Onboard LAN Boot ROM Onboard IDE Controller eSATA Controller eSATA Ctrl Mode GSATA Controller GSATA Ctrl Mode Onboard Serial Port 1 Onboard Parallel Port [Disabled] [RAID(XHD)] [Enabled] [Enabled] [Enabled] [Enabled] [Disabled] [Auto] [Enabled] [Disabled] [Press Enter...

Manual
Page 93
...Figure 1 Step 2: Save changes and exit BIOS Setup. B. Configuring SATA controller mode in BIOS Setup Make sure to configure the SATA controller mode correctly in this section may differ from your computer and press to RAID. Step 1: Turn on your power supply to available SATA port on ...the motherboard. Make sure eSATA Controller under the Integrated Peripherals menu is enabled (Figure 1). Appendix Then connect the power connector ...
...Figure 1 Step 2: Save changes and exit BIOS Setup. B. Configuring SATA controller mode in BIOS Setup Make sure to configure the SATA controller mode correctly in this section may differ from your computer and press to RAID. Step 1: Turn on your power supply to available SATA port on ...the motherboard. Make sure eSATA Controller under the Integrated Peripherals menu is enabled (Figure 1). Appendix Then connect the power connector ...
Manual
Page 94
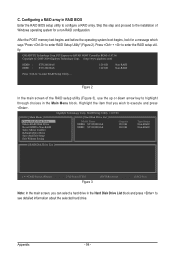
... Utility ... Appendix - 94 - PCI Express to SATAII HOST Controller ROM v1.07.06 Copyright (C) 2005-2009 Gigabyte Technology Corp. (http://www.gigabyte.com) HDD0 : HDD1 : ST3120026AS ST3120026AS 120 GB 120 GB Non-RAID Non-RAID Press to enter the RAID setup utility. Gigabyte Technology Corp. C. Configuring a RAID array in the Hard Disk Drive List block and press to...
... Utility ... Appendix - 94 - PCI Express to SATAII HOST Controller ROM v1.07.06 Copyright (C) 2005-2009 Gigabyte Technology Corp. (http://www.gigabyte.com) HDD0 : HDD1 : ST3120026AS ST3120026AS 120 GB 120 GB Non-RAID Non-RAID Press to enter the RAID setup utility. Gigabyte Technology Corp. C. Configuring a RAID array in the Hard Disk Drive List block and press to...

Manual
Page 99
...Function Turbo SATA3/USB 3.0 Azalia Codec Onboard H/W LAN Green LAN } SMART LAN Onboard LAN Boot ROM Onboard IDE Controller eSATA Controller eSATA Ctrl Mode GSATA Controller GSATA Ctrl Mode GSATA RAID Configuration Onboard Serial Port 1 [Disabled] [IDE] [Enabled] [Enabled] [Enabled] [Enabled] [Disabled] [Auto...installation of the SATA hard drive and the other end to create RAID. Configuring SATA controller and RAID mode in system BIOS Setup. The Marvell 9128 SATA controller controls the GSATA3_6/7 ports on the motherboard you do not want to ...
...Function Turbo SATA3/USB 3.0 Azalia Codec Onboard H/W LAN Green LAN } SMART LAN Onboard LAN Boot ROM Onboard IDE Controller eSATA Controller eSATA Ctrl Mode GSATA Controller GSATA Ctrl Mode GSATA RAID Configuration Onboard Serial Port 1 [Disabled] [IDE] [Enabled] [Enabled] [Enabled] [Enabled] [Disabled] [Auto...installation of the SATA hard drive and the other end to create RAID. Configuring SATA controller and RAID mode in system BIOS Setup. The Marvell 9128 SATA controller controls the GSATA3_6/7 ports on the motherboard you do not want to ...

Manual
Page 100
... marked with an asterisk (*). ENTER: Operation SPACE: Select F10: Exit/Save ESC: Return Figure 3 Appendix - 100 - Configuring a RAID array Create a RAID Array: Move the selection bar to proceed (Figure 3). The selected hard drive will be included in the array. Marvell BIOS Setup (c)...Version : Firmware Version : PCIe Speed rate : Configure SATA as : 1B4B 91A3 B1 1.0.0.1006 2.1.0.1314 2.56Gbps IDE Mode Help Marvell RAID on chip controller. Marvell BIOS Setup (c) 2009 Marvell Technology Group Ltd. C. After selecting the hard drives, press to HBA 0: Marvell 0 and press .
... marked with an asterisk (*). ENTER: Operation SPACE: Select F10: Exit/Save ESC: Return Figure 3 Appendix - 100 - Configuring a RAID array Create a RAID Array: Move the selection bar to proceed (Figure 3). The selected hard drive will be included in the array. Marvell BIOS Setup (c)...Version : Firmware Version : PCIe Speed rate : Configure SATA as : 1B4B 91A3 B1 1.0.0.1006 2.1.0.1314 2.56Gbps IDE Mode Help Marvell RAID on chip controller. Marvell BIOS Setup (c) 2009 Marvell Technology Group Ltd. C. After selecting the hard drives, press to HBA 0: Marvell 0 and press .

Manual
Page 102
... BIOS Version : Firmware Version : PCIe Speed rate : Configure SATA as : 1B4B 91A3 B1 1.0.0.1006 2.1.0.1314 2.56Gbps IDE Mode Help Marvell RAID on chip controller. ENTER: Operation F10: Exit/Save ESC: Return Figure 7 Appendix - 102 - When completed, you can see the new array under Topology\...ENTER: Operation F10: Exit/Save ESC: Return Figure 6 7. Yes No 1B4B 91A3 B1 1.0.0.1006 2.1.0.1314 2.56Gbps IDE Mode Help Marvell RAID on chip controller. Topology HBA 0 : Marvell 0 Virtual Disks VD 0: New_VD PD 0: WDC WD800JD-22L PD 8: WDC WD800JD-22L Free Physical Disks ...
... BIOS Version : Firmware Version : PCIe Speed rate : Configure SATA as : 1B4B 91A3 B1 1.0.0.1006 2.1.0.1314 2.56Gbps IDE Mode Help Marvell RAID on chip controller. ENTER: Operation F10: Exit/Save ESC: Return Figure 7 Appendix - 102 - When completed, you can see the new array under Topology\...ENTER: Operation F10: Exit/Save ESC: Return Figure 6 7. Yes No 1B4B 91A3 B1 1.0.0.1006 2.1.0.1314 2.56Gbps IDE Mode Help Marvell RAID on chip controller. Topology HBA 0 : Marvell 0 Virtual Disks VD 0: New_VD PD 0: WDC WD800JD-22L PD 8: WDC WD800JD-22L Free Physical Disks ...
Manual
Page 103
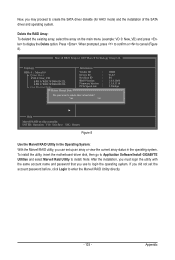
... rate : Configure SATA as : Do you use to enter the Marvell RAID Utility directly. - 103 - To install the utility, insert the motherboard driver disk, then go to Application Software\Install GIGABYTE Utilities and select Marvell Raid Utility to cancel (Figure 8). Press . Marvell BIOS Setup (c) 2009 Marvell... before, click Login to login the operating system. Delete the RAID Array: To deleted the existing array, select the array on chip controller. Yes No 1B4B 91A3 B1 1.0.0.1006 2.1.0.1314 2.56Gbps IDE Mode Help Marvell RAID on the main menu (example: VD 0: New_VD) and press...
... rate : Configure SATA as : Do you use to enter the Marvell RAID Utility directly. - 103 - To install the utility, insert the motherboard driver disk, then go to Application Software\Install GIGABYTE Utilities and select Marvell Raid Utility to cancel (Figure 8). Press . Marvell BIOS Setup (c) 2009 Marvell... before, click Login to login the operating system. Delete the RAID Array: To deleted the existing array, select the array on chip controller. Yes No 1B4B 91A3 B1 1.0.0.1006 2.1.0.1314 2.56Gbps IDE Mode Help Marvell RAID on the main menu (example: VD 0: New_VD) and press...
Manual
Page 104
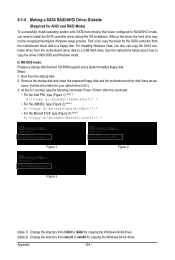
...64-bit driver. See the instructions below about how to a USB flash drive. For installing Windows Vista, you need to RAID/AHCI mode, you also can copy the SATA controller driver from the startup disk. 2: Remove the startup disk and insert the prepared floppy disk and the motherboard driver disk (...here we as- First of all, copy the driver for AHCI and RAID Mode) To successfully install operating system onto SATA hard...
...64-bit driver. See the instructions below about how to a USB flash drive. For installing Windows Vista, you need to RAID/AHCI mode, you also can copy the SATA controller driver from the startup disk. 2: Remove the startup disk and insert the prepared floppy disk and the motherboard driver disk (...here we as- First of all, copy the driver for AHCI and RAID Mode) To successfully install operating system onto SATA hard...
Manual
Page 106
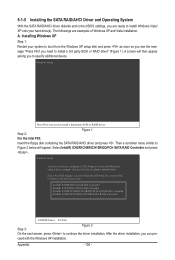
A screen will appear. Intel(R) ICH7R/DH SATA RAID Controller Intel(R) ICH7MDH SATA RAID Controller Intel(R) ICH8R/ICH9R/ICH10R/DO/PCH SATA RAID Controller Intel(R) ICH8M-E/ICH9M-E/PCHM SATA RAID Controller ENTER=Select F3=Exit Step 3: Figure 2 On the next screen, press to configure a SCSI Adapter for use... additional device. Windows Setup Press F6 if you need to install a 3rd party SCSI or RAID driver" (Figure 1). Select Intel(R) ICH8R/ICH9R/ICH10R/DO/PCH SATA RAID Controller and press . After the driver installation, you want from the Windows XP setup disk and ...
A screen will appear. Intel(R) ICH7R/DH SATA RAID Controller Intel(R) ICH7MDH SATA RAID Controller Intel(R) ICH8R/ICH9R/ICH10R/DO/PCH SATA RAID Controller Intel(R) ICH8M-E/ICH9M-E/PCHM SATA RAID Controller ENTER=Select F3=Exit Step 3: Figure 2 On the next screen, press to configure a SCSI Adapter for use... additional device. Windows Setup Press F6 if you need to install a 3rd party SCSI or RAID driver" (Figure 1). Select Intel(R) ICH8R/ICH9R/ICH10R/DO/PCH SATA RAID Controller and press . After the driver installation, you want from the Windows XP setup disk and ...

Manual
Page 109
Figure 8 The install menus described in Figure 7 appears, select Intel(R) ICH8R/ICH9R/ICH10R/DO/PCH SATA RAID Controller and click Next. Appendix Figure 7 Step 4: After the driver is loaded, select the RAID/AHCI drive(s) where you want to install the operating system and then click Next to continue the OS installation (Figure 8). Step 3: When a screen as shown in this chapter are for reference only and may differ by driver version. - 109 -
Figure 8 The install menus described in Figure 7 appears, select Intel(R) ICH8R/ICH9R/ICH10R/DO/PCH SATA RAID Controller and click Next. Appendix Figure 7 Step 4: After the driver is loaded, select the RAID/AHCI drive(s) where you want to install the operating system and then click Next to continue the OS installation (Figure 8). Step 3: When a screen as shown in this chapter are for reference only and may differ by driver version. - 109 -


