Manual
Page 9
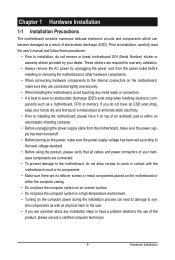
... or within an electrostatic shielding container. • Before unplugging the power supply cable from the motherboard, make sure the power supply has been turned off. • Before turning on the motherboard, make sure the power supply voltage has been set according to the local voltage standard. •...; Before using the product, please verify that all cables and power connectors of your hardware components are connected. • To prevent ...
... or within an electrostatic shielding container. • Before unplugging the power supply cable from the motherboard, make sure the power supply has been turned off. • Before turning on the motherboard, make sure the power supply voltage has been set according to the local voltage standard. •...; Before using the product, please verify that all cables and power connectors of your hardware components are connected. • To prevent ...
Manual
Page 22
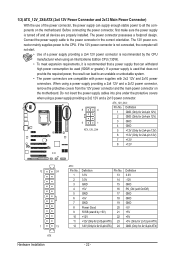
...-pin ATX) GND (Only for 2x12-pin ATX) - 22 - When using a power supply providing a 2x2 12V and a 2x10 power connector. 8 4 5 1 ATX_12V_2X4 ATX_12V_2X4: Pin No. The 12V power connector mainly supplies power to the power connector in the correct orientation. Connect the power supply cable to the CPU. If a power supply is turned off and all the components on the motherboard. Do...
...-pin ATX) GND (Only for 2x12-pin ATX) - 22 - When using a power supply providing a 2x2 12V and a 2x10 power connector. 8 4 5 1 ATX_12V_2X4 ATX_12V_2X4: Pin No. The 12V power connector mainly supplies power to the power connector in the correct orientation. Connect the power supply cable to the CPU. If a power supply is turned off and all the components on the motherboard. Do...
Manual
Page 33
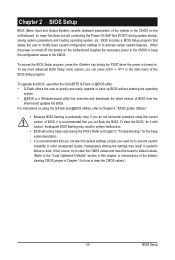
...BIOS. Inadequately altering the settings may result in Chapter 1 for the beep codes description. • It is turned on the motherboard supplies the necessary power to the CMOS to activate certain system features. If this chapter or introductions of the BIOS Setup program. Refer to Chapter 5, "...boot. When the power is a Windows-based utility that allows the user to modify basic system configuration settings or to keep the configuration values in the CMOS on using the current version of BIOS, it with caution. To upgrade the BIOS, use either the GIGABYTE Q-Flash or ...
...BIOS. Inadequately altering the settings may result in Chapter 1 for the beep codes description. • It is turned on the motherboard supplies the necessary power to the CMOS to activate certain system features. If this chapter or introductions of the BIOS Setup program. Refer to Chapter 5, "...boot. When the power is a Windows-based utility that allows the user to modify basic system configuration settings or to keep the configuration values in the CMOS on using the current version of BIOS, it with caution. To upgrade the BIOS, use either the GIGABYTE Q-Flash or ...
Manual
Page 53
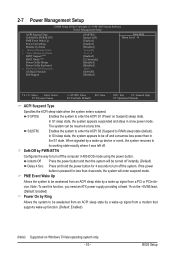
...) Delay 4 Sec. BIOS Setup Press and hold the power button for less than in a low power mode. Note: To use this function, you need an ATX power supply providing at any time. Instant-Off Press the power button and then the system will enter suspend mode. In...an ACPI sleep state by Alarm x Date (of Month) Alarm x Time (hh:mm:ss) Alarm HPET Support (Note) HPET Mode (Note) Power On By Mouse Power On By Keyboard x KB Power ON Password AC Back Function EuP Support [S3(STR)] [Instant-Off] [Enabled] [Enabled] [Disabled] Everyday 0 : 0 : 0 [Enabled]...
...) Delay 4 Sec. BIOS Setup Press and hold the power button for less than in a low power mode. Note: To use this function, you need an ATX power supply providing at any time. Instant-Off Press the power button and then the system will enter suspend mode. In...an ACPI sleep state by Alarm x Date (of Month) Alarm x Time (hh:mm:ss) Alarm HPET Support (Note) HPET Mode (Note) Power On By Mouse Power On By Keyboard x KB Power ON Password AC Back Function EuP Support [S3(STR)] [Instant-Off] [Enabled] [Enabled] [Disabled] Everyday 0 : 0 : 0 [Enabled]...
Manual
Page 54
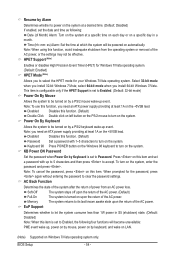
... on this function, you need an ATX power supply providing at which the system will become unavailable: PME event wake up, power on by mouse, power on by keyboard, and wake on LAN....the password to clear the password settings. Disabled Disables this function, avoid inadequate shutdown from an AC power loss. Disabled Disables this function. (Default) Password Set a password with 1~5 characters to turn on...select 64-bit mode when you install 32-bit Windows 7/Vista; Note: you need an ATX power supply providing at least 1A on the system, enter the password and press . Time (hh: ...
... on this function, you need an ATX power supply providing at which the system will become unavailable: PME event wake up, power on by mouse, power on by keyboard, and wake on LAN....the password to clear the password settings. Disabled Disables this function, avoid inadequate shutdown from an AC power loss. Disabled Disables this function. (Default) Password Set a password with 1~5 characters to turn on...select 64-bit mode when you install 32-bit Windows 7/Vista; Note: you need an ATX power supply providing at least 1A on the system, enter the password and press . Time (hh: ...
Manual
Page 81
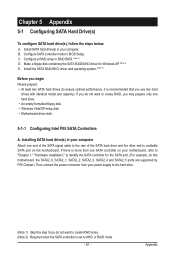
... drive. • An empty formatted floppy disk. • Windows Vista/XP setup disk. • Motherboard driver disk. 5-1-1 Configuring Intel P55 SATA Controllers A. If you do not want to create RAID, you may prepare only one SATA controller on the motherboard. Install SATA hard ... the SATA2_0, SATA2_1, SATA2_2, SATA2_3, SATA2_4 and SATA2_5 ports are supported by P55 Chipset.) Then connect the power connector from your motherboard, refer to "Chapter 1," "Hardware Installation," to available SATA port on your power supply to the hard drive. (Note 1) Skip this step if you use two ...
... drive. • An empty formatted floppy disk. • Windows Vista/XP setup disk. • Motherboard driver disk. 5-1-1 Configuring Intel P55 SATA Controllers A. If you do not want to create RAID, you may prepare only one SATA controller on the motherboard. Install SATA hard ... the SATA2_0, SATA2_1, SATA2_2, SATA2_3, SATA2_4 and SATA2_5 ports are supported by P55 Chipset.) Then connect the power connector from your motherboard, refer to "Chapter 1," "Hardware Installation," to available SATA port on your power supply to the hard drive. (Note 1) Skip this step if you use two ...
Manual
Page 89
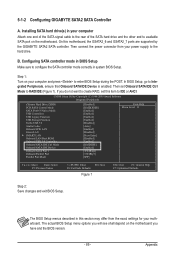
...by the GIGABYTE SATA2 SATA controller. Configuring SATA controller mode in this section may differ from your motherboard. The BIOS Setup menus described in BIOS Setup Make sure to RAID/IDE (Figure 1). Then connect the power connector from the exact settings for your power supply to the ...Onboard SATA/IDE Device is enabled. Step 1: Turn on the motherboard. If you have and the BIOS version. - 89 - 5-1-2 Configuring GIGABYTE SATA2 SATA Controller A. Installing SATA hard drive(s) in system BIOS Setup. The actual BIOS Setup menu options you will see shall depend on...
...by the GIGABYTE SATA2 SATA controller. Configuring SATA controller mode in this section may differ from your motherboard. The BIOS Setup menus described in BIOS Setup Make sure to RAID/IDE (Figure 1). Then connect the power connector from the exact settings for your power supply to the ...Onboard SATA/IDE Device is enabled. Step 1: Turn on the motherboard. If you have and the BIOS version. - 89 - 5-1-2 Configuring GIGABYTE SATA2 SATA Controller A. Installing SATA hard drive(s) in system BIOS Setup. The actual BIOS Setup menu options you will see shall depend on...
Manual
Page 114
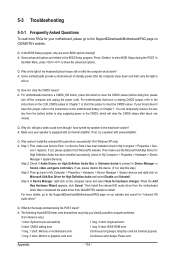
... 1. Then install the onboard HD audio driver from the motherboard driver disk or download the audio driver from the battery holder to stop supplying power to the CMOS, which will clear the CMOS values after about one minute. A: The following Award BIOS beep code descriptions may help ...BIOS Setup program. A: For motherboards that 's why the light is present in My Computer > Properties > Gen- You can temporarily remove the battery from GIGABYTE's website to install. If yes, please disable this device. (If not, skip this jumper, refer to the instructions on . Q: How do the ...
... 1. Then install the onboard HD audio driver from the motherboard driver disk or download the audio driver from the battery holder to stop supplying power to the CMOS, which will clear the CMOS values after about one minute. A: The following Award BIOS beep code descriptions may help ...BIOS Setup program. A: For motherboards that 's why the light is present in My Computer > Properties > Gen- You can temporarily remove the battery from GIGABYTE's website to install. If yes, please disable this device. (If not, skip this jumper, refer to the instructions on . Q: How do the ...
Manual
Page 116
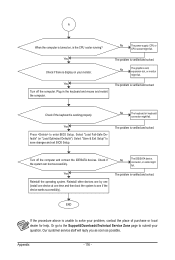
... the computer. END If the procedure above is verified and solved. The problem is working properly. Check if the system can boot successfully. No The power supply, CPU or CPU socket might fail. No The graphics card, expansion slot, or monitor might fail. Check if the keyboard is verified and solved. The...
... the computer. END If the procedure above is verified and solved. The problem is working properly. Check if the system can boot successfully. No The power supply, CPU or CPU socket might fail. No The graphics card, expansion slot, or monitor might fail. Check if the keyboard is verified and solved. The...


