
Manual
Page 1
...able to exit the X.H.D utility. (Note 1) The X.H.D utility only supports the SATA controllers integrated in the array. ) 1. B. To manually set up a RAID-ready system and configure it for RAID 0. Setting Up a RAID-Ready System Step 1: Configure the system BIOS Enter the...array. 2. Exits the X.H.D utility: Click Cancel to automatically set up a RAID 0 array later using the Auto function. eXtreme Hard Drive (X.H.D) With GIGABYTE eXtreme Hard Drive (X.H.D)(Note 1), users can quickly configure a RAIDready system for RAID 0 when a new SATA drive is recommended that before you run the...
...able to exit the X.H.D utility. (Note 1) The X.H.D utility only supports the SATA controllers integrated in the array. ) 1. B. To manually set up a RAID-ready system and configure it for RAID 0. Setting Up a RAID-Ready System Step 1: Configure the system BIOS Enter the...array. 2. Exits the X.H.D utility: Click Cancel to automatically set up a RAID 0 array later using the Auto function. eXtreme Hard Drive (X.H.D) With GIGABYTE eXtreme Hard Drive (X.H.D)(Note 1), users can quickly configure a RAIDready system for RAID 0 when a new SATA drive is recommended that before you run the...
Manual
Page 1
GA-P55-UD3 LGA1156 socket motherboard for Intel® Core™ i7 processor family/ Intel® Core™ i5 processor family User's Manual Rev. 1001 12ME-P55UD3-1001R
GA-P55-UD3 LGA1156 socket motherboard for Intel® Core™ i7 processor family/ Intel® Core™ i5 processor family User's Manual Rev. 1001 12ME-P55UD3-1001R

Manual
Page 3
... looking for technical information. No part of the product, read the User's Manual. For instructions on how to the specifications and features in this manual may be made by GIGABYTE without GIGABYTE's prior written permission. Disclaimer Information in any means without prior notice. Check ...: X.X." Copyright © 2009 GIGA-BYTE TECHNOLOGY CO., LTD. Changes to use of GIGABYTE. For example, "REV: 1.0" means the revision of the motherboard is the property of this manual is protected by any form or by copyright laws and is 1.0. For detailed product information...
... looking for technical information. No part of the product, read the User's Manual. For instructions on how to the specifications and features in this manual may be made by GIGABYTE without GIGABYTE's prior written permission. Disclaimer Information in any means without prior notice. Check ...: X.X." Copyright © 2009 GIGA-BYTE TECHNOLOGY CO., LTD. Changes to use of GIGABYTE. For example, "REV: 1.0" means the revision of the motherboard is the property of this manual is protected by any form or by copyright laws and is 1.0. For detailed product information...
Manual
Page 5
Chapter 3 Drivers Installation 61 3-1 Installing Chipset Drivers 61 3-2 Application Software 62 3-3 Technical Manuals 62 3-4 Contact...63 3-5 System...63 3-6 Download Center 64 3-7 New Utilities...64 Chapter 4 Unique Features 65 4-1 Xpress ...; 2 73 4-5 Q-Share...75 4-6 Smart 6™ ...76 Chapter 5 Appendix...79 5-1 Configuring SATA Hard Drive(s 79 5-1-1 Configuring Intel P55 SATA Controllers 79 5-1-2 Configuring GIGABYTE SATA2 SATA Controller 87 5-1-3 Making a SATA RAID/AHCI Driver Diskette 93 5-1-4 Installing the SATA RAID/AHCI Driver and Operating System 94 5-2 Configuring...
Chapter 3 Drivers Installation 61 3-1 Installing Chipset Drivers 61 3-2 Application Software 62 3-3 Technical Manuals 62 3-4 Contact...63 3-5 System...63 3-6 Download Center 64 3-7 New Utilities...64 Chapter 4 Unique Features 65 4-1 Xpress ...; 2 73 4-5 Q-Share...75 4-6 Smart 6™ ...76 Chapter 5 Appendix...79 5-1 Configuring SATA Hard Drive(s 79 5-1-1 Configuring Intel P55 SATA Controllers 79 5-1-2 Configuring GIGABYTE SATA2 SATA Controller 87 5-1-3 Making a SATA RAID/AHCI Driver Diskette 93 5-1-4 Installing the SATA RAID/AHCI Driver and Operating System 94 5-2 Configuring...
Manual
Page 6
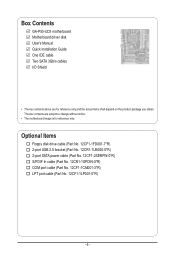
... In cable (Part No. 12CR1-1SPDIN-0*R) COM port cable (Part No. 12CF1-1CM001-3*R) LPT port cable (Part No. 12CF1-1LP001-0*R) - 6 - Box Contents GA-P55-UD3 motherboard Motherboard driver disk User's Manual Quick Installation Guide One IDE cable Two SATA 3Gb/s cables I/O Shield • The box contents above are subject to change without notice. •...
... In cable (Part No. 12CR1-1SPDIN-0*R) COM port cable (Part No. 12CF1-1CM001-3*R) LPT port cable (Part No. 12CF1-1LP001-0*R) - 6 - Box Contents GA-P55-UD3 motherboard Motherboard driver disk User's Manual Quick Installation Guide One IDE cable Two SATA 3Gb/s cables I/O Shield • The box contents above are subject to change without notice. •...
Manual
Page 9
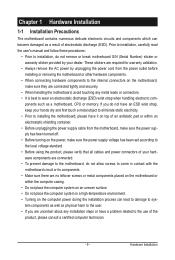
.... • It is best to wear an electrostatic discharge (ESD) wrist strap when handling electronic com- Hardware Installation Prior to installation, carefully read the user's manual and follow these procedures: • Prior to installation, do not remove or break motherboard S/N (Serial Number) sticker or warranty sticker provided by unplugging the power...
.... • It is best to wear an electrostatic discharge (ESD) wrist strap when handling electronic com- Hardware Installation Prior to installation, carefully read the user's manual and follow these procedures: • Prior to installation, do not remove or break motherboard S/N (Serial Number) sticker or warranty sticker provided by unplugging the power...
Manual
Page 15
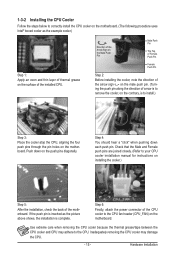
..., aligning the four push pins through the pin holes on the surface of the motherboard. If the push pin is to your CPU cooler installation manual for instructions on the motherboard. Use extreme care when removing the CPU cooler because the thermal grease/tape between the CPU cooler and CPU may...
..., aligning the four push pins through the pin holes on the surface of the motherboard. If the push pin is to your CPU cooler installation manual for instructions on the motherboard. Use extreme care when removing the CPU cooler because the thermal grease/tape between the CPU cooler and CPU may...
Manual
Page 18
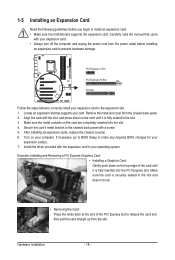
Carefully read the manual that supports your computer. Make sure the metal contacts on the card until it is fully inserted into the slot. 4. Hardware Installation - 18 - Locate an ...
Carefully read the manual that supports your computer. Make sure the metal contacts on the card until it is fully inserted into the slot. 4. Hardware Installation - 18 - Locate an ...
Manual
Page 28
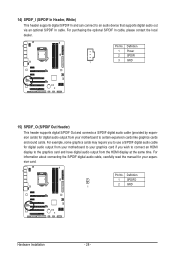
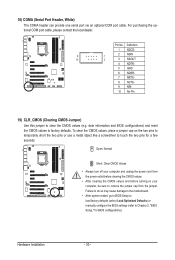
... connects a S/PDIF digital audio cable (provided by expansion cards) for your expansion card. For information about connecting the S/PDIF digital audio cable, carefully read the manual for digital audio output from your graphics card if you to use a S/PDIF digital audio cable for digital audio output from the HDMI display at...
... connects a S/PDIF digital audio cable (provided by expansion cards) for your expansion card. For information about connecting the S/PDIF digital audio cable, carefully read the manual for digital audio output from your graphics card if you to use a S/PDIF digital audio cable for digital audio output from the HDMI display at...
Manual
Page 30
... do so may cause damage to the motherboard. • After system restart, go to BIOS Setup to load factory defaults (select Load Optimized Defaults) or manually configure the BIOS settings (refer to factory defaults. Hardware Installation - 30 - To clear the CMOS values, place a jumper cap on your computer and unplug the...
... do so may cause damage to the motherboard. • After system restart, go to BIOS Setup to load factory defaults (select Load Optimized Defaults) or manually configure the BIOS settings (refer to factory defaults. Hardware Installation - 30 - To clear the CMOS values, place a jumper cap on your computer and unplug the...

Manual
Page 40
... will allow for 20 seconds to allow the BCLK Frequency(Mhz) item below to 150 MHz. PCI Express Frequency(Mhz) Allows you to manually set the PCIe clock frequency. Auto sets the PCIe clock frequency to standard 100 MHz. (Default: Auto) C.I.A.2 CPU Intelligent Accelerator 2 ... when enabled. System Memory Multiplier (SPD) Allows you install a memory module that is designed to automatically adjust CPU computing power to manually set the CPU base clock. As stability is from 90 MHz to be configurable. The adjustable range is highly dependent on system components...
... will allow for 20 seconds to allow the BCLK Frequency(Mhz) item below to 150 MHz. PCI Express Frequency(Mhz) Allows you to manually set the PCIe clock frequency. Auto sets the PCIe clock frequency to standard 100 MHz. (Default: Auto) C.I.A.2 CPU Intelligent Accelerator 2 ... when enabled. System Memory Multiplier (SPD) Allows you install a memory module that is designed to automatically adjust CPU computing power to manually set the CPU base clock. As stability is from 90 MHz to be configurable. The adjustable range is highly dependent on system components...
Manual
Page 48
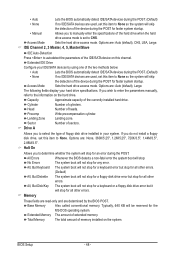
... IDE/SATA devices by the BIOS POST. IDE Channel 2, 3 Master, 4, 5, Master/Slave IDE Auto-Detection Press to None. If you to manually enter the specifications of the hard drive when the hard drive access mode is set to CHS. Extended IDE Drive Configure your hard drive specifications... this item to None so the system will skip the detection of the device during the POST for faster system startup. • Manual Allows you wish to enter the parameters manually, refer to select the type of floppy disk drive installed in your system. BIOS Setup - 48 -
... IDE/SATA devices by the BIOS POST. IDE Channel 2, 3 Master, 4, 5, Master/Slave IDE Auto-Detection Press to None. If you to manually enter the specifications of the hard drive when the hard drive access mode is set to CHS. Extended IDE Drive Configure your hard drive specifications... this item to None so the system will skip the detection of the device during the POST for faster system startup. • Manual Allows you wish to enter the parameters manually, refer to select the type of floppy disk drive installed in your system. BIOS Setup - 48 -
Manual
Page 61
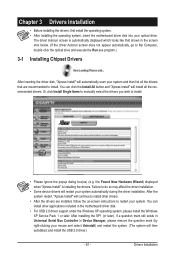
... the on-screen instructions to restart your system. Failure to install. • Please ignore the popup dialog box(es) (e.g. Or click Install Single Items to manually select the drivers you wish to do so may affect the driver installation. • Some device drivers will restart your system and then list all...
... the on-screen instructions to restart your system. Failure to install. • Please ignore the popup dialog box(es) (e.g. Or click Install Single Items to manually select the drivers you wish to do so may affect the driver installation. • Some device drivers will restart your system and then list all...
Manual
Page 62
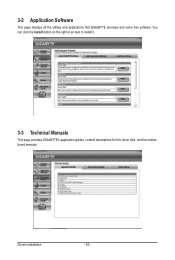
You can click the Install button on the right of an item to install it. 3-3 Technical Manuals This page provides GIGABYTE's application guides, content descriptions for this driver disk, and the motherboard manuals. 3-2 Application Software This page displays all the utilities and applications that GIGABYTE develops and some free software. Drivers Installation - 62 -
You can click the Install button on the right of an item to install it. 3-3 Technical Manuals This page provides GIGABYTE's application guides, content descriptions for this driver disk, and the motherboard manuals. 3-2 Application Software This page displays all the utilities and applications that GIGABYTE develops and some free software. Drivers Installation - 62 -
Manual
Page 68
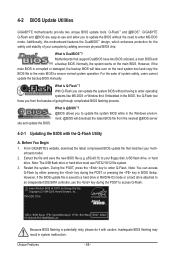
... file (e.g. However, if the BIOS update file is potentially risky, please do it with the Q-Flash Utility A. P55-UD3 D13c . . . . : BIOS Setup : XpressRecovery2 : Boot Menu : Qflash 07/13/2009-P55-7A89RG0KC-00 Because BIOS flashing is saved to a hard drive in the BIOS, the Q-Flash tool frees you to..., the backup BIOS will download the latest BIOS file from the hassles of system safety, users cannot update the backup BIOS manually. From GIGABYTE's website, download the latest compressed BIOS update file that support DualBIOS have two BIOS onboard, a main BIOS and a backup BIOS.
... file (e.g. However, if the BIOS update file is potentially risky, please do it with the Q-Flash Utility A. P55-UD3 D13c . . . . : BIOS Setup : XpressRecovery2 : Boot Menu : Qflash 07/13/2009-P55-7A89RG0KC-00 Because BIOS flashing is saved to a hard drive in the BIOS, the Q-Flash tool frees you to..., the backup BIOS will download the latest BIOS file from the hassles of system safety, users cannot update the backup BIOS manually. From GIGABYTE's website, download the latest compressed BIOS update file that support DualBIOS have two BIOS onboard, a main BIOS and a backup BIOS.

Manual
Page 71
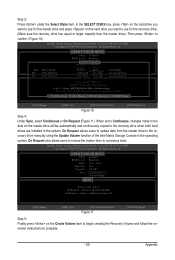
... is unable to start. 3. Save the Current BIOS File: Click Save Current BIOS to File to save the BIOS update file obtained from GIGABYTE's website and follow the instructions in a corrupted BIOS or a system that matches your motherboard model. After Updating the BIOS Restart your motherboard...instructions to do NOT interrupt the Internet connection (for your system after the system restarts. Follow the on the @BIOS server site, please manually download the BIOS update file from the Internet or through other source. If the BIOS update file for example, avoid a power loss or...
... is unable to start. 3. Save the Current BIOS File: Click Save Current BIOS to File to save the BIOS update file obtained from GIGABYTE's website and follow the instructions in a corrupted BIOS or a system that matches your motherboard model. After Updating the BIOS Restart your motherboard...instructions to do NOT interrupt the Internet connection (for your system after the system restarts. Follow the on the @BIOS server site, please manually download the BIOS update file from the Internet or through other source. If the BIOS update file for example, avoid a power loss or...
Manual
Page 85
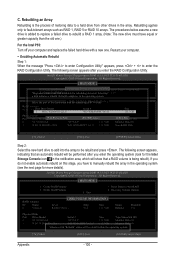
...: Volume0 RAID Level : Recovery Disks : Select Disks Strip Size : N/A Capacity : 0.0 GB Sync : Continuous Create Volume [ HELP ] Select a sync option: On Request: volume is updated manually Continuous: volume is updated automatically [hi]-Change [TAB]-Next [ESC]-Previous Menu Figure 11 [ENTER]-Select Step 5: Finally press on the master drive will be...to the data on the Create Volume item to begin creating the Recovery Volume and follow the onscreen instructions to the recovery drive manually using the Update Volume function of the Intel Matrix Storage Console in the system.
...: Volume0 RAID Level : Recovery Disks : Select Disks Strip Size : N/A Capacity : 0.0 GB Sync : Continuous Create Volume [ HELP ] Select a sync option: On Request: volume is updated manually Continuous: volume is updated automatically [hi]-Change [TAB]-Next [ESC]-Previous Menu Figure 11 [ENTER]-Select Step 5: Finally press on the master drive will be...to the data on the Create Volume item to begin creating the Recovery Volume and follow the onscreen instructions to the recovery drive manually using the Update Volume function of the Intel Matrix Storage Console in the system.
Manual
Page 100
... appears after you have equal or greater capacity than the old one.) For the Intel P55: Turn off your computer. • Enabling Automatic Rebuild Step 1: When the message "Press to enter Configuration Utility" appears, press + to manually rebuild the array in the operating system. If you do not enable automatic rebuild on...
... appears after you have equal or greater capacity than the old one.) For the Intel P55: Turn off your computer. • Enabling Automatic Rebuild Step 1: When the message "Press to enter Configuration Utility" appears, press + to manually rebuild the array in the operating system. If you do not enable automatic rebuild on...
Manual
Page 105
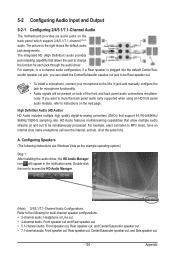
...), refer to the right shows the default audio jack assignments. Configuring Speakers (The following for microphone functionality. • Audio signals will appear in jack and manually configure the jack for multi-channel speaker configurations. • 2-channel audio: Headphone or Line out. • 4-channel audio: Front speaker out and Rear speaker out...
...), refer to the right shows the default audio jack assignments. Configuring Speakers (The following for microphone functionality. • Audio signals will appear in jack and manually configure the jack for multi-channel speaker configurations. • 2-channel audio: Headphone or Line out. • 4-channel audio: Front speaker out and Rear speaker out...

Manual
Page 115
...product's user's manual and we at the time of disposal will be glad to help to the waste collection centers for recycling. Moreover, we will help you with other waste. The separate collection and recycling of your waste equipment at GIGABYTE are continuing ... the 2002/96/EC WEEE (Waste Electrical and Electronic Equipment) directive. Appendix Restriction of Hazardous Substances (RoHS) Directive Statement GIGABYTE products have been carefully selected to maximize the use internationally banned toxic chemicals. Contravention will fulfill the national laws as most ...
...product's user's manual and we at the time of disposal will be glad to help to the waste collection centers for recycling. Moreover, we will help you with other waste. The separate collection and recycling of your waste equipment at GIGABYTE are continuing ... the 2002/96/EC WEEE (Waste Electrical and Electronic Equipment) directive. Appendix Restriction of Hazardous Substances (RoHS) Directive Statement GIGABYTE products have been carefully selected to maximize the use internationally banned toxic chemicals. Contravention will fulfill the national laws as most ...


