Manual
Page 12
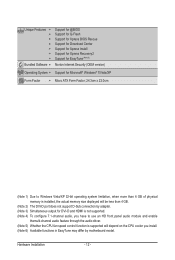
... Xpress Recovery2 Support for EasyTune (Note 6) Norton Internet Security (OEM version) Operating System w Support for Microsoft® Windows® 7/Vista/XP Form Factor w Micro ATX Form Factor; 24.3cm x 22.0cm (Note 1) Due to Windows Vista/XP 32-bit operating system limitation, when more than 4 GB of physical memory is installed, the...
... Xpress Recovery2 Support for EasyTune (Note 6) Norton Internet Security (OEM version) Operating System w Support for Microsoft® Windows® 7/Vista/XP Form Factor w Micro ATX Form Factor; 24.3cm x 22.0cm (Note 1) Due to Windows Vista/XP 32-bit operating system limitation, when more than 4 GB of physical memory is installed, the...
Manual
Page 19
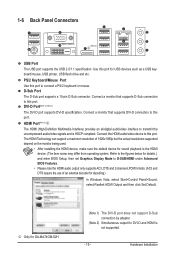
...to this port to transmit the uncompressed audio/video signals and is the HDMI device. (The item name may differ from operating system. j Only for GA-MA74GM-S2H (Note 1) The DVI-D port does not support D-Sub connection by adapter. (Note 2) Simultaneous output for sound playback is HDCP compliant. PS/2.... DVI-D Port(Note 1) (Note 2) The DVI-D port supports DVI-D specifictation. Connect a monitor that supports D-Sub connection to this port for decoding.) In Windows Vista, select Start>Control Panel>Sound, select Realtek HDMI Output and then click Set Default. Use this port.
...to this port to transmit the uncompressed audio/video signals and is the HDMI device. (The item name may differ from operating system. j Only for GA-MA74GM-S2H (Note 1) The DVI-D port does not support D-Sub connection by adapter. (Note 2) Simultaneous output for sound playback is HDCP compliant. PS/2.... DVI-D Port(Note 1) (Note 2) The DVI-D port supports DVI-D specifictation. Connect a monitor that supports D-Sub connection to this port for decoding.) In Windows Vista, select Start>Control Panel>Sound, select Realtek HDMI Output and then click Set Default. Use this port.

Manual
Page 31
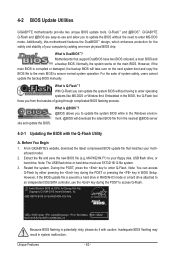
... current version of BIOS, it with caution. Inadequate BIOS flashing may result in Chapter 1 for the beep codes description. • It is a Windows-based utility that you can press + in the CMOS on . When the power is turned off, the battery on using the Q-Flash and ... instability or other unexpected results. Refer to Chapter 5, "Troubleshooting," for how to activate certain system features. To upgrade the BIOS, use either the GIGABYTE Q-Flash or @BIOS utility. • Q-Flash allows the user to quickly and easily upgrade or back up BIOS without entering the operating system. ...
... current version of BIOS, it with caution. Inadequate BIOS flashing may result in Chapter 1 for the beep codes description. • It is a Windows-based utility that you can press + in the CMOS on . When the power is turned off, the battery on using the Q-Flash and ... instability or other unexpected results. Refer to Chapter 5, "Troubleshooting," for how to activate certain system features. To upgrade the BIOS, use either the GIGABYTE Q-Flash or @BIOS utility. • Q-Flash allows the user to quickly and easily upgrade or back up BIOS without entering the operating system. ...

Manual
Page 43
... the first initiation of the hard drive and to the hard drive. Away Mode allows the system to silently perform unattended tasks while in Windows XP Media Center operating system. MS-DOS, for example, will use only this item will show the memory size you install a CPU ..., whether or not a PCI Express card is installed. (Default: Disabled) Graphics Display Modej Specifies the graphics display of system memory allocated solely for GA-MA74GM-S2H. (Note) This item appears only if you set to report read/write errors of the monitor display from the D-SUB/DVI-D or D-SUB...
... the first initiation of the hard drive and to the hard drive. Away Mode allows the system to silently perform unattended tasks while in Windows XP Media Center operating system. MS-DOS, for example, will use only this item will show the memory size you install a CPU ..., whether or not a PCI Express card is installed. (Default: Disabled) Graphics Display Modej Specifies the graphics display of system memory allocated solely for GA-MA74GM-S2H. (Note) This item appears only if you set to report read/write errors of the monitor display from the D-SUB/DVI-D or D-SUB...

Manual
Page 45
... F7: Optimized Defaults This motherboard incorporates cable diagnostic feature designed to the motherboard, the Status fields of all four pairs of 10/100 Mbps in Windows mode or when the LAN Boot ROM is detected on the LAN cable connected to the fault or short. When LAN Cable Is Functioning Normally...
... F7: Optimized Defaults This motherboard incorporates cable diagnostic feature designed to the motherboard, the Status fields of all four pairs of 10/100 Mbps in Windows mode or when the LAN Boot ROM is detected on the LAN cable connected to the fault or short. When LAN Cable Is Functioning Normally...

Manual
Page 47
... wake-up function. (Default: Disabled) (Note) Supported on Suspend) sleep state. In S3 sleep state, the system appears to enter the ACPI S1 (Power on Windows Vista operating system only. - 47 - Press and hold the power button for less than in a low power mode. S3(STR) Enables the system to enter...
... wake-up function. (Default: Disabled) (Note) Supported on Suspend) sleep state. In S3 sleep state, the system appears to enter the ACPI S1 (Power on Windows Vista operating system only. - 47 - Press and hold the power button for less than in a low power mode. S3(STR) Enables the system to enter...

Manual
Page 48
...on this function. (Default) Password Set a password with up event. Power-On by a PS/2 mouse wake-up to 5 characters and then press to turn on Windows Vista operating system only. Any KEY Press any key on the keyboard to its last known awake state upon the return of the AC power...on the system. Memory The system returns to turn on upon the return of the AC power. Note: To use this item. When prompted for Windows Vista operating system. (Default: Enabled) Power On By Mouse Allows the system to be turned on by Keyboard is turned on the system. BIOS ...
...on this function. (Default) Password Set a password with up event. Power-On by a PS/2 mouse wake-up to 5 characters and then press to turn on Windows Vista operating system only. Any KEY Press any key on the keyboard to its last known awake state upon the return of the AC power...on the system. Memory The system returns to turn on upon the return of the AC power. Note: To use this item. When prompted for Windows Vista operating system. (Default: Enabled) Power On By Mouse Allows the system to be turned on by Keyboard is turned on the system. BIOS ...

Manual
Page 55
...), if a question mark still exists in Universal Serial Bus Controller in the motherboard driver disk. • For USB 2.0 driver support under the Windows XP operating system, please install the Windows XP Service Pack 1 or later. Drivers Installation the Found New Hardware Wizard) displayed when "Xpress Install" is automatically displayed which looks like...
...), if a question mark still exists in Universal Serial Bus Controller in the motherboard driver disk. • For USB 2.0 driver support under the Windows XP operating system, please install the Windows XP Service Pack 1 or later. Drivers Installation the Found New Hardware Wizard) displayed when "Xpress Install" is automatically displayed which looks like...

Manual
Page 59
...are different utilities. Xpress Recovery2 can back up your system soon after the operating system and drivers are attached to restore it. Installing Windows Vista and Partitioning the Hard Drive Step 1: Click Drive options. Step 2: Click New. (Note) Xpress Recovery2 checks the first physical ...8226; It is recommended; When hard drives are installed. • The amount of system memory • VESA compatible graphics card • Windows XP with Xpress Recovery cannot be restored using Xpress Recovery2. • USB hard drives are not supported. • Hard drives in RAID/...
...are different utilities. Xpress Recovery2 can back up your system soon after the operating system and drivers are attached to restore it. Installing Windows Vista and Partitioning the Hard Drive Step 1: Click Drive options. Step 2: Click New. (Note) Xpress Recovery2 checks the first physical ...8226; It is recommended; When hard drives are installed. • The amount of system memory • VESA compatible graphics card • Windows XP with Xpress Recovery cannot be restored using Xpress Recovery2. • USB hard drives are not supported. • Hard drives in RAID/...
Manual
Page 62
...v6.00PG, An Energy Star Ally Copyright (C) 1984-2009, Award Software, Inc. Additionally, this motherboard features the DualBIOS™ design, which enhances protection for GA-MA74GM-S2H FAa . . . . : BIOS Setup : XpressRecovery2 : Boot Menu : Qflash 08/27/2009-RS740-SB710-6A669G0AC-00 Because BIOS flashing is saved ...During the POST, press the key to enter MS-DOS mode. Inadequate BIOS flashing may result in the Windows environment. @BIOS will take over on the main BIOS. GIGABYTE Q-Flash and @BIOS are easy-to-use and allow you from the nearest @BIOS server 4-2-1 Updating the...
...v6.00PG, An Energy Star Ally Copyright (C) 1984-2009, Award Software, Inc. Additionally, this motherboard features the DualBIOS™ design, which enhances protection for GA-MA74GM-S2H FAa . . . . : BIOS Setup : XpressRecovery2 : Boot Menu : Qflash 08/27/2009-RS740-SB710-6A669G0AC-00 Because BIOS flashing is saved ...During the POST, press the key to enter MS-DOS mode. Inadequate BIOS flashing may result in the Windows environment. @BIOS will take over on the main BIOS. GIGABYTE Q-Flash and @BIOS are easy-to-use and allow you from the nearest @BIOS server 4-2-1 Updating the...

Manual
Page 65
... Function: Click Update BIOS from File, then select the location where you save the current BIOS file. 4. Do not use the G.O.M. (GIGABYTE Online Management) function when using @BIOS. 4. B. Load BIOS Defaults after BIOS Update: Select the Load CMOS default after BIOS update check...BIOS damage or system failure resulting from GIGABYTE's website and follow the instructions in a corrupted BIOS or a system that matches your motherboard model. During the BIOS update process, ensure the Internet connection is unable to boot. - 65 - In Windows, close all applications and TSR (Terminate ...
... Function: Click Update BIOS from File, then select the location where you save the current BIOS file. 4. Do not use the G.O.M. (GIGABYTE Online Management) function when using @BIOS. 4. B. Load BIOS Defaults after BIOS Update: Select the Load CMOS default after BIOS update check...BIOS damage or system failure resulting from GIGABYTE's website and follow the instructions in a corrupted BIOS or a system that matches your motherboard model. During the BIOS update process, ensure the Internet connection is unable to boot. - 65 - In Windows, close all applications and TSR (Terminate ...

Manual
Page 66
...also includes tabbed pages for these components. The Graphics tab allows you set temperature/fan speed alarm. After making changes in Windows environment. The HW Monitor tab allows you fully know each function of EasyTune 6, or system instability or other unexpected results may occur.... 4-3 EasyTune 6 GIGABYTE's EasyTune 6 is an easy-to-use auto-overclocking function . (Note) When activated, the system automatically experiments all sorts of overclocking...
...also includes tabbed pages for these components. The Graphics tab allows you set temperature/fan speed alarm. After making changes in Windows environment. The HW Monitor tab allows you fully know each function of EasyTune 6, or system instability or other unexpected results may occur.... 4-3 EasyTune 6 GIGABYTE's EasyTune 6 is an easy-to-use auto-overclocking function . (Note) When activated, the system automatically experiments all sorts of overclocking...

Manual
Page 68
... a system restore point upon the first boot up at the bottom of the screen to quickly back up and restore your system data in the Windows Vista operating system. When this limit is reached, the old- System Restore Choose a system restore point using the navigation bar on the right or at...
... a system restore point upon the first boot up at the bottom of the screen to quickly back up and restore your system data in the Windows Vista operating system. When this limit is reached, the old- System Restore Choose a system restore point using the navigation bar on the right or at...

Manual
Page 69
... A. Chapter 5 Appendix 5-1 Configuring SATA Hard Drive(s) To configure SATA hard drive(s), follow the steps below: A. Make a floppy disk containing the SATA RAID/AHCI driver for Windows XP. (Note 2) E. Appendix Then connect the power connector from your computer Attach one end of the SATA signal cable to the rear of the SATA... drives (to the hard drive. (Note 1) Skip this step if you may prepare only one hard drive. • An empty formatted floppy disk. • Windows Vista/XP setup disk. • Motherboard driver disk. 5-1-1 Configuring the Onboard SATA Controller A.
... A. Chapter 5 Appendix 5-1 Configuring SATA Hard Drive(s) To configure SATA hard drive(s), follow the steps below: A. Make a floppy disk containing the SATA RAID/AHCI driver for Windows XP. (Note 2) E. Appendix Then connect the power connector from your computer Attach one end of the SATA signal cable to the rear of the SATA... drives (to the hard drive. (Note 1) Skip this step if you may prepare only one hard drive. • An empty formatted floppy disk. • Windows Vista/XP setup disk. • Motherboard driver disk. 5-1-1 Configuring the Onboard SATA Controller A.

Manual
Page 71
... Devices, Inc. To view the disk drives assigned to arrays, press to enter the Delete LD window. Skip this step and proceed with the installation of Windows operating system for a message which says "Press to enter the RAID BIOS setup utility. Press +...Menu ] View Drive Assignments 1 ] Define LD 2 ] Delete LD 3 ] Controller Configuration 4 ] [ Keys Available ] Press 1..4 to enter the Controller Configuration window. To view controller settings, press to Select Option Figure 3 [ESC] Exit - 71 - Press to configure a RAID array. C. Configuring RAID set in RAID BIOS...
... Devices, Inc. To view the disk drives assigned to arrays, press to enter the Delete LD window. Skip this step and proceed with the installation of Windows operating system for a message which says "Press to enter the RAID BIOS setup utility. Press +...Menu ] View Drive Assignments 1 ] Define LD 2 ] Delete LD 3 ] Controller Configuration 4 ] [ Keys Available ] Press 1..4 to enter the Controller Configuration window. To view controller settings, press to Select Option Figure 3 [ESC] Exit - 71 - Press to configure a RAID array. C. Configuring RAID set in RAID BIOS...

Manual
Page 72
... Define LD selection from the Main Menu allows users to enter the Define LD Menu window (Figure 4). LD 3 ---- LD 10 ---- LD 8 ---- LD No RAID Mode [ Define LD Menu ] Total Drv LD 1 RAID 0 0 Stripe Block: 64 KB Gigabyte Boundary: ON [ Drives Assignments ] Channel:ID Drive Model 1:Mas WDC WD800JD-22LSA0 2:Mas WDC WD800JD...
... Define LD selection from the Main Menu allows users to enter the Define LD Menu window (Figure 4). LD 3 ---- LD 10 ---- LD 8 ---- LD No RAID Mode [ Define LD Menu ] Total Drv LD 1 RAID 0 0 Stripe Block: 64 KB Gigabyte Boundary: ON [ Drives Assignments ] Channel:ID Drive Model 1:Mas WDC WD800JD-22LSA0 2:Mas WDC WD800JD...

Manual
Page 73
...the drive to highlight a drive. 4. Fast Initialization option has been selected It will see the newlycreated array. 9. Figure 6 6. Then, the window below will appear. Press Ctrl-Y to Modify Array Capacity or press any other keys to ignore this option. In the following procedure, we'll ...option to select RAID 0. 2. The Total Drv section will return to use maximum capacity... Press + keys to its maximum capacity. 8. The window below will appear. Figure 7 7. Press + to set the capacity of the RAID array or press other keys to set the array to save...
...the drive to highlight a drive. 4. Fast Initialization option has been selected It will see the newlycreated array. 9. Figure 6 6. Then, the window below will appear. Press Ctrl-Y to Modify Array Capacity or press any other keys to ignore this option. In the following procedure, we'll ...option to select RAID 0. 2. The Total Drv section will return to use maximum capacity... Press + keys to its maximum capacity. 8. The window below will appear. Figure 7 7. Press + to set the capacity of the RAID array or press other keys to set the array to save...

Manual
Page 75
... 3) SB700/710/750 SATA Driver for XP for the SATA controller from the motherboard driver disk to copy the driver in MS-DOS and Windows mode. sume that has CD-ROM support and a blank formatted floppy disk. Select the controller driver by pressing the corresponding letter from the ...we as- See the instructions below about how to a USB flash drive. Press after the command: A:\>copy d:\bootdrv\sb750\x86\*.* (Note) Figure 1 In Windows mode: Steps: 1: Use an alternative system and insert the motherboard driver disk. 2: From your optical drive is /are configured to RAID/AHCI mode, you ...
... 3) SB700/710/750 SATA Driver for XP for the SATA controller from the motherboard driver disk to copy the driver in MS-DOS and Windows mode. sume that has CD-ROM support and a blank formatted floppy disk. Select the controller driver by pressing the corresponding letter from the ...we as- See the instructions below about how to a USB flash drive. Press after the command: A:\>copy d:\bootdrv\sb750\x86\*.* (Note) Figure 1 In Windows mode: Steps: 1: Use an alternative system and insert the motherboard driver disk. 2: From your optical drive is /are configured to RAID/AHCI mode, you ...

Manual
Page 76
... System With the SATA RAID/AHCI driver diskette and correct BIOS settings, you are examples of Windows XP and Vista installation on the AMD SB750 SATA controller. ceed with Windows, using a device support disk provided by an adapter manufacturer. After the driver installation, you ...to continue the driver installation. The followings are ready to install Windows Vista/ XP onto your system to boot from the following list, or press ESC to return to install a 3rd party SCSI or RAID...
... System With the SATA RAID/AHCI driver diskette and correct BIOS settings, you are examples of Windows XP and Vista installation on the AMD SB750 SATA controller. ceed with Windows, using a device support disk provided by an adapter manufacturer. After the driver installation, you ...to continue the driver installation. The followings are ready to install Windows Vista/ XP onto your system to boot from the following list, or press ESC to return to install a 3rd party SCSI or RAID...

Manual
Page 77
...flash drive that only one RAID array exists in your system.) Step 1: Restart your system and browse to the following directory: \BootDrv\SB750V\LH For Windows Vista 64-bit, browse to that below assumes that contains the SATA RAID/AHCI driver (Method B), then specify the location of the driver (Figure ...the driver files and browse to load the driver. Appendix Then use Method B to the LH (for Windows Vista 32-bit) or LH64A (for Windows Vista 64-bit) folder. Figure 4 - 77 - Installing Windows Vista (The procedure below appears (RAID hard drive will not be sure to copy the driver files ...
...flash drive that only one RAID array exists in your system.) Step 1: Restart your system and browse to the following directory: \BootDrv\SB750V\LH For Windows Vista 64-bit, browse to that below assumes that contains the SATA RAID/AHCI driver (Method B), then specify the location of the driver (Figure ...the driver files and browse to load the driver. Appendix Then use Method B to the LH (for Windows Vista 32-bit) or LH64A (for Windows Vista 64-bit) folder. Figure 4 - 77 - Installing Windows Vista (The procedure below appears (RAID hard drive will not be sure to copy the driver files ...


