
Manual
Page 25
...sleep state. This function requires a chassis with a chassis intrusion switch/sensor. When connecting your system using the power switch (refer to Chapter 2, "BIOS Setup," "Power Management Setup," for information about beep codes. • HD (Hard Drive Activity LED, Blue) Connects to the power switch on...when the system is in different patterns to the power status indicator on the chassis front panel. RESRES+ CICI+ PWR+ PWR- Press the reset switch to restart the computer if the computer freezes and fails to perform a normal restart. • CI (Chassis Intrusion Header, Gray): ...
...sleep state. This function requires a chassis with a chassis intrusion switch/sensor. When connecting your system using the power switch (refer to Chapter 2, "BIOS Setup," "Power Management Setup," for information about beep codes. • HD (Hard Drive Activity LED, Blue) Connects to the power switch on...when the system is in different patterns to the power status indicator on the chassis front panel. RESRES+ CICI+ PWR+ PWR- Press the reset switch to restart the computer if the computer freezes and fails to perform a normal restart. • CI (Chassis Intrusion Header, Gray): ...

Manual
Page 28
date information and BIOS configurations) and reset the CMOS values to clear the CMOS values (e.g. Turn off . Gently remove the battery from the battery holder and wait for BIOS configurations). 14) BAT (Battery) The battery provides power to replace the battery by removing the battery: 1. Danger of explosion ...with an incorrect model. • Contact the place of purchase or local dealer if you are not able to keep the values (such as BIOS configurations, date, and time information) in accordance with an equivalent one minute. (Or use a metal object like a screwdriver to remove the...
date information and BIOS configurations) and reset the CMOS values to clear the CMOS values (e.g. Turn off . Gently remove the battery from the battery holder and wait for BIOS configurations). 14) BAT (Battery) The battery provides power to replace the battery by removing the battery: 1. Danger of explosion ...with an incorrect model. • Contact the place of purchase or local dealer if you are not able to keep the values (such as BIOS configurations, date, and time information) in accordance with an equivalent one minute. (Or use a metal object like a screwdriver to remove the...
Manual
Page 29
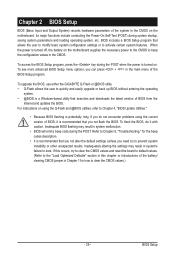
.... When the power is potentially risky, if you do it is recommended that you not flash the BIOS. BIOS Setup If this occurs, try to clear the CMOS values and reset the board to default values. (Refer to the "Load Optimized Defaults" section in this chapter or ... you need to) to keep the configuration values in system malfunction. • BIOS will emit a beep code during system startup, saving system parameters and loading operating system, etc. To upgrade the BIOS, use either the GIGABYTE Q-Flash or @BIOS utility. • Q-Flash allows the user to clear the CMOS values.) ...
.... When the power is potentially risky, if you do it is recommended that you not flash the BIOS. BIOS Setup If this occurs, try to clear the CMOS values and reset the board to default values. (Refer to the "Load Optimized Defaults" section in this chapter or ... you need to) to keep the configuration values in system malfunction. • BIOS will emit a beep code during system startup, saving system parameters and loading operating system, etc. To upgrade the BIOS, use either the GIGABYTE Q-Flash or @BIOS utility. • Q-Flash allows the user to clear the CMOS values.) ...

Manual
Page 33
Auto lets BIOS automatically set to Manual. Manual allows the memory clock control item below to be configurable. (Default: Auto) Memory Clock This option is configurable ... to manually set the memory clock. Incorrectly doing overclock may result in damage to X6.66. If this occurs, clear the CMOS values and reset the board to default values.) Set Memory Clock Determines whether to X5.33. X6.66 Sets Memory Clock to CPU, chipset, or memory and...life of these components. This page is for advanced users only and we recommend you made is set the memory clock as required. BIOS Setup
Auto lets BIOS automatically set to Manual. Manual allows the memory clock control item below to be configurable. (Default: Auto) Memory Clock This option is configurable ... to manually set the memory clock. Incorrectly doing overclock may result in damage to X6.66. If this occurs, clear the CMOS values and reset the board to default values.) Set Memory Clock Determines whether to X5.33. X6.66 Sets Memory Clock to CPU, chipset, or memory and...life of these components. This page is for advanced users only and we recommend you made is set the memory clock as required. BIOS Setup

Manual
Page 46
... connection when this field will show "No" at full speed. (Default: Enabled) BIOS Setup - 46 - 2-9 PC Health Status CMOS Setup Utility-Copyright (C) 1984-2009 Award Software PC Health Status Reset Case Open Status Case Opened Vcore DDR3 1.5V +3.3V +12V Current System Temperature Current... F5: Previous Values +/-/PU/PD: Value F10: Save F6: Fail-Safe Defaults ESC: Exit F1: General Help F7: Optimized Defaults Reset Case Open Status Keeps or clears the record of previous chassis intrusion status and the Case Opened field will show "Yes", otherwise it ...
... connection when this field will show "No" at full speed. (Default: Enabled) BIOS Setup - 46 - 2-9 PC Health Status CMOS Setup Utility-Copyright (C) 1984-2009 Award Software PC Health Status Reset Case Open Status Case Opened Vcore DDR3 1.5V +3.3V +12V Current System Temperature Current... F5: Previous Values +/-/PU/PD: Value F10: Save F6: Fail-Safe Defaults ESC: Exit F1: General Help F7: Optimized Defaults Reset Case Open Status Keeps or clears the record of previous chassis intrusion status and the Case Opened field will show "Yes", otherwise it ...
Manual
Page 59
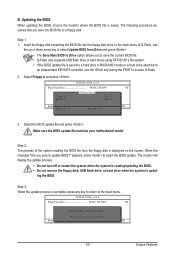
... is complete, press any key to return to Drive Enter : Run hi:Move ESC:Reset F10:Power Off Total size : 0 Free size : 0 3. Updating the BIOS When updating the BIOS, choose the location where the BIOS file is displayed on the screen. Step 1: 1. Q-Flash Utility v2.14 Flash Type... that you sure to a floppy disk. In the main menu of the system reading the BIOS file from Drive Please SparevsesBaInOySketoy Dtoricvoentinue Enter : Run hi:Move ESC:Reset F10:Power Off - 59 - ing the BIOS. B. Unique Features Select Floppy A and press . Step 2: The process of Q-Flash, ...
... is complete, press any key to return to Drive Enter : Run hi:Move ESC:Reset F10:Power Off Total size : 0 Free size : 0 3. Updating the BIOS When updating the BIOS, choose the location where the BIOS file is displayed on the screen. Step 1: 1. Q-Flash Utility v2.14 Flash Type... that you sure to a floppy disk. In the main menu of the system reading the BIOS file from Drive Please SparevsesBaInOySketoy Dtoricvoentinue Enter : Run hi:Move ESC:Reset F10:Power Off - 59 - ing the BIOS. B. Unique Features Select Floppy A and press . Step 2: The process of Q-Flash, ...


