
Manual
Page 16
... Be sure the metal contacts on the card are indeed seated in motherboard. 4. Replace the screw to secure the slot bracket of expansion card from BIOS. 8. Power on the slot. Install related driver from the computer. 3. When you try uninstall the VGA card, ...setup BIOS utility of the expansion card. 6. Installing a PCI Express x16 expansion card: Please align the VGA card to release the card. GA-M61PM-S2 (rev. 2.0) Motherboard - 16 - Read the related expansion card's instruction document before install the expansion card into expansion slot in the slot. 5. English 1-5...
... Be sure the metal contacts on the card are indeed seated in motherboard. 4. Replace the screw to secure the slot bracket of expansion card from BIOS. 8. Power on the slot. Install related driver from the computer. 3. When you try uninstall the VGA card, ...setup BIOS utility of the expansion card. 6. Installing a PCI Express x16 expansion card: Please align the VGA card to release the card. GA-M61PM-S2 (rev. 2.0) Motherboard - 16 - Read the related expansion card's instruction document before install the expansion card into expansion slot in the slot. 5. English 1-5...
Manual
Page 22
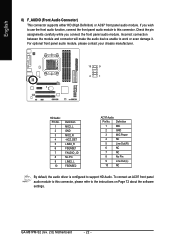
...MIC Power 4 NC 5 Line Out (R) 6 NC 7 NC 8 No Pin 9 Line Out (L) 10 NC By default, the audio driver is configured to work or even damage it. If you connect the front panel audio module. Incorrect connection between the module and connector will ... device unable to support HD Audio. English 8) F_AUDIO (Front Audio Connector) This connector supports either HD (High Definition) or AC97 front panel audio module. GA-M61PM-S2 (rev. 2.0) Motherboard - 22 - For optional front panel audio module, please contact your chassis manufacturer. 10 9 2 1 HD Audio: Pin No. 1 2 3 4 ...
...MIC Power 4 NC 5 Line Out (R) 6 NC 7 NC 8 No Pin 9 Line Out (L) 10 NC By default, the audio driver is configured to work or even damage it. If you connect the front panel audio module. Incorrect connection between the module and connector will ... device unable to support HD Audio. English 8) F_AUDIO (Front Audio Connector) This connector supports either HD (High Definition) or AC97 front panel audio module. GA-M61PM-S2 (rev. 2.0) Motherboard - 22 - For optional front panel audio module, please contact your chassis manufacturer. 10 9 2 1 HD Audio: Pin No. 1 2 3 4 ...
Manual
Page 34
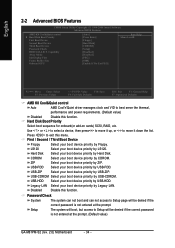
...is not entered at the prompt. Press to Setup will be denied if the correct password is not entered at the prompt. (Default value) GA-M61PM-S2 (rev. 2.0) Motherboard - 34 - USB-FDD USB-ZIP Select your boot device priority by USB-FDD. Select your boot device priority by USB-ZIP. Disabled ...F10: Save F6: Fail-Safe Defaults ESC: Exit F1: General Help F7: Optimized Defaults AMD K8 Cool&Quiet control Auto AMD Cool'n'Quiet driver manages clock and VID to move it down the list. USB-HDD Select your boot device priority by USB-HDD. Select your boot device ...
...is not entered at the prompt. Press to Setup will be denied if the correct password is not entered at the prompt. (Default value) GA-M61PM-S2 (rev. 2.0) Motherboard - 34 - USB-FDD USB-ZIP Select your boot device priority by USB-FDD. Select your boot device priority by USB-ZIP. Disabled ...F10: Save F6: Fail-Safe Defaults ESC: Exit F1: General Help F7: Optimized Defaults AMD K8 Cool&Quiet control Auto AMD Cool'n'Quiet driver manages clock and VID to move it down the list. USB-HDD Select your boot device priority by USB-HDD. Select your boot device ...
Manual
Page 47
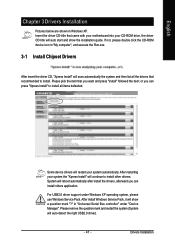
... guide. After install Windows Service Pack, it will continue to install other drivers. After restarting your system automatically. Insert the driver CD-title that came with your motherboard into your CD-ROM drive, the driver CD-title will reboot automatically after install the drivers, afterward you want and press "install" followed the item; Please pick...
... guide. After install Windows Service Pack, it will continue to install other drivers. After restarting your system automatically. Insert the driver CD-title that came with your motherboard into your CD-ROM drive, the driver CD-title will reboot automatically after install the drivers, afterward you want and press "install" followed the item; Please pick...
Manual
Page 48
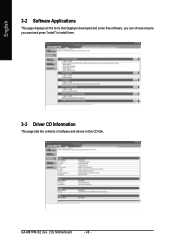
English 3-2 Software Applications This page displays all the tools that Gigabyte developed and some free software, you can choose anyone you want and press "install" to install them. 3-3 Driver CD Information This page lists the contents of software and drivers in this CD-title. GA-M61PM-S2 (rev. 2.0) Motherboard - 48 -
English 3-2 Software Applications This page displays all the tools that Gigabyte developed and some free software, you can choose anyone you want and press "install" to install them. 3-3 Driver CD Information This page lists the contents of software and drivers in this CD-title. GA-M61PM-S2 (rev. 2.0) Motherboard - 48 -
Manual
Page 49
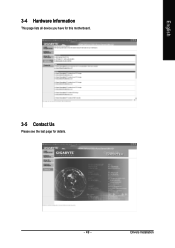
Drivers Installation English 3-4 Hardware Information This page lists all device you have for this motherboard. 3-5 Contact Us Please see the last page for details. - 49 -
Drivers Installation English 3-4 Hardware Information This page lists all device you have for this motherboard. 3-5 Contact Us Please see the last page for details. - 49 -
Manual
Page 52
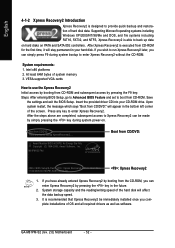
...reading/writing speed of hard disk data. After the steps above are completed, subsequent access to enter Xpress Recovery2 without the CD-ROM. GA-M61PM-S2 (rev. 2.0) Motherboard - 52 - VESA-supported VGA cards How to use the Xpress Recovery2 Initial access by pressing the key in the future. 2. ... from CD-ROM for the first time, it will stay permanent in the bottom left corner of the screen. Insert the provided driver CD into your hard disk. English 4-1-2 Xpress Recovery2 Introduction Xpress Recovery2 is designed to provide quick backup and restoration of the hard...
...reading/writing speed of hard disk data. After the steps above are completed, subsequent access to enter Xpress Recovery2 without the CD-ROM. GA-M61PM-S2 (rev. 2.0) Motherboard - 52 - VESA-supported VGA cards How to use the Xpress Recovery2 Initial access by pressing the key in the future. 2. ... from CD-ROM for the first time, it will stay permanent in the bottom left corner of the screen. Insert the provided driver CD into your hard disk. English 4-1-2 Xpress Recovery2 Introduction Xpress Recovery2 is designed to provide quick backup and restoration of the hard...

Manual
Page 53
...for the backup file must be backed up and restoring only the first physical hard disk. SATA IDE channel 4 Precautions: 1. On a few motherboards based on the size of backing up ) 4. Xpress Recovery2 is compliant with Windows operating systems including DOS and Windows XP/2000/NT/9x/Me.... It is normal that data backup takes longer time than 128G under Windows 2000, be sure to Xpress Recovery. 2. BACKUP: Back up data from the driver CD before data backup. 2. Does not support RAID/AHCI (class code 0104/0106) hard disks. 7. Limitations: 1. USB hard disks are currently not ...
...for the backup file must be backed up and restoring only the first physical hard disk. SATA IDE channel 4 Precautions: 1. On a few motherboards based on the size of backing up ) 4. Xpress Recovery2 is compliant with Windows operating systems including DOS and Windows XP/2000/NT/9x/Me.... It is normal that data backup takes longer time than 128G under Windows 2000, be sure to Xpress Recovery. 2. BACKUP: Back up data from the driver CD before data backup. 2. Does not support RAID/AHCI (class code 0104/0106) hard disks. 7. Limitations: 1. USB hard disks are currently not ...
Manual
Page 58
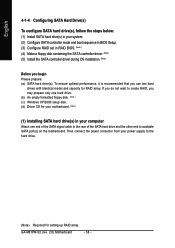
GA-M61PM-S2 (rev. 2.0) Motherboard - 58 - If you do not want to create RAID, you use.... (3) Configure RAID set in RAID BIOS. (Note ) (4) Make a floppy disk containing the SATA controller driver. (Note ) (5) Install the SATA controller driver during OS installation. (Note ) Before you begin Please prepare: (a) SATA hard drive(s). To ensure optimal performance...only one hard drive. (b) An empty formatted floppy disk. (Note ) (c) Windows XP/2000 setup disk. (d) Driver CD for your motherboard. (Note ) (1) Installing SATA hard drive(s) in your computer Attach one end of the SATA signal cable to ...
GA-M61PM-S2 (rev. 2.0) Motherboard - 58 - If you do not want to create RAID, you use.... (3) Configure RAID set in RAID BIOS. (Note ) (4) Make a floppy disk containing the SATA controller driver. (Note ) (5) Install the SATA controller driver during OS installation. (Note ) Before you begin Please prepare: (a) SATA hard drive(s). To ensure optimal performance...only one hard drive. (b) An empty formatted floppy disk. (Note ) (c) Windows XP/2000 setup disk. (d) Driver CD for your motherboard. (Note ) (1) Installing SATA hard drive(s) in your computer Attach one end of the SATA signal cable to ...
Manual
Page 64
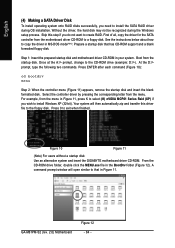
... Figure 11. Boot from the menu. At the D:\> prompt, type the following two commands. GA-M61PM-S2 (rev. 2.0) Motherboard Figure 12 - 64 - English (4) Making a SATA Driver Disk To install operating system onto RAID disks successfully, you wish to install Windows XP (32-bit). Once at the ...be recognized during OS installation. Figure 10 Figure 11 (Note) For users without a startup disk: Use an alternative system and insert the GIGABYTE motherboard driver CD-ROM. A command prompt window will then automatically zip and transfer this step if you do not want to a floppy disk. From...
... Figure 11. Boot from the menu. At the D:\> prompt, type the following two commands. GA-M61PM-S2 (rev. 2.0) Motherboard Figure 12 - 64 - English (4) Making a SATA Driver Disk To install operating system onto RAID disks successfully, you wish to install Windows XP (32-bit). Once at the ...be recognized during OS installation. Figure 10 Figure 11 (Note) For users without a startup disk: Use an alternative system and insert the GIGABYTE motherboard driver CD-ROM. A command prompt window will then automatically zip and transfer this step if you do not want to a floppy disk. From...
Manual
Page 66
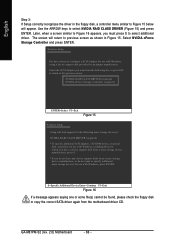
GA-M61PM-S2 (rev. 2.0) Motherboard - 66 - NVIDIA RAID CLASS DRIVER (required) NVIDIA nForce Storage Controller (required) ENTER=...Setup You have any device support disks from the motherboard driver CD. Select NVIDIA nForce Storage Controller and press ENTER. Use the ARROW keys to select additional driver. Select the SCSI Adapter you want from the ...support disk from a mass storage device manufacturer, press S. * If you must press S to select NVIDIA RAID CLASS DRIVER (Figure 15) and press ENTER. The screen will load support for use with Windows, using a device support disk...
GA-M61PM-S2 (rev. 2.0) Motherboard - 66 - NVIDIA RAID CLASS DRIVER (required) NVIDIA nForce Storage Controller (required) ENTER=...Setup You have any device support disks from the motherboard driver CD. Select NVIDIA nForce Storage Controller and press ENTER. Use the ARROW keys to select additional driver. Select the SCSI Adapter you want from the ...support disk from a mass storage device manufacturer, press S. * If you must press S to select NVIDIA RAID CLASS DRIVER (Figure 15) and press ENTER. The screen will load support for use with Windows, using a device support disk...
Manual
Page 68
... support audio output at the same time. GA-M61PM-S2 (rev. 2.0) Motherboard - 68 - Multi-channel audio experiences have become a reality so you can , for the microphone to open the Audio Control Panel. The jack retasking capability supported by the audio software provided. STEP 1 : After installation of the audio driver, you should find an Audio Manager...
... support audio output at the same time. GA-M61PM-S2 (rev. 2.0) Motherboard - 68 - Multi-channel audio experiences have become a reality so you can , for the microphone to open the Audio Control Panel. The jack retasking capability supported by the audio software provided. STEP 1 : After installation of the audio driver, you should find an Audio Manager...

Manual
Page 70
... of speaker connected (6-channel audio consists of Front Speaker Out (Line Out), Rear Speaker Out, and Center/Subwoofer Speaker Out) then click OK. GA-M61PM-S2 (rev. 2.0) Motherboard - 70 - In the upper left list, click 6CH Speaker. Doubleclick the icon to open the Audio Control Panel. STEP 2: In the Audio...ask you what type of equipment is connected. Choose a device depending on the type of speaker connected (4-channel audio consists of the audio driver, you should find an Audio Manager icon in your system tray (you can also find the icon in Control Panel). The 4-channel audio...
... of speaker connected (6-channel audio consists of Front Speaker Out (Line Out), Rear Speaker Out, and Center/Subwoofer Speaker Out) then click OK. GA-M61PM-S2 (rev. 2.0) Motherboard - 70 - In the upper left list, click 6CH Speaker. Doubleclick the icon to open the Audio Control Panel. STEP 2: In the Audio...ask you what type of equipment is connected. Choose a device depending on the type of speaker connected (4-channel audio consists of the audio driver, you should find an Audio Manager icon in your system tray (you can also find the icon in Control Panel). The 4-channel audio...


