Manual
Page 10
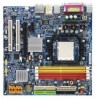
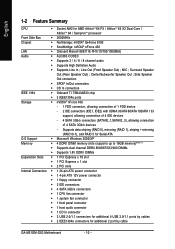
... ; Supports data striping (RAID 0), mirroring (RAID 1), striping + mirroring (RAID 0+1), and RAID 5 for Serial ATA O.S Support Š Microsoft Windows 2000/XP Memory Š 4 DDRII DIMM memory slots (supports up to 16GB memory)(Note 1) Š Supports dual channel DDRII 800/667/533/400...Supports Line In ; Line Out (Front Speaker Out) ; English 1-2 Feature Summary CPU Š Socket AM2 for additional 2 port by cable GA-M51GM-S2G Motherboard - 10 - Side Speaker Out connection Š SPDIF In/Out connection Š CD In connection IEEE 1394 Š Onboard TI TSB43AB23 ...
... ; Supports data striping (RAID 0), mirroring (RAID 1), striping + mirroring (RAID 0+1), and RAID 5 for Serial ATA O.S Support Š Microsoft Windows 2000/XP Memory Š 4 DDRII DIMM memory slots (supports up to 16GB memory)(Note 1) Š Supports dual channel DDRII 800/667/533/400...Supports Line In ; Line Out (Front Speaker Out) ; English 1-2 Feature Summary CPU Š Socket AM2 for additional 2 port by cable GA-M51GM-S2G Motherboard - 10 - Side Speaker Out connection Š SPDIF In/Out connection Š CD In connection IEEE 1394 Š Onboard TI TSB43AB23 ...
Manual
Page 11
Windows 64-bit operating system doesn't have such limitation. (Note 2) Whether the CPU Smart FAN Control function is installed, the actual memory available for the operating ... Bundle Software Š Norton Internet Security (OEM version) Form Factor Š Micro ATX form factor; 24.4cm x 24.4cm (Note 1) Due to the limitation of Windows 32-bit operating system, when more than 4GB of physical memory is supported will be less than 4GB;
Windows 64-bit operating system doesn't have such limitation. (Note 2) Whether the CPU Smart FAN Control function is installed, the actual memory available for the operating ... Bundle Software Š Norton Internet Security (OEM version) Form Factor Š Micro ATX form factor; 24.4cm x 24.4cm (Note 1) Due to the limitation of Windows 32-bit operating system, when more than 4GB of physical memory is supported will be less than 4GB;
Manual
Page 29
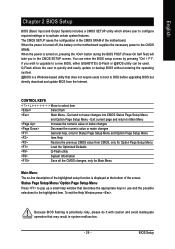
...potentially risky, please do it with caution and avoid inadequate operation that may result in system malfunction. - 29 - If you to a new BIOS, either GIGABYTE's Q-Flash or @BIOS utility can enter the BIOS setup screen by pressing "Ctrl + F1". Status Page Setup Menu / Option Page Setup Menu Press to...- Exit current page and return to Main Menu Increase the numeric value or make changes Decrease the numeric value or make changes General help window that does not require users to boot to the CMOS SRAM. Q-Flash allows the user to quickly and easily update or backup BIOS without...
...potentially risky, please do it with caution and avoid inadequate operation that may result in system malfunction. - 29 - If you to a new BIOS, either GIGABYTE's Q-Flash or @BIOS utility can enter the BIOS setup screen by pressing "Ctrl + F1". Status Page Setup Menu / Option Page Setup Menu Press to...- Exit current page and return to Main Menu Increase the numeric value or make changes Decrease the numeric value or make changes General help window that does not require users to boot to the CMOS SRAM. Q-Flash allows the user to quickly and easily update or backup BIOS without...
Manual
Page 49
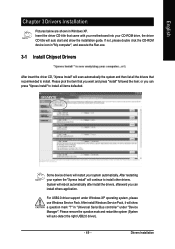
... "install" followed the item; For USB2.0 driver support under "Device Manager". English Chapter 3 Drivers Installation Pictures below are shown in "Universal Serial Bus controller" under Windows XP operating system, please use Windows Service Pack. in Windows XP. Some device drivers will auto-detect the right USB2.0 driver). - 49 - After install...
... "install" followed the item; For USB2.0 driver support under "Device Manager". English Chapter 3 Drivers Installation Pictures below are shown in "Universal Serial Bus controller" under Windows XP operating system, please use Windows Service Pack. in Windows XP. Some device drivers will auto-detect the right USB2.0 driver). - 49 - After install...

Manual
Page 53
... CPU frequency 8. English Chapter 4 Appendix 4-1 Unique Software Utilities 4-1-1 EasyTune 5 Introduction EasyTune 5 presents the most convenient Windows based system performance enhancement and manageability utility. GIGABYTE Logo Log on different motherboards. - 53 - Featuring several powerful yet easy to GIGABYTE website 10. Overclocking Enters the Overclocking setting page 2. Function display LEDs Shows the current functions status...
... CPU frequency 8. English Chapter 4 Appendix 4-1 Unique Software Utilities 4-1-1 EasyTune 5 Introduction EasyTune 5 presents the most convenient Windows based system performance enhancement and manageability utility. GIGABYTE Logo Log on different motherboards. - 53 - Featuring several powerful yet easy to GIGABYTE website 10. Overclocking Enters the Overclocking setting page 2. Function display LEDs Shows the current functions status...
Manual
Page 54
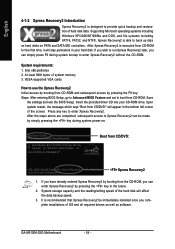
... Boot from CD/DVD:" will appear in your CD-ROM drive. After the steps above are completed, subsequent access to startup XpressRecovery2..... GA-M51GM-S2G Motherboard - 54 - Intel x86 platforms 2. System storage capacity and the reading/writing speed of the hard disk will stay permanent in the...any key to Xpress Recovery2 can simply press F9 during system power-on PATA and SATA IDE controllers. Supporting Microsoft operating systems including Windows XP/2000/NT/98/Me and DOS, and file systems including FAT16, FAT32, and NTFS, Xpress Recovery2 is able to enter ...
... Boot from CD/DVD:" will appear in your CD-ROM drive. After the steps above are completed, subsequent access to startup XpressRecovery2..... GA-M51GM-S2G Motherboard - 54 - Intel x86 platforms 2. System storage capacity and the reading/writing speed of the hard disk will stay permanent in the...any key to Xpress Recovery2 can simply press F9 during system power-on PATA and SATA IDE controllers. Supporting Microsoft operating systems including Windows XP/2000/NT/98/Me and DOS, and file systems including FAT16, FAT32, and NTFS, Xpress Recovery2 is able to enter ...
Manual
Page 55
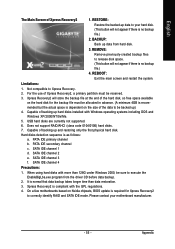
... actual space is no backup file.) 4. PATA IDE primary channel b. English The Main Screen of backing up hard disks installed with Windows operating systems including DOS and Windows XP/2000/NT/9x/Me. 5. Limitations: 1. Capable of the hard disk, so free space available on the size of Xpress ...disks with more than data restoration. 3. SATA IDE channel 3 f. It is normal that data backup takes longer time than 128G under Windows 2000, be allocated in advance. (A minimum 4GB is no backup file.) 2. REMOVE: Remove previously-created backup files to Xpress Recovery. 2.
... actual space is no backup file.) 4. PATA IDE primary channel b. English The Main Screen of backing up hard disks installed with Windows operating systems including DOS and Windows XP/2000/NT/9x/Me. 5. Limitations: 1. Capable of the hard disk, so free space available on the size of Xpress ...disks with more than data restoration. 3. SATA IDE channel 3 f. It is normal that data backup takes longer time than 128G under Windows 2000, be allocated in advance. (A minimum 4GB is no backup file.) 2. REMOVE: Remove previously-created backup files to Xpress Recovery. 2.
Manual
Page 56
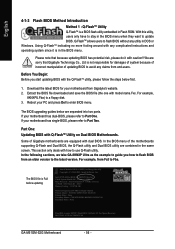
...please refer to enter SETUP / Dual BIOS / Q-Flash / F9 For Xpress Recovery 08/07/2003-i875P-6A79BG03C-00 GA-M51GM-S2G Motherboard - 56 - In the following sections, we take GA-8KNXP Ultra as the example to guide you start updating BIOS with the Q-FlashTM utility, please follow the steps below ...has potential risk, please do it is a BIOS flash utility embedded in DOS or Windows. Using Q-FlashTM indicating no more fooling around with dual BIOS. Before You Begin: Before you how to flash BIOS from Gigabyte's website. 2. The BIOS upgrading guides below first. 1. The BIOS file is ...
...please refer to enter SETUP / Dual BIOS / Q-Flash / F9 For Xpress Recovery 08/07/2003-i875P-6A79BG03C-00 GA-M51GM-S2G Motherboard - 56 - In the following sections, we take GA-8KNXP Ultra as the example to guide you start updating BIOS with the Q-FlashTM utility, please follow the steps below ...has potential risk, please do it is a BIOS flash utility embedded in DOS or Windows. Using Q-FlashTM indicating no more fooling around with dual BIOS. Before You Begin: Before you how to flash BIOS from Gigabyte's website. 2. The BIOS upgrading guides below first. 1. The BIOS file is ...
Manual
Page 63
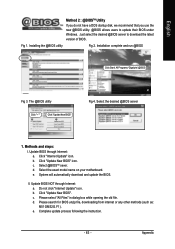
Just select the desired @BIOS server to update their BIOS under Windows. Select @BIOSTM sever. II. Do not click "Internet Update" icon. c. e. Select the desired @BIOS server 1. b. System will automatically download and update the BIOS. Update ... you use the new @BIOS utility. @BIOS allows users to download the latest version of BIOS. Installation complete and run @BIOS Click Start/ All Programs/ Gigabyte/ @BIOS Fig 3. Methods and steps: I. Update BIOS through Internet: a. e. Please select "All Files" in dialog box while opening the old file. Installing the @BIOS ...
Just select the desired @BIOS server to update their BIOS under Windows. Select @BIOSTM sever. II. Do not click "Internet Update" icon. c. e. Select the desired @BIOS server 1. b. System will automatically download and update the BIOS. Update ... you use the new @BIOS utility. @BIOS allows users to download the latest version of BIOS. Installation complete and run @BIOS Click Start/ All Programs/ Gigabyte/ @BIOS Fig 3. Methods and steps: I. Update BIOS through Internet: a. e. Please select "All Files" in dialog box while opening the old file. Installing the @BIOS ...
Manual
Page 65
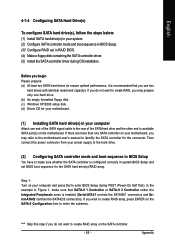
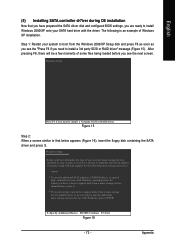
If you do not want to create RAID, you may prepare only one hard drive. (b) An empty formatted floppy disk. (c) Windows XP/2000 setup disk. (d) Driver CD for the SATA hard drive(s)/RAID array. Then connect the power connector from your power supply to the hard ...
If you do not want to create RAID, you may prepare only one hard drive. (b) An empty formatted floppy disk. (c) Windows XP/2000 setup disk. (d) Driver CD for the SATA hard drive(s)/RAID array. Then connect the power connector from your power supply to the hard ...

Manual
Page 67
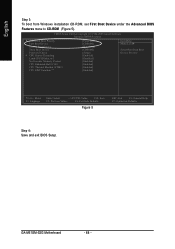
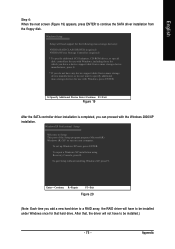
... the SATA hard drive onto which you wish to exit this menu. : Move PU/PD/+/-: Change Priority F10: Save Figure 4 - 67 - Press to install Microsoft Windows 2000/XP (Figure 4). After finished, re-enter the system BIOS Setup to move it down the list. In the Hard Disk Boot Priority submenu, select... Features menu. Bootable Add-in Cards Item Help Menu Level Use < > or < > to select a device, then press to move it up , or to install Microsoft Windows 2000/XP.
... the SATA hard drive onto which you wish to exit this menu. : Move PU/PD/+/-: Change Priority F10: Save Figure 4 - 67 - Press to install Microsoft Windows 2000/XP (Figure 4). After finished, re-enter the system BIOS Setup to move it down the list. In the Hard Disk Boot Priority submenu, select... Features menu. Bootable Add-in Cards Item Help Menu Level Use < > or < > to select a device, then press to move it up , or to install Microsoft Windows 2000/XP.
Manual
Page 68
GA-M51GM-S2G Motherboard - 68 - English Step 3: To boot from Windows installation CD-ROM, set First Boot Device under the Advanced BIOS Features menu to 3 No-Execute Memory Protect CPU Enhanced Halt (C1E) CPU Thermal Monitor 2(...
GA-M51GM-S2G Motherboard - 68 - English Step 3: To boot from Windows installation CD-ROM, set First Boot Device under the Advanced BIOS Features menu to 3 No-Execute Memory Protect CPU Enhanced Halt (C1E) CPU Thermal Monitor 2(...
Manual
Page 72
... floppy disk. Press 0 to the floppy disk. Step 1: Insert the prepared startup disk and motherboard driver CD-ROM in the BootDrv folder (Figure 14). GA-M51GM-S2G Motherboard Figure 14 - 72 - Your system will open similar to copy the driver in MS-DOS mode(Note1). Once at the A:\> prompt, change to..., press I to select (I) nVIDIA C51 Series Raid (XP) if you need to install Windows XP. Figure 12 Figure 13 (Note 1) For users without a startup disk: Use an alternative system and insert the GIGABYTE motherboard driver CD-ROM. First of all, copy the driver for the SATA controller from the...
... floppy disk. Press 0 to the floppy disk. Step 1: Insert the prepared startup disk and motherboard driver CD-ROM in the BootDrv folder (Figure 14). GA-M51GM-S2G Motherboard Figure 14 - 72 - Your system will open similar to copy the driver in MS-DOS mode(Note1). Once at the A:\> prompt, change to..., press I to select (I) nVIDIA C51 Series Raid (XP) if you need to install Windows XP. Figure 12 Figure 13 (Note 1) For users without a startup disk: Use an alternative system and insert the GIGABYTE motherboard driver CD-ROM. First of all, copy the driver for the SATA controller from the...
Manual
Page 73
... To specify additional SCSI adapters, CD-ROM drives, or special disk controllers for use with the driver. Currently, Setup will be a few moments of Windows XP installation. Figure 15 Step 2: When a screen similar to that you have prepared the SATA driver disk and configured BIOS settings, you are ready ...to install Windows 2000/XP onto your system, or you have any device support disks from a mass storage device manufacturer, or do not have chosen to specify...
... To specify additional SCSI adapters, CD-ROM drives, or special disk controllers for use with the driver. Currently, Setup will be a few moments of Windows XP installation. Figure 15 Step 2: When a screen similar to that you have prepared the SATA driver disk and configured BIOS settings, you are ready ...to install Windows 2000/XP onto your system, or you have any device support disks from a mass storage device manufacturer, or do not have chosen to specify...

Manual
Page 74
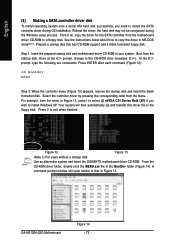
... the driver in the floppy disk, a controller menu similar to Figure 17 below will return to previous screen as shown in Figure 17. GA-M51GM-S2G Motherboard - 74 - "*" If you want from a mass storage device manufacturer, or do not create RAID, select NVIDIA NForce Storage Controller only... Storage Controller and press ENTER. NVIDIA RAID CLASS DRIVER (required) NVIDIA NForce Storage Controller (required) ENTER=Select F3=Exit Figure 17 Windows Setup Setup will load support for the following list, or press ESC to return to create RAID, select both NVIDIA RAID CLASS DRIVER...
... the driver in the floppy disk, a controller menu similar to Figure 17 below will return to previous screen as shown in Figure 17. GA-M51GM-S2G Motherboard - 74 - "*" If you want from a mass storage device manufacturer, or do not create RAID, select NVIDIA NForce Storage Controller only... Storage Controller and press ENTER. NVIDIA RAID CLASS DRIVER (required) NVIDIA NForce Storage Controller (required) ENTER=Select F3=Exit Figure 17 Windows Setup Setup will load support for the following list, or press ESC to return to create RAID, select both NVIDIA RAID CLASS DRIVER...
Manual
Page 75
...Exit Figure 20 (Note: Each time you add a new hard drive to a RAID array, the RAID driver will have to be installed under Windows once for that , the driver will load support for the following mass storage device(s): NVIDIA RAID CLASS DRIVER (required) NVIDIA NForce Storage Controller ... Additional Device Enter=Continue F3=Exit Figure 19 After the SATA controller driver installation is completed, you can proceed with Windows, press ENTER. After that hard drive. Windows Setup Setup will not have to be installed.) - 75 - WindowsXP Professional Setup Welcome to run on your computer....
...Exit Figure 20 (Note: Each time you add a new hard drive to a RAID array, the RAID driver will have to be installed under Windows once for that , the driver will load support for the following mass storage device(s): NVIDIA RAID CLASS DRIVER (required) NVIDIA NForce Storage Controller ... Additional Device Enter=Continue F3=Exit Figure 19 After the SATA controller driver installation is completed, you can proceed with Windows, press ENTER. After that hard drive. Windows Setup Setup will not have to be installed.) - 75 - WindowsXP Professional Setup Welcome to run on your computer....
Manual
Page 76
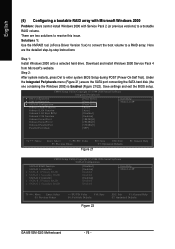
...: Select F5: Previous Values +/-/PU/PD: Value F10: Save F6: Fail-Safe Defaults Figure 22 ESC: Exit F1: General Help F7: Optimized Defaults GA-M51GM-S2G Motherboard - 76 - Here are two solutions to enter system BIOS Setup during POST (Power-On Self Test). Solutions 1: Use the NVRAID tool (nForce ... Version 5.xx) to convert the boot volume to a bootable RAID volume. There are the detailed step-by-step instructions: Step 1: Install Windows 2000 onto a selected hard drive. Save settings and exit the BIOS setup. Step 2: After system restarts, press Del to resolve this issue.
...: Select F5: Previous Values +/-/PU/PD: Value F10: Save F6: Fail-Safe Defaults Figure 22 ESC: Exit F1: General Help F7: Optimized Defaults GA-M51GM-S2G Motherboard - 76 - Here are two solutions to enter system BIOS Setup during POST (Power-On Self Test). Solutions 1: Use the NVRAID tool (nForce ... Version 5.xx) to convert the boot volume to a bootable RAID volume. There are the detailed step-by-step instructions: Step 1: Install Windows 2000 onto a selected hard drive. Save settings and exit the BIOS setup. Step 2: After system restarts, press Del to resolve this issue.

Manual
Page 77
Move to boot into Windows 2000. RAID Mode: Striping MediaShield RAID Utility Feb 8 2005 - Define a New Array - Restart the computer to the Free Disks section with the TAB key. Striping ...
Move to boot into Windows 2000. RAID Mode: Striping MediaShield RAID Utility Feb 8 2005 - Define a New Array - Restart the computer to the Free Disks section with the TAB key. Striping ...
Manual
Page 78
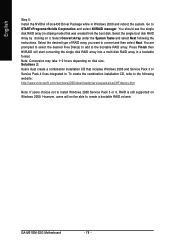
... then NVRAID will not be able to convert and then select Next. GA-M51GM-S2G Motherboard - 78 - Solutions 2: Users must create a combination installation CD that was created from the boot disk. Select the single boot disk RAID Array by clicking on Windows 2000. English Step 5: Install the NVIDIA nForce430 Driver Package while in . Note...
... then NVRAID will not be able to convert and then select Next. GA-M51GM-S2G Motherboard - 78 - Solutions 2: Users must create a combination installation CD that was created from the boot disk. Select the single boot disk RAID Array by clicking on Windows 2000. English Step 5: Install the NVIDIA nForce430 Driver Package while in . Note...
Manual
Page 79
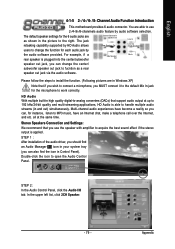
... have an Internet chat, make a telephone call over the Internet, and etc. STEP 1 : After installation of the audio driver, you should find the icon in Windows XP) Note that you can , for each audio jack by audio software selection. The default speaker settings for the microphone to use the speaker with...
... have an Internet chat, make a telephone call over the Internet, and etc. STEP 1 : After installation of the audio driver, you should find the icon in Windows XP) Note that you can , for each audio jack by audio software selection. The default speaker settings for the microphone to use the speaker with...


