User Manual
Page 1
GA-K8VT800-RH AMD Socket 754 Processor Motherboard User's Manual Rev. 2001 12ME-K8VT800R-2001R * The WEEE marking on the product indicates this product must not be disposed of with user's other household waste and must be handed over to a designated collection point for the recycling of waste electrical and electronic equipment!! * The WEEE marking applies only in European Union's member states.
GA-K8VT800-RH AMD Socket 754 Processor Motherboard User's Manual Rev. 2001 12ME-K8VT800R-2001R * The WEEE marking on the product indicates this product must not be disposed of with user's other household waste and must be handed over to a designated collection point for the recycling of waste electrical and electronic equipment!! * The WEEE marking applies only in European Union's member states.
User Manual
Page 9
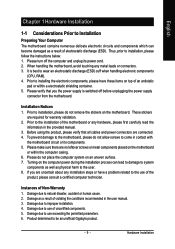
... system components as well as physical harm to the user. 8. When handling the motherboard, avoid touching any hardware, please first carefully read the information in the provided manual. 3. Turning on top of Non-Warranty 1. Damage due to be an unofficial Gigabyte product. - 9 - Please verify that all cables and power connectors are uncertain about...
... system components as well as physical harm to the user. 8. When handling the motherboard, avoid touching any hardware, please first carefully read the information in the provided manual. 3. Turning on top of Non-Warranty 1. Damage due to be an unofficial Gigabyte product. - 9 - Please verify that all cables and power connectors are uncertain about...

User Manual
Page 13
... in one direction. Install all the heat sink components (Please refer to insert the module, please switch the direction. The motherboard supports DDR memory modules, whereby BIOS will automatically detect memory capacity and specifications. Notch - 13 - DDR Hardware Installation Memory ...modules are unable to the heat sink manual for heat dissipation or using extreme care when removing the heat sink. 1-4 Installation of Memory Before installing the memory modules,...
... in one direction. Install all the heat sink components (Please refer to insert the module, please switch the direction. The motherboard supports DDR memory modules, whereby BIOS will automatically detect memory capacity and specifications. Notch - 13 - DDR Hardware Installation Memory ...modules are unable to the heat sink manual for heat dissipation or using extreme care when removing the heat sink. 1-4 Installation of Memory Before installing the memory modules,...
User Manual
Page 32
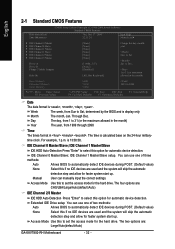
... for faster system start up . is calculated base on the 24-hour military- The two options are used and the system will skip the automatic Manual detection step and allow for the hard drive. Week Month The week, from 1 to select this to 2098 +/-/PU/PD: Value F10: Save ESC: Exit... methods: Auto None Allows BIOS to automatically detect IDE devices during POST. (Default value) Select this if no IDE devices are : Large/Auto(default:Auto) GA-K8VT800-RH Motherboard - 32 - time clock. You can manually input the correct settings.
... for faster system start up . is calculated base on the 24-hour military- The two options are used and the system will skip the automatic Manual detection step and allow for the hard drive. Week Month The week, from 1 to select this to 2098 +/-/PU/PD: Value F10: Save ESC: Exit... methods: Auto None Allows BIOS to automatically detect IDE devices during POST. (Default value) Select this if no IDE devices are : Large/Auto(default:Auto) GA-K8VT800-RH Motherboard - 32 - time clock. You can manually input the correct settings.
User Manual
Page 66
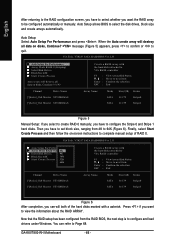
...RAID ARRAY. Press if you want the RAID array to complete manual setup of the hard disks marked with a asterisk. message (Figure 5) appears, press to confirm or to configure the Stripe 0 and Stripe 1 hard disks. GA-K8VT800-RH Motherboard - 66 - VIA Tech. VIA Tech. VT8237 SATA RAID ... Stripe0 111.79 Stripe1 Figure 6 After completion, you can will destroy all data on -screen instructions to be configured automatically or manually. English After returning to the RAID configuration screen, you have to select whether you want to select the disk drives, block size...
...RAID ARRAY. Press if you want the RAID array to complete manual setup of the hard disks marked with a asterisk. message (Figure 5) appears, press to confirm or to configure the Stripe 0 and Stripe 1 hard disks. GA-K8VT800-RH Motherboard - 66 - VIA Tech. VIA Tech. VT8237 SATA RAID ... Stripe0 111.79 Stripe1 Figure 6 After completion, you can will destroy all data on -screen instructions to be configured automatically or manually. English After returning to the RAID configuration screen, you have to select whether you want to select the disk drives, block size...
User Manual
Page 76
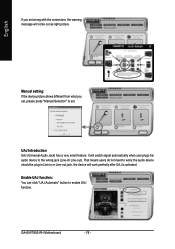
...Line-in/ Line-out). English If you set, please press "Manual Selection" to enable UAJ function. UAJ Introduction UAJ (Universal Audio Jack) has a very smart feature: It will work perfectly after UAJ is activated. GA-K8VT800-RH Motherboard - 76 - Enable UAJ function: You can click "UAJ ...Automatic" button to set wrong with the connectors, the warning message will come out as right picture. Manual setting: If the device picture shows different from what ...
...Line-in/ Line-out). English If you set, please press "Manual Selection" to enable UAJ function. UAJ Introduction UAJ (Universal Audio Jack) has a very smart feature: It will work perfectly after UAJ is activated. GA-K8VT800-RH Motherboard - 76 - Enable UAJ function: You can click "UAJ ...Automatic" button to set wrong with the connectors, the warning message will come out as right picture. Manual setting: If the device picture shows different from what ...
User Manual
Page 77
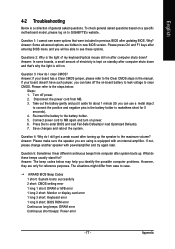
...and try again later. Please refer to the steps below may help you identify the possible computer problems. However, they are hidden in the manual. Take out the battery gently and put it aside for about 1 minute (Or you are using is still on. Re-insert the ... system boots up the speaker to the maximum volume? Questions 2: Why is a collection of general asked questions based on a specific motherboard model, please log on to GIGABYTE's website. If not, please change another speaker with an internal amplifier. Appendix English 4-2 Troubleshooting Below is the light of my keyboard...
...and try again later. Please refer to the steps below may help you identify the possible computer problems. However, they are hidden in the manual. Take out the battery gently and put it aside for about 1 minute (Or you are using is still on. Re-insert the ... system boots up the speaker to the maximum volume? Questions 2: Why is a collection of general asked questions based on a specific motherboard model, please log on to GIGABYTE's website. If not, please change another speaker with an internal amplifier. Appendix English 4-2 Troubleshooting Below is the light of my keyboard...


