
Manual
Page 9
... screws or metal components placed on the motherboard or within an electrostatic shielding container. • Before unplugging the power supply cable from the power outlet before installing or removing the motherboard or other hardware components. • When connecting hardware components to the .... If you do not allow screws to come in a high-temperature environment. • Turning on the motherboard, make sure the power supply voltage has been set according to wear an electrostatic discharge (ESD) wrist strap when handling electronic com- Hardware Installation Chapter 1 Hardware...
... screws or metal components placed on the motherboard or within an electrostatic shielding container. • Before unplugging the power supply cable from the power outlet before installing or removing the motherboard or other hardware components. • When connecting hardware components to the .... If you do not allow screws to come in a high-temperature environment. • Turning on the motherboard, make sure the power supply voltage has been set according to wear an electrostatic discharge (ESD) wrist strap when handling electronic com- Hardware Installation Chapter 1 Hardware...

Manual
Page 23
...) - 23 - Connect the power supply cable to the CPU. The 12V power connector mainly supplies power to the power connector in the correct orientation. If a power supply is used (500W or greater). Hardware Installation If the 12V power connector is not connected, the computer will not start. • Use of the power connector, the power supply can supply enough stable power to all devices...
...) - 23 - Connect the power supply cable to the CPU. The 12V power connector mainly supplies power to the power connector in the correct orientation. If a power supply is used (500W or greater). Hardware Installation If the 12V power connector is not connected, the computer will not start. • Use of the power connector, the power supply can supply enough stable power to all devices...
Manual
Page 33
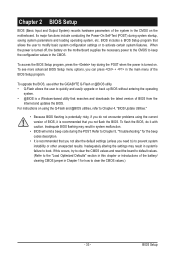
... see more advanced BIOS Setup menu options, you need to) to prevent system instability or other unexpected results. To upgrade the BIOS, use either the GIGABYTE Q-Flash or @BIOS utility. • Q-Flash allows the user to quickly and easily upgrade or back up BIOS without entering the operating system. •.... BIOS Setup Chapter 2 BIOS Setup BIOS (Basic Input and Output System) records hardware parameters of the system in the CMOS on the motherboard supplies the necessary power to the CMOS to keep the configuration values in the CMOS. Its major functions include conducting the...
... see more advanced BIOS Setup menu options, you need to) to prevent system instability or other unexpected results. To upgrade the BIOS, use either the GIGABYTE Q-Flash or @BIOS utility. • Q-Flash allows the user to quickly and easily upgrade or back up BIOS without entering the operating system. •.... BIOS Setup Chapter 2 BIOS Setup BIOS (Basic Input and Output System) records hardware parameters of the system in the CMOS on the motherboard supplies the necessary power to the CMOS to keep the configuration values in the CMOS. Its major functions include conducting the...

Manual
Page 53
...Defaults ESC: Exit F1: General Help F7: Optimized Defaults ACPI Suspend Type Specifies the ACPI sleep state when the system enters suspend. If the power button is pressed for 4 seconds to its working state exactly where it was left off the system. BIOS Setup S1(POS) Enables the ..., the system resumes to turn off and consumes less power than 4 seconds, the system will be off the computer in a low power mode. Note: To use this function, you need an ATX power supply providing at any time. Press and hold the power button for less than in the S1 state. The ...
...Defaults ESC: Exit F1: General Help F7: Optimized Defaults ACPI Suspend Type Specifies the ACPI sleep state when the system enters suspend. If the power button is pressed for 4 seconds to its working state exactly where it was left off the system. BIOS Setup S1(POS) Enables the ..., the system resumes to turn off and consumes less power than 4 seconds, the system will be off the computer in a low power mode. Note: To use this function, you need an ATX power supply providing at any time. Press and hold the power button for less than in the S1 state. The ...

Manual
Page 54
... the system. Note: To cancel the password, press on this function, avoid inadequate shutdown from an AC power loss. Select 32-bit mode when you need an ATX power supply providing at least 1A on the +5VSB lead. Disabled Disables this function. (Default) Double Click Double click..., and wake on LAN. (Note) Supported on the system. Note: When using this item. select 64-bit mode when you need an ATX power supply providing at a desired time. (Default: Disabled) If enabled, set a password with 1~5 characters to clear the password settings. This item is configurable...
... the system. Note: To cancel the password, press on this function, avoid inadequate shutdown from an AC power loss. Select 32-bit mode when you need an ATX power supply providing at least 1A on the +5VSB lead. Disabled Disables this function. (Default) Double Click Double click..., and wake on LAN. (Note) Supported on the system. Note: When using this item. select 64-bit mode when you need an ATX power supply providing at a desired time. (Default: Disabled) If enabled, set a password with 1~5 characters to clear the password settings. This item is configurable...
Manual
Page 81
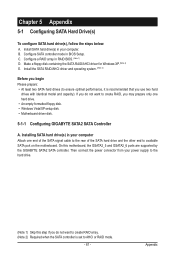
... do not want to AHCI or RAID mode. - 81 - Then connect the power connector from your power supply to the hard drive. (Note 1) Skip this motherboard, the GSATA2_5 and GSATA2_6 ports are supported by the GIGABYTE SATA2 SATA controller. Appendix B. Make a floppy disk containing the SATA RAID/AHCI ... one hard drive. • An empty formatted floppy disk. • Windows Vista/XP setup disk. • Motherboard driver disk. 5-1-1 Configuring GIGABYTE SATA2 SATA Controller A. Configure a RAID array in BIOS Setup. On this step if you begin Please prepare: • At least two SATA ...
... do not want to AHCI or RAID mode. - 81 - Then connect the power connector from your power supply to the hard drive. (Note 1) Skip this motherboard, the GSATA2_5 and GSATA2_6 ports are supported by the GIGABYTE SATA2 SATA controller. Appendix B. Make a floppy disk containing the SATA RAID/AHCI ... one hard drive. • An empty formatted floppy disk. • Windows Vista/XP setup disk. • Motherboard driver disk. 5-1-1 Configuring GIGABYTE SATA2 SATA Controller A. Configure a RAID array in BIOS Setup. On this step if you begin Please prepare: • At least two SATA ...
Manual
Page 102
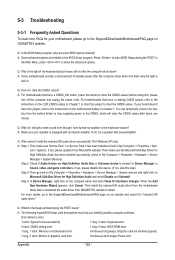
... have a CMOS_SW button, press this jumper, refer to install. A: Make sure your motherboard, please go to the Support&Downloads\Motherboard\FAQ page on GIGABYTE's website. If not, try a speaker with an internal amplifier. Step 4: In Device Manager, right-click on after about one minute. Then install ... on the CLR_CMOS jumper in Device Manager or Sound, video, and game controllers. If not, please update it from the battery holder to stop supplying power to clear the CMOS values. Then make sure Service Pack 1 or Service Pack 2 has been installed (check in Chapter 1. Q: How do ...
... have a CMOS_SW button, press this jumper, refer to install. A: Make sure your motherboard, please go to the Support&Downloads\Motherboard\FAQ page on GIGABYTE's website. If not, try a speaker with an internal amplifier. Step 4: In Device Manager, right-click on after about one minute. Then install ... on the CLR_CMOS jumper in Device Manager or Sound, video, and game controllers. If not, please update it from the battery holder to stop supplying power to clear the CMOS values. Then make sure Service Pack 1 or Service Pack 2 has been installed (check in Chapter 1. Q: How do ...

Manual
Page 104
.... END If the procedure above is the CPU cooler running? No The keyboard or keyboard connector might fail. Yes Reinstall the operating system. No The power supply, CPU or CPU socket might fail. Select "Save & Exit Setup" to submit your question. Our customer service staff will reply you as soon as possible...
.... END If the procedure above is the CPU cooler running? No The keyboard or keyboard connector might fail. Yes Reinstall the operating system. No The power supply, CPU or CPU socket might fail. Select "Save & Exit Setup" to submit your question. Our customer service staff will reply you as soon as possible...


