Manual
Page 1
GA-G31M-S2L/ GA-G31M-S2C LGA775 socket motherboard for Intel® CoreTM processor family/ Intel® Pentium® processor family/Intel® Celeron® processor family User's Manual Rev. 1103 12ME-G31MS2L-1103R
GA-G31M-S2L/ GA-G31M-S2C LGA775 socket motherboard for Intel® CoreTM processor family/ Intel® Pentium® processor family/Intel® Celeron® processor family User's Manual Rev. 1103 12ME-G31MS2L-1103R
Manual
Page 12
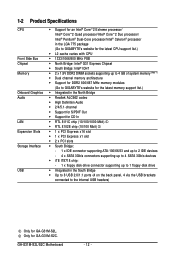
.../ Intel® Pentium® Dual-Core processor/Intel® Celeron® processor in the LGA 775 package (Go to GIGABYTE's website for the latest CPU support list.) Š L2 cache varies with CPU Š 1333/1066/800 MHz FSB ... Bridge: Intel® G31 Express Chipset Š South Bridge: Intel® ICH7 Š 2 x 1.8V DDR2 DIMM sockets supporting up to 4 GB of system memory (Note 1) Š Dual channel memory architecture Š Support for DDR2 800/667 MHz... back panel, 4 via the USB brackets connected to the internal USB headers) Only for GA-G31M-S2C. GA-G31M-S2L/S2C Motherboard - 12 -
.../ Intel® Pentium® Dual-Core processor/Intel® Celeron® processor in the LGA 775 package (Go to GIGABYTE's website for the latest CPU support list.) Š L2 cache varies with CPU Š 1333/1066/800 MHz FSB ... Bridge: Intel® G31 Express Chipset Š South Bridge: Intel® ICH7 Š 2 x 1.8V DDR2 DIMM sockets supporting up to 4 GB of system memory (Note 1) Š Dual channel memory architecture Š Support for DDR2 800/667 MHz... back panel, 4 via the USB brackets connected to the internal USB headers) Only for GA-G31M-S2C. GA-G31M-S2L/S2C Motherboard - 12 -
Manual
Page 15
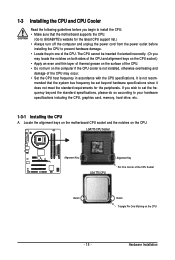
mended that the motherboard supports the CPU. (Go to GIGABYTE's website for the peripherals. Hardware Installation The CPU cannot be inserted if oriented incorrectly. ... Always turn on the computer if the CPU cooler is not recom- Locate the alignment keys on the motherboard CPU socket and the notches on the CPU - 15 - It is not installed, otherwise overheating and damage of the CPU ...may locate the notches on both sides of the CPU and alignment keys on the CPU socket.) • Apply an even and thin layer of thermal grease on the surface of the CPU. • ...
mended that the motherboard supports the CPU. (Go to GIGABYTE's website for the peripherals. Hardware Installation The CPU cannot be inserted if oriented incorrectly. ... Always turn on the computer if the CPU cooler is not recom- Locate the alignment keys on the motherboard CPU socket and the notches on the CPU - 15 - It is not installed, otherwise overheating and damage of the CPU ...may locate the notches on both sides of the CPU and alignment keys on the CPU socket.) • Apply an even and thin layer of thermal grease on the surface of the CPU. • ...
Manual
Page 16
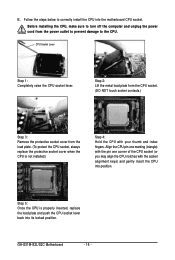
... the CPU pin one marking (triangle) with the pin one corner of the CPU socket (or you may align the CPU notches with your thumb and index fingers. CPU Socket Lever Step 1: Completely raise the CPU socket lever. Step 5: Once the CPU is not installed.) Step 4: Hold the CPU with... the CPU, make sure to turn off the computer and unplug the power cord from the load plate. (To protect the CPU socket, always replace the protective socket cover when the CPU is properly inserted, replace the load plate and push the CPU socket lever back into position. GA-G31M-S2L/S2C Motherboard - 16 -
... the CPU pin one marking (triangle) with the pin one corner of the CPU socket (or you may align the CPU notches with your thumb and index fingers. CPU Socket Lever Step 1: Completely raise the CPU socket lever. Step 5: Once the CPU is not installed.) Step 4: Hold the CPU with... the CPU, make sure to turn off the computer and unplug the power cord from the load plate. (To protect the CPU socket, always replace the protective socket cover when the CPU is properly inserted, replace the load plate and push the CPU socket lever back into position. GA-G31M-S2L/S2C Motherboard - 16 -
Manual
Page 18
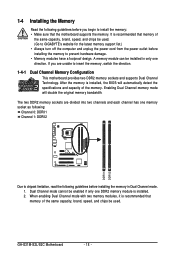
...Technology. 1-4 Installing the Memory Read the following guidelines before you are divided into two channels and each channel has one memory socket as following: Channel 0: DDRII1 Channel 1: DDRII2 DDRII1 DDRII2 Due to chipset limitation, read the following guidelines before installing the memory... to GIGABYTE's website for the latest memory support list.) • Always turn off the computer and unplug the power cord from the power outlet before installing the memory in only one DDR2 memory module is recommended that the motherboard supports the memory. GA-G31M-S2L/S2C Motherboard...
...Technology. 1-4 Installing the Memory Read the following guidelines before you are divided into two channels and each channel has one memory socket as following: Channel 0: DDRII1 Channel 1: DDRII2 DDRII1 DDRII2 Due to chipset limitation, read the following guidelines before installing the memory... to GIGABYTE's website for the latest memory support list.) • Always turn off the computer and unplug the power cord from the power outlet before installing the memory in only one DDR2 memory module is recommended that the motherboard supports the memory. GA-G31M-S2L/S2C Motherboard...
Manual
Page 19
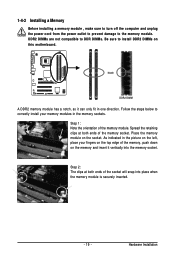
...so it vertically into place when the memory module is securely inserted. - 19 - Step 2: The clips at both ends of the memory socket. Follow the steps below to correctly install your fingers on the top edge of the memory module. Spread the retaining clips at both ends of... the memory module on the memory and insert it can only fit in the memory sockets. Step 1: Note the orientation of the memory, push down on the socket. Hardware Installation As indicated in the picture on the left, place your memory modules in one direction. 1-4-2 Installing a Memory Before ...
...so it vertically into place when the memory module is securely inserted. - 19 - Step 2: The clips at both ends of the memory socket. Follow the steps below to correctly install your fingers on the top edge of the memory module. Spread the retaining clips at both ends of... the memory module on the memory and insert it can only fit in the memory sockets. Step 1: Note the orientation of the memory, push down on the socket. Hardware Installation As indicated in the picture on the left, place your memory modules in one direction. 1-4-2 Installing a Memory Before ...
Manual
Page 80
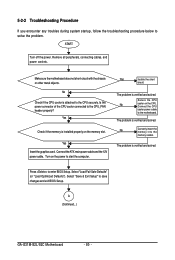
... power cable. Turn on the CPU. Remove all peripherals, connecting cables, and power cord etc. No Correctly insert the memory into the memory socket. Press to solve the problem. 5-2-2 Troubleshooting Procedure If you encounter any troubles during system startup, follow the troubleshooting procedure below to enter BIOS Setup... is verified and solved. Connect the CPU cooler power cable to the CPU securely. The problem is attached to the motherboard. A (Continued...) GA-G31M-S2L/S2C Motherboard - 80 - The problem is verified and solved. START Turn off the power.
... power cable. Turn on the CPU. Remove all peripherals, connecting cables, and power cord etc. No Correctly insert the memory into the memory socket. Press to solve the problem. 5-2-2 Troubleshooting Procedure If you encounter any troubles during system startup, follow the troubleshooting procedure below to enter BIOS Setup... is verified and solved. Connect the CPU cooler power cable to the CPU securely. The problem is attached to the motherboard. A (Continued...) GA-G31M-S2L/S2C Motherboard - 80 - The problem is verified and solved. START Turn off the power.
Manual
Page 81
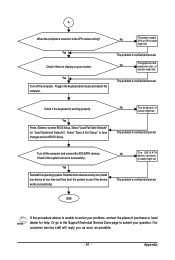
... device, connector, or cable might fail. Our customer service staff will reply you as soon as possible. - 81 - No The power supply, CPU or CPU socket might fail. The problem is the CPU cooler running? Reinstall other devices one by one (install one device at one time and then boot the...
... device, connector, or cable might fail. Our customer service staff will reply you as soon as possible. - 81 - No The power supply, CPU or CPU socket might fail. The problem is the CPU cooler running? Reinstall other devices one by one (install one device at one time and then boot the...

