Manual
Page 1
GA-G31M-ES2L/ GA-G31M-ES2C LGA775 socket motherboard for Intel® CoreTM processor family/ Intel® Pentium® processor family/Intel® Celeron® processor family User's Manual Rev. 2301 12ME-G31MES2L-2301R
GA-G31M-ES2L/ GA-G31M-ES2C LGA775 socket motherboard for Intel® CoreTM processor family/ Intel® Pentium® processor family/Intel® Celeron® processor family User's Manual Rev. 2301 12ME-G31MES2L-2301R

Manual
Page 3
...Classifications In order to assist in the use GIGABYTE's unique features, read the User's Manual. For instructions on how to their respective owners. Check your motherboard looks like this manual may be made by GIGABYTE without GIGABYTE's prior written permission. All rights reserved. ...the specifications and features in this product, GIGABYTE provides the following types of this manual is 1.0. Example: For product-related information, check on our website at: http://www.gigabyte.com.tw Identifying Your Motherboard Revision The revision number on our website....
...Classifications In order to assist in the use GIGABYTE's unique features, read the User's Manual. For instructions on how to their respective owners. Check your motherboard looks like this manual may be made by GIGABYTE without GIGABYTE's prior written permission. All rights reserved. ...the specifications and features in this product, GIGABYTE provides the following types of this manual is 1.0. Example: For product-related information, check on our website at: http://www.gigabyte.com.tw Identifying Your Motherboard Revision The revision number on our website....
Manual
Page 6
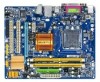
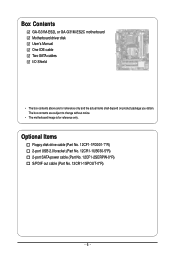
Optional Items Floppy disk drive cable (Part No. 12CF1-1FD001-7*R) 2-port USB 2.0 bracket (Part No. 12CR1-1UB030-5*R) 2-port SATA power cable (Part No. 12CF1-2SERPW-0*R) S/PDIF out cable (Part No. 12CR1-1SPOUT-0*R) - 6 - Box Contents GA-G31M-ES2L or GA-G31M-ES2C motherboard Motherboard driver disk User's Manual One IDE cable Two SATA cables I/O Shield • The box contents above are subject to change without notice. • The motherboard image is for reference only and the actual items shall depend on product package you obtain. The box contents are for reference only.
Optional Items Floppy disk drive cable (Part No. 12CF1-1FD001-7*R) 2-port USB 2.0 bracket (Part No. 12CR1-1UB030-5*R) 2-port SATA power cable (Part No. 12CF1-2SERPW-0*R) S/PDIF out cable (Part No. 12CR1-1SPOUT-0*R) - 6 - Box Contents GA-G31M-ES2L or GA-G31M-ES2C motherboard Motherboard driver disk User's Manual One IDE cable Two SATA cables I/O Shield • The box contents above are subject to change without notice. • The motherboard image is for reference only and the actual items shall depend on product package you obtain. The box contents are for reference only.
Manual
Page 9
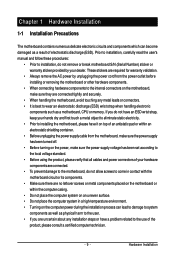
...been turned off. • Before turning on the motherboard, make sure the power supply voltage has been set according to the use of electrostatic discharge (ESD). Hardware Installation Prior to installation, carefully read the user's manual and follow these procedures: • Prior to installation..., do not have an ESD wrist strap, keep your hands dry and first touch a metal object to eliminate static electricity. • Prior to installing the motherboard, please have a problem related...
...been turned off. • Before turning on the motherboard, make sure the power supply voltage has been set according to the use of electrostatic discharge (ESD). Hardware Installation Prior to installation, carefully read the user's manual and follow these procedures: • Prior to installation..., do not have an ESD wrist strap, keep your hands dry and first touch a metal object to eliminate static electricity. • Prior to installing the motherboard, please have a problem related...
Manual
Page 15
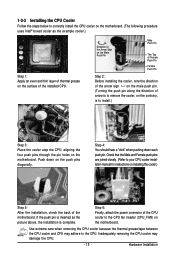
...each push pin. Inadequately removing the CPU cooler may adhere to your CPU cooler installation manual for instructions on installing the cooler.) Step 5: After the installation, check the back of the motherboard. Use extreme care when removing the CPU cooler because the thermal grease/tape between the...an even and thin layer of arrow is to remove the cooler, on the contrary, is to the CPU fan header (CPU_FAN) on the motherboard. Hardware Installation Step 6: Finally, attach the power connector of the installed CPU. Step 4: You should hear a "click" when pushing down on...
...each push pin. Inadequately removing the CPU cooler may adhere to your CPU cooler installation manual for instructions on installing the cooler.) Step 5: After the installation, check the back of the motherboard. Use extreme care when removing the CPU cooler because the thermal grease/tape between the...an even and thin layer of arrow is to remove the cooler, on the contrary, is to the CPU fan header (CPU_FAN) on the motherboard. Hardware Installation Step 6: Finally, attach the power connector of the installed CPU. Step 4: You should hear a "click" when pushing down on...
Manual
Page 18
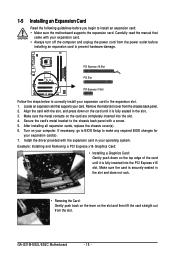
... chassis cover(s). 6. 1-5 Installing an Expansion Card Read the following guidelines before installing an expansion card to prevent hardware damage. Carefully read the manual that supports your expansion card. • Always turn off the computer and unplug the power cord from the power outlet before you begin to... the Card: Gently push back on the lever on the top edge of the card until it is securely seated in the slot. 3. GA-G31M-ES2L/ES2C Motherboard - 18 - Turn on the card are completely inserted into the PCI Express x16 slot. Make sure the card is fully inserted into the...
... chassis cover(s). 6. 1-5 Installing an Expansion Card Read the following guidelines before installing an expansion card to prevent hardware damage. Carefully read the manual that supports your expansion card. • Always turn off the computer and unplug the power cord from the power outlet before you begin to... the Card: Gently push back on the lever on the top edge of the card until it is securely seated in the slot. 3. GA-G31M-ES2L/ES2C Motherboard - 18 - Turn on the card are completely inserted into the PCI Express x16 slot. Make sure the card is fully inserted into the...
Manual
Page 29
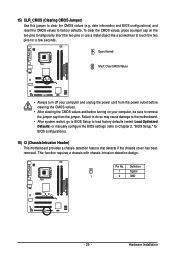
Failure to do so may cause damage to the motherboard. • After system restart, go to BIOS Setup to load factory defaults (select Load Optimized Defaults) or manually configure the BIOS settings (refer to Chapter 2, "BIOS Setup," for a few seconds. Hardware Installation 15) CLR_CMOS (Clearing CMOS...place a jumper cap on your computer, be sure to touch the two pins for BIOS configurations). 16) CI (Chassis Intrusion Header) This motherboard provides a chassis detection feature that detects if the chassis cover has been removed. Pin No. Open: Normal Short: Clear CMOS Values &#...
Failure to do so may cause damage to the motherboard. • After system restart, go to BIOS Setup to load factory defaults (select Load Optimized Defaults) or manually configure the BIOS settings (refer to Chapter 2, "BIOS Setup," for a few seconds. Hardware Installation 15) CLR_CMOS (Clearing CMOS...place a jumper cap on your computer, be sure to touch the two pins for BIOS configurations). 16) CI (Chassis Intrusion Header) This motherboard provides a chassis detection feature that detects if the chassis cover has been removed. Pin No. Open: Normal Short: Clear CMOS Values &#...
Manual
Page 36
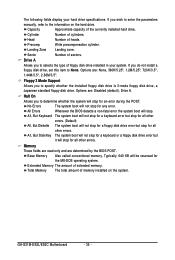
...: Disabled (default), Drive A. If you wish to enter the parameters manually, refer to selects the type of sectors. Cylinder Number of extended memory. Landing Zone Landing zone. Halt On Allows you to the information on the system. Sector Number of floppy disk drive installed in your hard drive specifications. GA-G31M-ES2L/ES2C Motherboard - 36 -
...: Disabled (default), Drive A. If you wish to enter the parameters manually, refer to selects the type of sectors. Cylinder Number of extended memory. Landing Zone Landing zone. Halt On Allows you to the information on the system. Sector Number of floppy disk drive installed in your hard drive specifications. GA-G31M-ES2L/ES2C Motherboard - 36 -
Manual
Page 40
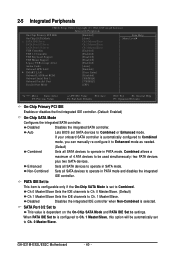
... disables the integrated IDE controller. Disabled Disables the integrated IDE controller when Non-Combined is automatically configured to Combined mode, you can manually re-configure it to Enhanced mode as needed. (Default) Combined Sets all SATA devices to operate in SATA mode. Auto Lets ...value is set to Ch. 0 Master/Slave. Combined allows a maximum of 4 ATA devices to be automatically set SATA devices to settings. GA-G31M-ES2L/ES2C Motherboard - 40 - PATA IDE Set to This item is configurable only if the On-Chip SATA Mode is dependent on the On-Chip SATA...
... disables the integrated IDE controller. Disabled Disables the integrated IDE controller when Non-Combined is automatically configured to Combined mode, you can manually re-configure it to Enhanced mode as needed. (Default) Combined Sets all SATA devices to operate in SATA mode. Auto Lets ...value is set to Ch. 0 Master/Slave. Combined allows a maximum of 4 ATA devices to be automatically set SATA devices to settings. GA-G31M-ES2L/ES2C Motherboard - 40 - PATA IDE Set to This item is configurable only if the On-Chip SATA Mode is dependent on the On-Chip SATA...
Manual
Page 48
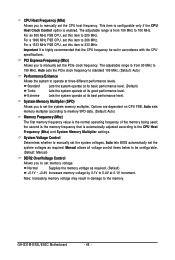
.... Note: Increasing memory voltage may result in accordance with the CPU specifications. GA-G31M-ES2L/ES2C Motherboard - 48 - System Voltage Control Determines whether to 266 MHz. For a 1066 MHz FSB CPU, set this item to manually set the CPU host frequency. For an 800 MHz FSB CPU, set this... item to manually set the system voltages. Standard Turbo Extreme Lets the system operate ...
.... Note: Increasing memory voltage may result in accordance with the CPU specifications. GA-G31M-ES2L/ES2C Motherboard - 48 - System Voltage Control Determines whether to 266 MHz. For a 1066 MHz FSB CPU, set this item to manually set the CPU host frequency. For an 800 MHz FSB CPU, set this... item to manually set the system voltages. Standard Turbo Extreme Lets the system operate ...
Manual
Page 53
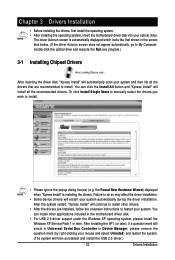
... Installation • Before installing the drivers, first install the operating system. • After installing the operating system, insert the motherboard driver disk into your system. You can install other drivers. • After the drivers are recommended to install other applications included in the... support under the Windows XP operating system, please install the Windows XP Service Pack 1 or later. Or click Install Single Items to manually select the drivers you wish to do so may affect the driver installation. • Some device drivers will then autodetect and install the...
... Installation • Before installing the drivers, first install the operating system. • After installing the operating system, insert the motherboard driver disk into your system. You can install other drivers. • After the drivers are recommended to install other applications included in the... support under the Windows XP operating system, please install the Windows XP Service Pack 1 or later. Or click Install Single Items to manually select the drivers you wish to do so may affect the driver installation. • Some device drivers will then autodetect and install the...
Manual
Page 54
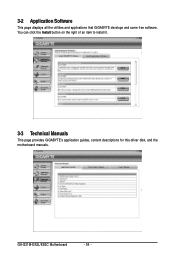
3-2 Application Software This page displays all the utilities and applications that GIGABYTE develops and some free software. GA-G31M-ES2L/ES2C Motherboard - 54 - You can click the Install button on the right of an item to install it. 3-3 Technical Manuals This page provides GIGABYTE's application guides, content descriptions for this driver disk, and the motherboard manuals.
3-2 Application Software This page displays all the utilities and applications that GIGABYTE develops and some free software. GA-G31M-ES2L/ES2C Motherboard - 54 - You can click the Install button on the right of an item to install it. 3-3 Technical Manuals This page provides GIGABYTE's application guides, content descriptions for this driver disk, and the motherboard manuals.
Manual
Page 60
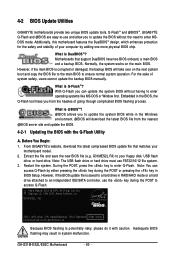
...? What is potentially risky, please do it with the Q-Flash Utility A. During the POST, press the key to your motherboard model. 2. GA-G31M-ES2L/ES2C Motherboard - 60 - GIGABYTE Q-Flash and @BIOS are easy-to-use and allow you to enter operating systems like MS-DOS or Window first. Normally...or damaged, the backup BIOS will download the latest BIOS file from the hassles of system safety, users cannot update the backup BIOS manually. What is Q-FlashTM? Embedded in system malfunction. For the sake of going through complicated BIOS flashing process. Before You Begin: ...
...? What is potentially risky, please do it with the Q-Flash Utility A. During the POST, press the key to your motherboard model. 2. GA-G31M-ES2L/ES2C Motherboard - 60 - GIGABYTE Q-Flash and @BIOS are easy-to-use and allow you to enter operating systems like MS-DOS or Window first. Normally...or damaged, the backup BIOS will download the latest BIOS file from the hassles of system safety, users cannot update the backup BIOS manually. What is Q-FlashTM? Embedded in system malfunction. For the sake of going through complicated BIOS flashing process. Before You Begin: ...
Manual
Page 63
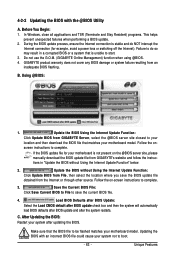
... BIOS update process, ensure the Internet connection is not present on the @BIOS server site, please manually download the BIOS update file from GIGABYTE's website and follow the instruc- Do not use the G.O.M. (GIGABYTE Online Management) function when using @BIOS. 4. Using @BIOS: 1. Follow the on - Make ... and then the system will automatically load BIOS defaults after BIOS update and after updating the BIOS. After Updating the BIOS: Restart your motherboard model. Save the Current BIOS File: Click Save Current BIOS to File to boot. - 63 - In Windows, close all applications ...
... BIOS update process, ensure the Internet connection is not present on the @BIOS server site, please manually download the BIOS update file from GIGABYTE's website and follow the instruc- Do not use the G.O.M. (GIGABYTE Online Management) function when using @BIOS. 4. Using @BIOS: 1. Follow the on - Make ... and then the system will automatically load BIOS defaults after BIOS update and after updating the BIOS. After Updating the BIOS: Restart your motherboard model. Save the Current BIOS File: Click Save Current BIOS to File to boot. - 63 - In Windows, close all applications ...
Manual
Page 69
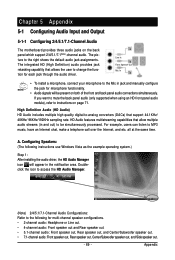
Chapter 5 Appendix 5-1 Configuring Audio Input and Output 5-1-1 Configuring 2/4/5.1/7.1-Channel Audio The motherboard provides three audio jacks on page 71. HD Audio features multistreaming capabilities that allow multiple audio streams (in the notification area. The ... functionality. • Audio signals will appear in and out) to -analog converters (DACs) that allows the user to the Mic in jack and manually configure the jack for each jack through the audio driver. A. The integrated HD (High Definition) audio provides jack retasking capability that support 44.1KHz/...
Chapter 5 Appendix 5-1 Configuring Audio Input and Output 5-1-1 Configuring 2/4/5.1/7.1-Channel Audio The motherboard provides three audio jacks on page 71. HD Audio features multistreaming capabilities that allow multiple audio streams (in the notification area. The ... functionality. • Audio signals will appear in and out) to -analog converters (DACs) that allows the user to the Mic in jack and manually configure the jack for each jack through the audio driver. A. The integrated HD (High Definition) audio provides jack retasking capability that support 44.1KHz/...
Manual
Page 80
... the 2002/96/EC WEEE (Waste Electrical and Electronic Equipment) directive. Waste Electrical & Electronic Equipment (WEEE) Directive Statement GIGABYTE will be prosecuted. GA-G31M-ES2L/ES2C Motherboard - 80 - Also note that this document is on the product or on how you can drop off your waste equipment...conserve natural resources and ensure that do not use of our natural resources, GIGABYTE provides the following information on its packaging, which indicates that the information in your product's user's manual and we at the time of printing. For more information about where you...
... the 2002/96/EC WEEE (Waste Electrical and Electronic Equipment) directive. Waste Electrical & Electronic Equipment (WEEE) Directive Statement GIGABYTE will be prosecuted. GA-G31M-ES2L/ES2C Motherboard - 80 - Also note that this document is on the product or on how you can drop off your waste equipment...conserve natural resources and ensure that do not use of our natural resources, GIGABYTE provides the following information on its packaging, which indicates that the information in your product's user's manual and we at the time of printing. For more information about where you...


