
Manual
Page 2
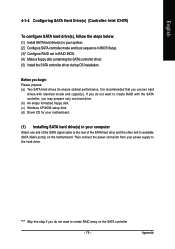
... model and capacity). Then connect the power connector from your motherboard. (1) Installing SATA hard drive(s) in RAID BIOS. (4) Make a floppy disk containing the SATA controller driver. (5) Install the SATA controller driver during OS installation. If you do not want to create ...RAID array on the motherboard. Ác Configuring SATA Hard Drive(s) (Controller: Intel ICH7R) Åé ...
... model and capacity). Then connect the power connector from your motherboard. (1) Installing SATA hard drive(s) in RAID BIOS. (4) Make a floppy disk containing the SATA controller driver. (5) Install the SATA controller driver during OS installation. If you do not want to create ...RAID array on the motherboard. Ác Configuring SATA Hard Drive(s) (Controller: Intel ICH7R) Åé ...
Manual
Page 9
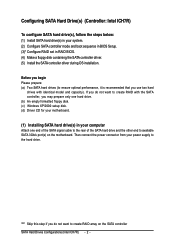
...Configurations (Intel ICH7R) First of all, you need to copy the driver for an executable program named MENU.exe (Figure 12). Figure 11 Step 3: Go to the BootDrv folder and look for the SATA controller from the motherboard driver CD to My Computer and right-click the CD-ROM drive icon... and select Open (Figure 11). Step 1: Find an available system and insert the motherboard driver CD into the CD-ROM drive.
...Configurations (Intel ICH7R) First of all, you need to copy the driver for an executable program named MENU.exe (Figure 12). Figure 11 Step 3: Go to the BootDrv folder and look for the SATA controller from the motherboard driver CD to My Computer and right-click the CD-ROM drive icon... and select Open (Figure 11). Step 1: Find an available system and insert the motherboard driver CD into the CD-ROM drive.
Manual
Page 10
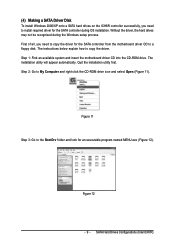
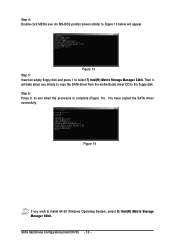
An MS-DOS prompt screen similar to Figure 13 below will take about one minute to copy the SATA driver from the motherboard driver CD to select 7) Intel(R) Matrix Storage Manager 32bit. Then it will appear. Åé ¤¤ ¤å Figure 13 Step 5: Insert an...;c Step 4: Double-click MENU.exe. Figure 14 If you wish to exit when the procedure is complete (Figure 14). You have copied the SATA driver sucessfully. SATA Hard Drives Configurations (Intel ICH7R) - 10 - Step 6: Press 0 to install 64-bit Windows Operating System, select 8) Intel(R) Matrix Storage Manager...
An MS-DOS prompt screen similar to Figure 13 below will take about one minute to copy the SATA driver from the motherboard driver CD to select 7) Intel(R) Matrix Storage Manager 32bit. Then it will appear. Åé ¤¤ ¤å Figure 13 Step 5: Insert an...;c Step 4: Double-click MENU.exe. Figure 14 If you wish to exit when the procedure is complete (Figure 14). You have copied the SATA driver sucessfully. SATA Hard Drives Configurations (Intel ICH7R) - 10 - Step 6: Press 0 to install 64-bit Windows Operating System, select 8) Intel(R) Matrix Storage Manager...

Manual
Page 12
... GR/GH SATA AHCI Controller (Desktop ICH7R/DH). Then it will be found, please check the floppy disk or copy the correct SATA driver again from the motherboard driver CD. Step 4: When the screen as shown below Åé will load support for use with Windows, using a device support disk...storage devices for which you have a device support disk from a mass storage device manufacturer, press S. * If you wish to load the SATA driver from the floppy disk. Windows Setup Setup will appear. Use the ARROW keys to the previous screen. Ác Step 3: If Setup correctly recognizes ...
... GR/GH SATA AHCI Controller (Desktop ICH7R/DH). Then it will be found, please check the floppy disk or copy the correct SATA driver again from the motherboard driver CD. Step 4: When the screen as shown below Åé will load support for use with Windows, using a device support disk...storage devices for which you have a device support disk from a mass storage device manufacturer, press S. * If you wish to load the SATA driver from the floppy disk. Windows Setup Setup will appear. Use the ARROW keys to the previous screen. Ác Step 3: If Setup correctly recognizes ...
Manual
Page 17
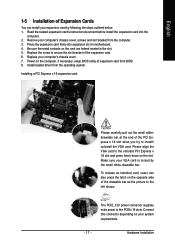
... card firmly into the computer. 2. Install related driver from the computer. 3. To release an installed card, users can install your expansion card by the small white-drawable bar. Remove your system requirements. - 17 - Be sure the metal contacts on the card are indeed seated in motherboard. 4. Power on the computer, if necessary...
... card firmly into the computer. 2. Install related driver from the computer. 3. To release an installed card, users can install your expansion card by the small white-drawable bar. Remove your system requirements. - 17 - Be sure the metal contacts on the card are indeed seated in motherboard. 4. Power on the computer, if necessary...
Manual
Page 19
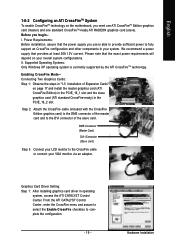
.... Enabling CrossFire Mode-Connecting Two Graphics Cards: Step 1: Observe the steps in the PCIE_16_2 slot. Graphics Card Driver Setting: Step 1: After installing graphics card driver in your overall system configurations. We recommend a power supply that the power supply you use is currrently supported ... Center, enter the CrossFire menu and assure to select the Enable CrossFire checkbox to the DVI connector of Expansion Cards" on the motherboard, you begin-I Connector (Slave card) Step 3: Connect your LCD monitor to fully support an CrossFire configuration and other components in ...
.... Enabling CrossFire Mode-Connecting Two Graphics Cards: Step 1: Observe the steps in the PCIE_16_2 slot. Graphics Card Driver Setting: Step 1: After installing graphics card driver in your overall system configurations. We recommend a power supply that the power supply you use is currrently supported ... Center, enter the CrossFire menu and assure to select the Enable CrossFire checkbox to the DVI connector of Expansion Cards" on the motherboard, you begin-I Connector (Slave card) Step 3: Connect your LCD monitor to fully support an CrossFire configuration and other components in ...
Manual
Page 20
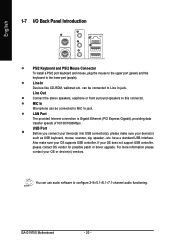
...(s) such as USB keyboard, mouse, scanner, zip, speaker...etc. Line Out Connect the stereo speakers, earphone or front surround speakers to the lower port (purple). GA-G1975X Motherboard - 20 - USB Port Before you connect your device(s) into USB connector(s), please make sure your OS or device(s) vendors. have a standard USB interface. Line In.... can be connected to Line In jack. Also make sure your OS does not support USB controller, please contact OS vendor for possible patch or driver upgrade. For more information please contact your OS supports USB controller.
...(s) such as USB keyboard, mouse, scanner, zip, speaker...etc. Line Out Connect the stereo speakers, earphone or front surround speakers to the lower port (purple). GA-G1975X Motherboard - 20 - USB Port Before you connect your device(s) into USB connector(s), please make sure your OS or device(s) vendors. have a standard USB interface. Line In.... can be connected to Line In jack. Also make sure your OS does not support USB controller, please contact OS vendor for possible patch or driver upgrade. For more information please contact your OS supports USB controller.
Manual
Page 44
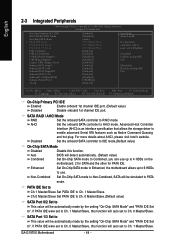
...[Enabled] [Disabled] [3F8/IRQ4] [Enabled] Item Help Menu Level` If a hard disk controller card is an interface specification that allows the storage driver to enable advanced Serial ATA features such as Native Command Queuing and hot plug. SATA RAID / AHCI Mode RAID Set the onboard SATA controller to...Disabled Set the onboard SATA controller to RAID mode. Enhanced Set On-Chip SATA mode to Enhanced, the motherboard allows up to 6 HDDs to use up to 4 HDDs on -chip IDE Port. GA-G1975X Motherboard - 44 - KLJI: Move Enter: Select +/-/PU/PD: Value F10: Save ESC: Exit F1: ...
...[Enabled] [Disabled] [3F8/IRQ4] [Enabled] Item Help Menu Level` If a hard disk controller card is an interface specification that allows the storage driver to enable advanced Serial ATA features such as Native Command Queuing and hot plug. SATA RAID / AHCI Mode RAID Set the onboard SATA controller to...Disabled Set the onboard SATA controller to RAID mode. Enhanced Set On-Chip SATA mode to Enhanced, the motherboard allows up to 6 HDDs to use up to 4 HDDs on -chip IDE Port. GA-G1975X Motherboard - 44 - KLJI: Move Enter: Select +/-/PU/PD: Value F10: Save ESC: Exit F1: ...
Manual
Page 59
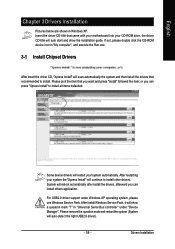
... install Windows Service Pack, it will reboot automatically after install the drivers, afterward you can install others application. Drivers Installation Insert the driver CD-title that came with your motherboard into your CD-ROM drive, the driver CD-title will continue to install. Some device drivers will restart your system the "Xpress Install" will auto start...
... install Windows Service Pack, it will reboot automatically after install the drivers, afterward you can install others application. Drivers Installation Insert the driver CD-title that came with your motherboard into your CD-ROM drive, the driver CD-title will continue to install. Some device drivers will restart your system the "Xpress Install" will auto start...
Manual
Page 60
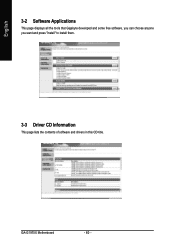
GA-G1975X Motherboard - 60 - English 3-2 Software Applications This page displays all the tools that Gigabyte developed and some free software, you can choose anyone you want and press "install" to install them. 3-3 Driver CD Information This page lists the contents of software and drivers in this CD-title.
GA-G1975X Motherboard - 60 - English 3-2 Software Applications This page displays all the tools that Gigabyte developed and some free software, you can choose anyone you want and press "install" to install them. 3-3 Driver CD Information This page lists the contents of software and drivers in this CD-title.
Manual
Page 61
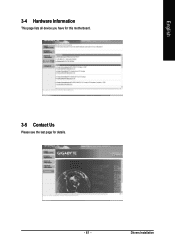
Drivers Installation English 3-4 Hardware Information This page lists all device you have for this motherboard. 3-5 Contact Us Please see the last page for details. - 61 -
Drivers Installation English 3-4 Hardware Information This page lists all device you have for this motherboard. 3-5 Contact Us Please see the last page for details. - 61 -
Manual
Page 63
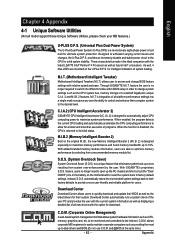
...future Intel® processors. M.I.T. (Motherboard Intelligent Tweaker) Motherboard Intelligent Tweaker (M.I .A. 2) is designed to automatically adjust CPU computing power to maximize system performance. C.I.A.2 (CPU Intelligent Accelerator 2) GIGABYTE CPU Intelligent Accelerator 2(C.I .T.) allows user...Built on the original M.I.B., the new Memory Intelligent Booster 2 (M.I .T.'s integration of all new drivers with relative speed and ease. With GIGABYTE's proprietary S.O.S. Through GIGABYTE M.I .B. 2 features. When enabled, the program detects the current CPU loading and automatically ...
...future Intel® processors. M.I.T. (Motherboard Intelligent Tweaker) Motherboard Intelligent Tweaker (M.I .A. 2) is designed to automatically adjust CPU computing power to maximize system performance. C.I.A.2 (CPU Intelligent Accelerator 2) GIGABYTE CPU Intelligent Accelerator 2(C.I .T.) allows user...Built on the original M.I.B., the new Memory Intelligent Booster 2 (M.I .T.'s integration of all new drivers with relative speed and ease. With GIGABYTE's proprietary S.O.S. Through GIGABYTE M.I .B. 2 features. When enabled, the program detects the current CPU loading and automatically ...
Manual
Page 66
...be solved by BIOS update) GA-K8U GA-K8U-9 GA-K8NXP-SLI GA-K8N Ultra-SLI GA-K8N Pro-SLI GA-K8NXP-9 GA-K8N Ultra-9 GA-K8NF-9 (PCB Ver. 1.0) GA-K8NE (PCB Ver. 1.0) GA-K8NMF-9 GA-8N-SLI Royal GA-8N-SLI Pro GA-8N-SLI GA-G1975X Motherboard - 66 - On a few motherboards based on the hard disk .... 4. Does not support RAID/AHCI (class code 0104/0106) hard disks. 7. SATA IDE channel 2 e. BACKUP: Back up data from the driver CD before data backup. 2. USB hard disks are currently not supported. 6. RESTORE: English Restore the backed-up ) 4. PATA IDE primary channel ...
...be solved by BIOS update) GA-K8U GA-K8U-9 GA-K8NXP-SLI GA-K8N Ultra-SLI GA-K8N Pro-SLI GA-K8NXP-9 GA-K8N Ultra-9 GA-K8NF-9 (PCB Ver. 1.0) GA-K8NE (PCB Ver. 1.0) GA-K8NMF-9 GA-8N-SLI Royal GA-8N-SLI Pro GA-8N-SLI GA-G1975X Motherboard - 66 - On a few motherboards based on the hard disk .... 4. Does not support RAID/AHCI (class code 0104/0106) hard disks. 7. SATA IDE channel 2 e. BACKUP: Back up data from the driver CD before data backup. 2. USB hard disks are currently not supported. 6. RESTORE: English Restore the backed-up ) 4. PATA IDE primary channel ...
Manual
Page 79
... only one hard drive. (b) An empty formatted floppy disk. (c) Windows XP/2000 setup disk. (d) Driver CD for your motherboard. (1) Installing SATA hard drive(s) in RAID BIOS. (4) Make a floppy disk containing the SATA controller driver. (5) Install the SATA controller driver during OS installation. Appendix Then connect the power connector from your power supply to available...
... only one hard drive. (b) An empty formatted floppy disk. (c) Windows XP/2000 setup disk. (d) Driver CD for your motherboard. (1) Installing SATA hard drive(s) in RAID BIOS. (4) Make a floppy disk containing the SATA controller driver. (5) Install the SATA controller driver during OS installation. Appendix Then connect the power connector from your power supply to available...
Manual
Page 82
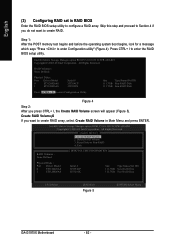
Press CTRL+ I , the Create RAID Volume screen will appear (Figure 5). Physical Disks : Port Driver Model 0 ST3120026AS 1 ST3120026AS Serial # 3JT354CP 3JT329JX Size Type/Status(Vol ID) 111.7GB Non-RAID Disk 111.7GB Non-RAID Disk...Volumes : None Defined. [ DISK/VOLUME INFORMATION ] Physical Disks : Port Driver Model 0 ST3120026AS 1 ST3120026AS Serial # 3JT354CP 3JT329JX Size Type/Status(Vol ID) 111.7GB Non-RAID Disk 111.7GB Non-RAID Disk [ ]-Select [ESC]-Exit Figure 5 [ENTER]-Select Menu GA-G1975X Motherboard - 82 - Step 1: After the POST memory test begins and before ...
Press CTRL+ I , the Create RAID Volume screen will appear (Figure 5). Physical Disks : Port Driver Model 0 ST3120026AS 1 ST3120026AS Serial # 3JT354CP 3JT329JX Size Type/Status(Vol ID) 111.7GB Non-RAID Disk 111.7GB Non-RAID Disk...Volumes : None Defined. [ DISK/VOLUME INFORMATION ] Physical Disks : Port Driver Model 0 ST3120026AS 1 ST3120026AS Serial # 3JT354CP 3JT329JX Size Type/Status(Vol ID) 111.7GB Non-RAID Disk 111.7GB Non-RAID Disk [ ]-Select [ESC]-Exit Figure 5 [ENTER]-Select Menu GA-G1975X Motherboard - 82 - Step 1: After the POST memory test begins and before ...

Manual
Page 86
... exit when finished. Fig.12 Fig. 13 (Note 1) For users without a startup disk: Use an alternative system and insert the GIGABYTE motherboard driver CD-ROM. Fig. 14 (Note 2) For 64-bit Windows Operating System, please select Intel(R) Matrix Storage Manager 64bit. First of all, copy the...drive folder, double click the MENU.exe file in your system. GA-G1975X Motherboard - 86 - Prepare a startup disk that in Figure 13, press 7 to select Intel Matrix Storage Manager 32 bit for the SATA controller from the motherboard driver CD-ROM to a floppy disk. See the instructions below about...
... exit when finished. Fig.12 Fig. 13 (Note 1) For users without a startup disk: Use an alternative system and insert the GIGABYTE motherboard driver CD-ROM. Fig. 14 (Note 2) For 64-bit Windows Operating System, please select Intel(R) Matrix Storage Manager 64bit. First of all, copy the...drive folder, double click the MENU.exe file in your system. GA-G1975X Motherboard - 86 - Prepare a startup disk that in Figure 13, press 7 to select Intel Matrix Storage Manager 32 bit for the SATA controller from the motherboard driver CD-ROM to a floppy disk. See the instructions below about...
Manual
Page 88
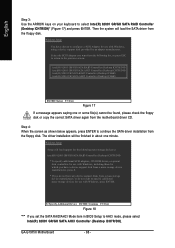
...the ARROW keys on your keyboard to continue the SATA driver installation from the floppy disk. GA-G1975X Motherboard - 88 - Then the system will be found, please check the floppy disk or copy the correct SATA driver again from the motherboard driver CD. Step 4: When the screen as shown below appears...FR SATA AHCI Controller (Desktop ICH6R) ENTER=Select F3=Exit Figure 17 If a message appears saying one minute. The driver installation will load the SATA driver from a mass storage device manufacturer, or do not want from the following mass storage device(s): Intel(R) 82801 GR/GH ...
...the ARROW keys on your keyboard to continue the SATA driver installation from the floppy disk. GA-G1975X Motherboard - 88 - Then the system will be found, please check the floppy disk or copy the correct SATA driver again from the motherboard driver CD. Step 4: When the screen as shown below appears...FR SATA AHCI Controller (Desktop ICH6R) ENTER=Select F3=Exit Figure 17 If a message appears saying one minute. The driver installation will load the SATA driver from a mass storage device manufacturer, or do not want from the following mass storage device(s): Intel(R) 82801 GR/GH ...
Manual
Page 90
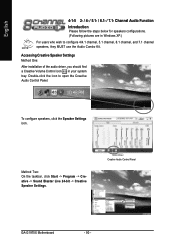
Accessing Creative Speaker Settings Method One: After installation of the audio driver, you should find a Creative Volume Control icon in Windows XP.) For users who wish to open the Creative Audio Control Panel. ...Double-click the icon to configure 4/4.1 channel, 5.1 channel, 6.1 channel, and 7.1 channel speakers, they MUST use the Audio Combo Kit. Creative Audio Control Panel GA-G1975X Motherboard - 90 - Channel Audio Function Introduction Please follow the steps below for speakers configurations. (Following pictures are in your system tray. English 4-1-5 2- / 4- / 5.1- / 6.1- / ...
Accessing Creative Speaker Settings Method One: After installation of the audio driver, you should find a Creative Volume Control icon in Windows XP.) For users who wish to open the Creative Audio Control Panel. ...Double-click the icon to configure 4/4.1 channel, 5.1 channel, 6.1 channel, and 7.1 channel speakers, they MUST use the Audio Combo Kit. Creative Audio Control Panel GA-G1975X Motherboard - 90 - Channel Audio Function Introduction Please follow the steps below for speakers configurations. (Following pictures are in your system tray. English 4-1-5 2- / 4- / 5.1- / 6.1- / ...


