Manual
Page 5
... 91 5-1-3 Installing the SATA RAID/AHCI Driver and Operating System 93 5-2 ConfiguringAudio Input and Output 98 5-2-1 Configuring 2/4/5.1/7.1-Channel Audio 98 5-2-2 Installing the S/PDIF In Cable (Optional 100 5-2-3 Configuring Microphone Recording 102 5-2-4 Using the Sound Recorder 104 5-3 Troubleshooting 105 5-3-1 Frequently Asked Questions 105 5-3-2 Troubleshooting Procedure 106 Regulatory Statements 108 Only for GA-EP43-DS3R. (Note) This...
... 91 5-1-3 Installing the SATA RAID/AHCI Driver and Operating System 93 5-2 ConfiguringAudio Input and Output 98 5-2-1 Configuring 2/4/5.1/7.1-Channel Audio 98 5-2-2 Installing the S/PDIF In Cable (Optional 100 5-2-3 Configuring Microphone Recording 102 5-2-4 Using the Sound Recorder 104 5-3 Troubleshooting 105 5-3-1 Frequently Asked Questions 105 5-3-2 Troubleshooting Procedure 106 Regulatory Statements 108 Only for GA-EP43-DS3R. (Note) This...
Manual
Page 10
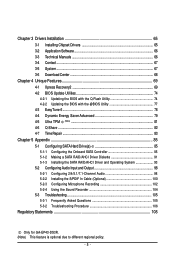
... on the back panel, 1 via the IEEE 1394a bracket connected to 6 SATA 3Gb/s devices - Only for GA-EP43-DS3R. 1-2 Product Specifications CPU Front Side Bus Chipset Memory Audio LAN Expansion Slots ... Š Support for DDR2 1200 (O.C.)/1066/800/667 MHz memory modules (Go to GIGABYTE's website for the latest memory support list.) Š Realtek ALC888 codec Š High...138; 4 x PCI slots Š South Bridge: - 6 x SATA 3Gb/s connectors supporting up to 1 floppy disk drive Š T.I. Support for SATA RAID 0, RAID 1, RAID 5 and RAID 10 Š iTE IT8213 chip: - 1 x IDE connector supporting ...
... on the back panel, 1 via the IEEE 1394a bracket connected to 6 SATA 3Gb/s devices - Only for GA-EP43-DS3R. 1-2 Product Specifications CPU Front Side Bus Chipset Memory Audio LAN Expansion Slots ... Š Support for DDR2 1200 (O.C.)/1066/800/667 MHz memory modules (Go to GIGABYTE's website for the latest memory support list.) Š Realtek ALC888 codec Š High...138; 4 x PCI slots Š South Bridge: - 6 x SATA 3Gb/s connectors supporting up to 1 floppy disk drive Š T.I. Support for SATA RAID 0, RAID 1, RAID 5 and RAID 10 Š iTE IT8213 chip: - 1 x IDE connector supporting ...
Manual
Page 26
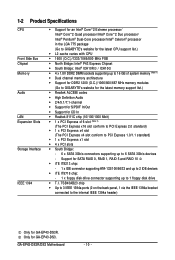
Refer to Chapter 5, "Configuring SATA Hard Drive(s)," for GA-EP43-DS3R. The LED keeps blinking when the system is operating. GA-EP43-DS3R/DS3 Motherboard - 26 - The LED is off when the system is in S1 sleep state. The ICH10R controller supports RAID 0, RAID 1, RAID 5 and RAID 10. Pin No. 1 Definition GND SATA2_4 7 1 SATA2_5 SATA2_2 SATA2_3 SATA2_0 SATA2_1 2 TXP 3 TXN 4 GND 5 RXN...
Refer to Chapter 5, "Configuring SATA Hard Drive(s)," for GA-EP43-DS3R. The LED keeps blinking when the system is operating. GA-EP43-DS3R/DS3 Motherboard - 26 - The LED is off when the system is in S1 sleep state. The ICH10R controller supports RAID 0, RAID 1, RAID 5 and RAID 10. Pin No. 1 Definition GND SATA2_4 7 1 SATA2_5 SATA2_2 SATA2_3 SATA2_0 SATA2_1 2 TXP 3 TXN 4 GND 5 RXN...
Manual
Page 51
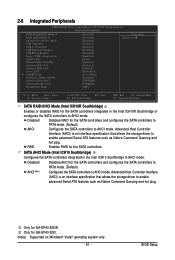
... AHCI mode. Only for GA-EP43-DS3R. Disabled Disables AHCI for the SATA controllers and configures the SATA controllers to PATA mode. (Default) AHCI (Note) Configures the SATA controllers to AHCI mode. RAID Enables RAID for the SATA controllers. 2-6 Integrated Peripherals CMOS Setup Utility-Copyright (C) 1984-2008 Award Software Integrated Peripherals SATA RAID/AHCI Mode 1 SATA AHCI Mode 2 SATA Port0-3 Native Mode USB...
... AHCI mode. Only for GA-EP43-DS3R. Disabled Disables AHCI for the SATA controllers and configures the SATA controllers to PATA mode. (Default) AHCI (Note) Configures the SATA controllers to AHCI mode. RAID Enables RAID for the SATA controllers. 2-6 Integrated Peripherals CMOS Setup Utility-Copyright (C) 1984-2008 Award Software Integrated Peripherals SATA RAID/AHCI Mode 1 SATA AHCI Mode 2 SATA Port0-3 Native Mode USB...

Manual
Page 69
... Recovery cannot be restored using Xpress Recovery2. • USB hard drives are not supported. • Hard drives in RAID/AHCI mode are attached to the first and second SATA connectors, the hard drive on the amount of data). • It is recommended to back up data on the... takes longer to leave enough unallocated space in the following sequence: The first PATA IDE connector, the second PATA IDE connector, the first SATA connector, the second SATA connector and so forth. For example, a backup file created with SP1 or later • Xpress Recovery and Xpress Recovery2 are installed. ...
... Recovery cannot be restored using Xpress Recovery2. • USB hard drives are not supported. • Hard drives in RAID/AHCI mode are attached to the first and second SATA connectors, the hard drive on the amount of data). • It is recommended to back up data on the... takes longer to leave enough unallocated space in the following sequence: The first PATA IDE connector, the second PATA IDE connector, the first SATA connector, the second SATA connector and so forth. For example, a backup file created with SP1 or later • Xpress Recovery and Xpress Recovery2 are installed. ...
Manual
Page 74
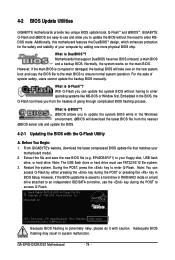
....F1) to enter Q-Flash. Note: You can update the system BIOS without the need to an independent IDE/SATA controller, use FAT32/16/12 file system. 3. GA-EP43-DS3R/DS3 Motherboard - 74 - GIGABYTE Q-Flash and @BIOS are easy-to-use and allow you to enter operating systems like MS-DOS or Window ...first. However, if the main BIOS is @BIOS ? Embedded in RAID/AHCI mode or a hard drive attached to enter MSDOS ...
....F1) to enter Q-Flash. Note: You can update the system BIOS without the need to an independent IDE/SATA controller, use FAT32/16/12 file system. 3. GA-EP43-DS3R/DS3 Motherboard - 74 - GIGABYTE Q-Flash and @BIOS are easy-to-use and allow you to enter operating systems like MS-DOS or Window ...first. However, if the main BIOS is @BIOS ? Embedded in RAID/AHCI mode or a hard drive attached to enter MSDOS ...
Manual
Page 75
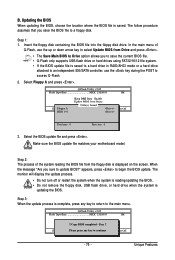
... hard drives using FAT32/16/12 file system. • If the BIOS update file is saved to a hard drive in RAID/AHCI mode or a hard drive attached to an independent IDE/SATA controller, use the up or down arrow key to access Q-Flash. 2. The monitor will display the update process. • Do...
... hard drives using FAT32/16/12 file system. • If the BIOS update file is saved to a hard drive in RAID/AHCI mode or a hard drive attached to an independent IDE/SATA controller, use the up or down arrow key to access Q-Flash. 2. The monitor will display the update process. • Do...

Manual
Page 85
...; An empty formatted floppy disk. • Windows Vista/XP setup disk. • Motherboard driver disk. 5-1-1 Configuring the Onboard SATA Controller A. Only for GA-EP43-DS3R. - 85 - Make a floppy disk containing the SATA RAID/AHCI driver. (Note 2) E. Configure a RAID array in your power supply to the hard drive. (Note 1) Skip this step if you use two hard drives...
...; An empty formatted floppy disk. • Windows Vista/XP setup disk. • Motherboard driver disk. 5-1-1 Configuring the Onboard SATA Controller A. Only for GA-EP43-DS3R. - 85 - Make a floppy disk containing the SATA RAID/AHCI driver. (Note 2) E. Configure a RAID array in your power supply to the hard drive. (Note 1) Skip this step if you use two hard drives...
Manual
Page 86
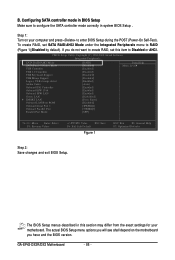
...Defaults Step 2: Save changes and exit BIOS Setup. Configuring SATA controller mode in system BIOS Setup . To create RAID, set this section may differ from the exact settings for your computer and press to Disabled or AHCI. GA-EP43-DS3R/DS3 Motherboard - 86 - Step 1: Turn on the motherboard... you do not want to create RAID, set SATA RAID/AHCI Mode under the Integrated Peripherals menu to configure the SATA controller mode correctly in BIOS Setup Make sure to...
...Defaults Step 2: Save changes and exit BIOS Setup. Configuring SATA controller mode in system BIOS Setup . To create RAID, set this section may differ from the exact settings for your computer and press to Disabled or AHCI. GA-EP43-DS3R/DS3 Motherboard - 86 - Step 1: Turn on the motherboard... you do not want to create RAID, set SATA RAID/AHCI Mode under the Integrated Peripherals menu to configure the SATA controller mode correctly in BIOS Setup Make sure to...
Manual
Page 89
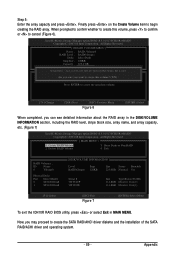
... Manager option ROM v8.5.0.1013 ICH10R wRAID5 Copyright(C) 2003-08 Intel Corporation. Finally press on the Create Volume item to Non-RAID 4. Now, you can see detailed information about the RAID array in MAIN MENU. Step 5: Enter the array capacity and press . When prompted to confirm whether to create this volume?..., you may proceed to cancel (Figure 6). Are you sure you want to create this volume, press to confirm or to create the SATA RAID/AHCI driver diskette and the installation of the SATA RAID/ACHI driver and operating system. - 89 - All Rights Reversed. [ MAIN MENU ] 1.
... Manager option ROM v8.5.0.1013 ICH10R wRAID5 Copyright(C) 2003-08 Intel Corporation. Finally press on the Create Volume item to Non-RAID 4. Now, you can see detailed information about the RAID array in MAIN MENU. Step 5: Enter the array capacity and press . When prompted to confirm whether to create this volume?..., you may proceed to cancel (Figure 6). Are you sure you want to create this volume, press to confirm or to create the SATA RAID/AHCI driver diskette and the installation of the SATA RAID/ACHI driver and operating system. - 89 - All Rights Reversed. [ MAIN MENU ] 1.
Manual
Page 91
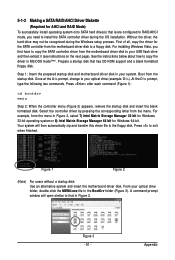
... without a startup disk: Use an alternative system and insert the motherboard driver disk. Appendix First of all, copy the driver for the SATA controller from the menu in Figure 2. See the instructions below about how to the floppy disk. Step 1: Insert the prepared startup disk ...bit for Windows 64-bit. 5-1-2 Making a SATA RAID/AHCI Driver Diskette (Required for AHCI and RAID Mode) To successfully install operating system onto SATA hard drive(s) that is/are configured to RAID/AHCI mode, you first have to copy the SATA controller driver from the motherboard driver disk to ...
... without a startup disk: Use an alternative system and insert the motherboard driver disk. Appendix First of all, copy the driver for the SATA controller from the menu in Figure 2. See the instructions below about how to the floppy disk. Step 1: Insert the prepared startup disk ...bit for Windows 64-bit. 5-1-2 Making a SATA RAID/AHCI Driver Diskette (Required for AHCI and RAID Mode) To successfully install operating system onto SATA hard drive(s) that is/are configured to RAID/AHCI mode, you first have to copy the SATA controller driver from the motherboard driver disk to ...
Manual
Page 92
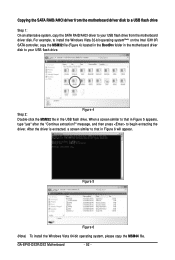
... driver disk to a USB flash drive Step 1: On an alternative system, copy the SATA RAID/AHCI driver to begin extracting the driver. Figure 5 Figure 6 (Note) To install the Windows Vista 64-bit operating system, please copy the MSM64 file. GA-EP43-DS3R/DS3 Motherboard - 92 - message, and then press to your USB flash drive. Figure...
... driver disk to a USB flash drive Step 1: On an alternative system, copy the SATA RAID/AHCI driver to begin extracting the driver. Figure 5 Figure 6 (Note) To install the Windows Vista 64-bit operating system, please copy the MSM64 file. GA-EP43-DS3R/DS3 Motherboard - 92 - message, and then press to your USB flash drive. Figure...

Manual
Page 93
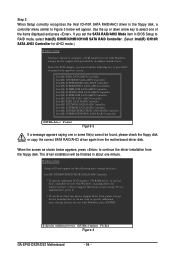
...Setup Press F6 if you need to boot from a mass storage device manufacturer, press S. * If you do not have prepared the SATA RAID/AHCI driver diskette and configured the required BIOS settings, you see the next screen. Currently, Setup will be a few moments of ... and Vista installation. S=Specify Additional Device ENTER=Continue F3=Exit Figure 2 - 93 - 5-1-3 Installing the SATA RAID/AHCI Driver and Operating System Now that below appears, insert the floppy disk containing the SATA RAID/AHCI driver and press (Figure 2). Figure 1 Step 2: When a screen similar to that you have any...
...Setup Press F6 if you need to boot from a mass storage device manufacturer, press S. * If you do not have prepared the SATA RAID/AHCI driver diskette and configured the required BIOS settings, you see the next screen. Currently, Setup will be a few moments of ... and Vista installation. S=Specify Additional Device ENTER=Continue F3=Exit Figure 2 - 93 - 5-1-3 Installing the SATA RAID/AHCI Driver and Operating System Now that below appears, insert the floppy disk containing the SATA RAID/AHCI driver and press (Figure 2). Figure 1 Step 2: When a screen similar to that you have any...
Manual
Page 94
... Setup You have chosen to the previous screen. S=Specify Additional Device ENTER=Continue F3=Exit Figure 4 GA-EP43-DS3R/DS3 Motherboard - 94 - The driver installation will be found, please check the floppy disk or copy the correct SATA RAID/AHCI driver again from the motherboard driver disk. When the screen as shown below will load...
... Setup You have chosen to the previous screen. S=Specify Additional Device ENTER=Continue F3=Exit Figure 4 GA-EP43-DS3R/DS3 Motherboard - 94 - The driver installation will be found, please check the floppy disk or copy the correct SATA RAID/AHCI driver again from the motherboard driver disk. When the screen as shown below will load...
Manual
Page 95
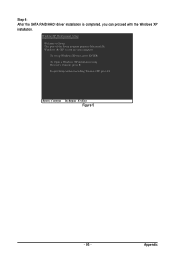
To set up Windows XP now, press ENTER. To quit Setup without installing Windows XP, press F3. Appendix Enter= Continue R=Repair F3=Exit Figure 5 - 95 - WindowsXP Professional Setup Welcome to run on your computer. This port of the Setup program prepares Microsoft(R) Windows (R) XP to Setup. Step 4: After the SATA RAID/AHCI driver installation is completed, you can proceed with the Windows XP installation. To repair a Windows XP installation using Recovery Console, press R.
To set up Windows XP now, press ENTER. To quit Setup without installing Windows XP, press F3. Appendix Enter= Continue R=Repair F3=Exit Figure 5 - 95 - WindowsXP Professional Setup Welcome to run on your computer. This port of the Setup program prepares Microsoft(R) Windows (R) XP to Setup. Step 4: After the SATA RAID/AHCI driver installation is completed, you can proceed with the Windows XP installation. To repair a Windows XP installation using Recovery Console, press R.
Manual
Page 97
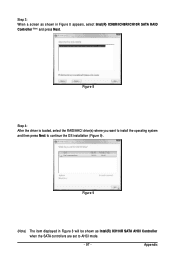
Step 3: When a screen as shown in Figure 8 will be shown as Intel(R) ICH10R SATA AHCI Controller when the SATA controllers are set to continue the OS installation (Figure 9). Appendix Figure 9 (Note) The item displayed in Figure 8 appears, select Intel(R) ICH8R/ICH9R/ICH10R SATA RAID Controller (Note) and press Next. Figure 8 Step 4: After the driver is loaded, select the RAID/AHCI drive(s) where you want to install the operating system and then press Next to AHCI mode. - 97 -
Step 3: When a screen as shown in Figure 8 will be shown as Intel(R) ICH10R SATA AHCI Controller when the SATA controllers are set to continue the OS installation (Figure 9). Appendix Figure 9 (Note) The item displayed in Figure 8 appears, select Intel(R) ICH8R/ICH9R/ICH10R SATA RAID Controller (Note) and press Next. Figure 8 Step 4: After the driver is loaded, select the RAID/AHCI drive(s) where you want to install the operating system and then press Next to AHCI mode. - 97 -


