
Manual
Page 9
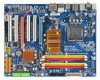
... remove the AC power by your hands dry and first touch a metal object to eliminate static electricity. • Prior to installing the motherboard, please have a problem related to the use of electrostatic discharge (ESD). Hardware Installation Chapter 1 Hardware Installation 1-1 Installation Precautions The motherboard contains numerous delicate electronic circuits and components which...
... remove the AC power by your hands dry and first touch a metal object to eliminate static electricity. • Prior to installing the motherboard, please have a problem related to the use of electrostatic discharge (ESD). Hardware Installation Chapter 1 Hardware Installation 1-1 Installation Precautions The motherboard contains numerous delicate electronic circuits and components which...

Manual
Page 27
... to the hard drive activity LED on the chassis front panel. The LED is off (S5). • PW (Power Switch, Red): Connects to indicate the problem. The S0 On LED is on when the system is detected, the BIOS may configure the way to turn off your chassis front panel module... to the speaker on the chassis front panel. If a problem is operating. 10) F_PANEL (Front Panel Header) Connect the power switch, reset switch, speaker and system status indicator on the chassis front panel. Note the...
... to the hard drive activity LED on the chassis front panel. The LED is off (S5). • PW (Power Switch, Red): Connects to indicate the problem. The S0 On LED is on when the system is detected, the BIOS may configure the way to turn off your chassis front panel module... to the speaker on the chassis front panel. If a problem is operating. 10) F_PANEL (Front Panel Header) Connect the power switch, reset switch, speaker and system status indicator on the chassis front panel. Note the...
Manual
Page 35
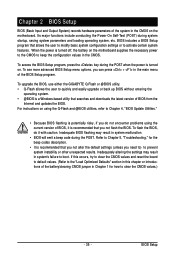
To upgrade the BIOS, use either the GIGABYTE Q-Flash or @BIOS utility. • Q-Flash allows the user to Chapter 5, "Troubleshooting," for how to boot. To flash the BIOS, do not encounter problems using the current version of BIOS, it with caution. Refer to quickly and easily upgrade or back up BIOS without entering...
To upgrade the BIOS, use either the GIGABYTE Q-Flash or @BIOS utility. • Q-Flash allows the user to Chapter 5, "Troubleshooting," for how to boot. To flash the BIOS, do not encounter problems using the current version of BIOS, it with caution. Refer to quickly and easily upgrade or back up BIOS without entering...

Manual
Page 53
... General Help F7: Optimized Defaults This motherboard incorporates cable diagnostic feature designed to detect the status of the attached LAN cable. When a Cable Problem Occurs... If a cable problem occurs on a specified pair of the attached LAN cable. - 53 - Refer to the following message will show 0m, as shown in ... Is Attached... it will show Open and the Length fields show Open, and the length shown is activated. BIOS Setup If no cable problem is detected on the LAN cable connected to the motherboard, the Status fields of all four pairs of 10/100/1000 Mbps in the...
... General Help F7: Optimized Defaults This motherboard incorporates cable diagnostic feature designed to detect the status of the attached LAN cable. When a Cable Problem Occurs... If a cable problem occurs on a specified pair of the attached LAN cable. - 53 - Refer to the following message will show 0m, as shown in ... Is Attached... it will show Open and the Length fields show Open, and the length shown is activated. BIOS Setup If no cable problem is detected on the LAN cable connected to the motherboard, the Status fields of all four pairs of 10/100/1000 Mbps in the...

Manual
Page 105
...screwdriver to the maximum volume? Press to load BIOS default settings. 6. A: The following Award BIOS beep code descriptions may help you identify possible computer problems. (For reference only.) 1 short: System boots successfully 2 short: CMOS setting error 1 long, 1 short: Memory or motherboard error 1 long...values? Press to show the advanced options. Appendix Plug in the BIOS Setup program. Refer to the Support\Motherboard\FAQ page on GIGABYTE's website. Saves changes and exit BIOS Setup (select "Save & Exit Setup") to restart your motherboard, please go to the ...
...screwdriver to the maximum volume? Press to load BIOS default settings. 6. A: The following Award BIOS beep code descriptions may help you identify possible computer problems. (For reference only.) 1 short: System boots successfully 2 short: CMOS setting error 1 long, 1 short: Memory or motherboard error 1 long...values? Press to show the advanced options. Appendix Plug in the BIOS Setup program. Refer to the Support\Motherboard\FAQ page on GIGABYTE's website. Saves changes and exit BIOS Setup (select "Save & Exit Setup") to restart your motherboard, please go to the ...

Manual
Page 106
.... No Correctly insert the memory into the memory socket. Select "Load Fail-Safe Defaults" (or "Load Optimized Defaults"). The problem is verified and solved. Make sure the motherboard does not short-circuit with the chassis or other metal objects. Connect the ATX...No Check if the CPU cooler is verified and solved. Secure the CPU No cooler on the CPU. Press to solve the problem. A (Continued...) GA-EP43-DS3R/DS3 Motherboard - 106 - 5-3-2 Troubleshooting Procedure If you encounter any troubles during system startup, follow the troubleshooting procedure below to ...
.... No Correctly insert the memory into the memory socket. Select "Load Fail-Safe Defaults" (or "Load Optimized Defaults"). The problem is verified and solved. Make sure the motherboard does not short-circuit with the chassis or other metal objects. Connect the ATX...No Check if the CPU cooler is verified and solved. Secure the CPU No cooler on the CPU. Press to solve the problem. A (Continued...) GA-EP43-DS3R/DS3 Motherboard - 106 - 5-3-2 Troubleshooting Procedure If you encounter any troubles during system startup, follow the troubleshooting procedure below to ...

Manual
Page 107
... works successfully). Our customer service staff will reply you as soon as possible. - 107 - No The keyboard or mouse might fail. The problem is verified and solved. Yes Turn off the computer and connect the IDE/SATA devices. Or go to the Support\Technical Service Zone page to... save changes and exit BIOS Setup. Appendix The problem is verified and solved. A When the computer is turned on your monitor. Select "Save & Exit Setup" to submit your question. Check if ...
... works successfully). Our customer service staff will reply you as soon as possible. - 107 - No The keyboard or mouse might fail. The problem is verified and solved. Yes Turn off the computer and connect the IDE/SATA devices. Or go to the Support\Technical Service Zone page to... save changes and exit BIOS Setup. Appendix The problem is verified and solved. A When the computer is turned on your monitor. Select "Save & Exit Setup" to submit your question. Check if ...


