
Manual
Page 46
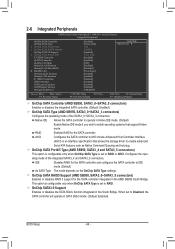
... controller to IDE mode. (Default) As SATA Type The mode depends on the OnChip SATA Type settings. 2-6 Integrated Peripherals CMOS Setup Utility-Copyright (C) 1984-2011 Award Software Integrated Peripherals OnChip SATA Controller OnChip SATA Type x OnChip SATA Port4/5 Type x OnChip SATA...Disabled, the SATA controller will operate in SATA 3Gb/s mode. (Default: Enabled) BIOS Setup - 46 - OnChip SATA RAID5 Support (AMD SB950, SATA3_0~SATA3_5 connectors) Enables or disables RAID 5 support for the SATA controller. When set to install operating systems that allows the...
... controller to IDE mode. (Default) As SATA Type The mode depends on the OnChip SATA Type settings. 2-6 Integrated Peripherals CMOS Setup Utility-Copyright (C) 1984-2011 Award Software Integrated Peripherals OnChip SATA Controller OnChip SATA Type x OnChip SATA Port4/5 Type x OnChip SATA...Disabled, the SATA controller will operate in SATA 3Gb/s mode. (Default: Enabled) BIOS Setup - 46 - OnChip SATA RAID5 Support (AMD SB950, SATA3_0~SATA3_5 connectors) Enables or disables RAID 5 support for the SATA controller. When set to install operating systems that allows the...
Manual
Page 47
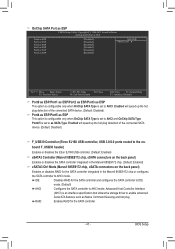
... chip or configures the SATA controller to AHCI mode. IDE Disables RAID for the SATA controller and configures the SATA controller to IDE mode. (Default) AHCI Configures the SATA controller to AHCI. BIOS Setup Advanced Host Controller Interface (AHCI) is set to as SATA Type... Enabled) eSATA3 Ctrl Mode (Marvell 88SE9172 chip, eSATA connectors on the back panel) Enables or disables RAID for the SATA controller. - 47 - OnChip SATA Port as ESP CMOS Setup Utility-Copyright (C) 1984-2011 Award Software OnChip SATA Port as ESP Port0 as ESP Port1 as ESP ...
... chip or configures the SATA controller to AHCI mode. IDE Disables RAID for the SATA controller and configures the SATA controller to IDE mode. (Default) AHCI Configures the SATA controller to AHCI. BIOS Setup Advanced Host Controller Interface (AHCI) is set to as SATA Type... Enabled) eSATA3 Ctrl Mode (Marvell 88SE9172 chip, eSATA connectors on the back panel) Enables or disables RAID for the SATA controller. - 47 - OnChip SATA Port as ESP CMOS Setup Utility-Copyright (C) 1984-2011 Award Software OnChip SATA Port as ESP Port0 as ESP Port1 as ESP ...

Manual
Page 61
... data and hard drive access speed may affect the speed at the end of the hard drive, make sure to boot from the Windows Vista setup disk. System Requirements: • At least 512 MB of it. actual size requirements vary, depending on the amount of data). • It is ...; VESA compatible graphics card • Windows XP with Xpress Recovery cannot be restored using Xpress Recovery2. • USB hard drives are not supported. • RAID drives are not supported. • GPT partitions are not supported. • Hard drives larger than to back up data on the first SATA connector is...
... data and hard drive access speed may affect the speed at the end of the hard drive, make sure to boot from the Windows Vista setup disk. System Requirements: • At least 512 MB of it. actual size requirements vary, depending on the amount of data). • It is ...; VESA compatible graphics card • Windows XP with Xpress Recovery cannot be restored using Xpress Recovery2. • USB hard drives are not supported. • RAID drives are not supported. • GPT partitions are not supported. • Hard drives larger than to back up data on the first SATA connector is...
Manual
Page 64
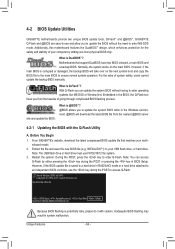
What is saved to a hard drive in RAID/AHCI mode or a hard drive attached to enter ...BIOS update file is DualBIOS™? What is potentially risky, please do it with the Q-Flash Utility A. GA-990FXA-UD3 D4 . . . . : BIOS Setup : XpressRecovery2 : Boot Menu : Qflash 04/27/2011-RD990-SB950-7A66FG06C-00 Because BIOS flashing is Q-...download the latest BIOS file from the hassles of going through complicated BIOS flashing process. 4-2 BIOS Update Utilities GIGABYTE motherboards provide two unique BIOS update tools, Q-Flash™ and @BIOS™. Embedded in system malfunction....
What is saved to a hard drive in RAID/AHCI mode or a hard drive attached to enter ...BIOS update file is DualBIOS™? What is potentially risky, please do it with the Q-Flash Utility A. GA-990FXA-UD3 D4 . . . . : BIOS Setup : XpressRecovery2 : Boot Menu : Qflash 04/27/2011-RD990-SB950-7A66FG06C-00 Because BIOS flashing is Q-...download the latest BIOS file from the hassles of going through complicated BIOS flashing process. 4-2 BIOS Update Utilities GIGABYTE motherboards provide two unique BIOS update tools, Q-Flash™ and @BIOS™. Embedded in system malfunction....
Manual
Page 75
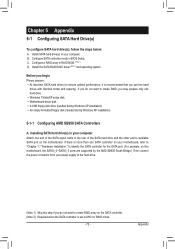
... Drive(s) To configure SATA hard drive(s), follow the steps below: A. C. Install the SATA RAID/AHCI driver (Note 2) and operating system. If there is set to AHCI or RAID mode. - 75 - Configure a RAID array in BIOS Setup. Configure SATA controller mode in RAID BIOS. (Note 1) D. Appendix Installing SATA hard drive(s) in your computer Attach one hard...
... Drive(s) To configure SATA hard drive(s), follow the steps below: A. C. Install the SATA RAID/AHCI driver (Note 2) and operating system. If there is set to AHCI or RAID mode. - 75 - Configure a RAID array in BIOS Setup. Configure SATA controller mode in RAID BIOS. (Note 1) D. Appendix Installing SATA hard drive(s) in your computer Attach one hard...
Manual
Page 76
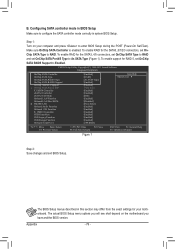
...Make sure OnChip SATA Controller is enabled. To enable support for the SATA3_4/5 connectors, set OnChip SATA Type to RAID and set On- CMOS Setup Utility-Copyright (C) 1984-2011 Integrated Peripherals Award Software Menu Item Help Level OnChip SATA Controller OnChip SATA ... Help F7: Optimized Defaults Figure 1 Step 2: Save changes and exit BIOS Setup. To enable RAID for RAID 5, set OnChip SATA RAID5 Support to As SATA Type (Figure 1). The BIOS Setup menus described in system BIOS Setup. Step 1: Turn on the motherboard you have and the BIOS version. To...
...Make sure OnChip SATA Controller is enabled. To enable support for the SATA3_4/5 connectors, set OnChip SATA Type to RAID and set On- CMOS Setup Utility-Copyright (C) 1984-2011 Integrated Peripherals Award Software Menu Item Help Level OnChip SATA Controller OnChip SATA ... Help F7: Optimized Defaults Figure 1 Step 2: Save changes and exit BIOS Setup. To enable RAID for RAID 5, set OnChip SATA RAID5 Support to As SATA Type (Figure 1). The BIOS Setup menus described in system BIOS Setup. Step 1: Turn on the motherboard you have and the BIOS version. To...

Manual
Page 77
... ROM Utility" (Figure 2). Press + to enter the LD View/LD Define Menu window. To create an array, press to enter the RAID BIOS setup utility. Option ROM Utility (c) 2011 Advanced Micro Devices, Inc. [ Main Menu ] View Drive Assignments 1 ] LD View/ LD Define Menu 2 ] Delete LD Menu 3 ] Controller Configuration 4 ]... [ Keys Available ] Press 1..4 to enter the Delete LD Menu window. No Array is the first option screen when you enter the BIOS RAID Setup utility. (Figure 3). To delete an array, press to Select Option Figure 3 [ESC] Exit - 77 -
... ROM Utility" (Figure 2). Press + to enter the LD View/LD Define Menu window. To create an array, press to enter the RAID BIOS setup utility. Option ROM Utility (c) 2011 Advanced Micro Devices, Inc. [ Main Menu ] View Drive Assignments 1 ] LD View/ LD Define Menu 2 ] Delete LD Menu 3 ] Controller Configuration 4 ]... [ Keys Available ] Press 1..4 to enter the Delete LD Menu window. No Array is the first option screen when you enter the BIOS RAID Setup utility. (Figure 3). To delete an array, press to Select Option Figure 3 [ESC] Exit - 77 -
Manual
Page 81
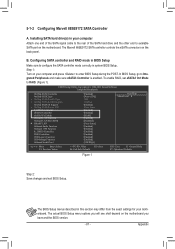
... F10: Save F6: Fail-Safe Defaults ESC: Exit F1: General Help F7: Optimized Defaults Figure 1 Step 2: Save changes and exit BIOS Setup. Configuring SATA controller and RAID mode in BIOS Setup Make sure to available SATA port on the motherboard you will see shall depend on the motherboard. 5-1-2 Configuring Marvell 88SE9172 SATA Controller...
... F10: Save F6: Fail-Safe Defaults ESC: Exit F1: General Help F7: Optimized Defaults Figure 1 Step 2: Save changes and exit BIOS Setup. Configuring SATA controller and RAID mode in BIOS Setup Make sure to available SATA port on the motherboard you will see shall depend on the motherboard. 5-1-2 Configuring Marvell 88SE9172 SATA Controller...

Manual
Page 82
... SATA 3Gb/s SATA 3Gb/s Press + to enter BIOS Setup or to continue Figure 2 On the main screen of Windows operating system for a message which says "Press + to enter BIOS Setup or to enter the RAID setup utility. Press + to continue" (Figure 2). Marvell 88SE91xx... Adapter - After the POST memory test begins and before the operating system boot begins, look for a non-RAID configuration. Configuring a RAID array in RAID BIOS Enter the RAID BIOS setup utility to move ...
... SATA 3Gb/s SATA 3Gb/s Press + to enter BIOS Setup or to continue Figure 2 On the main screen of Windows operating system for a message which says "Press + to enter BIOS Setup or to enter the RAID setup utility. Press + to continue" (Figure 2). Marvell 88SE91xx... Adapter - After the POST memory test begins and before the operating system boot begins, look for a non-RAID configuration. Configuring a RAID array in RAID BIOS Enter the RAID BIOS setup utility to move ...

Manual
Page 83
...: Select, ESC: Back/Exit Figure 5 - 83 - Then press on the RAID tab. Create a RAID Array: Step 1: On the main screen, press on NEXT. [ Selection] Marvell BIOS Setup (c) 2009 Marvell Technology Group Ltd. [ Adapter] [ Devices] [ RAID ] Select free disks to add them into the RAID array. Selected hard drives are marked with an asterisk (Figure 5). Appendix
...: Select, ESC: Back/Exit Figure 5 - 83 - Then press on the RAID tab. Create a RAID Array: Step 1: On the main screen, press on NEXT. [ Selection] Marvell BIOS Setup (c) 2009 Marvell Technology Group Ltd. [ Adapter] [ Devices] [ RAID ] Select free disks to add them into the RAID array. Selected hard drives are marked with an asterisk (Figure 5). Appendix

Manual
Page 84
...::)::WW1R5DDA2CC4ID7WW80DD880000JJDD--2222LLSSAA00 NEXSTt ripe Size : 64KB Quick Init : NO Cache Mode : WriteBack VD Name : GBT Disk ID : 01 NEXT [ RAID ] RAID Config Size 76.3GB 76.3GB Max Speed Status SATA 3Gb/s FREE SATA 3Gb/s FREE Create the VD?[Y] Figure 7 Appendix - 84 ... hard drives when creating the array. 4. Options include RAID 0 (Stripe) and RAID 1 (Mirror). 2. Options include 32 KB, 64 KB, and 128 KB. 3. Marvell BIOS Setup (c) 2009 Marvell Technology Group Ltd. [ Selection] [ Adapter] [ Devices] [ RAID ] Select free disks to cancel (Figure 7). Cache ...
...::)::WW1R5DDA2CC4ID7WW80DD880000JJDD--2222LLSSAA00 NEXSTt ripe Size : 64KB Quick Init : NO Cache Mode : WriteBack VD Name : GBT Disk ID : 01 NEXT [ RAID ] RAID Config Size 76.3GB 76.3GB Max Speed Status SATA 3Gb/s FREE SATA 3Gb/s FREE Create the VD?[Y] Figure 7 Appendix - 84 ... hard drives when creating the array. 4. Options include RAID 0 (Stripe) and RAID 1 (Mirror). 2. Options include 32 KB, 64 KB, and 128 KB. 3. Marvell BIOS Setup (c) 2009 Marvell Technology Group Ltd. [ Selection] [ Adapter] [ Devices] [ RAID ] Select free disks to cancel (Figure 7). Cache ...

Manual
Page 85
...or press other keys to confirm. Now, you want to install the operating system. Marvell BIOS Setup (C) 2009 Marvell Technology Group Ltd. [ Selection] [ Adapter] [ Devices] [ RAID ] RAID Config Delete VD ID * 0 Name GBT Size 152.4GB Level RAID0 Status ONLINE Stripe 64KB ...message "Do you can proceed to delete the VD's MBR?" When completed, the RAID tab will display the new array. (Figure 8) [ Selection] Marvell BIOS Setup (c) 2009 Marvell Technology Group Ltd. [ Adapter] [ Devices] [ RAID ] [Virtual Disks] ID Name Size Level 0 GBT 152.4GB RAID0 [Physical ...
...or press other keys to confirm. Now, you want to install the operating system. Marvell BIOS Setup (C) 2009 Marvell Technology Group Ltd. [ Selection] [ Adapter] [ Devices] [ RAID ] RAID Config Delete VD ID * 0 Name GBT Size 152.4GB Level RAID0 Status ONLINE Stripe 64KB ...message "Do you can proceed to delete the VD's MBR?" When completed, the RAID tab will display the new array. (Figure 8) [ Selection] Marvell BIOS Setup (c) 2009 Marvell Technology Group Ltd. [ Adapter] [ Devices] [ RAID ] [Virtual Disks] ID Name Size Level 0 GBT 152.4GB RAID0 [Physical ...
Manual
Page 87
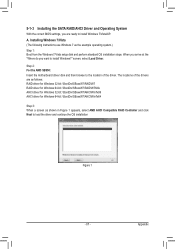
...install Windows 7/Vista/XP. Installing Windows 7/Vista (The following instructions use Windows 7 as shown in Figure 1 appears, select AMD AHCI Compatible RAID Controller and click Next to load the driver and continue the OS installation Figure 1 - 87 - screen, select Load Driver. A. Appendix Step...RAID\W7 RAID driver for Windows 64-bit: \BootDrv\SBxxxW7\RAID\W764A AHCI driver for Windows 32-bit: \BootDrv\SBxxxW7\AHCI\Win7x86 AHCI driver for Windows 64-bit: \BootDrv\SBxxxW7\AHCI\Win7x64 Step 3: When a screen as the example operating system.) Step 1: Boot from the Windows 7/Vista setup...
...install Windows 7/Vista/XP. Installing Windows 7/Vista (The following instructions use Windows 7 as shown in Figure 1 appears, select AMD AHCI Compatible RAID Controller and click Next to load the driver and continue the OS installation Figure 1 - 87 - screen, select Load Driver. A. Appendix Step...RAID\W7 RAID driver for Windows 64-bit: \BootDrv\SBxxxW7\RAID\W764A AHCI driver for Windows 32-bit: \BootDrv\SBxxxW7\AHCI\Win7x86 AHCI driver for Windows 64-bit: \BootDrv\SBxxxW7\AHCI\Win7x64 Step 3: When a screen as the example operating system.) Step 1: Boot from the Windows 7/Vista setup...
Manual
Page 89
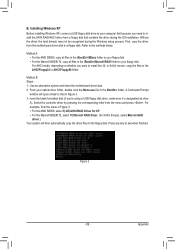
...re using a USB floppy disk drive, make sure it is designated as drive A). Press any key to that contains the driver during the Windows setup process. Installing Windows XP Before installing Windows XP, connect a USB floppy disk drive to your optical drive folder, double click the Menu.exe file ...in Figure 3. 3: nsert the blank formatted disk (if you need to install the SATA RAID/AHCI driver from the motherboard driver disk to the floppy disk. Select the controller driver by pressing the corresponding letter from the menu in Figure...
...re using a USB floppy disk drive, make sure it is designated as drive A). Press any key to that contains the driver during the Windows setup process. Installing Windows XP Before installing Windows XP, connect a USB floppy disk drive to your optical drive folder, double click the Menu.exe file ...in Figure 3. 3: nsert the blank formatted disk (if you need to install the SATA RAID/AHCI driver from the motherboard driver disk to the floppy disk. Select the controller driver by pressing the corresponding letter from the menu in Figure...

Manual
Page 90
... the SCSI Adapter you want from the Windows XP setup disk and press as soon as you see the message "Press F6 if you to that in Figure 4 will appear. AMD AHCI Compatible RAID Controller-x86 platform AMD AHCI Compatible RAID Controller-x64 platform ENTER=Select F3=Exit Figure 4 Appendix... - 90 - A screen will then appear asking you need to install a 3rd party SCSI or RAID driver." Windows Setup You have chosen to boot from the following for use with Windows, using a device support disk provided by an adapter manufacturer. Refer to ...
... the SCSI Adapter you want from the Windows XP setup disk and press as soon as you see the message "Press F6 if you to that in Figure 4 will appear. AMD AHCI Compatible RAID Controller-x86 platform AMD AHCI Compatible RAID Controller-x64 platform ENTER=Select F3=Exit Figure 4 Appendix... - 90 - A screen will then appear asking you need to install a 3rd party SCSI or RAID driver." Windows Setup You have chosen to boot from the following for use with Windows, using a device support disk provided by an adapter manufacturer. Refer to ...
Manual
Page 91
...installation. - 91 - Then select Marvell 91xx SATA RAID Controller 32bit Driver and press . When both of the two drivers appear on whether you can proceed with Windows, using a device support disk provided by an adapter manufacturer. Appendix Windows Setup You have chosen to be installed. Below we ...assume that you want to install the 32-bit or 64-bit version of the Marvell shared library and Marvell 91xx SATA RAID Controller need to configure a SCSI Adapter for 32bit...
...installation. - 91 - Then select Marvell 91xx SATA RAID Controller 32bit Driver and press . When both of the two drivers appear on whether you can proceed with Windows, using a device support disk provided by an adapter manufacturer. Appendix Windows Setup You have chosen to be installed. Below we ...assume that you want to install the 32-bit or 64-bit version of the Marvell shared library and Marvell 91xx SATA RAID Controller need to configure a SCSI Adapter for 32bit...

Manual
Page 93
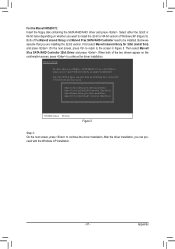
...3Gb/s FREE NEXT ENTER/SPACE: Select, ESC: Back/Exit - 93 - To enable an automatic rebuild in the RAID setup utility first. • Enabling Automatic Rebuild Step 1: When the message "Press + to enter BIOS Setup or to continue" appears, press + to set as a Spare drive in the operating system, you have to enter... the RAID setup utility. Press or on the new hard drive to confirm. Appendix For the Marvell 88SE9172: Turn off your computer. Restart your computer and ...
...3Gb/s FREE NEXT ENTER/SPACE: Select, ESC: Back/Exit - 93 - To enable an automatic rebuild in the RAID setup utility first. • Enabling Automatic Rebuild Step 1: When the message "Press + to enter BIOS Setup or to continue" appears, press + to set as a Spare drive in the operating system, you have to enter... the RAID setup utility. Press or on the new hard drive to confirm. Appendix For the Marvell 88SE9172: Turn off your computer. Restart your computer and ...
Manual
Page 94
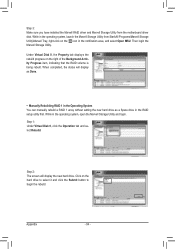
... and Marvell Storage Utility from Start\All Programs\Marvell Storage Utility\Marvell Tray, right-click on the icon in the RAID setup utility first. Under Virtual Disk 0, the Property tab displays the rebuild progress on the hard drive to select it and click the Submit ... operating system, launch the Marvell Storage Utility from the motherboard driver disk. Click on the right of the Background Activity Progress item, indicating that the RAID volume is being rebuilt. While in the operating system, open the Marvell Storage Utility and login. Step 1: Under Virtual Disk 0, click the Operation...
... and Marvell Storage Utility from Start\All Programs\Marvell Storage Utility\Marvell Tray, right-click on the icon in the RAID setup utility first. Under Virtual Disk 0, the Property tab displays the rebuild progress on the hard drive to select it and click the Submit ... operating system, launch the Marvell Storage Utility from the motherboard driver disk. Click on the right of the Background Activity Progress item, indicating that the RAID volume is being rebuilt. While in the operating system, open the Marvell Storage Utility and login. Step 1: Under Virtual Disk 0, click the Operation...


