Manual
Page 16
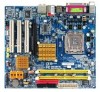
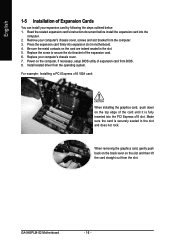
...1. When removing the graphics card, gently push back on the black lever on the card are indeed seated in the slot. 5. GA-945PLM-S2 Motherboard - 16 - Read the related expansion card's instruction document before install the expansion card into expansion slot in the slot and does ... expansion card firmly into the computer. 2. Replace your computer's chassis cover, screws and slot bracket from the computer. 3. Install related driver from the operating system. English 1-5 Installation of expansion card from BIOS. 8. Make sure the card is fully inserted into the PCI Express ...
...1. When removing the graphics card, gently push back on the black lever on the card are indeed seated in the slot. 5. GA-945PLM-S2 Motherboard - 16 - Read the related expansion card's instruction document before install the expansion card into expansion slot in the slot and does ... expansion card firmly into the computer. 2. Replace your computer's chassis cover, screws and slot bracket from the computer. 3. Install related driver from the operating system. English 1-5 Installation of expansion card from BIOS. 8. Make sure the card is fully inserted into the PCI Express ...
Manual
Page 24
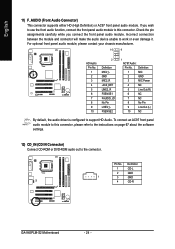
... 1 MIC 2 GND 3 MIC Power 4 NC 5 Line Out (R) 6 NC 7 NC 8 No Pin 9 Line Out (L) 10 NC By default, the audio driver is configured to work or even damage it. Definition 1 CD-L 2 GND 1 3 GND 4 CD-R GA-945PLM-S2 Motherboard - 24 - For optional front panel audio module, please contact your chassis manufacturer. 10 9 HD Audio: Pin No. 1 2 3 4 5 6 7 8 9 10...
... 1 MIC 2 GND 3 MIC Power 4 NC 5 Line Out (R) 6 NC 7 NC 8 No Pin 9 Line Out (L) 10 NC By default, the audio driver is configured to work or even damage it. Definition 1 CD-L 2 GND 1 3 GND 4 CD-R GA-945PLM-S2 Motherboard - 24 - For optional front panel audio module, please contact your chassis manufacturer. 10 9 HD Audio: Pin No. 1 2 3 4 5 6 7 8 9 10...

Manual
Page 51
... your system. the Found New Hardware Wizard) dis- You can press "Xpress Install" to install all the drivers that you can install other drivers. • After the drivers are shown in the motherboard driver disk. • For USB 2.0 driver support under the Windows XP operating system, please install the Windows XP Service Pack 1 or later. After...
... your system. the Found New Hardware Wizard) dis- You can press "Xpress Install" to install all the drivers that you can install other drivers. • After the drivers are shown in the motherboard driver disk. • For USB 2.0 driver support under the Windows XP operating system, please install the Windows XP Service Pack 1 or later. After...
Manual
Page 52
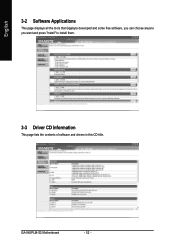
GA-945PLM-S2 Motherboard - 52 - English 3-2 Software Applications This page displays all the tools that Gigabyte developed and some free software, you can choose anyone you want and press "install" to install them. 3-3 Driver CD Information This page lists the contents of software and drivers in this CD-title.
GA-945PLM-S2 Motherboard - 52 - English 3-2 Software Applications This page displays all the tools that Gigabyte developed and some free software, you can choose anyone you want and press "install" to install them. 3-3 Driver CD Information This page lists the contents of software and drivers in this CD-title.
Manual
Page 53
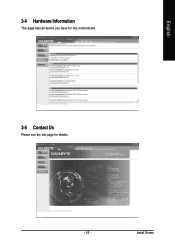
English 3-4 Hardware Information This page lists all device you have for this motherboard. 3-5 Contact Us Please see the last page for details. - 53 - Install Drivers
English 3-4 Hardware Information This page lists all device you have for this motherboard. 3-5 Contact Us Please see the last page for details. - 53 - Install Drivers
Manual
Page 56
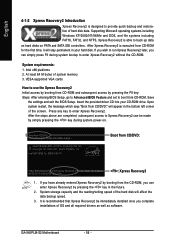
... XpressRecovery2..... Upon system restart, the message which says "Boot from CD-ROM for 945PLM-S2 FI . . . . :BIOS Setup/Q-Flash :Xpress Recovery2 :Boot Menu :Qflash 06/20/2007-I945-6A79TG0LC-00 : Xpress Recovery2 1. GA-945PLM-S2 Motherboard - 56 - After Xpress Recovery2 is executed from CD/DVD:" will affect the ...CD-ROM. Intel I945 BIOS for the first time, it will stay permanent in your CD-ROM drive. Insert the provided driver CD into your hard disk. English 4-1-2 Xpress Recovery2 Introduction Xpress Recovery2 is designed to run Xpress Recovery2 later, you can ...
... XpressRecovery2..... Upon system restart, the message which says "Boot from CD-ROM for 945PLM-S2 FI . . . . :BIOS Setup/Q-Flash :Xpress Recovery2 :Boot Menu :Qflash 06/20/2007-I945-6A79TG0LC-00 : Xpress Recovery2 1. GA-945PLM-S2 Motherboard - 56 - After Xpress Recovery2 is executed from CD/DVD:" will affect the ...CD-ROM. Intel I945 BIOS for the first time, it will stay permanent in your CD-ROM drive. Insert the provided driver CD into your hard disk. English 4-1-2 Xpress Recovery2 Introduction Xpress Recovery2 is designed to run Xpress Recovery2 later, you can ...
Manual
Page 57
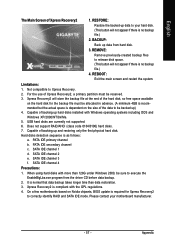
BACKUP: Back up data from the driver CD before data backup. 2. SATA IDE channel 1 d. SATA IDE channel 2 e. It is as... to Xpress Recovery. 2. Xpress Recovery2 will store the backup file at the end of the data to your motherboard manufacturer. - 57 - mended but the actual space is dependent on the size of the hard disk, so... is no backup file.) 4. USB hard disks are currently not supported. 6. PATA IDE primary channel b. On a few motherboards based on the hard disk for Xpress Recovery2 to release disk space. (This button will not appear if there is no...
BACKUP: Back up data from the driver CD before data backup. 2. SATA IDE channel 1 d. SATA IDE channel 2 e. It is as... to Xpress Recovery. 2. Xpress Recovery2 will store the backup file at the end of the data to your motherboard manufacturer. - 57 - mended but the actual space is dependent on the size of the hard disk, so... is no backup file.) 4. USB hard disks are currently not supported. 6. PATA IDE primary channel b. On a few motherboards based on the hard disk for Xpress Recovery2 to release disk space. (This button will not appear if there is no...
Manual
Page 62
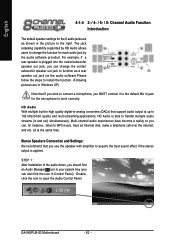
... experiences have an Internet chat, make a telephone call over the Internet, and etc. STEP 1 : After installation of the audio driver, you should find the icon in Control Panel). Stereo Speakers Connection and Settings: We recommend that you can, for each audio jack... Manager icon in and out) simultaneously. The jack retasking capability supported by the audio software provided. all at up to work correctly. GA-945PLM-S2 Motherboard - 62 - Channel Audio Function Introduction The default speaker settings for the microphone to 192 kHz/24-bit quality and multi-streaming applications,...
... experiences have an Internet chat, make a telephone call over the Internet, and etc. STEP 1 : After installation of the audio driver, you should find the icon in Control Panel). Stereo Speakers Connection and Settings: We recommend that you can, for each audio jack... Manager icon in and out) simultaneously. The jack retasking capability supported by the audio software provided. all at up to work correctly. GA-945PLM-S2 Motherboard - 62 - Channel Audio Function Introduction The default speaker settings for the microphone to 192 kHz/24-bit quality and multi-streaming applications,...
Manual
Page 64
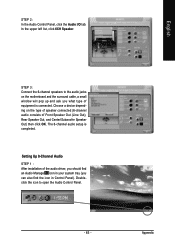
Choose a device depending on the motherboard and the surround cable, a small window will pop up and ask you can also find the icon in Control Panel). The 4channel audio setup is ..., click the Audio I/O tab. Doubleclick the icon to the audio jacks on the type of speaker connected (4-channel audio consists of the audio driver, you should find an Audio Manager icon in your system tray (you what type of equipment is completed. GA-945PLM-S2 Motherboard - 64 - In the upper left list, click 4CH Speaker.
Choose a device depending on the motherboard and the surround cable, a small window will pop up and ask you can also find the icon in Control Panel). The 4channel audio setup is ..., click the Audio I/O tab. Doubleclick the icon to the audio jacks on the type of speaker connected (4-channel audio consists of the audio driver, you should find an Audio Manager icon in your system tray (you what type of equipment is completed. GA-945PLM-S2 Motherboard - 64 - In the upper left list, click 4CH Speaker.
Manual
Page 65
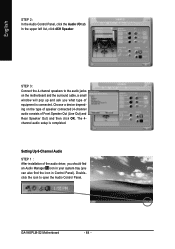
... Center/Subwoofer Speaker Out) then click OK. English STEP 2: In the Audio Control Panel, click the Audio I/O tab. Choose a device depending on the motherboard and the surround cable, a small window will pop up and ask you can also find the icon in Control Panel). Appendix STEP 3: Connect the 6-channel... Audio Control Panel. - 65 - Doubleclick the icon to the audio jacks on the type of speaker connected (6-channel audio consists of the audio driver, you should find an Audio Manager icon in your system tray (you what type of equipment is completed. In the upper left list, click ...
... Center/Subwoofer Speaker Out) then click OK. English STEP 2: In the Audio Control Panel, click the Audio I/O tab. Choose a device depending on the motherboard and the surround cable, a small window will pop up and ask you can also find the icon in Control Panel). Appendix STEP 3: Connect the 6-channel... Audio Control Panel. - 65 - Doubleclick the icon to the audio jacks on the type of speaker connected (6-channel audio consists of the audio driver, you should find an Audio Manager icon in your system tray (you what type of equipment is completed. In the upper left list, click ...


