Manual
Page 4
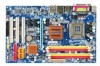
...GA-945PL-DS3/GA-945PL-S3 (rev. 2.0) Motherboard Layout 7 Block Diagram ...8 Chapter 1 Hardware Installation 9 1-1 Considerations Prior to Installation 9 1-2 Feature Summary 10 1-3 Installation of the CPU and CPU Cooler 12 1-3-1 Installation of the CPU 12 1-3-2 Installation of the Cooler 13 1-4 Installation of Memory 14 1-5 Installation of Expansion Cards 16 1-6 I/O Back Panel Introduction 17 1-7 Connectors Introduction 18 Chapter 2 BIOS... Setup 29 The Main Menu (For example: GA-945PL-DS3 BIOS Ver.: F1a 30 2-1 Standard CMOS Features 32 2-2 Advanced BIOS Features 34 ...
...GA-945PL-DS3/GA-945PL-S3 (rev. 2.0) Motherboard Layout 7 Block Diagram ...8 Chapter 1 Hardware Installation 9 1-1 Considerations Prior to Installation 9 1-2 Feature Summary 10 1-3 Installation of the CPU and CPU Cooler 12 1-3-1 Installation of the CPU 12 1-3-2 Installation of the Cooler 13 1-4 Installation of Memory 14 1-5 Installation of Expansion Cards 16 1-6 I/O Back Panel Introduction 17 1-7 Connectors Introduction 18 Chapter 2 BIOS... Setup 29 The Main Menu (For example: GA-945PL-DS3 BIOS Ver.: F1a 30 2-1 Standard CMOS Features 32 2-2 Advanced BIOS Features 34 ...
Manual
Page 7
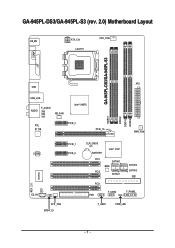
GA-945PL-DS3/GA-945PL-S3 (rev. 2.0) Motherboard Layout KB_MS ATX_12V LGA775 CPU_FAN GA-945PL-DS3/GA-945PL-S3 COMA LPT ATX USB USB_LAN F_AUDIO AUDIO NB_FAN Intel® 945PL RTL 8111B PCIE_3 PCIE_16 DDRII1 DDRII2 DDRII3 DDRII4 PWR_FAN CODEC PCIE_1 PCIE_2 CI CD_IN SYS _FAN SPDIF_IO CLR_CMOS BATTERY Intel® ICH7 PCI1 SATAII0 BIOS PCI2 SATAII1 PCI3 FDD F_USB2 SATAII2 SATAII3 IDE1 F_PANEL F_USB1 PWR_LED - 7 - REV: 2.0 IT8718
GA-945PL-DS3/GA-945PL-S3 (rev. 2.0) Motherboard Layout KB_MS ATX_12V LGA775 CPU_FAN GA-945PL-DS3/GA-945PL-S3 COMA LPT ATX USB USB_LAN F_AUDIO AUDIO NB_FAN Intel® 945PL RTL 8111B PCIE_3 PCIE_16 DDRII1 DDRII2 DDRII3 DDRII4 PWR_FAN CODEC PCIE_1 PCIE_2 CI CD_IN SYS _FAN SPDIF_IO CLR_CMOS BATTERY Intel® ICH7 PCI1 SATAII0 BIOS PCI2 SATAII1 PCI3 FDD F_USB2 SATAII2 SATAII3 IDE1 F_PANEL F_USB1 PWR_LED - 7 - REV: 2.0 IT8718
Manual
Page 12
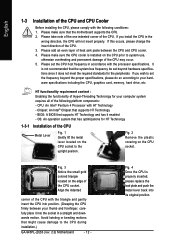
... for HT Technology 1-3-1 Installation of the CPU Metal Lever Fig. 1 Gently lift the metal lever located on the CPU prior to the CPU during installation.) GA-945PL-(D)S3 (rev. 2.0) Motherboard - 12 - OS: An operation system that might cause damage to system use, otherwise overheating and permanent damage of the CPU may occur... located on the CPU socket. English 1-3 Installation of the CPU and CPU Cooler Before installing the CPU, please comply with HT Technology - BIOS: A BIOS that the system bus frequency be set the frequency beyond hardware specifications since it enabled -
... for HT Technology 1-3-1 Installation of the CPU Metal Lever Fig. 1 Gently lift the metal lever located on the CPU prior to the CPU during installation.) GA-945PL-(D)S3 (rev. 2.0) Motherboard - 12 - OS: An operation system that might cause damage to system use, otherwise overheating and permanent damage of the CPU may occur... located on the CPU socket. English 1-3 Installation of the CPU and CPU Cooler Before installing the CPU, please comply with HT Technology - BIOS: A BIOS that the system bus frequency be set the frequency beyond hardware specifications since it enabled -
Manual
Page 14
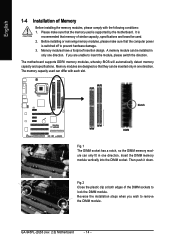
..., specifications and brand be installed in only one direction. Memory modules have a foolproof insertion design. The motherboard supports DDRII memory modules, whereby BIOS will automatically detect memory capacity and specifications. GA-945PL-(D)S3 (rev. 2.0) Motherboard - 14 - English 1-4 Installation of Memory Before installing the memory modules, please comply with each slot. A memory module can be...
..., specifications and brand be installed in only one direction. Memory modules have a foolproof insertion design. The motherboard supports DDRII memory modules, whereby BIOS will automatically detect memory capacity and specifications. GA-945PL-(D)S3 (rev. 2.0) Motherboard - 14 - English 1-4 Installation of Memory Before installing the memory modules, please comply with each slot. A memory module can be...
Manual
Page 16
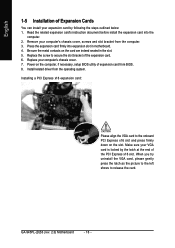
...the latch as the picture to the left shows to secure the slot bracket of expansion card from BIOS. 8. Install related driver from the computer. 3. Press the expansion card firmly into the computer. 2. GA-945PL-(D)S3 (rev. 2.0) Motherboard - 16 - Installing a PCI Express x16 expansion card: Please align the ...install your expansion card by the latch at the end of the PCI Express x16 slot. Power on the computer, if necessary, setup BIOS utility of the expansion card. 6. Replace your VGA card is locked by following the steps outlined below: 1. Read the related expansion card...
...the latch as the picture to the left shows to secure the slot bracket of expansion card from BIOS. 8. Install related driver from the computer. 3. Press the expansion card firmly into the computer. 2. GA-945PL-(D)S3 (rev. 2.0) Motherboard - 16 - Installing a PCI Express x16 expansion card: Please align the ...install your expansion card by the latch at the end of the PCI Express x16 slot. Power on the computer, if necessary, setup BIOS utility of the expansion card. 6. Replace your VGA card is locked by following the steps outlined below: 1. Read the related expansion card...
Manual
Page 22
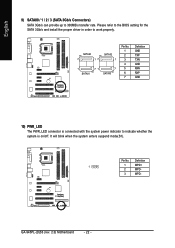
... the system enters suspend mode(S1). English 9) SATAII0 / 1 / 2 / 3 (SATA 3Gb/s Connectors) SATA 3Gb/s can provide up to work properly. Pin No. Please refer to the BIOS setting for the SATA 3Gb/s and install the proper driver in order to 300MB/s transfer rate. SATAII0 7 17 SATAII2 1 1 71 7 SATAII1 SATAII3 Pin No. 1 2 3 4 5 6 7 Definition... TXN GND RXN RXP GND 10) PWR_LED The PWR_LED connector is connected with the system power indicator to indicate whether the system is on/off. GA-945PL-(D)S3 (rev. 2.0) Motherboard - 22 - Definition 1 1 MPD+ 2 MPD- 3 MPD-
... the system enters suspend mode(S1). English 9) SATAII0 / 1 / 2 / 3 (SATA 3Gb/s Connectors) SATA 3Gb/s can provide up to work properly. Pin No. Please refer to the BIOS setting for the SATA 3Gb/s and install the proper driver in order to 300MB/s transfer rate. SATAII0 7 17 SATAII2 1 1 71 7 SATAII1 SATAII3 Pin No. 1 2 3 4 5 6 7 Definition... TXN GND RXN RXP GND 10) PWR_LED The PWR_LED connector is connected with the system power indicator to indicate whether the system is on/off. GA-945PL-(D)S3 (rev. 2.0) Motherboard - 22 - Definition 1 1 MPD+ 2 MPD- 3 MPD-
Manual
Page 26
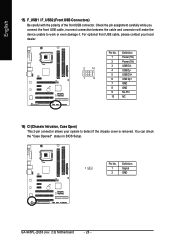
... and connector will make the device unable to detect if the chassis cover is removed. Pin No. Definition 1 1 Signal 2 GND GA-945PL-(D)S3 (rev. 2.0) Motherboard - 26 - You can check the "Case Opened" status in BIOS Setup. For optional front USB cable, please contact your local dealer. 2 10 1 9 Pin No. 1 2 3 4 5 6 7 8 9 10 Definition Power (5V) Power...
... and connector will make the device unable to detect if the chassis cover is removed. Pin No. Definition 1 1 Signal 2 GND GA-945PL-(D)S3 (rev. 2.0) Motherboard - 26 - You can check the "Case Opened" status in BIOS Setup. For optional front USB cable, please contact your local dealer. 2 10 1 9 Pin No. 1 2 3 4 5 6 7 8 9 10 Definition Power (5V) Power...

Manual
Page 30
...among the items and press to the default settings for your motherboard. GA-945PL-(D)S3 (rev. 2.0) Motherboard - 30 - This action makes the system reset to accept or enter the sub-menu. The BIOS Setup menus described in the BIOS Setup when somehow the system is not stable as figure below) ...may differ from the exact settings for stability. 3. If you don't find the settings you enter Award BIOS CMOS Setup Utility, the Main Menu (as usual. The Main Menu (For example: GA-945PL-DS3 BIOS Ver.: F1a) Once you want, press "Ctrl+F1" to select the first boot device. CMOS Setup...
...among the items and press to the default settings for your motherboard. GA-945PL-(D)S3 (rev. 2.0) Motherboard - 30 - This action makes the system reset to accept or enter the sub-menu. The BIOS Setup menus described in the BIOS Setup when somehow the system is not stable as figure below) ...may differ from the exact settings for stability. 3. If you don't find the settings you enter Award BIOS CMOS Setup Utility, the Main Menu (as usual. The Main Menu (For example: GA-945PL-DS3 BIOS Ver.: F1a) Once you want, press "Ctrl+F1" to select the first boot device. CMOS Setup...

Manual
Page 32
...) None Select this option for the hard drive. You can use one of the two methods: Auto None Allows BIOS to Sat, determined by the BIOS and is , , , . Extended IDE/SATA Drive. GA-945PL-(D)S3 (rev. 2.0) Motherboard - 32 - IDE Channel 0 Master, Slave IDE HDD Auto-Detection Press "Enter" to ...will skip the automatic detection step and allow for automatic device detection. Manual User can use one of three methods: Auto Allows BIOS to set the access mode for automatic device detection. The four options are used and the system will skip the automatic detection step...
...) None Select this option for the hard drive. You can use one of the two methods: Auto None Allows BIOS to Sat, determined by the BIOS and is , , , . Extended IDE/SATA Drive. GA-945PL-(D)S3 (rev. 2.0) Motherboard - 32 - IDE Channel 0 Master, Slave IDE HDD Auto-Detection Press "Enter" to ...will skip the automatic detection step and allow for automatic device detection. Manual User can use one of three methods: Auto Allows BIOS to set the access mode for automatic device detection. The four options are used and the system will skip the automatic detection step...
Manual
Page 34
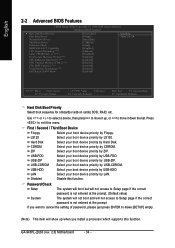
.... USB-HDD Select your boot device priority by USB-HDD. ZIP Select your boot device priority by ZIP. English 2-2 Advanced BIOS Features CMOS Setup Utility-Copyright (C) 1984-2006 Award Software Advanced BIOS Features ` Hard Disk Boot Priority First Boot Device Second Boot Device Third Boot Device Password Check HDD S.M.A.R.T. Capability CPU Hyper... will show up , or to Setup page if the correct password is not entered at the prompt. If you install a processor which supports this function. GA-945PL-(D)S3 (rev. 2.0) Motherboard - 34 -
.... USB-HDD Select your boot device priority by USB-HDD. ZIP Select your boot device priority by ZIP. English 2-2 Advanced BIOS Features CMOS Setup Utility-Copyright (C) 1984-2006 Award Software Advanced BIOS Features ` Hard Disk Boot Priority First Boot Device Second Boot Device Third Boot Device Password Check HDD S.M.A.R.T. Capability CPU Hyper... will show up , or to Setup page if the correct password is not entered at the prompt. If you install a processor which supports this function. GA-945PL-(D)S3 (rev. 2.0) Motherboard - 34 -
Manual
Page 36
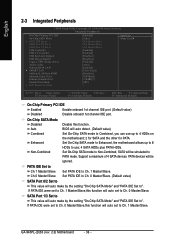
... set to Ch. 1 Master/Slave. BIOS will auto detect. (Default value) Combined Set On-Chip SATA mode to Non-Combined, SATA will auto set to Ch. 0 Master/Slave,this function. Non-Combined Set On-Chip SATA mode to Combined, you can use ; 4 SATA HDDs plus PATA HDDs. GA-945PL-(D)S3 (rev. 2.0) Motherboard - 36 - On...
... set to Ch. 1 Master/Slave. BIOS will auto detect. (Default value) Combined Set On-Chip SATA mode to Non-Combined, SATA will auto set to Ch. 0 Master/Slave,this function. Non-Combined Set On-Chip SATA mode to Combined, you can use ; 4 SATA HDDs plus PATA HDDs. GA-945PL-(D)S3 (rev. 2.0) Motherboard - 36 - On...
Manual
Page 38
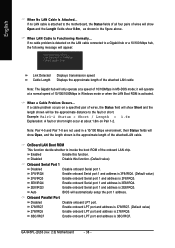
... are not used in MS-DOS mode; Disabled Disable this function. When LAN Cable Is Functioning Normally... If no LAN cable is activated. Auto BIOS will be the approximate distance to the motherboard, the Status fields of all four pairs of wires will appear: Start detecting at a speed of the... LPT port and address is 278/IRQ5. 3BC/IRQ7 Enable onboard LPT port and address is 2E8/IRQ3. English When No LAN Cable Is Attached... GA-945PL-(D)S3 (rev. 2.0) Motherboard - 38 - If no cable problem is the approximate length of wires, the Status field will show Short and the length shown...
... are not used in MS-DOS mode; Disabled Disable this function. When LAN Cable Is Functioning Normally... If no LAN cable is activated. Auto BIOS will be the approximate distance to the motherboard, the Status fields of all four pairs of wires will appear: Start detecting at a speed of the... LPT port and address is 278/IRQ5. 3BC/IRQ7 Enable onboard LPT port and address is 2E8/IRQ3. English When No LAN Cable Is Attached... GA-945PL-(D)S3 (rev. 2.0) Motherboard - 38 - If no cable problem is the approximate length of wires, the Status field will show Short and the length shown...

Manual
Page 39
... ESC: Exit F1: General Help F7: Optimized Defaults ACPI Suspend Type S1(POS) Set ACPI suspend type to S1/POS(Power On Suspend). (Default value) S3(STR) Set ACPI suspend type to Power off instantly. (Default value) Delay 4 Sec. English Parallel Port Mode SPP EPP ECP ECP+EPP ECP Mode Use... DMA 3 1 Using Parallel port as Standard Parallel Port. (Default value) Using Parallel port as Extended Capabilities Port. to S3/STR(Suspend To RAM). Using Parallel port as ECP & EPP mode. Soft-Off by Ring function. (Default value) - 39...
... ESC: Exit F1: General Help F7: Optimized Defaults ACPI Suspend Type S1(POS) Set ACPI suspend type to S1/POS(Power On Suspend). (Default value) S3(STR) Set ACPI suspend type to Power off instantly. (Default value) Delay 4 Sec. English Parallel Port Mode SPP EPP ECP ECP+EPP ECP Mode Use... DMA 3 1 Using Parallel port as Standard Parallel Port. (Default value) Using Parallel port as Extended Capabilities Port. to S3/STR(Suspend To RAM). Using Parallel port as ECP & EPP mode. Soft-Off by Ring function. (Default value) - 39...
Manual
Page 48
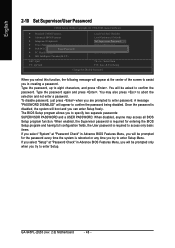
...the center of the screen to assist you in Advance BIOS Features Menu, you will appear to enter password. To disable password, just press when you are prompted to confirm the password being disabled. GA-945PL-(D)S3 (rev. 2.0) Motherboard - 48 - English 2-10... Set Supervisor/User Password CMOS Setup Utility-Copyright (C) 1984-2006 Award Software ` Standard CMOS Features ` Advanced BIOS Features ` Integrated Peripherals ` Power Management Setup ` PnP/PCI ...
...the center of the screen to assist you in Advance BIOS Features Menu, you will appear to enter password. To disable password, just press when you are prompted to confirm the password being disabled. GA-945PL-(D)S3 (rev. 2.0) Motherboard - 48 - English 2-10... Set Supervisor/User Password CMOS Setup Utility-Copyright (C) 1984-2006 Award Software ` Standard CMOS Features ` Advanced BIOS Features ` Integrated Peripherals ` Power Management Setup ` PnP/PCI ...
Manual
Page 56
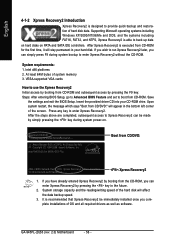
... system restart, the message which says "Boot from CD/DVD: : Xpress Recovery2 1. After Xpress Recovery2 is executed from CD-ROM for 945PL-DS3 F1a . . . . :BIOS Setup/Q-Flash, : Xpress Recovery2, : Boot Menu 10/18/2006-I945-6A79TG0DC-00 Boot from CD/DVD:" will appear in the bottom ...during system bootup to boot from CD/DVD: Press any key to back up data on hard disks on . . . Boot from CD-ROM. GA-945PL-(D)S3 (rev. 2.0) Motherboard - 56 - Intel x86 platforms 2. After the steps above are completed, subsequent access to Xpress Recovery2 can be immediately installed once...
... system restart, the message which says "Boot from CD/DVD: : Xpress Recovery2 1. After Xpress Recovery2 is executed from CD-ROM for 945PL-DS3 F1a . . . . :BIOS Setup/Q-Flash, : Xpress Recovery2, : Boot Menu 10/18/2006-I945-6A79TG0DC-00 Boot from CD/DVD:" will appear in the bottom ...during system bootup to boot from CD/DVD: Press any key to back up data on hard disks on . . . Boot from CD-ROM. GA-945PL-(D)S3 (rev. 2.0) Motherboard - 56 - Intel x86 platforms 2. After the steps above are completed, subsequent access to Xpress Recovery2 can be immediately installed once...
Manual
Page 58
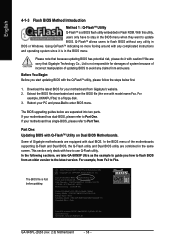
... from Gigabyte's website. 2. Q-FlashTM allows users to flash BIOS without any complicated instructions and operating system since it with how to Part Two. For example, 8KNXPU.Fba) to Fba. If your motherboard has dual-BIOS, please refer to enter SETUP / Dual BIOS / Q-Flash / F9 For Xpress Recovery 08/07/2003-i875P-6A79BG03C-00 GA-945PL-(D)S3 (rev...
... from Gigabyte's website. 2. Q-FlashTM allows users to flash BIOS without any complicated instructions and operating system since it with how to Part Two. For example, 8KNXPU.Fba) to Fba. If your motherboard has dual-BIOS, please refer to enter SETUP / Dual BIOS / Q-Flash / F9 For Xpress Recovery 08/07/2003-i875P-6A79BG03C-00 GA-945PL-(D)S3 (rev...

Manual
Page 60
GA-945PL-(D)S3 (rev. 2.0) Motherboard - 60 - Dual BIOS Utility Boot From Main Bios Main ROM Type/Size SST 49LF003A Backup ROM Type/Size SST 49LF003A 512K 512K Wide Range Protection Disable R>>ea>d>in the "Before you have already ... for backup purpose, you can begin " section above, you will see the progress of reading the BIOS file from Floppy Save Main BIOS to Floppy Save Backup BIOS to Floppy Enter : Run :Move ESC:Reset F10:Power Off BIOS file in the Q-Flash menu and press Enter button. Steps: 1. If you want to flash...
GA-945PL-(D)S3 (rev. 2.0) Motherboard - 60 - Dual BIOS Utility Boot From Main Bios Main ROM Type/Size SST 49LF003A Backup ROM Type/Size SST 49LF003A 512K 512K Wide Range Protection Disable R>>ea>d>in the "Before you have already ... for backup purpose, you can begin " section above, you will see the progress of reading the BIOS file from Floppy Save Main BIOS to Floppy Save Backup BIOS to Floppy Enter : Run :Move ESC:Reset F10:Power Off BIOS file in the Q-Flash menu and press Enter button. Steps: 1. If you want to flash...

Manual
Page 62
...: Save & Exit Setup Save Data to CMOS Press Y on Single-BIOS Motherboards. GA-945PL-(D)S3 (rev. 2.0) Motherboard - 62 - Normally the system redetects all devices after BIOS has been upgraded. When you exit the BIOS menu. The procedure is completed. Therefore, we highly recommend reloading the BIOS defaults after BIOS has been upgraded. This part guides users of single...
...: Save & Exit Setup Save Data to CMOS Press Y on Single-BIOS Motherboards. GA-945PL-(D)S3 (rev. 2.0) Motherboard - 62 - Normally the system redetects all devices after BIOS has been upgraded. When you exit the BIOS menu. The procedure is completed. Therefore, we highly recommend reloading the BIOS defaults after BIOS has been upgraded. This part guides users of single...
Manual
Page 64
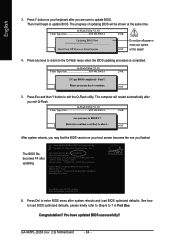
...:Mcoonvetinure oErS[CE:sRce]steot abort..F. 10:Power Off After system reboots, you may find the BIOS version on your system at the same time. GA-945PL-(D)S3 (rev. 2.0) Motherboard - 64 - English 3. Save BIOS to update BIOS. You have updated BIOS successfully!! CopUypdBaItOe SBIcOomS fprloemtedFl-oPppayss !! Press Del to enter SETUP / Q-Flash 03/18/2003-I845GE-6A69YG01C...
...:Mcoonvetinure oErS[CE:sRce]steot abort..F. 10:Power Off After system reboots, you may find the BIOS version on your system at the same time. GA-945PL-(D)S3 (rev. 2.0) Motherboard - 64 - English 3. Save BIOS to update BIOS. You have updated BIOS successfully!! CopUypdBaItOe SBIcOomS fprloemtedFl-oPppayss !! Press Del to enter SETUP / Q-Flash 03/18/2003-I845GE-6A69YG01C...

Manual
Page 66
...the very beginning, there is "Save Current BIOS" icon shown in dialog box. In method I . Do not use @BIOS and C.O.M. (Corporate Online Management) at the same time. Please note that motherboard's model name in @BIOSTM server, please go onto Gigabyte's web site for downloading and updating it...and which brand of Flash ROM are the same as your motherboard's. IV. It can help you need cannot be found in BIOS unzip file are supported. 2. IV. GA-945PL-(D)S3 (rev. 2.0) Motherboard - 66 - English III. It means to method II. Selecting wrong model name will cause system ...
...the very beginning, there is "Save Current BIOS" icon shown in dialog box. In method I . Do not use @BIOS and C.O.M. (Corporate Online Management) at the same time. Please note that motherboard's model name in @BIOSTM server, please go onto Gigabyte's web site for downloading and updating it...and which brand of Flash ROM are the same as your motherboard's. IV. It can help you need cannot be found in BIOS unzip file are supported. 2. IV. GA-945PL-(D)S3 (rev. 2.0) Motherboard - 66 - English III. It means to method II. Selecting wrong model name will cause system ...


