User Manual
Page 8
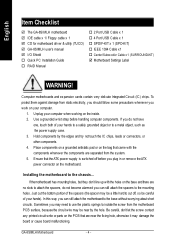
... þ IDE cable x 1/ Floppy cable x 1 þ CD for motherboard driver & utility (TUCD) þ GA-8SIMLH user's manual þ I/O Shield o Quick PC Installation Guide o RAID Manual o 2 Port USB Cable x 1 o 4 Port USB Cable x 1 o SPDIF-KIT x 1 (SPD-KIT) o IEEE 1394 ...the fixing hole, otherwise it may be careful of your hands). Installing the motherboard to the mounting holes. Sometimes you work on the motherboard. GA-8SIMLH Motherboard - 4 - To protect them against damage from the motherboard PCB surface, because the circuit wire may need to use the plastic springs ...
... þ IDE cable x 1/ Floppy cable x 1 þ CD for motherboard driver & utility (TUCD) þ GA-8SIMLH user's manual þ I/O Shield o Quick PC Installation Guide o RAID Manual o 2 Port USB Cable x 1 o 4 Port USB Cable x 1 o SPDIF-KIT x 1 (SPD-KIT) o IEEE 1394 ...the fixing hole, otherwise it may be careful of your hands). Installing the motherboard to the mounting holes. Sometimes you work on the motherboard. GA-8SIMLH Motherboard - 4 - To protect them against damage from the motherboard PCB surface, because the circuit wire may need to use the plastic springs ...
User Manual
Page 16
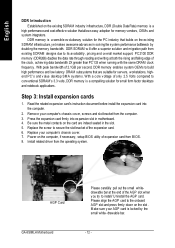
... that builds on the existing SDRAM infrastructure, yet makes awesome advances in solving the system performance bottleneck by the small white- Install related driver from the computer. 3. Step 3: Install expansion cards 1. With peak bandwidth of the AGP slot when you try to conventional SDRAM's ... the same DRAM clock frequency. Replace your computer's chassis cover, screws and slot bracket from the operating system. AGP Card GA-8SIMLH Motherboard Please carefully pull out the small whitedrawable bar at both the rising and falling edge of only 2.5 Volts compared to install...
... that builds on the existing SDRAM infrastructure, yet makes awesome advances in solving the system performance bottleneck by the small white- Install related driver from the computer. 3. Step 3: Install expansion cards 1. With peak bandwidth of the AGP slot when you try to conventional SDRAM's ... the same DRAM clock frequency. Replace your computer's chassis cover, screws and slot bracket from the operating system. AGP Card GA-8SIMLH Motherboard Please carefully pull out the small whitedrawable bar at both the rising and falling edge of only 2.5 Volts compared to install...

User Manual
Page 17
Alsomake sure your OS doesnot supportUSB controller, please contact OS vendor for possible patch or driver upgrade. If your OS supports USB controler. Have a standard USB interface. For more information please contact your device(s) such as USB keyboard,mouse, scanner, zip, ...
Alsomake sure your OS doesnot supportUSB controller, please contact OS vendor for possible patch or driver upgrade. If your OS supports USB controler. Have a standard USB interface. For more information please contact your device(s) such as USB keyboard,mouse, scanner, zip, ...
User Manual
Page 18
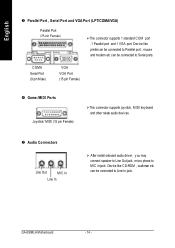
Device like CD-ROM , walkman etc can be connected to Serial ports. GA-8SIMLH Motherboard - 14 - y Audio Connectors Line Out MIC In Line In Ø After install onboard audio driver, you may connect speaker to Line Out jack, micro phone to Parallel port ; Device like printercan be connected to MIC Injack. English w Parallel Port...
Device like CD-ROM , walkman etc can be connected to Serial ports. GA-8SIMLH Motherboard - 14 - y Audio Connectors Line Out MIC In Line In Ø After install onboard audio driver, you may connect speaker to Line Out jack, micro phone to Parallel port ; Device like printercan be connected to MIC Injack. English w Parallel Port...
User Manual
Page 54
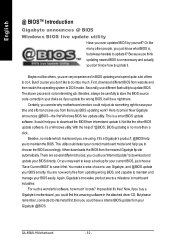
... code correctly in the attached driver CD. Besides, no more than a click. Or you may want to use different flash utility to internetat first,then you update the wrong BIOS, it . Again, Gigabyte's innovative producterects a milestone in BIOS updating and spend quite a lot oftime to DOS mode. Impossible! GA-8SIMLH Motherboard - 50 - You make...
... code correctly in the attached driver CD. Besides, no more than a click. Or you may want to use different flash utility to internetat first,then you update the wrong BIOS, it . Again, Gigabyte's innovative producterects a milestone in BIOS updating and spend quite a lot oftime to DOS mode. Impossible! GA-8SIMLH Motherboard - 50 - You make...

User Manual
Page 55
...of "Overclock". This is the firstwindows based overclocking utility is also another choice.Click "Advanced Mode" to the experts in driver CD. "Advanced Mode", allows users to change the system bus / AGP / Memory working frequency in some enthusiasts. Technical...Ifuser runs EasyTune 4 over -clocking methods, EasyTune 4doesn'trequire users tochange neitherBIOS norhardwareswitch/jumper setting; English Easy TuneTM 4 Introduction Gigabyte announces EasyTuneTM 4 Windows based Overclocking utility EasyTune 4 carries on the heritage so as to get ultimate system performance . But...
...of "Overclock". This is the firstwindows based overclocking utility is also another choice.Click "Advanced Mode" to the experts in driver CD. "Advanced Mode", allows users to change the system bus / AGP / Memory working frequency in some enthusiasts. Technical...Ifuser runs EasyTune 4 over -clocking methods, EasyTune 4doesn'trequire users tochange neitherBIOS norhardwareswitch/jumper setting; English Easy TuneTM 4 Introduction Gigabyte announces EasyTuneTM 4 Windows based Overclocking utility EasyTune 4 carries on the heritage so as to get ultimate system performance . But...
User Manual
Page 60
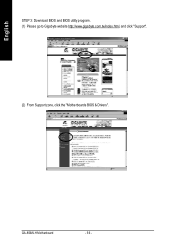
GA-8SIMLH Motherboard - 56 - English STEP 3: Download BIOS and BIOS utility program. (1) Please go to Gigabyte website http://www.gigabyte.com.tw/index.html, and click "Support". (2) From Supportzone, click the "Motherboards BIOS & Drivers".
GA-8SIMLH Motherboard - 56 - English STEP 3: Download BIOS and BIOS utility program. (1) Please go to Gigabyte website http://www.gigabyte.com.tw/index.html, and click "Support". (2) From Supportzone, click the "Motherboards BIOS & Drivers".

User Manual
Page 73
English RCehvaispitoenr H5istAoprypendix Picture below are shown in "My computer", and execute the setup.exe. 1.Click "SiS 650 VGA Driver " item. (1) 2.Click "Next". (2) 3.Click "Next". (3) 4.Click "Next". (4) - 69 - SiS 650 VGA Driver: Insert the driver CD-title that came with your motherboard into your CD-ROM driver, the driver CD-title will auto start and show the installation guide. Appendix If not, please double click the CD-ROM device icon in Windows XP (TUCD driver version 2.1) Appendix A: SiS 650/650GX/650GL/651 Chipset Driver Installation A.
English RCehvaispitoenr H5istAoprypendix Picture below are shown in "My computer", and execute the setup.exe. 1.Click "SiS 650 VGA Driver " item. (1) 2.Click "Next". (2) 3.Click "Next". (3) 4.Click "Next". (4) - 69 - SiS 650 VGA Driver: Insert the driver CD-title that came with your motherboard into your CD-ROM driver, the driver CD-title will auto start and show the installation guide. Appendix If not, please double click the CD-ROM device icon in Windows XP (TUCD driver version 2.1) Appendix A: SiS 650/650GX/650GL/651 Chipset Driver Installation A.

User Manual
Page 75
English B. USB Patch Driver: Enable S3 for USB Device Setup is preparing the InstallShield(R) Wizard which will auto start and show the installation guide. SiS AGP Driver: Insert the driver CD-title that came with your motherboard into your CD-ROM driver, the driver CD-title will guide you through the setup process. - 71 - Appendix If not, please double click the CD-ROM device icon in "My computer", and execute the setup.exe. 1.Click "SiS AGP Driver " item. (1) 2.Click "Next". (2) 3.Click "Finish" to restart computer. (3) (4) C.
English B. USB Patch Driver: Enable S3 for USB Device Setup is preparing the InstallShield(R) Wizard which will auto start and show the installation guide. SiS AGP Driver: Insert the driver CD-title that came with your motherboard into your CD-ROM driver, the driver CD-title will guide you through the setup process. - 71 - Appendix If not, please double click the CD-ROM device icon in "My computer", and execute the setup.exe. 1.Click "SiS AGP Driver " item. (1) 2.Click "Next". (2) 3.Click "Finish" to restart computer. (3) (4) C.
User Manual
Page 76
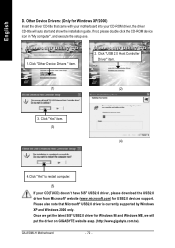
... (5) If your CD-ROM driver, the driver CD-title will put the driver on GIGABYTE website asap. (http://www.gigabyte.com.tw). Please also note that came with your motherboard into your CD(TUCD) doesn't have SiS® USB2.0 driver, please download the USB2.0 driver from Microsoft® website (... driver for Windows XP/2000) Insert the driver CD-title that Microsoft® USB2.0 driver is currently supported by Windows XP and Windows 2000 only. If not, please double click the CD-ROM device icon in "My computer", and execute the setup.exe. 1.Click "Other Device Drivers " item. 2. GA-8SIMLH ...
... (5) If your CD-ROM driver, the driver CD-title will put the driver on GIGABYTE website asap. (http://www.gigabyte.com.tw). Please also note that came with your motherboard into your CD(TUCD) doesn't have SiS® USB2.0 driver, please download the USB2.0 driver from Microsoft® website (... driver for Windows XP/2000) Insert the driver CD-title that Microsoft® USB2.0 driver is currently supported by Windows XP and Windows 2000 only. If not, please double click the CD-ROM device icon in "My computer", and execute the setup.exe. 1.Click "Other Device Drivers " item. 2. GA-8SIMLH ...

User Manual
Page 77
Appendix Press "Audio" icon. 1.Click "SiS 7012 Sound Driver" item. (1) 2.Click "Next". (2) 3.Click "Next". (3) (4) 4.Click "Finish" to restart computer. If not, please double click the CD-ROM device icon in "My computer", and execute the setup.exe. "*" for PCB Ver.: 2.01 (5) - 73 - English Appendix B: SiS 7012 Sound Driver * Insert the driver CD-title that came with your motherboard into your CD-ROM driver, the driver CD-title will auto start and show the installation guide.
Appendix Press "Audio" icon. 1.Click "SiS 7012 Sound Driver" item. (1) 2.Click "Next". (2) 3.Click "Next". (3) (4) 4.Click "Finish" to restart computer. If not, please double click the CD-ROM device icon in "My computer", and execute the setup.exe. "*" for PCB Ver.: 2.01 (5) - 73 - English Appendix B: SiS 7012 Sound Driver * Insert the driver CD-title that came with your motherboard into your CD-ROM driver, the driver CD-title will auto start and show the installation guide.

User Manual
Page 78
Press "Audio" icon. 1.Click "Realtek AC'97 Audio Driver" item. (1) 2.Click "Next". (2) 3.Click "Finish" to restart computer. (3) (4) "**" for PCB Ver.: 2.1 GA-8SIMLH Motherboard - 74 - English Appendix B-1: Realtek AC'97 Audio Driver ** Insert the driver CD-title that came with your motherboard into your CD-ROM driver, the driver CD-title will auto start and show the installation guide. If not, please double click the CD-ROM device icon in "My computer", and execute the setup.exe.
Press "Audio" icon. 1.Click "Realtek AC'97 Audio Driver" item. (1) 2.Click "Next". (2) 3.Click "Finish" to restart computer. (3) (4) "**" for PCB Ver.: 2.1 GA-8SIMLH Motherboard - 74 - English Appendix B-1: Realtek AC'97 Audio Driver ** Insert the driver CD-title that came with your motherboard into your CD-ROM driver, the driver CD-title will auto start and show the installation guide. If not, please double click the CD-ROM device icon in "My computer", and execute the setup.exe.

User Manual
Page 79
Appendix If not, please double click the CD-ROM device icon in "My computer", and execute the setup.exe. Press "Network" icon. 1.Click "RealTek 8100/8139 LAN Driver". (1) 2.Click "Next". (2) 3.Click "Finish". (3) (4) - 75 - English RApepvenisdiixoCn: RHeaislTteok r8y100/8139 LAN Driver Insert the driver CD-title that came with your motherboard into your CD-ROM driver, the driver CD-title will auto start and show the installation guide.
Appendix If not, please double click the CD-ROM device icon in "My computer", and execute the setup.exe. Press "Network" icon. 1.Click "RealTek 8100/8139 LAN Driver". (1) 2.Click "Next". (2) 3.Click "Finish". (3) (4) - 75 - English RApepvenisdiixoCn: RHeaislTteok r8y100/8139 LAN Driver Insert the driver CD-title that came with your motherboard into your CD-ROM driver, the driver CD-title will auto start and show the installation guide.
User Manual
Page 80
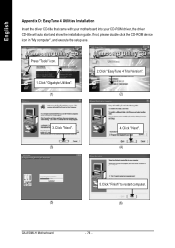
Press "Tools" icon. 1.Click "Gigabyte Utilities". (1) 2.Click "EasyTune 4 Trial Version". (2) 3.Click "Next". (3) 4.Click "Next". (4) (5) GA-8SIMLH Motherboard 5.Click "Finish" to restart computer. (6) - 76 - English RApepvenisdiixoDn: EHaissyTtuonrey4 Utilities Installation Insert the driver CD-title that came with your motherboard into your CD-ROM driver, the driver CD-title will auto start and show the installation guide. If not, please double click the CD-ROM device icon in "My computer", and execute the setup.exe.
Press "Tools" icon. 1.Click "Gigabyte Utilities". (1) 2.Click "EasyTune 4 Trial Version". (2) 3.Click "Next". (3) 4.Click "Next". (4) (5) GA-8SIMLH Motherboard 5.Click "Finish" to restart computer. (6) - 76 - English RApepvenisdiixoDn: EHaissyTtuonrey4 Utilities Installation Insert the driver CD-title that came with your motherboard into your CD-ROM driver, the driver CD-title will auto start and show the installation guide. If not, please double click the CD-ROM device icon in "My computer", and execute the setup.exe.


