
User Manual
Page 1
M Please do not remove any errors or omissions that may void the warranty of this booklet. M Due to update the information contained herein. M The author assumes no responsibility for any labels on motherboard, this may appear in this document nor does the author make a commitment to rapid change in technology, some of the specifications might be out of date beforepublication of this motherboard. M Third-party brands and names are the property of their respective owners.
M Please do not remove any errors or omissions that may void the warranty of this booklet. M Due to update the information contained herein. M The author assumes no responsibility for any labels on motherboard, this may appear in this document nor does the author make a commitment to rapid change in technology, some of the specifications might be out of date beforepublication of this motherboard. M Third-party brands and names are the property of their respective owners.

User Manual
Page 4
.../ (818) 854-9339 hereby declares that may not cause harmful and (2) this device must accept any inference received, including that the product Product Name: Motherboard Model Number:GA-8SIMLH Conforms to the following specifications: FCC Part 15, Subpart B, Section 15.107(a) and Section 15.109(a), Class B Digital Device Supplementary Information: This device complies...
.../ (818) 854-9339 hereby declares that may not cause harmful and (2) this device must accept any inference received, including that the product Product Name: Motherboard Model Number:GA-8SIMLH Conforms to the following specifications: FCC Part 15, Subpart B, Section 15.107(a) and Section 15.109(a), Class B Digital Device Supplementary Information: This device complies...

User Manual
Page 5
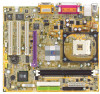
GA-8SIMLH P4 Titan-DDR Motherboard USER'S MANUAL Pentium®4 Processor Motherboard Rev. 2101 12M E-8SIM LH -2101
GA-8SIMLH P4 Titan-DDR Motherboard USER'S MANUAL Pentium®4 Processor Motherboard Rev. 2101 12M E-8SIM LH -2101

User Manual
Page 6
English Table of Content Item Checklist 4 WARNING 4 Chapter 1 Introduction 5 Features Summary 5 GA-8SIMLH Motherboard Layout 7 Chapter 2 Hardware Installation Process 8 Step 1: Install the Central Processing Unit (CPU 9 Step1-1 : CPU Installation 9 Step1-2 : CPU Heat Sink Installation 10 Step 2: Install memory modules ... 23 The Main Menu (For example: BIOS Ver. : F1o 24 Standard CMOS Features 26 Advanced BIOS Features 29 Integrated Peripherals 31 Power Management Setup 35 GA-8SIMLH Motherboard - 2 -
English Table of Content Item Checklist 4 WARNING 4 Chapter 1 Introduction 5 Features Summary 5 GA-8SIMLH Motherboard Layout 7 Chapter 2 Hardware Installation Process 8 Step 1: Install the Central Processing Unit (CPU 9 Step1-1 : CPU Installation 9 Step1-2 : CPU Heat Sink Installation 10 Step 2: Install memory modules ... 23 The Main Menu (For example: BIOS Ver. : F1o 24 Standard CMOS Features 26 Advanced BIOS Features 29 Integrated Peripherals 31 Power Management Setup 35 GA-8SIMLH Motherboard - 2 -
User Manual
Page 8
...1. Just cut off before handling computer components. Sometimes you work on the motherboard. English Item Checklist þ The GA-8SIMLH motherboard þ IDE cable x 1/ Floppy cable x 1 þ CD for motherboard driver & utility (TUCD) þ GA-8SIMLH user's manual þ I/O Shield o Quick PC Installation Guide o RAID...3. To protect them against damage from the system. 5. Hold components by the hole. Installing the motherboard to the mounting holes. GA-8SIMLH Motherboard - 4 - If themotherboard has mounting holes, but they don't line up with the components whenever...
...1. Just cut off before handling computer components. Sometimes you work on the motherboard. English Item Checklist þ The GA-8SIMLH motherboard þ IDE cable x 1/ Floppy cable x 1 þ CD for motherboard driver & utility (TUCD) þ GA-8SIMLH user's manual þ I/O Shield o Quick PC Installation Guide o RAID...3. To protect them against damage from the system. 5. Hold components by the hole. Installing the motherboard to the mounting holes. GA-8SIMLH Motherboard - 4 - If themotherboard has mounting holes, but they don't line up with the components whenever...
User Manual
Page 10
... - Build in SiS651 Chipset - PS/2 Mouse power on your system can run under these specific bus frequencies are not the standard specifications for PCB Ver.: 2.1 GA-8SIMLH Motherboard - 6 - STR(Suspend-To-RAM) - Line In/ Line Out/ Mic In/ CD_In/ AUX_IN/ Game Port - AC Recovery - PS/2 Keyboard power on by password - Supports EasyTune 4 - Licensed...
... - Build in SiS651 Chipset - PS/2 Mouse power on your system can run under these specific bus frequencies are not the standard specifications for PCB Ver.: 2.1 GA-8SIMLH Motherboard - 6 - STR(Suspend-To-RAM) - Line In/ Line Out/ Mic In/ CD_In/ AUX_IN/ Game Port - AC Recovery - PS/2 Keyboard power on by password - Supports EasyTune 4 - Licensed...
User Manual
Page 12
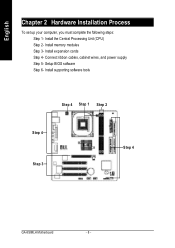
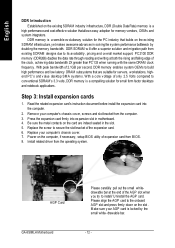
Install expansion cards Step 4- Install supporting software tools Step 4 Step 1 Step 2 Step 4 Step 3 Step 4 GA-8SIMLH Motherboard - 8 - Setup BIOS software Step 6- Install memory modules Step 3- Connect ribbon cables, cabinet wires, and power supply Step 5- Install the Central Processing Unit (CPU) Step 2- English Chapter 2 Hardware Installation Process To set up your computer, you must complete the following steps: Step 1-
Install expansion cards Step 4- Install supporting software tools Step 4 Step 1 Step 2 Step 4 Step 3 Step 4 GA-8SIMLH Motherboard - 8 - Setup BIOS software Step 6- Install memory modules Step 3- Connect ribbon cables, cabinet wires, and power supply Step 5- Install the Central Processing Unit (CPU) Step 2- English Chapter 2 Hardware Installation Process To set up your computer, you must complete the following steps: Step 1-

User Manual
Page 13
... tight, andthen continue pull the rod to 650 Socket Actuation Lever 1. Pin1 indicator Pin1 indicator 3. M Please make sure the CPU type is supported by the motherboard. Please change the insert orientation. - 9 - Hardw are Installation Process CPU Top View 4. Then insert the CPU into the socket. English Step 1: Install the Central Processing...
... tight, andthen continue pull the rod to 650 Socket Actuation Lever 1. Pin1 indicator Pin1 indicator 3. M Please make sure the CPU type is supported by the motherboard. Please change the insert orientation. - 9 - Hardw are Installation Process CPU Top View 4. Then insert the CPU into the socket. English Step 1: Install the Central Processing...

User Manual
Page 14
GA-8SIMLH Motherboard - 10 - M Please refer to the CPU socket. To avoid this completes the installation. Hook the other end of the cooler bracket to the CPU socket ...
GA-8SIMLH Motherboard - 10 - M Please refer to the CPU socket. To avoid this completes the installation. Hook the other end of the cooler bracket to the CPU socket ...

User Manual
Page 15
... insert orientation. - 11 - Reverse the installation steps when you wish to lock the DIMM module. Hardw are Installation Process English Step 2: Install memory modules The motherboard has 2 dual inline memory module (DIMM) sockets. Support Unbuffered DDR DIMM Sizes type: 64 Mbit (2Mx8x4 banks) 64 Mbit (1Mx16x4 banks) 128 Mbit(2Mx16x4 banks...
... insert orientation. - 11 - Reverse the installation steps when you wish to lock the DIMM module. Hardw are Installation Process English Step 2: Install memory modules The motherboard has 2 dual inline memory module (DIMM) sockets. Support Unbuffered DDR DIMM Sizes type: 64 Mbit (2Mx8x4 banks) 64 Mbit (1Mx16x4 banks) 128 Mbit(2Mx16x4 banks...
User Manual
Page 16
Read the related expansion card's instruction document before install the expansion card into expansion slot in motherboard. 4. drawable bar. - 12 - With peak bandwidth of 2.1GB per second, DDR memory enables system OEMs to build high performance and low ... SDRAM w ill offer a superior solution and migration path from the computer. 3. Replace the screw to install/ Uninstall the AGP card. AGP Card GA-8SIMLH Motherboard Please carefully pull out the small whitedrawable bar at both the rising and falling edge of only 2.5 Volts compared to its availability, pricing and overall...
Read the related expansion card's instruction document before install the expansion card into expansion slot in motherboard. 4. drawable bar. - 12 - With peak bandwidth of 2.1GB per second, DDR memory enables system OEMs to build high performance and low ... SDRAM w ill offer a superior solution and migration path from the computer. 3. Replace the screw to install/ Uninstall the AGP card. AGP Card GA-8SIMLH Motherboard Please carefully pull out the small whitedrawable bar at both the rising and falling edge of only 2.5 Volts compared to its availability, pricing and overall...
User Manual
Page 18
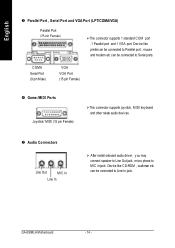
... Line Out MIC In Line In Ø After install onboard audio driver, you may connect speaker to Line Out jack, micro phone to Serial ports. GA-8SIMLH Motherboard - 14 - English w Parallel Port , Serial Port and VGA Port (LPT/COMA/VGA) Parallel Port (25 pin Female) ØThis connector supports 1 standard COM port ,1 Parallel...
... Line Out MIC In Line In Ø After install onboard audio driver, you may connect speaker to Line Out jack, micro phone to Serial ports. GA-8SIMLH Motherboard - 14 - English w Parallel Port , Serial Port and VGA Port (LPT/COMA/VGA) Parallel Port (25 pin Female) ØThis connector supports 1 standard COM port ,1 Parallel...
User Manual
Page 20
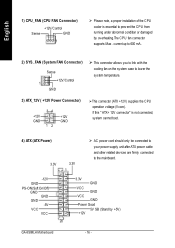
... after ATX power cable and other related devices are firmly connected to prevent the CPU from running under abnormal condition or damaged by +5V) +12V GA-8SIMLH Motherboard - 16 - If this " ATX+ 12V connector" is essential to the mainboard. -12V GND PS-ON(Soft On/Off) GND GND GND -5V VCC VCC 20...
... after ATX power cable and other related devices are firmly connected to prevent the CPU from running under abnormal condition or damaged by +5V) +12V GA-8SIMLH Motherboard - 16 - If this " ATX+ 12V connector" is essential to the mainboard. -12V GND PS-ON(Soft On/Off) GND GND GND -5V VCC VCC 20...

User Manual
Page 22
..., PC speaker, reset switch andpower switch etc of your chassis front panel to the F_PANEL connector according to the pin assignment above. 10) BAT1 (Battery) + GA-8SIMLH Motherboard CAUTI ON v Danger of used batteries according to the manufacturer's instructions. - 18 - v Dispose of explosion if battery is incorrectly replaced. v Replace only with the same...
..., PC speaker, reset switch andpower switch etc of your chassis front panel to the F_PANEL connector according to the pin assignment above. 10) BAT1 (Battery) + GA-8SIMLH Motherboard CAUTI ON v Danger of used batteries according to the manufacturer's instructions. - 18 - v Dispose of explosion if battery is incorrectly replaced. v Replace only with the same...

User Manual
Page 24
... dealer for optional front USB cable. 1 Pow er USB Dx- N SOU TB GND N RIBN RTSB- Ø Be careful with the polarity of the COMB connector. GA-8SIMLH Motherboard - 20 - Check the pin assignment while you connect the front USB cable. Check the pin assignment while you connect the COMB cable. English 15) F_USB1...
... dealer for optional front USB cable. 1 Pow er USB Dx- N SOU TB GND N RIBN RTSB- Ø Be careful with the polarity of the COMB connector. GA-8SIMLH Motherboard - 20 - Check the pin assignment while you connect the front USB cable. Check the pin assignment while you connect the COMB cable. English 15) F_USB1...
User Manual
Page 28
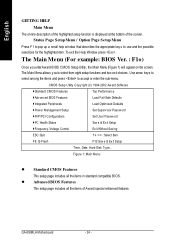
... or enter the sub-menu. The Main Menu (For example: BIOS Ver. : F1o) Once you to select from eight setup functions and two exit choices. GA-8SIMLH Motherboard - 24 - To exit the Help Window press . CMOS Setup Utility -Copy right (C) 1984-2002 Aw ard Softw are }Standard CMOS Features Top Performance }Adv anced...
... or enter the sub-menu. The Main Menu (For example: BIOS Ver. : F1o) Once you to select from eight setup functions and two exit choices. GA-8SIMLH Motherboard - 24 - To exit the Help Window press . CMOS Setup Utility -Copy right (C) 1984-2002 Aw ard Softw are }Standard CMOS Features Top Performance }Adv anced...

User Manual
Page 30
... (or the max imum allow ed in the month) 1999 to Sat, determined by the BIOS and is , , , . 8Week The w eek, from 1999 through 2098 GA-8SIMLH Motherboard - 26 - Driv e A Driv e B Floppy 3 Mode Support Halt On Base Memory Ex tended Memory Total Memory 1.44M, 3.5 in the month) The y ear, from Sun to 2098...
... (or the max imum allow ed in the month) 1999 to Sat, determined by the BIOS and is , , , . 8Week The w eek, from 1999 through 2098 GA-8SIMLH Motherboard - 26 - Driv e A Driv e B Floppy 3 Mode Support Halt On Base Memory Ex tended Memory Total Memory 1.44M, 3.5 in the month) The y ear, from Sun to 2098...

User Manual
Page 32
The value of the base memory is typically 512 K for systems with 640 K or more memory installed on the motherboard. English C Floppy 3 Mode Support (for systems with 512 K memory installed on the motherboard, or 640 K for J apan Area) 8Disabled Normal Floppy Driv e. (Default v alue) 8Driv e A Driv e A is 3 ...not stop for a key board or disk error; This is detected during the POST. it w ill stop for a key board error; GA-8SIMLH Motherboard - 28 - Extended Memory The BIOS determines how much extended memory is determined by POST (PowerOn Self Test) ofthe BIOS. C Memory ...
The value of the base memory is typically 512 K for systems with 640 K or more memory installed on the motherboard. English C Floppy 3 Mode Support (for systems with 512 K memory installed on the motherboard, or 640 K for J apan Area) 8Disabled Normal Floppy Driv e. (Default v alue) 8Driv e A Driv e A is 3 ...not stop for a key board or disk error; This is detected during the POST. it w ill stop for a key board error; GA-8SIMLH Motherboard - 28 - Extended Memory The BIOS determines how much extended memory is determined by POST (PowerOn Self Test) ofthe BIOS. C Memory ...

User Manual
Page 34
Note that there w ill not be any w arning message if the driv e installed is 360 K. (Default v alue) GA-8SIMLH Motherboard - 30 - English C Boot Up Fl oppy Seek During POST, BIOS will determine the floppy disk drive installed is 40 or 80 tracks. 360 K type is 40 tracks 720 K, 1.2 M and 1.44 M are all 80 tracks. 8Enabled BIOS searches for the ty pe of floppy disk driv e by track number. Note that BIOS can not tell from 720 K, 1.2 M or 1.44 M driv e ty pe as they are all 80tracks. 8Disabled BIOS w ill not search for floppy disk driv e to determine it is 40 or 80 tracks.
Note that there w ill not be any w arning message if the driv e installed is 360 K. (Default v alue) GA-8SIMLH Motherboard - 30 - English C Boot Up Fl oppy Seek During POST, BIOS will determine the floppy disk drive installed is 40 or 80 tracks. 360 K type is 40 tracks 720 K, 1.2 M and 1.44 M are all 80 tracks. 8Enabled BIOS searches for the ty pe of floppy disk driv e by track number. Note that BIOS can not tell from 720 K, 1.2 M or 1.44 M driv e ty pe as they are all 80tracks. 8Disabled BIOS w ill not search for floppy disk driv e to determine it is 40 or 80 tracks.

User Manual
Page 36
... PCI IDE 8Enabled Enable onboard 2nd channel IDE port. (Default v alue) 8Disabled Disable onboard 2nd channel IDE port. Enable Onboard Lan Chip function. (Default Value) GA-8SIMLH Motherboard - 32 - C AC97 Audio 8Enabled 8Disabled Enable onboard AC'97 audio function. (Default v alue) Disable this function. C On-Chip Primary PCI IDE 8Enabled Enable onboard 1st...
... PCI IDE 8Enabled Enable onboard 2nd channel IDE port. (Default v alue) 8Disabled Disable onboard 2nd channel IDE port. Enable Onboard Lan Chip function. (Default Value) GA-8SIMLH Motherboard - 32 - C AC97 Audio 8Enabled 8Disabled Enable onboard AC'97 audio function. (Default v alue) Disable this function. C On-Chip Primary PCI IDE 8Enabled Enable onboard 1st...


