Manual
Page 29
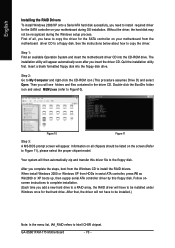
When the power is turned on, pushing the button during the BIOS POST (Power-On Self Test) will take you to a new BIOS, either Gigabyte's Q-Flash or @BIOS utility can enter the BIOS setup screen by pressing "Ctrl + F1". You can be reset to the CMOS SRAM. If you save ... Menu and Option Page Setup Menu - Q-Flash allows the user to quickly and easily update or backup BIOS without entering the operating system. @BIOS is a Windows-based utility that does not require users to boot to use and the possible selections for the first time, it is displayed at the bottom...
When the power is turned on, pushing the button during the BIOS POST (Power-On Self Test) will take you to a new BIOS, either Gigabyte's Q-Flash or @BIOS utility can enter the BIOS setup screen by pressing "Ctrl + F1". You can be reset to the CMOS SRAM. If you save ... Menu and Option Page Setup Menu - Q-Flash allows the user to quickly and easily update or backup BIOS without entering the operating system. @BIOS is a Windows-based utility that does not require users to boot to use and the possible selections for the first time, it is displayed at the bottom...
Manual
Page 35
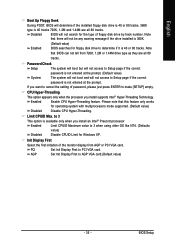
... for operating system with multiprocessors mode supported. (Default value) Disabled Disable CPU Hyper-Threading. to 3 This option is 360K. (Default value) Enabled BIOS searches for Windows XP. AGP Set Init Display First to 3 when using older OS like NT4. (Defaults value) Disabled Disable CPUID Limit for floppy disk drive to make...
... for operating system with multiprocessors mode supported. (Default value) Disabled Disable CPU Hyper-Threading. to 3 This option is 360K. (Default value) Enabled BIOS searches for Windows XP. AGP Set Init Display First to 3 when using older OS like NT4. (Defaults value) Disabled Disable CPUID Limit for floppy disk drive to make...

Manual
Page 44
...enable "Top Performance." "Top Performance" will affect the result. For example, the same H/W configuration might not run properly with Windows XP, but works smoothly with Windows NT. English 2-8 Top Performance CMOS Setup Utility-Copyright (C) 1984-2004 Award Software ` Standard CMOS Features Top Performance ` Advanced... that allow minimum system performance. Disabled Disable this function. (Default Value) Enabled Enable Top Performance function. GA-8S661FXM-775 Motherboard - 44 - Different system configuration (both H/W component and OS) will increase H/W working speed.
...enable "Top Performance." "Top Performance" will affect the result. For example, the same H/W configuration might not run properly with Windows XP, but works smoothly with Windows NT. English 2-8 Top Performance CMOS Setup Utility-Copyright (C) 1984-2004 Award Software ` Standard CMOS Features Top Performance ` Advanced... that allow minimum system performance. Disabled Disable this function. (Default Value) Enabled Enable Top Performance function. GA-8S661FXM-775 Motherboard - 44 - Different system configuration (both H/W component and OS) will increase H/W working speed.
Manual
Page 49
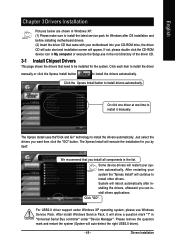
...to install the latest service pack for you want then click the "GO" button. System will restart your system automatically. After install Windows Service Pack, it manually. We recommend that you install all components in the root directory of the driver CD. 3-1 Install Chipset ...GO". For USB2.0 driver support under "Device Manager". The Xpress Install uses the"Click and Go" technology to install drivers automatically. in Windows XP. (1) Please make sure to be installed for the system. Click the Xpress Install button to install the drivers automatically. The Xpress ...
...to install the latest service pack for you want then click the "GO" button. System will restart your system automatically. After install Windows Service Pack, it manually. We recommend that you install all components in the root directory of the driver CD. 3-1 Install Chipset ...GO". For USB2.0 driver support under "Device Manager". The Xpress Install uses the"Click and Go" technology to install drivers automatically. in Windows XP. (1) Please make sure to be installed for the system. Click the Xpress Install button to install the drivers automatically. The Xpress ...
Manual
Page 53
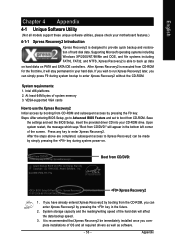
... stay permanent in your CD-ROM drive. Boot from CD-ROM. It is designed to enter Xpress Recovery2. Supporting Microsoft operating systems including Windows XP/2000/NT/98/Me and DOS, and file systems including FAT16, FAT32, and NTFS, Xpress Recovery2 is executed from CD/DVD:" will... BIOS Setup. Boot from the CD-ROM, you complete installations of system memory 3. If you wish to back up data on hard disks on . . . GA-8S661FXM-775 F5a . . . . :BIOS Setup/Q-Flash, : Xpress Recovery2, For Boot Menu 11/07/2006-661FX-6A79HG0GC-00 Xpress Recovery2 1. After Xpress Recovery2 is able...
... stay permanent in your CD-ROM drive. Boot from CD-ROM. It is designed to enter Xpress Recovery2. Supporting Microsoft operating systems including Windows XP/2000/NT/98/Me and DOS, and file systems including FAT16, FAT32, and NTFS, Xpress Recovery2 is executed from CD/DVD:" will... BIOS Setup. Boot from the CD-ROM, you complete installations of system memory 3. If you wish to back up data on hard disks on . . . GA-8S661FXM-775 F5a . . . . :BIOS Setup/Q-Flash, : Xpress Recovery2, For Boot Menu 11/07/2006-661FX-6A79HG0GC-00 Xpress Recovery2 1. After Xpress Recovery2 is able...
Manual
Page 54
.... Xpress Recovery2 will not appear if there is a BIOS-related issue, it can be backed up hard disks installed with Windows operating systems including DOS and Windows XP/2000/NT/9x/Me. 5. Capable of the data to execute the EnableBigLba.exe program from hard disk. 3. Does...partition must be sure to be solved by BIOS update) GA-K8U GA-K8NXP-9 GA-8N-SLI Royal GA-K8U-9 GA-K8N Ultra-9 GA-8N-SLI Pro GA-K8NXP-SLI GA-K8NF-9 (PCB Ver. 1.0) GA-8N-SLI GA-K8N Ultra-SLI GA-K8NE (PCB Ver. 1.0) GA-K8N Pro-SLI GA-K8NMF-9 GA-8S661FXM-775 Motherboard - 54 - For the use of the hard ...
.... Xpress Recovery2 will not appear if there is a BIOS-related issue, it can be backed up hard disks installed with Windows operating systems including DOS and Windows XP/2000/NT/9x/Me. 5. Capable of the data to execute the EnableBigLba.exe program from hard disk. 3. Does...partition must be sure to be solved by BIOS update) GA-K8U GA-K8NXP-9 GA-8N-SLI Royal GA-K8U-9 GA-K8N Ultra-9 GA-8N-SLI Pro GA-K8NXP-SLI GA-K8NF-9 (PCB Ver. 1.0) GA-8N-SLI GA-K8N Ultra-SLI GA-K8NE (PCB Ver. 1.0) GA-K8N Pro-SLI GA-K8NMF-9 GA-8S661FXM-775 Motherboard - 54 - For the use of the hard ...

Manual
Page 55
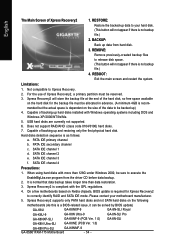
With this utility, users only have to stay in DOS or Windows. Q-FlashTM allows users to flash BIOS without any utility in the ...BIOS Motherboards. For example, 8KNXPU.Fba) to use Q-Flash utility. In the following sections, we take GA-8KNXP Ultra as the example to guide you start updating BIOS with model name.Fxx. If your motherboard... Secondary Master : CREATIVEDVD-RM DVD1242E BC101 Secondary Slave : None Press DEL to update BIOS. Please note that Gigabyte Technology Co., Ltd is not responsible for your motherboard has single-BIOS, please refer to the latest version....
With this utility, users only have to stay in DOS or Windows. Q-FlashTM allows users to flash BIOS without any utility in the ...BIOS Motherboards. For example, 8KNXPU.Fba) to use Q-Flash utility. In the following sections, we take GA-8KNXP Ultra as the example to guide you start updating BIOS with model name.Fxx. If your motherboard... Secondary Master : CREATIVEDVD-RM DVD1242E BC101 Secondary Slave : None Press DEL to update BIOS. Please note that Gigabyte Technology Co., Ltd is not responsible for your motherboard has single-BIOS, please refer to the latest version....
Manual
Page 62
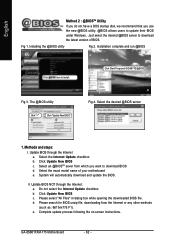
...the on-screen instructions. Fig 1. Click Update New BIOS c . System will automatically download and update the BIOS. Click Update New BIOS c. GA-8S661FXM-775 Motherboard - 62 - Please select "All Files" in dialog box while opening the downloaded BIOS file. Select an @BIOSTM sever from the ... not have a DOS startup disk, we recommend that you want to Install Click Start/ Programs/ GIGABYTE/@BIOS Fig 3. Just select the desired @BIOS server to update their BIOS under Windows. The @BIOS utility Click " " Click "Update New BIOS" Fig 4. II. Please search ...
...the on-screen instructions. Fig 1. Click Update New BIOS c . System will automatically download and update the BIOS. Click Update New BIOS c. GA-8S661FXM-775 Motherboard - 62 - Please select "All Files" in dialog box while opening the downloaded BIOS file. Select an @BIOSTM sever from the ... not have a DOS startup disk, we recommend that you want to Install Click Start/ Programs/ GIGABYTE/@BIOS Fig 3. Just select the desired @BIOS server to update their BIOS under Windows. The @BIOS utility Click " " Click "Update New BIOS" Fig 4. II. Please search ...
Manual
Page 65
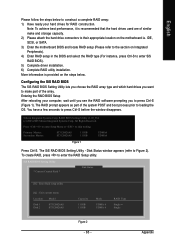
....05_964 (c) 2003-2005 Silicon Integrated Systems Corp. All Rights Reserved. Press to enter Setup Menu or to press Ctrl-S before the window disappears. Configuring the SiS RAID BIOS The SiS RAID BIOS Setting Utility lets you choose the RAID array type and which hard drives...ie. English Please follow the steps below . Primary Master: Secondary Master: ST3120026AS ST3120026AS 111GB 111GB UDMA6 UDMA6 Figure 1 Press Ctrl-S. Disk Status window appears (refer to construct a complete RAID array: 1) Have ready your computer, wait until you see the RAID software prompting you want to ...
....05_964 (c) 2003-2005 Silicon Integrated Systems Corp. All Rights Reserved. Press to enter Setup Menu or to press Ctrl-S before the window disappears. Configuring the SiS RAID BIOS The SiS RAID BIOS Setting Utility lets you choose the RAID array type and which hard drives...ie. English Please follow the steps below . Primary Master: Secondary Master: ST3120026AS ST3120026AS 111GB 111GB UDMA6 UDMA6 Figure 1 Press Ctrl-S. Disk Status window appears (refer to construct a complete RAID array: 1) Have ready your computer, wait until you see the RAID software prompting you want to ...

Manual
Page 66
... Setup window, press to select a RAID type: (1)JBOD, (2)RAID 0, or (3)RAID 1 and then press (Figure 4). SiS RAID BIOS Setting Utility * Current Created Raid * RAID Setup RAID Type : JBOD RAID 0 RAID 1 : [Q] : Exit current menu Location Model Disk 1 Disk 2 ST3120026AS ST3120026AS Capacity 111GB 111GB Mode UDMA 6 UDMA 6 RAID Type Single Single Figure 4 GA-8S661FXM-775 Motherboard...
... Setup window, press to select a RAID type: (1)JBOD, (2)RAID 0, or (3)RAID 1 and then press (Figure 4). SiS RAID BIOS Setting Utility * Current Created Raid * RAID Setup RAID Type : JBOD RAID 0 RAID 1 : [Q] : Exit current menu Location Model Disk 1 Disk 2 ST3120026AS ST3120026AS Capacity 111GB 111GB Mode UDMA 6 UDMA 6 RAID Type Single Single Figure 4 GA-8S661FXM-775 Motherboard...

Manual
Page 68
Until the "Do You Want to Save changes? N Location Model Capacity Mode Disk 1 Disk 2 ST3120026AS ST3120026AS 111GB 111GB UDMA 6 UDMA 6 RAID Type RAID0 RAID0 Figure 8 GA-8S661FXM-775 Motherboard - 68 - SiS RAID BIOS Setting Utility * Current Created Raid * RAID 0 : Disk 1 Disk 2 RAID Setup [R] : [Q] : Exit current menu Do You Want to Save changes?" message ... Setup Press [D] key to confirm. English After the completion, you will see the RAID array under the * Current Created Raid * list in the RAID Setup window (Figure 7).
Until the "Do You Want to Save changes? N Location Model Capacity Mode Disk 1 Disk 2 ST3120026AS ST3120026AS 111GB 111GB UDMA 6 UDMA 6 RAID Type RAID0 RAID0 Figure 8 GA-8S661FXM-775 Motherboard - 68 - SiS RAID BIOS Setting Utility * Current Created Raid * RAID 0 : Disk 1 Disk 2 RAID Setup [R] : [Q] : Exit current menu Do You Want to Save changes?" message ... Setup Press [D] key to confirm. English After the completion, you will see the RAID array under the * Current Created Raid * list in the RAID Setup window (Figure 7).

Manual
Page 69
Finally, when the "Are you want to delete a RAID volume, simply press in the following window (Figure 9) and then use arrow keys to select the RAID Volume and press to delete RAID [Q] : Exit current menu Location Model Disk 1 Disk 2 ST3120026AS ST3120026AS ...
Finally, when the "Are you want to delete a RAID volume, simply press in the following window (Figure 9) and then use arrow keys to select the RAID Volume and press to delete RAID [Q] : Exit current menu Location Model Disk 1 Disk 2 ST3120026AS ST3120026AS ...
Manual
Page 70
... drive. Step 2: Go to install required driver for the SATA controller on your motherboard from the Windows CD to a floppy disk. GA-8S661FXM-775 Motherboard - 70 - When install Windows 2000 or Windows XP from HDDs in the driver CD. Then you complete the steps, boot from the motherboard driver... The installation utility will appear. After you will not have to copy the driver for the SATA controller on your motherboard during the Windows setup process. Without the driver, the hard disk may not be installed.) Note: In the menu list, IAA_RAID refers to Figure10)....
... drive. Step 2: Go to install required driver for the SATA controller on your motherboard from the Windows CD to a floppy disk. GA-8S661FXM-775 Motherboard - 70 - When install Windows 2000 or Windows XP from HDDs in the driver CD. Then you complete the steps, boot from the motherboard driver... The installation utility will appear. After you will not have to copy the driver for the SATA controller on your motherboard during the Windows setup process. Without the driver, the hard disk may not be installed.) Note: In the menu list, IAA_RAID refers to Figure10)....

Manual
Page 71
... for stereo speaker output check box. - 71 - STEP 3: On the AC97 Audio Configuration menu, click the Speaker Configuration tab and select the 2-channel mode for Windows 98SE/2000/ME/XP. Please follow the steps below to enable the function! 2 Channel Audio Setup We recommend that you 'll find a Sound Effect icon...
... for stereo speaker output check box. - 71 - STEP 3: On the AC97 Audio Configuration menu, click the Speaker Configuration tab and select the 2-channel mode for Windows 98SE/2000/ME/XP. Please follow the steps below to enable the function! 2 Channel Audio Setup We recommend that you 'll find a Sound Effect icon...
Manual
Page 77
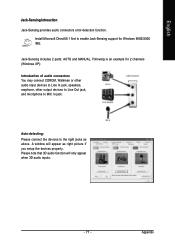
...error-detection function. Jack-Sensing includes 2 parts: AUTO and MANUAL. Install Microsoft DirectX8.1 first to enable Jack-Sensing support for 2 channels (Windows XP): Introduction of audio connectors You may connect CDROM, Walkman or other audio input devices to Line In jack, speakers, earphone, other output...jack, and microphone to the right jacks as right picture if you setup the devices properly. Following is an example for Windows 98SE/2000 /ME. Appendix A window will only appear when 3D audio inputs. - 77 - Auto-detecting: Please connect the devices to MIC In jack. ...
...error-detection function. Jack-Sensing includes 2 parts: AUTO and MANUAL. Install Microsoft DirectX8.1 first to enable Jack-Sensing support for 2 channels (Windows XP): Introduction of audio connectors You may connect CDROM, Walkman or other audio input devices to Line In jack, speakers, earphone, other output...jack, and microphone to the right jacks as right picture if you setup the devices properly. Following is an example for Windows 98SE/2000 /ME. Appendix A window will only appear when 3D audio inputs. - 77 - Auto-detecting: Please connect the devices to MIC In jack. ...

Manual
Page 2
.../SATA_SB is recommended that you use two hard drives with the SATA controller, you may prepare only one hard drive. (b) An empty formatted floppy disk. (c) Windows XP/2000 setup disk. (d) Driver CD for your motherboard. (1) Installing SATA hard drive(s) in your computer Attach one end of the SATA signal cable to...
.../SATA_SB is recommended that you use two hard drives with the SATA controller, you may prepare only one hard drive. (b) An empty formatted floppy disk. (c) Windows XP/2000 setup disk. (d) Driver CD for your motherboard. (1) Installing SATA hard drive(s) in your computer Attach one end of the SATA signal cable to...
Manual
Page 4
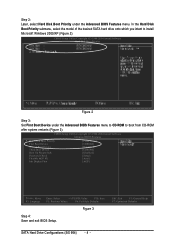
Ác Step 2: Later, select Hard Disk Boot Priority under the Advanced BIOS Features menu to CD-ROM to install ¤¤ Microsoft Windows 2000/XP (Figure 2). CMOS Setup Utility-Copyright (C) 1984-2004 Award Software ¤å Hard Disk Boot Priority `` K L KL Figure 2 Step 3: Set First Boot Device under ...
Ác Step 2: Later, select Hard Disk Boot Priority under the Advanced BIOS Features menu to CD-ROM to install ¤¤ Microsoft Windows 2000/XP (Figure 2). CMOS Setup Utility-Copyright (C) 1984-2004 Award Software ¤å Hard Disk Boot Priority `` K L KL Figure 2 Step 3: Set First Boot Device under ...
Manual
Page 5
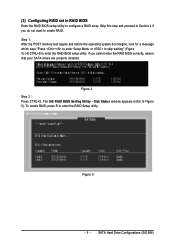
... set in RAID BIOS Enter the RAID BIOS setup utility to enter the RAID Setup utility. Skip this step and proceed to Figure 5). Disk Status window appears (refer to Section 4 if you cannot enter the RAID BIOS correctly, assure that your SATA drives are properly installed.
... set in RAID BIOS Enter the RAID BIOS setup utility to enter the RAID Setup utility. Skip this step and proceed to Figure 5). Disk Status window appears (refer to Section 4 if you cannot enter the RAID BIOS correctly, assure that your SATA drives are properly installed.
Manual
Page 9
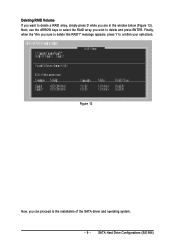
Figure 12 Now, you sure to delete this RAID?" Finally, when the "Are you can proceed to the installation of the SATA driver and operating system. - 9 - SATA Hard Drive Configurations (SiS 964) message appears, press Y to confirm your selections. Next, use the ARROW keys to select the RAID array you are in the window below (Figure 12). Deleting RAID Volume If you want to delete a RAID array, simply press D while you wish to delete and press ENTER.
Figure 12 Now, you sure to delete this RAID?" Finally, when the "Are you can proceed to the installation of the SATA driver and operating system. - 9 - SATA Hard Drive Configurations (SiS 964) message appears, press Y to confirm your selections. Next, use the ARROW keys to select the RAID array you are in the window below (Figure 12). Deleting RAID Volume If you want to delete a RAID array, simply press D while you wish to delete and press ENTER.
Manual
Page 10
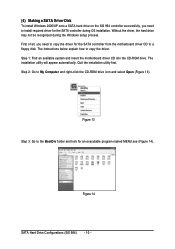
... appear automatically. Step 2: Go to copy the driver. Without the driver, the hard drive ¤¤ may not be recognized during the Windows setup process. ¤å First of all, you need to copy the driver for the SATA controller from the motherboard driver CD to a... folder and look for an executable program named MENU.exe (Figure 14). Ác (4) Making a SATA Driver Disk Åé To install Windows 2000/XP onto a SATA hard drive on the SiS 964 controller successfully, you need to install required driver for the SATA controller during OS installation...
... appear automatically. Step 2: Go to copy the driver. Without the driver, the hard drive ¤¤ may not be recognized during the Windows setup process. ¤å First of all, you need to copy the driver for the SATA controller from the motherboard driver CD to a... folder and look for an executable program named MENU.exe (Figure 14). Ác (4) Making a SATA Driver Disk Åé To install Windows 2000/XP onto a SATA hard drive on the SiS 964 controller successfully, you need to install required driver for the SATA controller during OS installation...


