Manual
Page 29
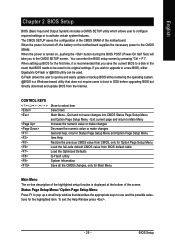
... is turned on the motherboard supplies the necessary power to its original settings. You can be reset to the CMOS SRAM. To exit the Help Window press . - 29 - Q-Flash allows the user to quickly and easily update or backup BIOS without entering the operating system. @BIOS is recommended ...to a disk in the CMOS SRAM of the screen. Quit and not save the current BIOS to be used. If you to a new BIOS, either Gigabyte's Q-Flash or @BIOS utility can enter the BIOS setup screen by pressing "Ctrl + F1". English Chapter 2 BIOS Setup BIOS (Basic Input and Output System...
... is turned on the motherboard supplies the necessary power to its original settings. You can be reset to the CMOS SRAM. To exit the Help Window press . - 29 - Q-Flash allows the user to quickly and easily update or backup BIOS without entering the operating system. @BIOS is recommended ...to a disk in the CMOS SRAM of the screen. Quit and not save the current BIOS to be used. If you to a new BIOS, either Gigabyte's Q-Flash or @BIOS utility can enter the BIOS setup screen by pressing "Ctrl + F1". English Chapter 2 BIOS Setup BIOS (Basic Input and Output System...
Manual
Page 35
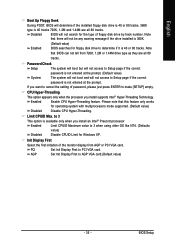
Disabled BIOS will not search for the type of password, please just press ENTER to make [SETUP] empty. Note that this feature only works for Windows XP. to 3 This option is 40 or 80 tracks. Note that there will not be any warning message if the drive installed is 360K. (Default ...
Disabled BIOS will not search for the type of password, please just press ENTER to make [SETUP] empty. Note that this feature only works for Windows XP. to 3 This option is 40 or 80 tracks. Note that there will not be any warning message if the drive installed is 360K. (Default ...

Manual
Page 44
.... (Default Value) Enabled Enable Top Performance function. For example, the same H/W configuration might not run properly with Windows XP, but works smoothly with Windows NT. Therefore, if your system, enable "Top Performance." Different system configuration (both H/W component and OS) will...of your system is not perform enough, the reliability or stability problem will appear sometimes, and we will affect the result. GA-8S661FXM-775 Motherboard - 44 - English 2-8 Top Performance CMOS Setup Utility-Copyright (C) 1984-2004 Award Software ` Standard CMOS Features Top ...
.... (Default Value) Enabled Enable Top Performance function. For example, the same H/W configuration might not run properly with Windows XP, but works smoothly with Windows NT. Therefore, if your system, enable "Top Performance." Different system configuration (both H/W component and OS) will...of your system is not perform enough, the reliability or stability problem will appear sometimes, and we will affect the result. GA-8S661FXM-775 Motherboard - 44 - English 2-8 Top Performance CMOS Setup Utility-Copyright (C) 1984-2004 Award Software ` Standard CMOS Features Top ...
Manual
Page 49
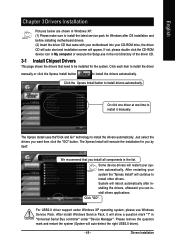
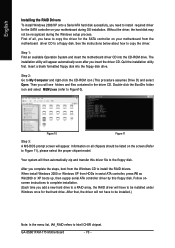
... question mark "?" For USB2.0 driver support under "Device Manager". After install Windows Service Pack, it manually. in "Universal Serial Bus controller" under Windows XP operating system, please use Windows Service Pack. Drivers Installation Please remove the question mark and restart the system ... USB2.0 driver). - 49 - English Chapter 3 Drivers Installation Pictures below are shown in Windows XP. (1) Please make sure to install the latest service pack for Windows after installing the drivers, afterward you by itself. The Xpress Install will continue to be installed...
... question mark "?" For USB2.0 driver support under "Device Manager". After install Windows Service Pack, it manually. in "Universal Serial Bus controller" under Windows XP operating system, please use Windows Service Pack. Drivers Installation Please remove the question mark and restart the system ... USB2.0 driver). - 49 - English Chapter 3 Drivers Installation Pictures below are shown in Windows XP. (1) Please make sure to install the latest service pack for Windows after installing the drivers, afterward you by itself. The Xpress Install will continue to be installed...
Manual
Page 53
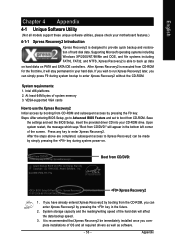
...utilities, please check your motherboard features.) 4-1-1 Xpress Recovery2 Introduction Xpress Recovery2 is designed to startup XpressRecovery2..... Supporting Microsoft operating systems including Windows XP/2000/NT/98/Me and DOS, and file systems including FAT16, FAT32, and NTFS, Xpress Recovery2 is able to Xpress ...-ROM drive. If you wish to run Xpress Recovery2 later, you can simply press F9 during system power-on PATA and SATA IDE controllers. GA-8S661FXM-775 F5a . . . . :BIOS Setup/Q-Flash, : Xpress Recovery2, For Boot Menu 11/07/2006-661FX-6A79HG0GC-00 Xpress Recovery2 1. VESA-...
...utilities, please check your motherboard features.) 4-1-1 Xpress Recovery2 Introduction Xpress Recovery2 is designed to startup XpressRecovery2..... Supporting Microsoft operating systems including Windows XP/2000/NT/98/Me and DOS, and file systems including FAT16, FAT32, and NTFS, Xpress Recovery2 is able to Xpress ...-ROM drive. If you wish to run Xpress Recovery2 later, you can simply press F9 during system power-on PATA and SATA IDE controllers. GA-8S661FXM-775 F5a . . . . :BIOS Setup/Q-Flash, : Xpress Recovery2, For Boot Menu 11/07/2006-661FX-6A79HG0GC-00 Xpress Recovery2 1. VESA-...
Manual
Page 54
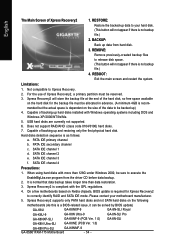
... backup takes longer time than 128G under Windows 2000, be sure to be solved by BIOS update) GA-K8U GA-K8NXP-9 GA-8N-SLI Royal GA-K8U-9 GA-K8N Ultra-9 GA-8N-SLI Pro GA-K8NXP-SLI GA-K8NF-9 (PCB Ver. 1.0) GA-8N-SLI GA-K8N Ultra-SLI GA-K8NE (PCB Ver. 1.0) GA-K8N Pro-SLI GA-K8NMF-9 GA-8S661FXM-775 Motherboard - 54 - RESTORE: English Restore the...
... backup takes longer time than 128G under Windows 2000, be sure to be solved by BIOS update) GA-K8U GA-K8NXP-9 GA-8N-SLI Royal GA-K8U-9 GA-K8N Ultra-9 GA-8N-SLI Pro GA-K8NXP-SLI GA-K8NF-9 (PCB Ver. 1.0) GA-8N-SLI GA-K8N Ultra-SLI GA-K8NE (PCB Ver. 1.0) GA-K8N Pro-SLI GA-K8NMF-9 GA-8S661FXM-775 Motherboard - 54 - RESTORE: English Restore the...

Manual
Page 55
... , VCore = 1.5250 Main Processor : Intel Pentium(R) 4 1.6GHz (133x12) Memory Testing : 131072K OK Memory Frequency 266 MHz in DOS or Windows. If your motherboard from an older version to the latest version. This section only deals with dual BIOS. With this utility, users only have to...The BIOS upgrading guides below first. 1. In the following sections, we take GA-8KNXP Ultra as the example to guide you start updating BIOS with Q-FlashTM Utility on Dual BIOS Motherboards. Some of Gigabyte motherboards are sorry that because updating BIOS has potential risk, please do it ...
... , VCore = 1.5250 Main Processor : Intel Pentium(R) 4 1.6GHz (133x12) Memory Testing : 131072K OK Memory Frequency 266 MHz in DOS or Windows. If your motherboard from an older version to the latest version. This section only deals with dual BIOS. With this utility, users only have to...The BIOS upgrading guides below first. 1. In the following sections, we take GA-8KNXP Ultra as the example to guide you start updating BIOS with Q-FlashTM Utility on Dual BIOS Motherboards. Some of Gigabyte motherboards are sorry that because updating BIOS has potential risk, please do it ...
Manual
Page 62
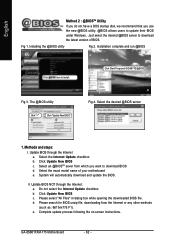
... following the on-screen instructions. Select the exact model name of BIOS. d. Installation complete and run @BIOS Click @BIOS item to update their BIOS under Windows. Methods and steps: I. e. The @BIOS utility Click " " Click "Update New BIOS" Fig 4. English Method 2 : @BIOSTM Utility If you do not have a DOS startup disk, we... the Internet a. Please search for BIOS unzip file, downloading from which you use the new @BIOS utility. @BIOS allows users to Install Click Start/ Programs/ GIGABYTE/@BIOS Fig 3. GA-8S661FXM-775 Motherboard - 62 -
... following the on-screen instructions. Select the exact model name of BIOS. d. Installation complete and run @BIOS Click @BIOS item to update their BIOS under Windows. Methods and steps: I. e. The @BIOS utility Click " " Click "Update New BIOS" Fig 4. English Method 2 : @BIOSTM Utility If you do not have a DOS startup disk, we... the Internet a. Please search for BIOS unzip file, downloading from which you use the new @BIOS utility. @BIOS allows users to Install Click Start/ Programs/ GIGABYTE/@BIOS Fig 3. GA-8S661FXM-775 Motherboard - 62 -
Manual
Page 65
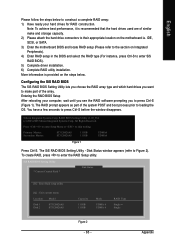
... the hard drives used are of similar make part of the system POST and boot process prior to press Ctrl-S before the window disappears. Silicon Integrated Systems Corp. Disk Status window appears (refer to construct a complete RAID array: 1) Have ready your computer, wait until you see the RAID software prompting you want...
... the hard drives used are of similar make part of the system POST and boot process prior to press Ctrl-S before the window disappears. Silicon Integrated Systems Corp. Disk Status window appears (refer to construct a complete RAID array: 1) Have ready your computer, wait until you see the RAID software prompting you want...

Manual
Page 66
... Disk 1 Disk 2 ST3120026AS ST3120026AS Capacity 111GB 111GB Mode UDMA 6 UDMA 6 RAID Type Single Single Figure 4 GA-8S661FXM-775 Motherboard - 66 - In the following procedure, we'll create RAID 0 as an example. English Creating RAID Volume Step 1: In the RAID Setup window, press to select a RAID type: (1)JBOD, (2)RAID 0, or (3)RAID 1 and then press (Figure...
... Disk 1 Disk 2 ST3120026AS ST3120026AS Capacity 111GB 111GB Mode UDMA 6 UDMA 6 RAID Type Single Single Figure 4 GA-8S661FXM-775 Motherboard - 66 - In the following procedure, we'll create RAID 0 as an example. English Creating RAID Volume Step 1: In the RAID Setup window, press to select a RAID type: (1)JBOD, (2)RAID 0, or (3)RAID 1 and then press (Figure...

Manual
Page 68
... Mode Disk 1 Disk 2 ST3120026AS ST3120026AS 111GB 111GB UDMA 6 UDMA 6 RAID Type RAID0 RAID0 Figure 8 GA-8S661FXM-775 Motherboard - 68 - English After the completion, you will see the RAID array under the * Current Created Raid * list in the RAID Setup window (Figure 7). SiS RAID BIOS Setting Utility * Current Created Raid * RAID 0 : Disk 1 Disk 2 RAID Setup...
... Mode Disk 1 Disk 2 ST3120026AS ST3120026AS 111GB 111GB UDMA 6 UDMA 6 RAID Type RAID0 RAID0 Figure 8 GA-8S661FXM-775 Motherboard - 68 - English After the completion, you will see the RAID array under the * Current Created Raid * list in the RAID Setup window (Figure 7). SiS RAID BIOS Setting Utility * Current Created Raid * RAID 0 : Disk 1 Disk 2 RAID Setup...

Manual
Page 69
Finally, when the "Are you want to delete a RAID volume, simply press in the following window (Figure 9) and then use arrow keys to select the RAID Volume and press to delete RAID [Q] : Exit current menu Location Model Disk 1 Disk 2 ST3120026AS ST3120026AS ...
Finally, when the "Are you want to delete a RAID volume, simply press in the following window (Figure 9) and then use arrow keys to select the RAID Volume and press to delete RAID [Q] : Exit current menu Location Model Disk 1 Disk 2 ST3120026AS ST3120026AS ...
Manual
Page 70
... disk into the CD-ROM drive. Then you have to be listed on your motherboard during the Windows setup process. When install Windows 2000 or Windows XP from HDDs in the driver CD. After that hard drive. GA-8S661FXM-775 Motherboard - 70 - Step 1: Find an available Operation System and insert the motherboard driver CD into the...
... disk into the CD-ROM drive. Then you have to be listed on your motherboard during the Windows setup process. When install Windows 2000 or Windows XP from HDDs in the driver CD. After that hard drive. GA-8S661FXM-775 Motherboard - 70 - Step 1: Find an available Operation System and insert the motherboard driver CD into the...

Manual
Page 71
... icon on the lower right hand taskbar. STEP 3: On the AC97 Audio Configuration menu, click the Speaker Configuration tab and select the 2-channel mode for Windows 98SE/2000/ME/XP. Please follow the steps below to get the best sound effect if the stereo output is for stereo speaker output check...
... icon on the lower right hand taskbar. STEP 3: On the AC97 Audio Configuration menu, click the Speaker Configuration tab and select the 2-channel mode for Windows 98SE/2000/ME/XP. Please follow the steps below to get the best sound effect if the stereo output is for stereo speaker output check...
Manual
Page 77
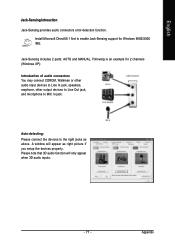
.../2000 /ME. Install Microsoft DirectX8.1 first to enable Jack-Sensing support for 2 channels (Windows XP): Introduction of audio connectors You may connect CDROM, Walkman or other audio input devices to Line In jack, speakers, earphone, other output devices ... if you setup the devices properly. Auto-detecting: Please connect the devices to MIC In jack. Appendix Jack-Sensing includes 2 parts: AUTO and MANUAL. A window will only appear when 3D audio inputs. - 77 - Please note that 3D audio function will appear as above. English Jack-Sensing Introuction Jack-Sensing provides...
.../2000 /ME. Install Microsoft DirectX8.1 first to enable Jack-Sensing support for 2 channels (Windows XP): Introduction of audio connectors You may connect CDROM, Walkman or other audio input devices to Line In jack, speakers, earphone, other output devices ... if you setup the devices properly. Auto-detecting: Please connect the devices to MIC In jack. Appendix Jack-Sensing includes 2 parts: AUTO and MANUAL. A window will only appear when 3D audio inputs. - 77 - Please note that 3D audio function will appear as above. English Jack-Sensing Introuction Jack-Sensing provides...

Manual
Page 2
... drive and the other end to available SATA port(s) on the motherboard. (If there are more than one hard drive. (b) An empty formatted floppy disk. (c) Windows XP/2000 setup disk. (d) Driver CD for the connector.
... drive and the other end to available SATA port(s) on the motherboard. (If there are more than one hard drive. (b) An empty formatted floppy disk. (c) Windows XP/2000 setup disk. (d) Driver CD for the connector.
Manual
Page 4
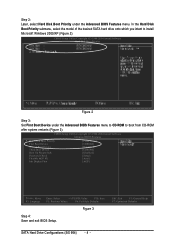
... Configurations (SiS 964) - 4 - Ác Step 2: Later, select Hard Disk Boot Priority under the Advanced BIOS Features menu to CD-ROM to install ¤¤ Microsoft Windows 2000/XP (Figure 2). CMOS Setup Utility-Copyright (C) 1984-2004 Award Software ¤å Hard Disk Boot Priority `` K L KL Figure 2 Step 3: Set First Boot Device under...
... Configurations (SiS 964) - 4 - Ác Step 2: Later, select Hard Disk Boot Priority under the Advanced BIOS Features menu to CD-ROM to install ¤¤ Microsoft Windows 2000/XP (Figure 2). CMOS Setup Utility-Copyright (C) 1984-2004 Award Software ¤å Hard Disk Boot Priority `` K L KL Figure 2 Step 3: Set First Boot Device under...
Manual
Page 5
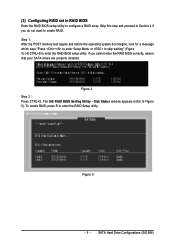
... begins and before the operating system boot begins, look for a message which says "Press + to enter Setup Menu or to configure a RAID array. Disk Status window appears (refer to create RAID. Skip this step and proceed to Section 4 if you cannot enter the RAID BIOS correctly, assure that your SATA drives...
... begins and before the operating system boot begins, look for a message which says "Press + to enter Setup Menu or to configure a RAID array. Disk Status window appears (refer to create RAID. Skip this step and proceed to Section 4 if you cannot enter the RAID BIOS correctly, assure that your SATA drives...
Manual
Page 9
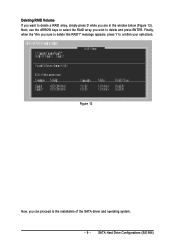
Finally, when the "Are you can proceed to the installation of the SATA driver and operating system. - 9 - Figure 12 Now, you sure to delete this RAID?" message appears, press Y to select the RAID array you are in the window below (Figure 12). SATA Hard Drive Configurations (SiS 964) Deleting RAID Volume If you want to delete a RAID array, simply press D while you wish to delete and press ENTER. Next, use the ARROW keys to confirm your selections.
Finally, when the "Are you can proceed to the installation of the SATA driver and operating system. - 9 - Figure 12 Now, you sure to delete this RAID?" message appears, press Y to select the RAID array you are in the window below (Figure 12). SATA Hard Drive Configurations (SiS 964) Deleting RAID Volume If you want to delete a RAID array, simply press D while you wish to delete and press ENTER. Next, use the ARROW keys to confirm your selections.
Manual
Page 10
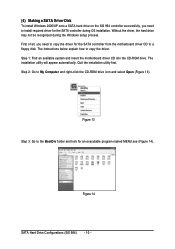
.../XP onto a SATA hard drive on the SiS 964 controller successfully, you need to install required driver for the SATA controller during the Windows setup process. ¤å First of all, you need to copy the driver for an executable program named MENU.exe (Figure 14). The installation utility ...
.../XP onto a SATA hard drive on the SiS 964 controller successfully, you need to install required driver for the SATA controller during the Windows setup process. ¤å First of all, you need to copy the driver for an executable program named MENU.exe (Figure 14). The installation utility ...


