
Manual
Page 2
... rear of the SATA connector to the hard drive. "*" Skip this step if you may prepare only one hard drive. (b) An empty formatted floppy disk. (c) Windows XP/2000 setup disk. (d) Driver CD for the connector. If you do not want to create RAID array on the SATA controller SATA Hard Drive...
... rear of the SATA connector to the hard drive. "*" Skip this step if you may prepare only one hard drive. (b) An empty formatted floppy disk. (c) Windows XP/2000 setup disk. (d) Driver CD for the connector. If you do not want to create RAID array on the SATA controller SATA Hard Drive...
Manual
Page 4
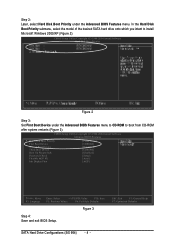
Ác Step 2: Later, select Hard Disk Boot Priority under the Advanced BIOS Features menu to CD-ROM to install ¤¤ Microsoft Windows 2000/XP (Figure 2). In the Hard Disk Åé Boot Priority submenu, select the model of the desired SATA hard drive onto which you intent ...
Ác Step 2: Later, select Hard Disk Boot Priority under the Advanced BIOS Features menu to CD-ROM to install ¤¤ Microsoft Windows 2000/XP (Figure 2). In the Hard Disk Åé Boot Priority submenu, select the model of the desired SATA hard drive onto which you intent ...
Manual
Page 5
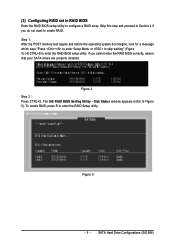
.... Figure 4 Step 2 Press CTRL+S. Figure 5 - 5 - SATA Hard Drive Configurations (SiS 964) The SiS RAID BIOS Setting Utility - Hit CTRL+S to skip waiting" (Figure 4). Disk Status window appears (refer to enter the RAID Setup utility. Skip this step and proceed to Section 4 if you cannot enter the RAID BIOS correctly, assure that...
.... Figure 4 Step 2 Press CTRL+S. Figure 5 - 5 - SATA Hard Drive Configurations (SiS 964) The SiS RAID BIOS Setting Utility - Hit CTRL+S to skip waiting" (Figure 4). Disk Status window appears (refer to enter the RAID Setup utility. Skip this step and proceed to Section 4 if you cannot enter the RAID BIOS correctly, assure that...
Manual
Page 9
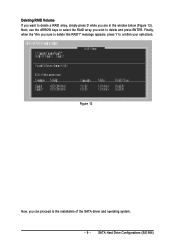
SATA Hard Drive Configurations (SiS 964) message appears, press Y to confirm your selections. Finally, when the "Are you can proceed to the installation of the SATA driver and operating system. - 9 - Figure 12 Now, you sure to delete this RAID?" Next, use the ARROW keys to select the RAID array you are in the window below (Figure 12). Deleting RAID Volume If you want to delete a RAID array, simply press D while you wish to delete and press ENTER.
SATA Hard Drive Configurations (SiS 964) message appears, press Y to confirm your selections. Finally, when the "Are you can proceed to the installation of the SATA driver and operating system. - 9 - Figure 12 Now, you sure to delete this RAID?" Next, use the ARROW keys to select the RAID array you are in the window below (Figure 12). Deleting RAID Volume If you want to delete a RAID array, simply press D while you wish to delete and press ENTER.
Manual
Page 10
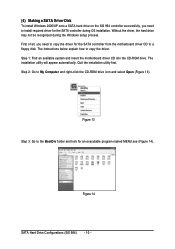
... the motherboard driver CD into the CD-ROM drive. The installation utility will appear automatically. Ác (4) Making a SATA Driver Disk Åé To install Windows 2000/XP onto a SATA hard drive on the SiS 964 controller successfully, you need to install required driver for the SATA controller during the... Windows setup process. ¤å First of all, you need to copy the driver for the SATA controller from the motherboard driver CD to the ...
... the motherboard driver CD into the CD-ROM drive. The installation utility will appear automatically. Ác (4) Making a SATA Driver Disk Åé To install Windows 2000/XP onto a SATA hard drive on the SiS 964 controller successfully, you need to install required driver for the SATA controller during the... Windows setup process. ¤å First of all, you need to copy the driver for the SATA controller from the motherboard driver CD to the ...
Manual
Page 12
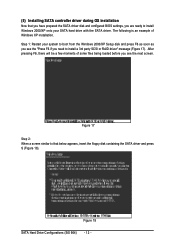
...screen similar to that you have prepared the SATA driver disk and configured BIOS settings, you are ready to install Windows 2000/XP onto your system to boot from the Windows 2000/XP Setup disk and press F6 as soon as you need to install a 3rd party SCSI or RAID driver..." message (Figure 17). After pressing F6, there will be a few moments of ¤¤ Windows XP installation. ¤å Step 1: Restart your SATA hard drive with the SATA driver. Ác (5) Installing SATA controller driver during OS installation Åé...
...screen similar to that you have prepared the SATA driver disk and configured BIOS settings, you are ready to install Windows 2000/XP onto your system to boot from the Windows 2000/XP Setup disk and press F6 as soon as you need to install a 3rd party SCSI or RAID driver..." message (Figure 17). After pressing F6, there will be a few moments of ¤¤ Windows XP installation. ¤å Step 1: Restart your SATA hard drive with the SATA driver. Ác (5) Installing SATA controller driver during OS installation Åé...
Manual
Page 13
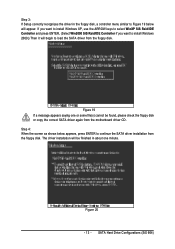
Step 4: When the screen as shown below appears, press ENTER to Figure 19 below will appear. Figure 20 - 13 - If you want to install Windows XP, use the ARROW keys to select WinXP SiS Raid/IDE Controller and press ENTER. (Select Win2000 SiS Raid/IDE Controller if you want to ...load the SATA driver from the floppy disk. SATA Hard Drive Configurations (SiS 964) The driver installation will begin to install Windows 2000.) Then it will be found, please check the floppy disk or copy the correct SATA driver again from the motherboard driver CD. Figure 19...
Step 4: When the screen as shown below appears, press ENTER to Figure 19 below will appear. Figure 20 - 13 - If you want to install Windows XP, use the ARROW keys to select WinXP SiS Raid/IDE Controller and press ENTER. (Select Win2000 SiS Raid/IDE Controller if you want to ...load the SATA driver from the floppy disk. SATA Hard Drive Configurations (SiS 964) The driver installation will begin to install Windows 2000.) Then it will be found, please check the floppy disk or copy the correct SATA driver again from the motherboard driver CD. Figure 19...
Manual
Page 14
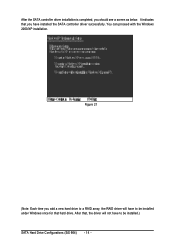
After that hard drive. You can proceed with the Windows Åé 2000/XP installation. ¤¤ ¤å Figure 21 (Note: Each time you add a new hard drive to a RAID array, the RAID driver will have to be installed.) SATA Hard Drive Configurations (SiS 964) - 14 - It indicates that you should see a screen as below. Ác After the SATA controller driver installation is completed, you have to be installed under Windows once for that , the driver will not have installed the SATA controller driver successfully.
After that hard drive. You can proceed with the Windows Åé 2000/XP installation. ¤¤ ¤å Figure 21 (Note: Each time you add a new hard drive to a RAID array, the RAID driver will have to be installed.) SATA Hard Drive Configurations (SiS 964) - 14 - It indicates that you should see a screen as below. Ác After the SATA controller driver installation is completed, you have to be installed under Windows once for that , the driver will not have installed the SATA controller driver successfully.
Manual
Page 27
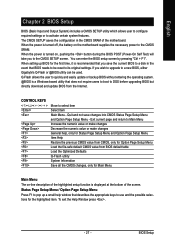
You can be reset to a new BIOS, either Gigabyte's Q-Flash or @BIOS utility can enter the BIOS setup screen by pressing "Ctrl + F1... item. The CMOS SETUP saves the configuration in the event that BIOS needs to be used. To exit the Help Window press . - 27 - CONTROL KEYS Enter> Move to activate certain system features. When the power is recommended that... to Main Menu Increase the numeric value or make changes Decrease the numeric value or make changes General help window that does not require users to boot to the CMOS SRAM. BIOS Setup If you to use and the...
You can be reset to a new BIOS, either Gigabyte's Q-Flash or @BIOS utility can enter the BIOS setup screen by pressing "Ctrl + F1... item. The CMOS SETUP saves the configuration in the event that BIOS needs to be used. To exit the Help Window press . - 27 - CONTROL KEYS Enter> Move to activate certain system features. When the power is recommended that... to Main Menu Increase the numeric value or make changes Decrease the numeric value or make changes General help window that does not require users to boot to the CMOS SRAM. BIOS Setup If you to use and the...
Manual
Page 33
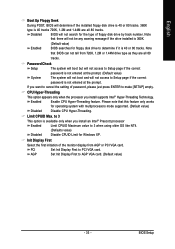
... setting of the monitor display from 720K, 1.2M or 1.44M drive type as they are all 80 tracks. Note that this feature only works for Windows XP. AGP Set Init Display First to PCI VGA card. BIOS Setup If you want to determine if it is available only when you install...
... setting of the monitor display from 720K, 1.2M or 1.44M drive type as they are all 80 tracks. Note that this feature only works for Windows XP. AGP Set Init Display First to PCI VGA card. BIOS Setup If you want to determine if it is available only when you install...
Manual
Page 42
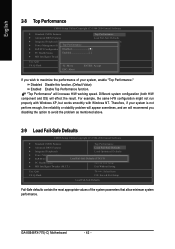
... performance of the system parameters that allow minimum system performance. Therefore, if your system, enable "Top Performance." GA-8S648FX-775(-C) Motherboard - 42 - For example, the same H/W configuration might not run properly with Windows XP, but works smoothly with Windows NT. Disabled Disable this function. (Default Value) Enabled Enable Top Performance function. Different system configuration (both...
... performance of the system parameters that allow minimum system performance. Therefore, if your system, enable "Top Performance." GA-8S648FX-775(-C) Motherboard - 42 - For example, the same H/W configuration might not run properly with Windows XP, but works smoothly with Windows NT. Disabled Disable this function. (Default Value) Enabled Enable Top Performance function. Different system configuration (both...
Manual
Page 45
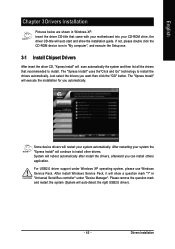
...the"Click and Go" technology to install other drivers. in Windows XP. English Chapter 3 Drivers Installation Pictures below are shown in "Universal Serial Bus controller" under Windows XP operating system, please use Windows Service Pack. Insert the driver CD-title that recommended to ...install. After install Windows Service Pack, it will continue to install the drivers automatically. ...
...the"Click and Go" technology to install other drivers. in Windows XP. English Chapter 3 Drivers Installation Pictures below are shown in "Universal Serial Bus controller" under Windows XP operating system, please use Windows Service Pack. Insert the driver CD-title that recommended to ...install. After install Windows Service Pack, it will continue to install the drivers automatically. ...
Manual
Page 49
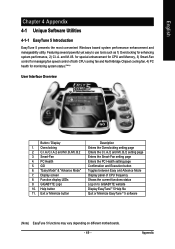
...Shows the current functions status Log on to use tools such as 1) Overclocking for monitoring system status.(Note) User Interface Overview Button / Display 1. GIGABYTE Logo 10. Overclocking 2. Function display LEDs 9. Exit or Minimize button Description Enters the Overclocking setting page Enters the C.I.A./2 and M.I .B.2 3. ... Mode" 7. PC Health 5. Display screen 8. English Chapter 4 Appendix 4-1 Unique Software Utilities 4-1-1 EasyTune 5 Introduction EasyTune 5 presents the most convenient Windows based system performance enhancement and manageability utility.
...Shows the current functions status Log on to use tools such as 1) Overclocking for monitoring system status.(Note) User Interface Overview Button / Display 1. GIGABYTE Logo 10. Overclocking 2. Function display LEDs 9. Exit or Minimize button Description Enters the Overclocking setting page Enters the C.I.A./2 and M.I .B.2 3. ... Mode" 7. PC Health 5. Display screen 8. English Chapter 4 Appendix 4-1 Unique Software Utilities 4-1-1 EasyTune 5 Introduction EasyTune 5 presents the most convenient Windows based system performance enhancement and manageability utility.
Manual
Page 50
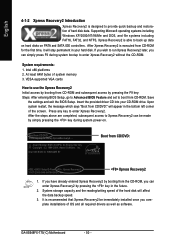
...Insert the provided driver CD into your hard disk. Intel 945 BIOS for the first time, it will affect the data backup speed. 3. GA-8S648FX-775(-C) Motherboard - 50 - Upon system restart, the message which says "Boot from CD/DVD: Xpress Recovery2 1. If you have already entered ...Flash, : Xpress Recovery2 11/07/2005-I945-6A79HG0GC-00 Boot from CD/DVD:" will appear in the future. 2. Supporting Microsoft operating systems including Windows XP/2000/NT/98/Me and DOS, and file systems including FAT16, FAT32, and NTFS, Xpress Recovery2 is designed to provide quick backup and ...
...Insert the provided driver CD into your hard disk. Intel 945 BIOS for the first time, it will affect the data backup speed. 3. GA-8S648FX-775(-C) Motherboard - 50 - Upon system restart, the message which says "Boot from CD/DVD: Xpress Recovery2 1. If you have already entered ...Flash, : Xpress Recovery2 11/07/2005-I945-6A79HG0GC-00 Boot from CD/DVD:" will appear in the future. 2. Supporting Microsoft operating systems including Windows XP/2000/NT/98/Me and DOS, and file systems including FAT16, FAT32, and NTFS, Xpress Recovery2 is designed to provide quick backup and ...
Manual
Page 51
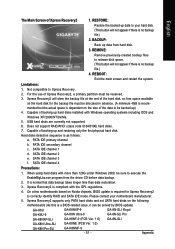
.... (A minimum 4GB is normal that data backup takes longer time than 128G under Windows 2000, be solved by BIOS update) GA-K8U GA-K8U-9 GA-K8NXP-SLI GA-K8N Ultra-SLI GA-K8N Pro-SLI GA-K8NXP-9 GA-K8N Ultra-9 GA-K8NF-9 (PCB Ver. 1.0) GA-K8NE (PCB Ver. 1.0) GA-K8NMF-9 - 51 - It is recom- REMOVE: Remove previously-created backup files to...
.... (A minimum 4GB is normal that data backup takes longer time than 128G under Windows 2000, be solved by BIOS update) GA-K8U GA-K8U-9 GA-K8NXP-SLI GA-K8N Ultra-SLI GA-K8N Pro-SLI GA-K8NXP-9 GA-K8N Ultra-9 GA-K8NF-9 (PCB Ver. 1.0) GA-K8NE (PCB Ver. 1.0) GA-K8NMF-9 - 51 - It is recom- REMOVE: Remove previously-created backup files to...
Manual
Page 52
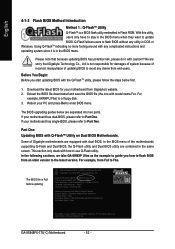
...Recovery 08/07/2003-i875P-6A79BG03C-00 GA-8S648FX-775(-C) Motherboard - 52 - We are equipped with model name.Fxx. If your PC and press Del to use Q-Flash utility. If your motherboard from an older version to a floppy disk. 3. Please note that Gigabyte Technology Co., Ltd is in the ...OK , VCore = 1.5250 Main Processor : Intel Pentium(R) 4 1.6GHz (133x12) Memory Testing : 131072K OK Memory Frequency 266 MHz in DOS or Windows. Extract the BIOS file downloaded and save the BIOS file (the one with dual BIOS. The BIOS upgrading guides below first. 1. Some of the motherboards...
...Recovery 08/07/2003-i875P-6A79BG03C-00 GA-8S648FX-775(-C) Motherboard - 52 - We are equipped with model name.Fxx. If your PC and press Del to use Q-Flash utility. If your motherboard from an older version to a floppy disk. 3. Please note that Gigabyte Technology Co., Ltd is in the ...OK , VCore = 1.5250 Main Processor : Intel Pentium(R) 4 1.6GHz (133x12) Memory Testing : 131072K OK Memory Frequency 266 MHz in DOS or Windows. Extract the BIOS file downloaded and save the BIOS file (the one with dual BIOS. The BIOS upgrading guides below first. 1. Some of the motherboards...
Manual
Page 59
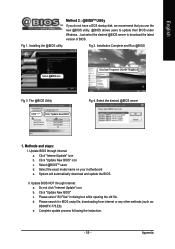
Installation Complete and Run @BIOS Select @BIOS item Click Sart/ Programs/ GIGABYTE/@BIOS Fig 3. Select the desired @BIOS server 1. Click "Internet Update" ...Internet: a. Update BIOS NOT through Internet a. Appendix Just select the desired @BIOS server to update their BIOS under Windows. Methods and steps: I. English Method 2 : @BIOSTM Utility If you do not have a DOS startup disk,... unzip file, downloading from internet or any other methods (such as: 8S648FX-775.E6). System will automatically download and update the BIOS. Please select "All Files" in dialog box while...
Installation Complete and Run @BIOS Select @BIOS item Click Sart/ Programs/ GIGABYTE/@BIOS Fig 3. Select the desired @BIOS server 1. Click "Internet Update" ...Internet: a. Update BIOS NOT through Internet a. Appendix Just select the desired @BIOS server to update their BIOS under Windows. Methods and steps: I. English Method 2 : @BIOSTM Utility If you do not have a DOS startup disk,... unzip file, downloading from internet or any other methods (such as: 8S648FX-775.E6). System will automatically download and update the BIOS. Please select "All Files" in dialog box while...
Manual
Page 62
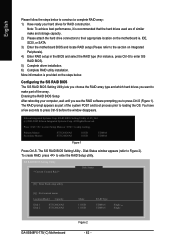
... the RAID array type and which hard drives you to skip waiting. To create RAID, press to press Ctrl-S before the window disappears. IDE, SCSI, or SATA. 3) Enter the motherboard BIOS and locate RAID setup (Please refer to the section on Integrated... Utility * Current Created Raid * Disk Status [R] : Enter Raid setup utility [Q] : Exit current menu LocationModel Capacity Disk 1 Disk 2 ST3120026AS ST3120026AS GA-8S648FX-775(-C) Motherboard Mode 111GB 111GB RAID Type UDMA 6 UDMA 6 Single Single ¹Ï5 Figure 2 - 62 - More information is recommended that the hard...
... the RAID array type and which hard drives you to skip waiting. To create RAID, press to press Ctrl-S before the window disappears. IDE, SCSI, or SATA. 3) Enter the motherboard BIOS and locate RAID setup (Please refer to the section on Integrated... Utility * Current Created Raid * Disk Status [R] : Enter Raid setup utility [Q] : Exit current menu LocationModel Capacity Disk 1 Disk 2 ST3120026AS ST3120026AS GA-8S648FX-775(-C) Motherboard Mode 111GB 111GB RAID Type UDMA 6 UDMA 6 Single Single ¹Ï5 Figure 2 - 62 - More information is recommended that the hard...
Manual
Page 63
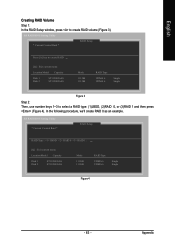
English Creating RAID Volume Step 1: In the RAID Setup window, press to select a RAID type: (1)JBOD, (2)RAID 0, or (3)RAID 1 and then press (Figure 4). SiS RAID BIOS Setting Utility * Current Created Raid * RAID Setup RAID Type : ...
English Creating RAID Volume Step 1: In the RAID Setup window, press to select a RAID type: (1)JBOD, (2)RAID 0, or (3)RAID 1 and then press (Figure 4). SiS RAID BIOS Setting Utility * Current Created Raid * RAID Setup RAID Type : ...
Manual
Page 65
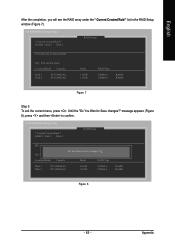
... Setup Press [D] key to confirm. English After the completion, you will see the RAID array under the * Current Created Raid * list in the RAID Setup window (Figure 7).
... Setup Press [D] key to confirm. English After the completion, you will see the RAID array under the * Current Created Raid * list in the RAID Setup window (Figure 7).


