
Manual
Page 10
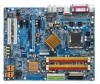
...SATAII0_1, SATAII2_3), allowing connection of 4 SATA 3Gb/s devices - Supports data striping (RAID 0), mirroring (RAID 1), striping + mirroring (RAID 0+1), and RAID 5 for Serial ATA O.S Support Š Microsoft Windows 2000/XP Memory Š 4 DDR II DIMM memory slots (supports up to 8GB memory) (Note 2) Š Supports dual channel DDR II 667 (Note 3)/533 unbuffered... connector Š 1 front audio connector Š 1 CD In connector Š 1 SPDIF In connector Š 3 USB 2.0/1.1 connectors for additional 6 ports by cables Š 1 RF_ID connector GA-8N775 Motherboard - 10 -
...SATAII0_1, SATAII2_3), allowing connection of 4 SATA 3Gb/s devices - Supports data striping (RAID 0), mirroring (RAID 1), striping + mirroring (RAID 0+1), and RAID 5 for Serial ATA O.S Support Š Microsoft Windows 2000/XP Memory Š 4 DDR II DIMM memory slots (supports up to 8GB memory) (Note 2) Š Supports dual channel DDR II 667 (Note 3)/533 unbuffered... connector Š 1 front audio connector Š 1 CD In connector Š 1 SPDIF In connector Š 3 USB 2.0/1.1 connectors for additional 6 ports by cables Š 1 RF_ID connector GA-8N775 Motherboard - 10 -

Manual
Page 29
...time, it with caution and avoid inadequate operation that may result in system malfunction. - 29 - If you wish to upgrade to a new BIOS, either Gigabyte's Q-Flash or @BIOS utility can enter the BIOS setup screen by pressing "Ctrl + F1". Exit current page and return to its original settings. BIOS...item. You can be reset to Main Menu Increase the numeric value or make changes Decrease the numeric value or make changes General help window that BIOS needs to the CMOS SETUP screen. The CMOS SETUP saves the configuration in the event that describes the appropriate keys to ...
...time, it with caution and avoid inadequate operation that may result in system malfunction. - 29 - If you wish to upgrade to a new BIOS, either Gigabyte's Q-Flash or @BIOS utility can enter the BIOS setup screen by pressing "Ctrl + F1". Exit current page and return to its original settings. BIOS...item. You can be reset to Main Menu Increase the numeric value or make changes Decrease the numeric value or make changes General help window that BIOS needs to the CMOS SETUP screen. The CMOS SETUP saves the configuration in the event that describes the appropriate keys to ...
Manual
Page 35
... you to PCI Express VGA card. (Default value) (Note) This item will not access to Setup page if the correct password is only working for windows XP. (Default value) No-Execute Memory Protect (Note) Enabled Enable No-Execute Memory Protect function. (Default value) Disabled Disable No-Execute Memory Protect function. Enabled...
... you to PCI Express VGA card. (Default value) (Note) This item will not access to Setup page if the correct password is only working for windows XP. (Default value) No-Execute Memory Protect (Note) Enabled Enable No-Execute Memory Protect function. (Default value) Disabled Disable No-Execute Memory Protect function. Enabled...
Manual
Page 49
... the "Xpress Install" will auto-detect the right USB2.0 driver). - 49 - For USB2.0 driver support under "Device Manager". in Windows XP. Just select the drivers you can install others application. Drivers Installation The "Xpress Install" uses the"Click and Go" technology to install...the question mark and restart the system (System will continue to install other drivers. System will show the installation guide. After install Windows Service Pack, it will reboot automatically after install the drivers, afterward you want then click the "GO" button. English Chapter ...
... the "Xpress Install" will auto-detect the right USB2.0 driver). - 49 - For USB2.0 driver support under "Device Manager". in Windows XP. Just select the drivers you can install others application. Drivers Installation The "Xpress Install" uses the"Click and Go" technology to install...the question mark and restart the system (System will continue to install other drivers. System will show the installation guide. After install Windows Service Pack, it will reboot automatically after install the drivers, afterward you want then click the "GO" button. English Chapter ...

Manual
Page 54
...cooling fan, 4) PC health for enhancing system performance, 2) C.I .B. GA-8N775 Motherboard - 54 - Featuring several powerful yet easy to GIGABYTE website Display EasyTuneTM 5 Help file Quit or Minimize EasyTuneTM 5 software ...(Note) EasyTune 5 functions may vary depending on different motherboards. and M.I .A. "Easy Mode" & "Advance Mode" 7. English 4-1-1 EasyTune 5 Introduction EasyTune 5 presents the most convenient Windows based system performance enhancement and manageability utility. GIGABYTE...
...cooling fan, 4) PC health for enhancing system performance, 2) C.I .B. GA-8N775 Motherboard - 54 - Featuring several powerful yet easy to GIGABYTE website Display EasyTuneTM 5 Help file Quit or Minimize EasyTuneTM 5 software ...(Note) EasyTune 5 functions may vary depending on different motherboards. and M.I .A. "Easy Mode" & "Advance Mode" 7. English 4-1-1 EasyTune 5 Introduction EasyTune 5 presents the most convenient Windows based system performance enhancement and manageability utility. GIGABYTE...

Manual
Page 55
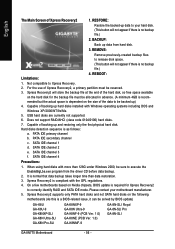
Supporting Microsoft operating systems including Windows XP/2000/NT/98/Me and DOS, and file systems including FAT16, FAT32, and NTFS, Xpress Recovery2 is executed from CD/DVD: Press any key ... Xpress Recovery2 later, you complete installations of system memory 3. Appendix At least 64M bytes of OS and all required drivers as well as software. - 55 - GA-8N775 E5 . . . . :BIOS Setup/Q-Flash, : Xpress Recovery2, For Boot Menu 11/16/2005-C19-MCP04-6A61EG0FC-00 Xpress Recovery2 1. English 4-1-2 Xpress Recovery2 Introduction Xpress Recovery2 is...
Supporting Microsoft operating systems including Windows XP/2000/NT/98/Me and DOS, and file systems including FAT16, FAT32, and NTFS, Xpress Recovery2 is executed from CD/DVD: Press any key ... Xpress Recovery2 later, you complete installations of system memory 3. Appendix At least 64M bytes of OS and all required drivers as well as software. - 55 - GA-8N775 E5 . . . . :BIOS Setup/Q-Flash, : Xpress Recovery2, For Boot Menu 11/16/2005-C19-MCP04-6A61EG0FC-00 Xpress Recovery2 1. English 4-1-2 Xpress Recovery2 Introduction Xpress Recovery2 is...
Manual
Page 56
... issue, it can be solved by BIOS update) GA-K8U GA-K8U-9 GA-K8NXP-SLI GA-K8N Ultra-SLI GA-K8N Pro-SLI GA-K8NXP-9 GA-K8N Ultra-9 GA-K8NF-9 (PCB Ver. 1.0) GA-K8NE (PCB Ver. 1.0) GA-K8NMF-9 GA-8N-SLI Royal GA-8N-SLI Pro GA-8N-SLI GA-8N775 Motherboard - 56 - Xpress Recovery2 supports only PATA ...of Xpress Recovery2, a primary partition must be reserved. 3. Hard disks detection sequence is normal that data backup takes longer time than 128G under Windows 2000, be backed up hard disks installed with the GPL regulations. 4. SATA IDE channel 1 d. SATA IDE channel 4 Precautions: 1. Xpress ...
... issue, it can be solved by BIOS update) GA-K8U GA-K8U-9 GA-K8NXP-SLI GA-K8N Ultra-SLI GA-K8N Pro-SLI GA-K8NXP-9 GA-K8N Ultra-9 GA-K8NF-9 (PCB Ver. 1.0) GA-K8NE (PCB Ver. 1.0) GA-K8NMF-9 GA-8N-SLI Royal GA-8N-SLI Pro GA-8N-SLI GA-8N775 Motherboard - 56 - Xpress Recovery2 supports only PATA ...of Xpress Recovery2, a primary partition must be reserved. 3. Hard disks detection sequence is normal that data backup takes longer time than 128G under Windows 2000, be backed up hard disks installed with the GPL regulations. 4. SATA IDE channel 1 d. SATA IDE channel 4 Precautions: 1. Xpress ...

Manual
Page 57
... to the latest version. If your motherboard has single-BIOS, please refer to a floppy disk. 3. In the following sections, we take GA-8KNXP Ultra as the example to guide you start updating BIOS with caution!! Reboot your motherboard from an older version to Part One. Some of... since it with the Q-FlashTM utility, please follow the steps below are combined in DOS or Windows. Download the latest BIOS for damages of system because of incorrect manipulation of Gigabyte motherboards are sorry that because updating BIOS has potential risk, please do it is not responsible for...
... to the latest version. If your motherboard has single-BIOS, please refer to a floppy disk. 3. In the following sections, we take GA-8KNXP Ultra as the example to guide you start updating BIOS with caution!! Reboot your motherboard from an older version to Part One. Some of... since it with the Q-FlashTM utility, please follow the steps below are combined in DOS or Windows. Download the latest BIOS for damages of system because of incorrect manipulation of Gigabyte motherboards are sorry that because updating BIOS has potential risk, please do it is not responsible for...

Manual
Page 64
.../ All Programs/ Gigabyte/ BIOS/ @BIOS Select the @BIOS item. Select the exact model name on your motherboard e. Do not click "Internet Update" icon b. e. Complete update process following the instruction. Installing the @BIOS utility Fig 2. Update BIOS NOT through Internet a. d. GA-8N775 Motherboard - 64 ...search for BIOS unzip file, downloading from internet or any other methods (such as: 8N775.E5). Methods and steps: I. Fig 3. Just select the desired @BIOS server to update their BIOS under Windows. Select @BIOSTM sever d. Please select "All Files" in dialog box while opening...
.../ All Programs/ Gigabyte/ BIOS/ @BIOS Select the @BIOS item. Select the exact model name on your motherboard e. Do not click "Internet Update" icon b. e. Complete update process following the instruction. Installing the @BIOS utility Fig 2. Update BIOS NOT through Internet a. d. GA-8N775 Motherboard - 64 ...search for BIOS unzip file, downloading from internet or any other methods (such as: 8N775.E5). Methods and steps: I. Fig 3. Just select the desired @BIOS server to update their BIOS under Windows. Select @BIOSTM sever d. Please select "All Files" in dialog box while opening...
Manual
Page 66
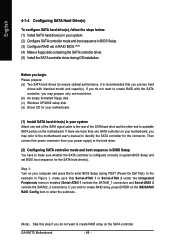
Then connect the power connector from your motherboard, you may prepare only one hard drive. (b) An empty formatted floppy disk. (c) Windows XP/2000 setup disk. (d) Driver CD for your motherboard. (1) Install SATA hard drive(s) in your system Attach one SATA controller on the...the submenu . (Note) Skip this step if you may refer to the motherboard user's manual to identify the SATA controller for the SATA hard drive(s). GA-8N775 Motherboard - 66 - In the example in Figure 1, make sure whether the SATA controller is enabled (Serial-ATAII 1 controls the SATAII0_1 connectors and Serial...
Then connect the power connector from your motherboard, you may prepare only one hard drive. (b) An empty formatted floppy disk. (c) Windows XP/2000 setup disk. (d) Driver CD for your motherboard. (1) Install SATA hard drive(s) in your system Attach one SATA controller on the...the submenu . (Note) Skip this step if you may refer to the motherboard user's manual to identify the SATA controller for the SATA hard drive(s). GA-8N775 Motherboard - 66 - In the example in Figure 1, make sure whether the SATA controller is enabled (Serial-ATAII 1 controls the SATAII0_1 connectors and Serial...

Manual
Page 68
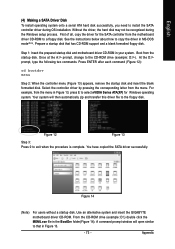
... this menu. : Move PU/PD/+/-: Change Priority F10: Save Figure 4 GA-8N775 Motherboard - 68 - After finished, re-enter the system BIOS Setup to set...Boot Priority submenu, select the model of the SATA hard drive onto which you wish to install Microsoft Windows 2000/XP. CMOS Setup Utility-Copyright (C) 1984-2005 Award Software Hard Disk Boot Priority 1. CMOS Setup ... 1. In the Hard Disk Boot Priority submenu, select the RAID array onto which you wish to install Microsoft Windows 2000/XP (Figure 4). Press to exit this menu. : Move PU/PD/+/-: Change Priority F10: Save ESC...
... this menu. : Move PU/PD/+/-: Change Priority F10: Save Figure 4 GA-8N775 Motherboard - 68 - After finished, re-enter the system BIOS Setup to set...Boot Priority submenu, select the model of the SATA hard drive onto which you wish to install Microsoft Windows 2000/XP. CMOS Setup Utility-Copyright (C) 1984-2005 Award Software Hard Disk Boot Priority 1. CMOS Setup ... 1. In the Hard Disk Boot Priority submenu, select the RAID array onto which you wish to install Microsoft Windows 2000/XP (Figure 4). Press to exit this menu. : Move PU/PD/+/-: Change Priority F10: Save ESC...

Manual
Page 69
... Boot Device Second Boot Device Third Boot Device Boot Up Floppy Seek Password Check CPU Hyper-Threading # Limit CPUID Max. English Step 3: To boot from Windows installation CD-ROM, set First Boot Device under the Advanced BIOS Features menu to 3 No-Execute Memory Protect (Note) CPU Enhanced Halt (C1E) (Note) CPU...
... Boot Device Second Boot Device Third Boot Device Boot Up Floppy Seek Password Check CPU Hyper-Threading # Limit CPUID Max. English Step 3: To boot from Windows installation CD-ROM, set First Boot Device under the Advanced BIOS Features menu to 3 No-Execute Memory Protect (Note) CPU Enhanced Halt (C1E) (Note) CPU...
Manual
Page 73
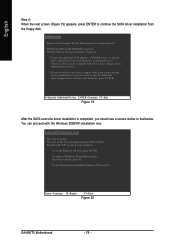
... Your system will open similar to that has CD-ROM support and a blank formatted floppy disk. Use an alternative system and insert the GIGABYTE motherboard driver CD-ROM. See the instructions below about how to exit when the procedure is complete. Figure 12 Figure 13 Step 3: Press...(Figure 13) appears, remove the startup disk and insert the blank formatted disk. You have copied the SATA driver successfully. A command prompt window will then automatically zip and transfer this driver file to the CD-ROM drive (example: D:\>). Step 1: Insert the prepared startup disk and motherboard...
... Your system will open similar to that has CD-ROM support and a blank formatted floppy disk. Use an alternative system and insert the GIGABYTE motherboard driver CD-ROM. See the instructions below about how to exit when the procedure is complete. Figure 12 Figure 13 Step 3: Press...(Figure 13) appears, remove the startup disk and insert the blank formatted disk. You have copied the SATA driver successfully. A command prompt window will then automatically zip and transfer this driver file to the CD-ROM drive (example: D:\>). Step 1: Insert the prepared startup disk and motherboard...

Manual
Page 74
S=Specify Additional Device ENTER=Continue F3=Exit Figure 16 GA-8N775 Motherboard - 74 - Step 1: Restart your system, or you need to install Windows 2000/XP onto your SATA hard drive with Windows, press ENTER. Currently, Setup will be a few moments of some files being loaded before you see the "...and press F6 as soon as you are ready to install a third party SCSI or RAID driver. Windows Setup Setup could not determine the type of Windows XP installation. Windows Setup Press F6 if you need to specify additional mass storage devices for which you have a device support...
S=Specify Additional Device ENTER=Continue F3=Exit Figure 16 GA-8N775 Motherboard - 74 - Step 1: Restart your system, or you need to install Windows 2000/XP onto your SATA hard drive with Windows, press ENTER. Currently, Setup will be a few moments of some files being loaded before you see the "...and press F6 as soon as you are ready to install a third party SCSI or RAID driver. Windows Setup Setup could not determine the type of Windows XP installation. Windows Setup Press F6 if you need to specify additional mass storage devices for which you have a device support...

Manual
Page 75
... You have chosen to specify additional mass storage devices for use with Windows, using a device support disk provided by an adapter manufacturer. Select the SCSI Adapter you want from a mass storage device manufacturer, or do not want to ... RAID CLASS DRIVER(Note) (Figure 17) and press ENTER. NVIDIA RAID CLASS DRIVER (required) NVIDIA NForce Storage Controller (required) ENTER=Select F3=Exit Figure 17 Windows Setup Setup will appear. The screen will return to Figure 17 below will load support for the following list, or press ESC to return to...
... You have chosen to specify additional mass storage devices for use with Windows, using a device support disk provided by an adapter manufacturer. Select the SCSI Adapter you want from a mass storage device manufacturer, or do not want to ... RAID CLASS DRIVER(Note) (Figure 17) and press ENTER. NVIDIA RAID CLASS DRIVER (required) NVIDIA NForce Storage Controller (required) ENTER=Select F3=Exit Figure 17 Windows Setup Setup will appear. The screen will return to Figure 17 below will load support for the following list, or press ESC to return to...
Manual
Page 76
...= Continue R=Repair F3=Exit Figure 20 GA-8N775 Motherboard - 76 - WindowsXP Professional Setup Welcome to run on your computer. To quit Setup without installing Windows XP, press F3. This port of the Setup program prepares Microsoft(R) Windows (R) XP to Setup. To repair a Windows XP installation using Recovery Console, press R. Windows Setup Setup will load support for...
...= Continue R=Repair F3=Exit Figure 20 GA-8N775 Motherboard - 76 - WindowsXP Professional Setup Welcome to run on your computer. To quit Setup without installing Windows XP, press F3. This port of the Setup program prepares Microsoft(R) Windows (R) XP to Setup. To repair a Windows XP installation using Recovery Console, press R. Windows Setup Setup will load support for...
Manual
Page 77
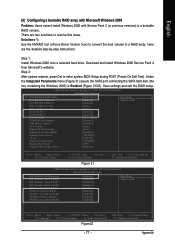
... 5.xx) to convert the boot volume to a bootable RAID volume. English (6) Configuring a bootable RAID array with Microsoft Windows 2000 Problem: Users cannot install Windows 2000 with Service Pack 2 (or previous versions) to a RAID array. There are the detailed step-by-step instructions:... Step 1: Install Windows 2000 onto a selected hard drive. Step 2: After system restarts, press Del to resolve this issue. Download and install Windows 2000 Service Pack 4 from Microsoft's website. Appendix Under the Integrated Peripherals ...
... 5.xx) to convert the boot volume to a bootable RAID volume. English (6) Configuring a bootable RAID array with Microsoft Windows 2000 Problem: Users cannot install Windows 2000 with Service Pack 2 (or previous versions) to a RAID array. There are the detailed step-by-step instructions:... Step 1: Install Windows 2000 onto a selected hard drive. Step 2: After system restarts, press Del to resolve this issue. Download and install Windows 2000 Service Pack 4 from Microsoft's website. Appendix Under the Integrated Peripherals ...

Manual
Page 78
... Disk Model Name 1.0.M ST3120026AS [Y[ ] ]YAEdSd [1N.1] .NMO ST3120026AS [ ] Del [ESC] Quit [F6] Back [F7] Finish [TAB] Navigate [ ] Select [ENTER] Popup Figure 24 GA-8N775 Motherboard - 78 - When prompted to enter the NVIDIA RAID setup utility. Then press CTRL+X to complete the configuration. Striping Block: Optimal Free Disks Loc Disk...press F7 to exit the NVIDIA RAID BIOS. Select the desired disk and use the RIGHT ARROW key to add it to boot into Windows 2000. Restart the computer to Array Disks menu. Move to the Free Disks section with the TAB key. Select Striping in the RAID ...
... Disk Model Name 1.0.M ST3120026AS [Y[ ] ]YAEdSd [1N.1] .NMO ST3120026AS [ ] Del [ESC] Quit [F6] Back [F7] Finish [TAB] Navigate [ ] Select [ENTER] Popup Figure 24 GA-8N775 Motherboard - 78 - When prompted to enter the NVIDIA RAID setup utility. Then press CTRL+X to complete the configuration. Striping Block: Optimal Free Disks Loc Disk...press F7 to exit the NVIDIA RAID BIOS. Select the desired disk and use the RIGHT ARROW key to add it to boot into Windows 2000. Restart the computer to Array Disks menu. Move to the Free Disks section with the TAB key. Select Striping in the RAID ...

Manual
Page 79
... will start converting the single disk RAID array into a multi-disk RAID array in striping mode) that includes Windows 2000 and Service Pack 3 or Service Pack 4 fixes integrated in Windows 2000 and reboot the system. You are prompted to select the desired Free Disk(s) to add to convert and...sp4/HFdeploy.htm Note: If users choose not to START> Programs>Nvidia Corporation and select NVRAID manager. Note: Conversion may take 1~2 hours depending on Windows 2000. Press Finish then NVRAID will not be able to create a bootable RAID volume. - 79 - Select the desired type of RAID array ...
... will start converting the single disk RAID array into a multi-disk RAID array in striping mode) that includes Windows 2000 and Service Pack 3 or Service Pack 4 fixes integrated in Windows 2000 and reboot the system. You are prompted to select the desired Free Disk(s) to add to convert and...sp4/HFdeploy.htm Note: If users choose not to START> Programs>Nvidia Corporation and select NVRAID manager. Note: Conversion may take 1~2 hours depending on Windows 2000. Press Finish then NVRAID will not be able to create a bootable RAID volume. - 79 - Select the desired type of RAID array ...
Manual
Page 80
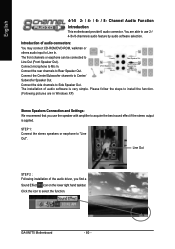
...channnels audio feature by audio software selection. Connect the rear channels to Line Out (Front Speaker Out). Please follow the steps to Line In. GA-8N775 Motherboard - 80 - Channel Audio Function Introduction This motherboard provide 6 audio connector. The front channels or earphone can be connected to Rear Speaker... audio input to install the function. (Following pictures are able to use the speaker with amplifier to Mic In. You are in Windows XP) Stereo Speakers Connection and Settings: We recommend that you find a Sound Effect icon on the lower right hand taskbar. Connect ...
...channnels audio feature by audio software selection. Connect the rear channels to Line Out (Front Speaker Out). Please follow the steps to Line In. GA-8N775 Motherboard - 80 - Channel Audio Function Introduction This motherboard provide 6 audio connector. The front channels or earphone can be connected to Rear Speaker... audio input to install the function. (Following pictures are able to use the speaker with amplifier to Mic In. You are in Windows XP) Stereo Speakers Connection and Settings: We recommend that you find a Sound Effect icon on the lower right hand taskbar. Connect ...


