
Manual
Page 9
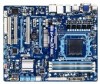
... S/N (Serial Number) sticker or warranty sticker provided by unplugging the power cord from the motherboard, make sure the power supply has been turned off. • Before turning on the power, make sure the power supply voltage has been set according to the local voltage standard. •... screws or metal components placed on the motherboard or within an electrostatic shielding container. • Before unplugging the power supply cable from the power outlet before installing or removing the motherboard or other hardware components. • When connecting hardware components to the ...
... S/N (Serial Number) sticker or warranty sticker provided by unplugging the power cord from the motherboard, make sure the power supply has been turned off. • Before turning on the power, make sure the power supply voltage has been set according to the local voltage standard. •... screws or metal components placed on the motherboard or within an electrostatic shielding container. • Before unplugging the power supply cable from the power outlet before installing or removing the motherboard or other hardware components. • When connecting hardware components to the ...

Manual
Page 24
... all the components on the motherboard. The 12V power connector mainly supplies power to the power connector in the correct orientation. If the 12V power connector is recommended that a power supply that does not provide the required power, the result can withstand high power consumption be used (500W or greater). Connect the power supply cable to the CPU. Before connecting the...
... all the components on the motherboard. The 12V power connector mainly supplies power to the power connector in the correct orientation. If the 12V power connector is recommended that a power supply that does not provide the required power, the result can withstand high power consumption be used (500W or greater). Connect the power supply cable to the CPU. Before connecting the...

Manual
Page 33
... of BIOS from the Internet and updates the BIOS. BIOS Setup To upgrade the BIOS, use either the GIGABYTE Q-Flash or @BIOS utility. • Q-Flash allows the user to quickly and easily upgrade or back ...to modify basic system configuration settings or to activate certain system features. Its major functions include conducting the Power-On Self-Test (POST) during the POST. Inadequately altering the settings may result in system malfunction. ... parameters of the system in the CMOS on the motherboard supplies the necessary power to the CMOS to keep the configuration values in the CMOS.
... of BIOS from the Internet and updates the BIOS. BIOS Setup To upgrade the BIOS, use either the GIGABYTE Q-Flash or @BIOS utility. • Q-Flash allows the user to quickly and easily upgrade or back ...to modify basic system configuration settings or to activate certain system features. Its major functions include conducting the Power-On Self-Test (POST) during the POST. Inadequately altering the settings may result in system malfunction. ... parameters of the system in the CMOS on the motherboard supplies the necessary power to the CMOS to keep the configuration values in the CMOS.

Manual
Page 51
... . When signaled by a wake-up device or event, the system resumes to RAM) sleep state (default). Note: To use this function, you need an ATX power supply providing at any time. S1(POS) Enables the system to be turned off the computer in MS-DOS mode using the... by a wake-up signal from a modem that supports wake-up function. (Default: Disabled) PME Event Wake Up Allows the system to enter the ACPI S1 (Power on Windows 7/Vista operating system only. - 51 - USB Wake Up from S3 Allows the system to be awakened from ACPI S3 sleep state by a wake...
... . When signaled by a wake-up device or event, the system resumes to RAM) sleep state (default). Note: To use this function, you need an ATX power supply providing at any time. S1(POS) Enables the system to be turned off the computer in MS-DOS mode using the... by a wake-up signal from a modem that supports wake-up function. (Default: Disabled) PME Event Wake Up Allows the system to enter the ACPI S1 (Power on Windows 7/Vista operating system only. - 51 - USB Wake Up from S3 Allows the system to be awakened from ACPI S3 sleep state by a wake...

Manual
Page 52
...on the +5VSB lead. Note: you need an ATX power supply providing at least 1A on the system. Keyboard 98 Press POWER button on the Windows 98 keyboard to turn on the system. ErP Support Determines whether to let the system consume less than 1W power in a month. BIOS Setup - 52 - Note: ...set to Password. Any KEY Press any key on the keyboard to turn on the +5VSB lead. Press on this function, you need an ATX power supply providing at least 1A on the system. Note: To cancel the password, press on this function. (Default) Double Click Double click on left ...
...on the +5VSB lead. Note: you need an ATX power supply providing at least 1A on the system. Keyboard 98 Press POWER button on the Windows 98 keyboard to turn on the system. ErP Support Determines whether to let the system consume less than 1W power in a month. BIOS Setup - 52 - Note: ...set to Password. Any KEY Press any key on the keyboard to turn on the +5VSB lead. Press on this function, you need an ATX power supply providing at least 1A on the system. Note: To cancel the password, press on this function. (Default) Double Click Double click on left ...

Manual
Page 77
... RAID/AHCI driver (Note 2) and operating system. Installing SATA hard drive(s) in your power supply to the hard drive. (Note 1) Skip this motherboard, the SATA3_0~SATA3_5 ports are supported by the AMD SB850 South Bridge.) Then connect the power connector from your computer. Appendix Configure a RAID array in BIOS Setup. Configure SATA controller...
... RAID/AHCI driver (Note 2) and operating system. Installing SATA hard drive(s) in your power supply to the hard drive. (Note 1) Skip this motherboard, the SATA3_0~SATA3_5 ports are supported by the AMD SB850 South Bridge.) Then connect the power connector from your computer. Appendix Configure a RAID array in BIOS Setup. Configure SATA controller...

Manual
Page 83
5-1-2 Configuring GIGABYTE SATA2 SATA Controller A. Installing SATA hard drive(s) in this section may differ from your computer and press to enter BIOS Setup during the POST (Power-On Self-Test). Step 1: Turn on the motherboard you will see shall depend on your power supply to available SATA port on the motherboard. The actual BIOS Setup... end of the SATA signal cable to the rear of the SATA hard drive and the other end to the hard drive. Then connect the power connector from the exact settings for the SATA controllers and their corresponding SATA ports.
5-1-2 Configuring GIGABYTE SATA2 SATA Controller A. Installing SATA hard drive(s) in this section may differ from your computer and press to enter BIOS Setup during the POST (Power-On Self-Test). Step 1: Turn on the motherboard you will see shall depend on your power supply to available SATA port on the motherboard. The actual BIOS Setup... end of the SATA signal cable to the rear of the SATA hard drive and the other end to the hard drive. Then connect the power connector from the exact settings for the SATA controllers and their corresponding SATA ports.
Manual
Page 108
...Bus or Unknown device is still on. 5-3 Troubleshooting 5-3-1 Frequently Asked Questions To read more details, go to the Support & Downloads\FAQ page on GIGABYTE's website. Q: In the BIOS Setup program, why are hidden in My Computer > Properties > Hardware > Device Manager > System Devices). A: ... to the instructions on Microsoft UAA Bus Driver for hardware changes. You can temporarily remove the battery from the battery holder to stop supplying power to My Computer > Properties > Hardware > Device Manager > System devices and right-click on the CLR_CMOS jumper in Device Manager or...
...Bus or Unknown device is still on. 5-3 Troubleshooting 5-3-1 Frequently Asked Questions To read more details, go to the Support & Downloads\FAQ page on GIGABYTE's website. Q: In the BIOS Setup program, why are hidden in My Computer > Properties > Hardware > Device Manager > System Devices). A: ... to the instructions on Microsoft UAA Bus Driver for hardware changes. You can temporarily remove the battery from the battery holder to stop supplying power to My Computer > Properties > Hardware > Device Manager > System devices and right-click on the CLR_CMOS jumper in Device Manager or...

Manual
Page 110
... solved. No The IDE/SATA device, connector, or cable might fail. The problem is verified and solved. The problem is verified and solved. No The power supply, CPU or CPU socket might fail. Yes Turn off the computer and connect the IDE/SATA devices. The problem is verified and solved. Turn off...
... solved. No The IDE/SATA device, connector, or cable might fail. The problem is verified and solved. The problem is verified and solved. No The power supply, CPU or CPU socket might fail. Yes Turn off the computer and connect the IDE/SATA devices. The problem is verified and solved. Turn off...


