Manual
Page 1
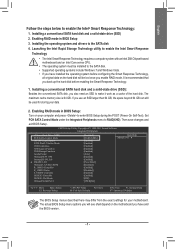
... recommended that you back up the hard disk before configuring the Smart Response Technology, all original data on the motherboard you have installed the operating system before enabling the Smart Response Technology. 1. Then save changes and exit BIOS Setup. Installing...computer and press to the SATA disk 4. Launching the Intel Rapid Storage Technology utility to enable the Intel Smart Response Technology • The Intel Smart Response Technology requires a computer system with an Intel Z68 Chipset-based motherboard and an Intel Core series CPU. • The operating system must...
... recommended that you back up the hard disk before configuring the Smart Response Technology, all original data on the motherboard you have installed the operating system before enabling the Smart Response Technology. 1. Then save changes and exit BIOS Setup. Installing...computer and press to the SATA disk 4. Launching the Intel Rapid Storage Technology utility to enable the Intel Smart Response Technology • The Intel Smart Response Technology requires a computer system with an Intel Z68 Chipset-based motherboard and an Intel Core series CPU. • The operating system must...
Manual
Page 7
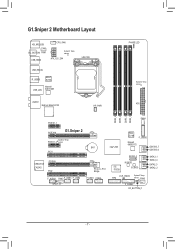
G1.Sniper 2 Motherboard Layout KB_MS_USB CPU_FAN OC_BUTTON FAN1 USB_HDMI System1 Temp. sensor FAN3 F_PANEL OC_BUTTON_F - 7 - sensor ATX DDR3_4 DDR3_2 DDR3_3 DDR3_1 PCIEX1_1 FAN4 PCIEX16 G1.Sniper 2 System2 Temp. sensor ATX_12V_2X4 LGA1155 USB_ESATA R_USB30 Etron ...EJ168 Marvell USB_LAN 88E1118R AUDIO BigFoot Killer E2100 HP_PWR PHASE LED System4 Temp. PCIEX1_2 sensor PCI1 CREATIVE CA20K2 PCIEX8 PCI2 F_AUDIO FAN2 F_USB3 F_USB2 SPDIF_O BAT PCIe to PCI Bridge F_USB1 COMA Intel® Z68...
G1.Sniper 2 Motherboard Layout KB_MS_USB CPU_FAN OC_BUTTON FAN1 USB_HDMI System1 Temp. sensor FAN3 F_PANEL OC_BUTTON_F - 7 - sensor ATX DDR3_4 DDR3_2 DDR3_3 DDR3_1 PCIEX1_1 FAN4 PCIEX16 G1.Sniper 2 System2 Temp. sensor ATX_12V_2X4 LGA1155 USB_ESATA R_USB30 Etron ...EJ168 Marvell USB_LAN 88E1118R AUDIO BigFoot Killer E2100 HP_PWR PHASE LED System4 Temp. PCIEX1_2 sensor PCI1 CREATIVE CA20K2 PCIEX8 PCI2 F_AUDIO FAN2 F_USB3 F_USB2 SPDIF_O BAT PCIe to PCI Bridge F_USB1 COMA Intel® Z68...
Manual
Page 8
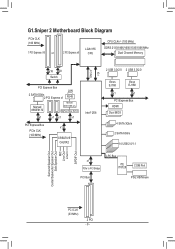
G1.Sniper 2 Motherboard Block Diagram PCIe CLK (100 MHz) 1 PCI Express x16 or 2 PCI Express x8 LGA1155 CPU CPU CLK+/- (100 MHz) DDR3 2133/1866/1600/1333/1066 ... Express x1 RJ45 Marvell 88SE9172 Marvell 88E1118R phy BigFoot Killer E2100 x1 x1 x1 x1 PCI Express Bus PCIe CLK (100 MHz) x1 CREATIVE CA20K2 Intel® Z68 DMI 2.0 FDI 2 USB 3.0/2.0 2 USB 3.0/2.0 Etron EJ168 Etron EJ168 x1 x1 PCI Express Bus HDMI Dual BIOS 4 SATA 3Gb/s 2 SATA 6Gb/s 14 USB 2.0/1.1 x1 PCIe...
G1.Sniper 2 Motherboard Block Diagram PCIe CLK (100 MHz) 1 PCI Express x16 or 2 PCI Express x8 LGA1155 CPU CPU CLK+/- (100 MHz) DDR3 2133/1866/1600/1333/1066 ... Express x1 RJ45 Marvell 88SE9172 Marvell 88E1118R phy BigFoot Killer E2100 x1 x1 x1 x1 PCI Express Bus PCIe CLK (100 MHz) x1 CREATIVE CA20K2 Intel® Z68 DMI 2.0 FDI 2 USB 3.0/2.0 2 USB 3.0/2.0 Etron EJ168 Etron EJ168 x1 x1 PCI Express Bus HDMI Dual BIOS 4 SATA 3Gb/s 2 SATA 6Gb/s 14 USB 2.0/1.1 x1 PCIe...
Manual
Page 21
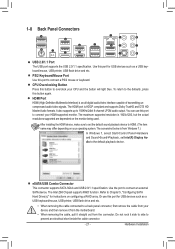
..., USB flash drive and etc. •• When removing the cable connected to a back panel connector, first remove the cable from the motherboard. •• When removing the cable, pull it side to side to prevent an electrical short inside the cable connector. - 21 - The... (The item name may differ depending on configuring a RAID array. HDMI Port HDMI (High-Definition Multimedia Interface) is from the connector. The Intel Z68 Chipset supports RAID function. Do not rock it straight out from Windows 7.) In Windows 7, select Start>Control Panel>Hardware and Sound>Sound>Playback...
..., USB flash drive and etc. •• When removing the cable connected to a back panel connector, first remove the cable from the motherboard. •• When removing the cable, pull it side to side to prevent an electrical short inside the cable connector. - 21 - The... (The item name may differ depending on configuring a RAID array. HDMI Port HDMI (High-Definition Multimedia Interface) is from the connector. The Intel Z68 Chipset supports RAID function. Do not rock it straight out from Windows 7.) In Windows 7, select Start>Control Panel>Hardware and Sound>Sound>Playback...
Manual
Page 85
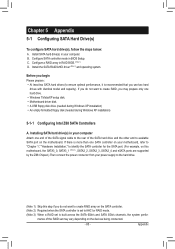
...," to identify the SATA controller for the SATA port. (For example, on this motherboard, the SATA3_0, SATA3_1 (Note 3), SATA2_2, SATA2_3, SATA2_4 and eSATA ports are supported by the Z68 Chipset.) Then connect the power connector from your power supply to the hard drive. ...drive. • Windows 7/Vista/XP setup disk. • Motherboard driver disk. • A USB floppy disk drive (needed during Windows XP installation) • An empty formatted floppy disk (needed during Windows XP installation) 5-1-1 Configuring Intel Z68 SATA Controllers A. Configure SATA controller mode in RAID BIOS. ...
...," to identify the SATA controller for the SATA port. (For example, on this motherboard, the SATA3_0, SATA3_1 (Note 3), SATA2_2, SATA2_3, SATA2_4 and eSATA ports are supported by the Z68 Chipset.) Then connect the power connector from your power supply to the hard drive. ...drive. • Windows 7/Vista/XP setup disk. • Motherboard driver disk. • A USB floppy disk drive (needed during Windows XP installation) • An empty formatted floppy disk (needed during Windows XP installation) 5-1-1 Configuring Intel Z68 SATA Controllers A. Configure SATA controller mode in RAID BIOS. ...
Manual
Page 99
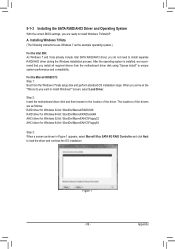
...driver during the Windows installation process. For the Marvell 88SE9172: Step 1: Boot from the motherboard driver disk using "Xpress Install" to install Windows 7/Vista/XP. Step 2: Insert the motherboard driver disk and then browse to the location of the drivers are as follows: RAID ... Windows 64-bit: \BootDrv\Marvell\AHCI\Floppy64 Step 3: When a screen as the example operating system.) For the Intel Z68: As Windows 7 and Vista already include Intel SATA RAID/AHCI driver, you are ready to ensure system performance and compatibility. Appendix The locations of the driver....
...driver during the Windows installation process. For the Marvell 88SE9172: Step 1: Boot from the motherboard driver disk using "Xpress Install" to install Windows 7/Vista/XP. Step 2: Insert the motherboard driver disk and then browse to the location of the drivers are as follows: RAID ... Windows 64-bit: \BootDrv\Marvell\AHCI\Floppy64 Step 3: When a screen as the example operating system.) For the Intel Z68: As Windows 7 and Vista already include Intel SATA RAID/AHCI driver, you are ready to ensure system performance and compatibility. Appendix The locations of the driver....

Manual
Page 100
...first because you need to that contains the driver during the Windows setup process. Method B: Steps: 1: Use an alternative system and insert the motherboard driver disk. 2: From your floppy disk. erating system. • For the Marvell 88SE9172, select 7) Marvell RAID driver. (For AHCI drive...RAID\Floppy32 folder to the floppy disk. Refer to exit when finished. Method A: • For the Intel Z68, copy all files in Figure 2, • For the Intel Z68, select 8) Intel Rapid Storage driver for 32bit system for Windows XP 32-bit op- A Command Prompt window will then ...
...first because you need to that contains the driver during the Windows setup process. Method B: Steps: 1: Use an alternative system and insert the motherboard driver disk. 2: From your floppy disk. erating system. • For the Marvell 88SE9172, select 7) Marvell RAID driver. (For AHCI drive...RAID\Floppy32 folder to the floppy disk. Refer to exit when finished. Method A: • For the Intel Z68, copy all files in Figure 2, • For the Intel Z68, select 8) Intel Rapid Storage driver for 32bit system for Windows XP 32-bit op- A Command Prompt window will then ...


