Manual
Page 11
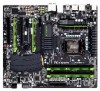
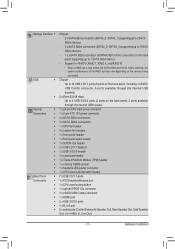
... (TPM) header ŠŠ 1 x clearing CMOS jumper ŠŠ 1 x heatsink LED power connector ŠŠ 1 x CPU overclocking button header Back Panel ŠŠ 7 x USB 2.0/1.1 ports Connectors ŠŠ 1 x PS/2 keyboard/mouse port ŠŠ 1 x CPU overclocking button ŠŠ 1 x optical S/PDIF Out connector ŠŠ 1 x eSATA/USB Combo connector ŠŠ 1 x HDMI...
... (TPM) header ŠŠ 1 x clearing CMOS jumper ŠŠ 1 x heatsink LED power connector ŠŠ 1 x CPU overclocking button header Back Panel ŠŠ 7 x USB 2.0/1.1 ports Connectors ŠŠ 1 x PS/2 keyboard/mouse port ŠŠ 1 x CPU overclocking button ŠŠ 1 x optical S/PDIF Out connector ŠŠ 1 x eSATA/USB Combo connector ŠŠ 1 x HDMI...
Manual
Page 20
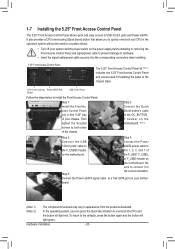
...the panel to hardware. • Insert the signal cable/power cable securely into a free 5.25" bay of on the motherboard. CPU Overclocking Power eSATA Port Button USB 3.0/2.0 Ports Follow the steps below to install the Front Access Control Panel: Step 1: Install the Front Access...orientation. board. (Note 1) The components received may vary in appearance from the products illustrated. (Note 2) In the operating system, you to overclock the CPU and the button will light green. 1-7 Installing the 5.25" Front Access Control Panel The 5.25" Front Access Control Panel allows quick...
...the panel to hardware. • Insert the signal cable/power cable securely into a free 5.25" bay of on the motherboard. CPU Overclocking Power eSATA Port Button USB 3.0/2.0 Ports Follow the steps below to install the Front Access Control Panel: Step 1: Install the Front Access...orientation. board. (Note 1) The components received may vary in appearance from the products illustrated. (Note 2) In the operating system, you to overclock the CPU and the button will light green. 1-7 Installing the 5.25" Front Access Control Panel The 5.25" Front Access Control Panel allows quick...
Manual
Page 21
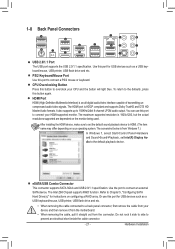
CPU Overclocking Button Press this port to connect a PS/2 mouse or keyboard. You can use this port to connect your CPU and the button will light blue. ... port for instructions on your device and then remove it from the motherboard. •• When removing the cable, pull it side to side to overclock your HDMI-supported monitor. The Intel Z68 Chipset supports RAID function. The HDMI port is an all-digital audio/video interface capable of transmitting uncompressed...
CPU Overclocking Button Press this port to connect a PS/2 mouse or keyboard. You can use this port to connect your CPU and the button will light blue. ... port for instructions on your device and then remove it from the motherboard. •• When removing the cable, pull it side to side to overclock your HDMI-supported monitor. The Intel Z68 Chipset supports RAID function. The HDMI port is an all-digital audio/video interface capable of transmitting uncompressed...
Manual
Page 33
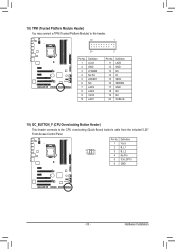
... PCIe power connector (SATA)(X58A-OC) 13 NC 14 ID 15 SB3V 16 SERIRQ 17 GND 18 NC 19 NC 20 SUSCLK 19) OC_BUTTON_F (CPU Overclocking Button Header) This header connects to this header. DB_PORT BIOS Switc 1 1 19 TPM w/housing 20 Pin No. 1 2 3 4 5 6 7 8 9 10 ... module(X58A-OC) PWM Swi DIP 2 DIP Pin No. 1 18) TPM (Trusted Platform Module Header) You may connect a TPM (Trusted Platform Module) to the CPU overclocking (Quick Boost) button's cable from the included 5.25" Front Access Control Panel. 4 6 1 3 Pin No. 1 2 3 4 5 6 Definition Vcc3 B_L1 B_L2 No Pin ICH_GP10...
... PCIe power connector (SATA)(X58A-OC) 13 NC 14 ID 15 SB3V 16 SERIRQ 17 GND 18 NC 19 NC 20 SUSCLK 19) OC_BUTTON_F (CPU Overclocking Button Header) This header connects to this header. DB_PORT BIOS Switc 1 1 19 TPM w/housing 20 Pin No. 1 2 3 4 5 6 7 8 9 10 ... module(X58A-OC) PWM Swi DIP 2 DIP Pin No. 1 18) TPM (Trusted Platform Module Header) You may connect a TPM (Trusted Platform Module) to the CPU overclocking (Quick Boost) button's cable from the included 5.25" Front Access Control Panel. 4 6 1 3 Pin No. 1 2 3 4 5 6 Definition Vcc3 B_L1 B_L2 No Pin ICH_GP10...
Manual
Page 39
Incorrectly doing overclock/overvoltage may result in damage to boot. BIOS Setup If this occurs, clear the CMOS values and reset the board to default values.) CMOS Setup ... +/-/PU/PD: Value F10: Save F6: Fail-Safe Defaults ESC: Exit F1: General Help F7: Optimized Defaults Whether the system will work stably with the overclock/overvoltage settings you made is for advanced users only and we recommend you not to alter the default settings to prevent system instability or other...
Incorrectly doing overclock/overvoltage may result in damage to boot. BIOS Setup If this occurs, clear the CMOS values and reset the board to default values.) CMOS Setup ... +/-/PU/PD: Value F10: Save F6: Fail-Safe Defaults ESC: Exit F1: General Help F7: Optimized Defaults Whether the system will work stably with the overclock/overvoltage settings you made is for advanced users only and we recommend you not to alter the default settings to prevent system instability or other...
Manual
Page 42
... is highly recommended that supports this function. (Default) Profile1 Uses Profile 1 settings. Profile2 (Note 2) Uses Profile 2 settings. Note: If your system fails to boot after overclocking, please wait for 20 seconds to allow the BCLK/DMI/PEG Frequency(0.1MHz) item below to decrease power consumption. Depending on XMP memory module(s) to...
... is highly recommended that supports this function. (Default) Profile1 Uses Profile 1 settings. Profile2 (Note 2) Uses Profile 2 settings. Note: If your system fails to boot after overclocking, please wait for 20 seconds to allow the BCLK/DMI/PEG Frequency(0.1MHz) item below to decrease power consumption. Depending on XMP memory module(s) to...
Manual
Page 72
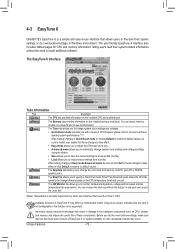
... you with 3 levels of these components. The HW Monitor tab allows you install an Intel Core i5 or Core i7 CPU. 4-3 EasyTune 6 GIGABYTE's EasyTune 6 is a simple and easy-to-use your own sound file (.wav file). (Note) Quick Boost is not supported. After making ...these changes to take effect or click Default to restore to monitor hardware temperature, voltage and fan speed and set . Incorrectly doing overclock/overvoltage may differ by motherboard model. The EasyTune 6 Interface Tabs Information Tab Function The CPU tab provides information on the installed memory ...
... you with 3 levels of these components. The HW Monitor tab allows you install an Intel Core i5 or Core i7 CPU. 4-3 EasyTune 6 GIGABYTE's EasyTune 6 is a simple and easy-to-use your own sound file (.wav file). (Note) Quick Boost is not supported. After making ...these changes to take effect or click Default to restore to monitor hardware temperature, voltage and fan speed and set . Incorrectly doing overclock/overvoltage may differ by motherboard model. The EasyTune 6 Interface Tabs Information Tab Function The CPU tab provides information on the installed memory ...
Manual
Page 76
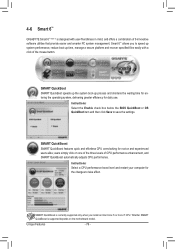
4-6 Smart 6™ GIGABYTE Smart 6™ (Note 1) is designed with a click of 6 innovative software utilities that provide easier and smarter PC system management. Instructions: Select a CPU performance boost level ... box below the BIOS QuickBoot or OS QuickBoot item and then click Save to take effect. SMART QuickBoost SMART QuickBoost features quick and effortless CPU overclocking for daily use.
4-6 Smart 6™ GIGABYTE Smart 6™ (Note 1) is designed with a click of 6 innovative software utilities that provide easier and smarter PC system management. Instructions: Select a CPU performance boost level ... box below the BIOS QuickBoot or OS QuickBoot item and then click Save to take effect. SMART QuickBoost SMART QuickBoost features quick and effortless CPU overclocking for daily use.
Manual
Page 82
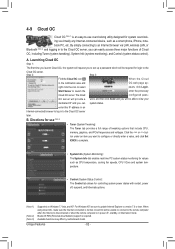
... in to complete. • System Info (System Monitoring): The System Info tab enables real time PC system status monitoring for use overclocking utility designed for controlling system power states with restart, power off , standby, or hibernation mode. The Cloud configured pass- A. enter...CPU temperature, cooling fan speeds, CPU VCore and system temperature. • Control (System Status Control): The Control tab allows for system overclocking via LAN, wireless LAN, or Bluetooth (Note 2) and logging in the notification area and OC web page ap- Launching Cloud OC ...
... in to complete. • System Info (System Monitoring): The System Info tab enables real time PC system status monitoring for use overclocking utility designed for controlling system power states with restart, power off , standby, or hibernation mode. The Cloud configured pass- A. enter...CPU temperature, cooling fan speeds, CPU VCore and system temperature. • Control (System Status Control): The Control tab allows for system overclocking via LAN, wireless LAN, or Bluetooth (Note 2) and logging in the notification area and OC web page ap- Launching Cloud OC ...
Manual
Page 83
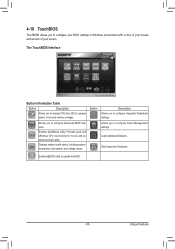
... Allows you to configure your BIOS settings in Windows environment with a click of your mouse and a touch of your screen. Provides quick and effortless CPU overclocking for novice and experienced users alike. The TouchBIOS Interface Button Information Table Button Description Allows you to update the BIOS. - 83 -
... Allows you to configure your BIOS settings in Windows environment with a click of your mouse and a touch of your screen. Provides quick and effortless CPU overclocking for novice and experienced users alike. The TouchBIOS Interface Button Information Table Button Description Allows you to update the BIOS. - 83 -


