
Manual
Page 3
... and features in this manual may be made by copyright laws and is the property of GIGABYTE. Check your motherboard looks like this product, GIGABYTE provides the following types of documentations: For quick set-up of this manual is... Manual. Example: For product-related information, check on our website at: http://www.gigabyte.com Identifying Your Motherboard Revision The revision number on your motherboard revision before updating motherboard BIOS, drivers, or when looking for technical information. All rights reserved. Changes to their respective owners...
... and features in this manual may be made by copyright laws and is the property of GIGABYTE. Check your motherboard looks like this product, GIGABYTE provides the following types of documentations: For quick set-up of this manual is... Manual. Example: For product-related information, check on our website at: http://www.gigabyte.com Identifying Your Motherboard Revision The revision number on your motherboard revision before updating motherboard BIOS, drivers, or when looking for technical information. All rights reserved. Changes to their respective owners...
Manual
Page 6
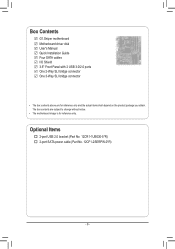
Box Contents G1.Sniper motherboard Motherboard driver disk User's Manual Quick Installation Guide Four SATA cables I/O Shield 3.5" Front Panel with 2 USB 3.0/2.0 ports One 2-Way SLI bridge connector One 3-Way SLI bridge connector • The box contents above are subject to change without notice. • The motherboard image is for reference only and the actual items shall depend on the product package you obtain. Optional Items 2-port USB 2.0 bracket (Part No. 12CR1-1UB030-5*R) 2-port SATA power cable (Part No. 12CF1-2SERPW-0*R) - 6 - The box contents are for reference only.
Box Contents G1.Sniper motherboard Motherboard driver disk User's Manual Quick Installation Guide Four SATA cables I/O Shield 3.5" Front Panel with 2 USB 3.0/2.0 ports One 2-Way SLI bridge connector One 3-Way SLI bridge connector • The box contents above are subject to change without notice. • The motherboard image is for reference only and the actual items shall depend on the product package you obtain. Optional Items 2-port USB 2.0 bracket (Part No. 12CR1-1UB030-5*R) 2-port SATA power cable (Part No. 12CF1-2SERPW-0*R) - 6 - The box contents are for reference only.
Manual
Page 18
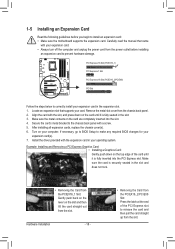
...Express x1 Slot PCI Express x16 Slot (PCIEX16_2/PCIEX8) PCI Slot Follow the steps below to install an expansion card: • Make sure the motherboard supports the expansion card. Align the card with a screw. 5. Example: Installing and Removing a PCI Express Graphics Card: • Installing a ...installing all expansion cards, replace the chassis cover(s). 6. Hardware Installation - 18 - • Removing the Card from the slot. Install the driver provided with your card. Make sure the card is fully seated in the slot and does not rock. • Removing the Card from...
...Express x1 Slot PCI Express x16 Slot (PCIEX16_2/PCIEX8) PCI Slot Follow the steps below to install an expansion card: • Make sure the motherboard supports the expansion card. Align the card with a screw. 5. Example: Installing and Removing a PCI Express Graphics Card: • Installing a ...installing all expansion cards, replace the chassis cover(s). 6. Hardware Installation - 18 - • Removing the Card from the slot. Install the driver provided with your card. Make sure the card is fully seated in the slot and does not rock. • Removing the Card from...
Manual
Page 19
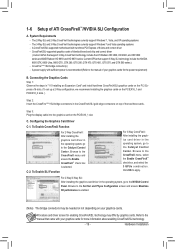
...9800 GTX, GTX 260, GTX 280, GTX 470, GTX 480, GTX 570, and GTX 580 series.) - A CrossFireX/SLI-supported motherboard with sufficient power is recommended (Refer to the Set SLI and Physx Configuration screen and ensure Maximize 3D performance is selected. A power...go to the Catalyst Control Center. CrossFireX/SLI-supported graphics cards of ATI CrossFireX™/NVIDIA SLI Configuration A. Configuring the Graphics Card Driver C-1. The 2-Way SLI and 2-Way CrossFireX technologies currently support Windows 7, Vista, and XP operating systems - To Enable SLI Function ...
...9800 GTX, GTX 260, GTX 280, GTX 470, GTX 480, GTX 570, and GTX 580 series.) - A CrossFireX/SLI-supported motherboard with sufficient power is recommended (Refer to the Set SLI and Physx Configuration screen and ensure Maximize 3D performance is selected. A power...go to the Catalyst Control Center. CrossFireX/SLI-supported graphics cards of ATI CrossFireX™/NVIDIA SLI Configuration A. Configuring the Graphics Card Driver C-1. The 2-Way SLI and 2-Way CrossFireX technologies currently support Windows 7, Vista, and XP operating systems - To Enable SLI Function ...

Manual
Page 34
Motherboard Model BIOS Version G1.Sniper F1f . . . . : BIOS Setup : XpressRecovery2 : Boot Menu : Qflash 01/19/2011-X58-ICH10-7A89QG0RC-00 Function Keys Function Keys: : POST SCREEN Press the key to access ... to select the first boot device, then press to Xpress Recovery2 during the POST. In Boot Menu, use the up hard drive data using the driver disk, the key can access Boot Menu again to change the first boot device setting as needed. : Q-FLASH Press the key to enter BIOS Setup...
Motherboard Model BIOS Version G1.Sniper F1f . . . . : BIOS Setup : XpressRecovery2 : Boot Menu : Qflash 01/19/2011-X58-ICH10-7A89QG0RC-00 Function Keys Function Keys: : POST SCREEN Press the key to access ... to select the first boot device, then press to Xpress Recovery2 during the POST. In Boot Menu, use the up hard drive data using the driver disk, the key can access Boot Menu again to change the first boot device setting as needed. : Q-FLASH Press the key to enter BIOS Setup...
Manual
Page 61
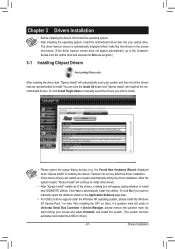
... Yes to automatically install the utilities. Drivers Installation Chapter 3 Drivers Installation • Before installing the drivers, first install the operating system. • After installing the operating system, insert the motherboard driver disk into your system and then list all of the drivers, a dialog box will appear asking whether to install new GIGABYTE utilities. You can click the...
... Yes to automatically install the utilities. Drivers Installation Chapter 3 Drivers Installation • Before installing the drivers, first install the operating system. • After installing the operating system, insert the motherboard driver disk into your system and then list all of the drivers, a dialog box will appear asking whether to install new GIGABYTE utilities. You can click the...

Manual
Page 62
Drivers Installation - 62 - You can click the Install button on the right of an item to install it. 3-3 Technical Manuals This page provides GIGABYTE's application guides, content descriptions for this driver disk, and the motherboard manuals. 3-2 Application Software This page displays all the utilities and applications that GIGABYTE develops and some free software.
Drivers Installation - 62 - You can click the Install button on the right of an item to install it. 3-3 Technical Manuals This page provides GIGABYTE's application guides, content descriptions for this driver disk, and the motherboard manuals. 3-2 Application Software This page displays all the utilities and applications that GIGABYTE develops and some free software.

Manual
Page 66
... the backup image file. actual size requirements vary, depending on the amount of data) and begin the installation of the operating system. Boot from the motherboard driver disk to the unallocated space (black stripe along the top). Unique Features - 66 -
... the backup image file. actual size requirements vary, depending on the amount of data) and begin the installation of the operating system. Boot from the motherboard driver disk to the unallocated space (black stripe along the top). Unique Features - 66 -

Manual
Page 75
... Displays the computers with computers on this icon Figure 1. Unique Features About Q-Share ... Directions for using Q-Share After installing Q-Share from the motherboard driver disk, go to Start>All Programs>GIGABYTE>Q-Share. Open Incoming Folder : C:\Q-ShareFolder Change Incoming Folder : C:\Q-ShareFolder Update Q-Share ... Disable Incoming Folder ... Enable Incoming Folder ... Exit... 4-5 Q-Share Q-Share is NOT...
... Displays the computers with computers on this icon Figure 1. Unique Features About Q-Share ... Directions for using Q-Share After installing Q-Share from the motherboard driver disk, go to Start>All Programs>GIGABYTE>Q-Share. Open Incoming Folder : C:\Q-ShareFolder Change Incoming Folder : C:\Q-ShareFolder Update Q-Share ... Disable Incoming Folder ... Enable Incoming Folder ... Exit... 4-5 Q-Share Q-Share is NOT...
Manual
Page 81
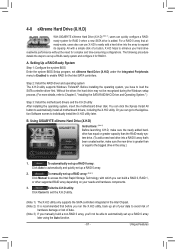
...GIGABYTE eXtreme Hard Drive (X.H.D) Instructions: (Note 2) Before launching X.H.D, make sure the new drive is recommended that 's been created earlier, make sure the newly added harddrive has equal or greater capacity than the RAID-ready system drive. (To add a new hard drive into the array to set up all motherboard drivers..., including the X.H.D utility. Without the driver, the hard drive may not be able to individually install the X.H.D utility later. B. Exits the X.H.D ...
...GIGABYTE eXtreme Hard Drive (X.H.D) Instructions: (Note 2) Before launching X.H.D, make sure the new drive is recommended that 's been created earlier, make sure the newly added harddrive has equal or greater capacity than the RAID-ready system drive. (To add a new hard drive into the array to set up all motherboard drivers..., including the X.H.D utility. Without the driver, the hard drive may not be able to individually install the X.H.D utility later. B. Exits the X.H.D ...

Manual
Page 83
... SATA hard drives (to create RAID, you may prepare only one hard drive. • Windows 7/Vista/XP setup disk. • Motherboard driver disk. 5-1-1 Configuring Intel ICH10R SATA Controllers A. If you do not want to create RAID array on the SATA controller. (Note 2) ... 1," "Hardware Installation," to identify the SATA controller for the SATA port. (For example, on the motherboard. Configure SATA controller mode in RAID BIOS. (Note 1) D. Install the SATA RAID/AHCI driver (Note 2) and operating system. Configure a RAID array in BIOS Setup. Appendix B. Chapter 5 Appendix...
... SATA hard drives (to create RAID, you may prepare only one hard drive. • Windows 7/Vista/XP setup disk. • Motherboard driver disk. 5-1-1 Configuring Intel ICH10R SATA Controllers A. If you do not want to create RAID array on the SATA controller. (Note 2) ... 1," "Hardware Installation," to identify the SATA controller for the SATA port. (For example, on the motherboard. Configure SATA controller mode in RAID BIOS. (Note 1) D. Install the SATA RAID/AHCI driver (Note 2) and operating system. Configure a RAID array in BIOS Setup. Appendix B. Chapter 5 Appendix...

Manual
Page 102
... or AHCI mode, it is normal that you will not see the hard drive(s) in the Marvell Storage Utility. To install the utility, insert the motherboard driver disk, then go to Application Software\Install Application Software and select Marvell Storage Utility to install. Appendix - 102 - Note: After the installation, you must login...
... or AHCI mode, it is normal that you will not see the hard drive(s) in the Marvell Storage Utility. To install the utility, insert the motherboard driver disk, then go to Application Software\Install Application Software and select Marvell Storage Utility to install. Appendix - 102 - Note: After the installation, you must login...
Manual
Page 103
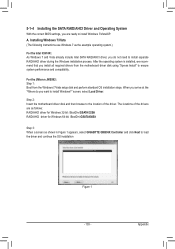
... 7/Vista (The following instructions use Windows 7 as shown in Figure 1 appears, select GIGABYTE GBB36X Controller and click Next to load the driver and continue the OS installation Figure 1 - 103 - Step 2: Insert the motherboard driver disk and then browse to the location of the drivers are ready to install Windows 7/Vista/XP. The locations of the...
... 7/Vista (The following instructions use Windows 7 as shown in Figure 1 appears, select GIGABYTE GBB36X Controller and click Next to load the driver and continue the OS installation Figure 1 - 103 - Step 2: Insert the motherboard driver disk and then browse to the location of the drivers are ready to install Windows 7/Vista/XP. The locations of the...

Manual
Page 104
... standard OS installation steps. The locations of the driver. Step 2: Insert the motherboard driver disk and then browse to the location of the drivers are as follows: RAID driver for Windows 32-bit: \BootDrv\Marvell\RAID\i386 RAID driver for Windows 64-bit: \BootDrv\Marvell\RAID\amd64 AHCI driver for Windows 32-bit: \BootDrv\Marvell\AHCI\Win32...
... standard OS installation steps. The locations of the driver. Step 2: Insert the motherboard driver disk and then browse to the location of the drivers are as follows: RAID driver for Windows 32-bit: \BootDrv\Marvell\RAID\i386 RAID driver for Windows 64-bit: \BootDrv\Marvell\RAID\amd64 AHCI driver for Windows 32-bit: \BootDrv\Marvell\AHCI\Win32...
Manual
Page 105
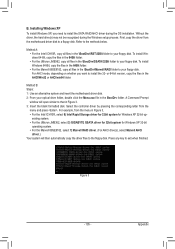
... window will then automatically copy the driver files to a floppy disk. erating system. • For the JMicron JMB362, select 3) GIGABYTE GSATA driver for 32bit system for Windows XP 32-bit op- Select the controller driver by pressing the corresponding letter from the motherboard driver disk to the floppy disk. Refer...hard drive(s) may not be recognized during the OS installation. Method B: Steps: 1: Use an alternative system and insert the motherboard driver disk. 2: From your optical drive folder, double click the Menu.exe file in the \BootDrv\GSATA\32Bit folder to ...
... window will then automatically copy the driver files to a floppy disk. erating system. • For the JMicron JMB362, select 3) GIGABYTE GSATA driver for 32bit system for Windows XP 32-bit op- Select the controller driver by pressing the corresponding letter from the motherboard driver disk to the floppy disk. Refer...hard drive(s) may not be recognized during the OS installation. Method B: Steps: 1: Use an alternative system and insert the motherboard driver disk. 2: From your optical drive folder, double click the Menu.exe file in the \BootDrv\GSATA\32Bit folder to ...
Manual
Page 109
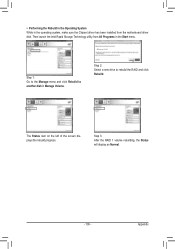
• Performing the Rebuild in the Operating System While in the Start menu. Appendix Then launch the Intel Rapid Storage Technology utility from All Programs in the operating system, make sure the Chipset driver has been installed from the motherboard driver disk. Step 2: Select a new drive to another disk in Manage Volume. Step 1: Go to the Manage menu and click Rebuild to rebuild the RAID and click Rebuild. The Status item on the left of the screen displays the rebuild progress. Step 3: After the RAID 1 volume rebuilding, the Status will display as Normal. - 109 -
• Performing the Rebuild in the Operating System While in the Start menu. Appendix Then launch the Intel Rapid Storage Technology utility from All Programs in the operating system, make sure the Chipset driver has been installed from the motherboard driver disk. Step 2: Select a new drive to another disk in Manage Volume. Step 1: Go to the Manage menu and click Rebuild to rebuild the RAID and click Rebuild. The Status item on the left of the screen displays the rebuild progress. Step 3: After the RAID 1 volume rebuilding, the Status will display as Normal. - 109 -

Manual
Page 112
...RAID LIST block. Step 1: In the GIGABYTE RAID CONFIGURER screen, right-click on the array to be rebuilt in the tool bar.) Step 2: When the Rebuilding RAID Wizard appears, click Next. Launch the GIGABYTE RAID CONFIGURER from the motherboard driver disk. • Rebuilding in the ...operating system Make sure the JMicron JMB362 SATA controller driver has been installed from All Programs in the Start menu. Appendix - 112 -
...RAID LIST block. Step 1: In the GIGABYTE RAID CONFIGURER screen, right-click on the array to be rebuilt in the tool bar.) Step 2: When the Rebuilding RAID Wizard appears, click Next. Launch the GIGABYTE RAID CONFIGURER from the motherboard driver disk. • Rebuilding in the ...operating system Make sure the JMicron JMB362 SATA controller driver has been installed from All Programs in the Start menu. Appendix - 112 -

Manual
Page 114
Step 3: Make sure you have installed the Marvell RAID driver and Marvell Storage Utility from Start\All Programs\Marvell Storage Utility\Marvell Tray, right-click on the icon in the notification area, and select Open ... the Background Activity Progress item, indicating that the RAID volume is being rebuilt. While in the operating system, launch the Marvell Storage Utility from the motherboard driver disk. Step 2: The screen will display as Done. • Manually Rebuilding RAID 1 in the Operating System You can manually rebuild a RAID 1 array without setting the...
Step 3: Make sure you have installed the Marvell RAID driver and Marvell Storage Utility from Start\All Programs\Marvell Storage Utility\Marvell Tray, right-click on the icon in the notification area, and select Open ... the Background Activity Progress item, indicating that the RAID volume is being rebuilt. While in the operating system, launch the Marvell Storage Utility from the motherboard driver disk. Step 2: The screen will display as Done. • Manually Rebuilding RAID 1 in the Operating System You can manually rebuild a RAID 1 array without setting the...
Manual
Page 115
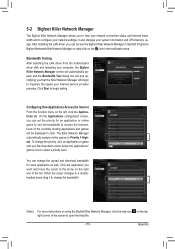
After installing the LAN driver, you can access the Bigfoot Killer Network Manager in Start\All Programs\ Bigfoot Networks\Killer Network Manager or right-click on the left, click the ... on using the Bigfoot Killer Network Manager, click the help icon on the right end of the bar. Bandwidth Testing After installing the LAN driver from the motherboard driver disk and restarting your computer, the Bigfoot Killer Network Manager screen will automatically appear and the Bandwidth Test dialog box will pop up, notifying...
After installing the LAN driver, you can access the Bigfoot Killer Network Manager in Start\All Programs\ Bigfoot Networks\Killer Network Manager or right-click on the left, click the ... on using the Bigfoot Killer Network Manager, click the help icon on the right end of the bar. Bandwidth Testing After installing the LAN driver from the motherboard driver disk and restarting your computer, the Bigfoot Killer Network Manager screen will automatically appear and the Bandwidth Test dialog box will pop up, notifying...
Manual
Page 122
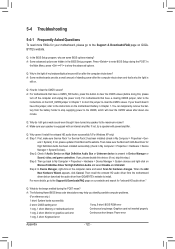
... have this , please turn off the computer and unplug the power cord). Then install the onboard HD audio driver from the motherboard driver disk or download the audio driver from Microsoft's website. Press to enter BIOS Setup during the POST mean? You can temporarily remove the battery ...Scan for hardware changes. 5-4 Troubleshooting 5-4-1 Frequently Asked Questions To read more details, go to the Support & Downloads\FAQ page on GIGABYTE's website. Then make sure Service Pack 1 or Service Pack 2 has been installed (check in Device Manager or Sound, video, and game controllers...
... have this , please turn off the computer and unplug the power cord). Then install the onboard HD audio driver from the motherboard driver disk or download the audio driver from Microsoft's website. Press to enter BIOS Setup during the POST mean? You can temporarily remove the battery ...Scan for hardware changes. 5-4 Troubleshooting 5-4-1 Frequently Asked Questions To read more details, go to the Support & Downloads\FAQ page on GIGABYTE's website. Then make sure Service Pack 1 or Service Pack 2 has been installed (check in Device Manager or Sound, video, and game controllers...


