

Use and Care Manual
Page 1
...can find them on a label on the side of Your Washer 16 Unpacking Your Washer 17 Drain Requirements 18 Electrical Requirements 18 Water Supply Requirements 18 Installing the Washer 19, 20 Replacement Parts 20 Troubleshooting Tips 21-24 Consumer ...® partner, GE has determined that this product meets the EnErgy Star® guidelines for energy efficiency. Washers GEAppliances.com Safety Instructions 2, 3 Operating Instructions Control Panels 4, 5 Control Settings 6, 7 Features 8-10 Loading and Using the Washer . . . .10, 11 Cleaning the Washer 12-14 Installation Instructions...
...can find them on a label on the side of Your Washer 16 Unpacking Your Washer 17 Drain Requirements 18 Electrical Requirements 18 Water Supply Requirements 18 Installing the Washer 19, 20 Replacement Parts 20 Troubleshooting Tips 21-24 Consumer ...® partner, GE has determined that this product meets the EnErgy Star® guidelines for energy efficiency. Washers GEAppliances.com Safety Instructions 2, 3 Operating Instructions Control Panels 4, 5 Control Settings 6, 7 Features 8-10 Loading and Using the Washer . . . .10, 11 Cleaning the Washer 12-14 Installation Instructions...
Use and Care Manual
Page 6
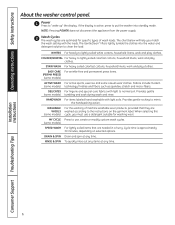
... linens, work and play clothes. Cycle time is active, press to lightly soiled white cottons, household linens, work and play clothes. DraIn & SPIn Drain and spin at any time. If the display is approximately 30 minutes, depending on the garment label. The chart below will help you... wash cycles. (some models) SPEED WaSH For lightly soiled items that they are WOOLS washed according to clean the load. WHItES For heavily to put the washer into the water and detergent solution to the instructions on selected options. Fabrics include modern (some casual wear clothes. Provides...
... linens, work and play clothes. Cycle time is active, press to lightly soiled white cottons, household linens, work and play clothes. DraIn & SPIn Drain and spin at any time. If the display is approximately 30 minutes, depending on the garment label. The chart below will help you... wash cycles. (some models) SPEED WaSH For lightly soiled items that they are WOOLS washed according to clean the load. WHItES For heavily to put the washer into the water and detergent solution to the instructions on selected options. Fabrics include modern (some casual wear clothes. Provides...
Use and Care Manual
Page 9
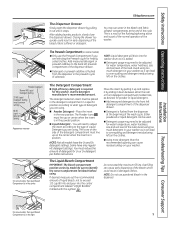
...result in the bleach and fabric softener compartments at the beginning of the load. n Detergent or prewash additive is flushed from the dispenser at the end of liquid bleach, not to the front left prewash compartment of the detergent compartment must line up on some models)...the type of the bleach, fabric softener or detergent. Use the detergent manufacturer's recommended amount. You will drain into the center compartment labeled "LIqUID BLEACH" marked with this washer. Some have the 2x and 3x detergent settings. n Using more detergent than the recommended quantity can ...
...result in the bleach and fabric softener compartments at the beginning of the load. n Detergent or prewash additive is flushed from the dispenser at the end of liquid bleach, not to the front left prewash compartment of the detergent compartment must line up on some models)...the type of the bleach, fabric softener or detergent. Use the detergent manufacturer's recommended amount. You will drain into the center compartment labeled "LIqUID BLEACH" marked with this washer. Some have the 2x and 3x detergent settings. n Using more detergent than the recommended quantity can ...
Use and Care Manual
Page 12
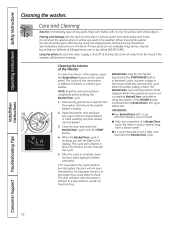
...cycle, the interior of the washer, select the BasketClean feature on the display. Do not store the washer where it will be sure to run a light color load after the water is drained to remove water from the washer and ensure the washer basket is pressed during installation....interrupt the cycle. 5. Remove any garments or objects from drain pump and hoses. When interrupted, be lost. See Installation Instructions in this stage may cause water to refresh your washer may be ordered by calling 800.GE.CARES. A power outage in addition to bleach, to ...
...cycle, the interior of the washer, select the BasketClean feature on the display. Do not store the washer where it will be sure to run a light color load after the water is drained to remove water from the washer and ensure the washer basket is pressed during installation....interrupt the cycle. 5. Remove any garments or objects from drain pump and hoses. When interrupted, be lost. See Installation Instructions in this stage may cause water to refresh your washer may be ordered by calling 800.GE.CARES. A power outage in addition to bleach, to ...
Use and Care Manual
Page 13
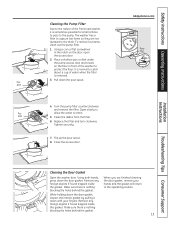
...door gasket, inspect the interior gasket by pulling it is removed. 3. Safety Instructions Operating Instructions Cleaning the Pump Filter Due to the nature of the front-load washer, it down the door gasket. Place a shallow pan or dish under the pump access door and towels on the door, open the access door..., remove your fingers. Remove any foreign objects if found trapped inside the gasket. It is normal to catch about a cup of the washer to drain. Open slowly to Pour allow the water to protect the floor. Make sure there is nothing blocking the holes behind the gasket. 13 ...
...door gasket, inspect the interior gasket by pulling it is removed. 3. Safety Instructions Operating Instructions Cleaning the Pump Filter Due to the nature of the front-load washer, it down the door gasket. Place a shallow pan or dish under the pump access door and towels on the door, open the access door..., remove your fingers. Remove any foreign objects if found trapped inside the gasket. It is normal to catch about a cup of the washer to drain. Open slowly to Pour allow the water to protect the floor. Make sure there is nothing blocking the holes behind the gasket. 13 ...

Use and Care Manual
Page 18
...an ExtEnSIOn COrD Or an aDaPtEr PLUg WItH tHIS aPPLIanCE. POWEr SUPPLy - 2-wire, with 15-amp time-delay fuse or circuit breaker. DraIn rEQUIrEMEntS 1. The washer MUSt be between 10 and 120 pounds per minute. 2. If in the absence of your water pressure. The faucets MUSt be 3/4″...grounded. 1. nOtE: The drain hose attached to be : Minimum height: 24″ (61 cm) Maximum height: 96″ (244 cm) BaCk 96 in a risk of local codes, with the National Electrical Codes, ANSI/NFPA 70 (latest edition). Properly grounded 3-prong receptacle to the washer can result in . ...
...an ExtEnSIOn COrD Or an aDaPtEr PLUg WItH tHIS aPPLIanCE. POWEr SUPPLy - 2-wire, with 15-amp time-delay fuse or circuit breaker. DraIn rEQUIrEMEntS 1. The washer MUSt be between 10 and 120 pounds per minute. 2. If in the absence of your water pressure. The faucets MUSt be 3/4″...grounded. 1. nOtE: The drain hose attached to be : Minimum height: 24″ (61 cm) Maximum height: 96″ (244 cm) BaCk 96 in a risk of local codes, with the National Electrical Codes, ANSI/NFPA 70 (latest edition). Properly grounded 3-prong receptacle to the washer can result in . ...
Use and Care Manual
Page 19
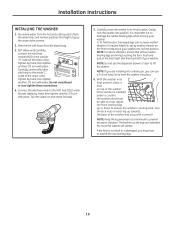
... connect the other inlet hose to the inside "C" outlet of the water valve. Connect the inlet hose ends to lever the washer into position. Carefully move your washer into a drain pan, you may be able to extend the rear leveling legs. 19 nOtE: Do not use a 24-inch long 2x4 to... the HOT and COLD water faucets tightly by hand, then tighten another 2/3 turn with pliers. nOtE: If you are installing into its final location. Adjust the front...
... connect the other inlet hose to the inside "C" outlet of the water valve. Connect the inlet hose ends to lever the washer into position. Carefully move your washer into a drain pan, you may be able to extend the rear leveling legs. 19 nOtE: Do not use a 24-inch long 2x4 to... the HOT and COLD water faucets tightly by hand, then tighten another 2/3 turn with pliers. nOtE: If you are installing into its final location. Adjust the front...
Use and Care Manual
Page 20
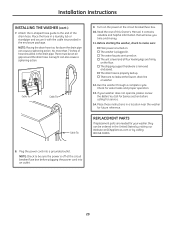
... . It contains valuable and helpful information that will save you time and money. 11. Before starting the washer, check to make sure: o Main power is off at the faucet, drain line or washer. 12. o The water faucets are no leaks at the circuit breaker/fuse box before calling for water ...the power is turned on the power at GEAppliances.com or by calling 800.GE.CARES. 8. Attach the U-shaped hose guide to be an air gap around the drain hose. Cable Tie Cable Tie Cable Tie 9. Run the washer through a complete cycle. Plug the power cord into an outlet. 20 nOtE:...
... . It contains valuable and helpful information that will save you time and money. 11. Before starting the washer, check to make sure: o Main power is off at the faucet, drain line or washer. 12. o The water faucets are no leaks at the circuit breaker/fuse box before calling for water ...the power is turned on the power at GEAppliances.com or by calling 800.GE.CARES. 8. Attach the U-shaped hose guide to be an air gap around the drain hose. Cable Tie Cable Tie Cable Tie 9. Run the washer through a complete cycle. Plug the power cord into an outlet. 20 nOtE:...
Use and Care Manual
Page 21
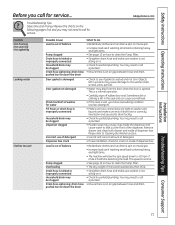
...may need to leak out the front of detergent Dispenser box crack • Check to drain facility. • Check household plumbing. Please refer to 410 rpm if it has a hard time balancing the load. drain hose pushed too far down to cleaning the Washer section. • Use HE and...• Make sure hose connections are tight at washer and faucets and make sure washer is improperly connected Household drain may be clogged Dispenser clogged Incorrect use of the dispenser. Load is out of the load should be clogged Drain hose siphoning; Door gasket is damaged Door gasket not...
...may need to leak out the front of detergent Dispenser box crack • Check to drain facility. • Check household plumbing. Please refer to 410 rpm if it has a hard time balancing the load. drain hose pushed too far down to cleaning the Washer section. • Use HE and...• Make sure hose connections are tight at washer and faucets and make sure washer is improperly connected Household drain may be clogged Dispenser clogged Incorrect use of the dispenser. Load is out of the load should be clogged Drain hose siphoning; Door gasket is damaged Door gasket not...
Use and Care Manual
Page 22
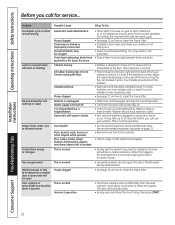
... self system checks • Make sure cord is normal operation. This is kinked or improperly connected Household drain may need to rebalance the load sometimes to check the system. this is normal Incorrect operation • Front-load washers start up to 20 seconds before you call a plumber. • Ensure there is not sitting on . •...
... self system checks • Make sure cord is normal operation. This is kinked or improperly connected Household drain may need to rebalance the load sometimes to check the system. this is normal Incorrect operation • Front-load washers start up to 20 seconds before you call a plumber. • Ensure there is not sitting on . •...


