

Use and Care Manual
Page 1
... the Washer 19, 20 Replacement Parts 20 Troubleshooting Tips 21-24 Consumer Support Warranty 25 Service Telephone Numbers 26 Owner's Manual & Installation Instructions GFWN1000 WBVH5200 WBVH5300 WCVH6400 WCVH6800 WHDVH680 As an EnErgy Star® partner, GE has ...174; guidelines for energy efficiency. Washers GEAppliances.com Safety Instructions 2, 3 Operating Instructions Control Panels 4, 5 Control Settings 6, 7 Features 8-10 Loading and Using the Washer . . . .10, 11 Cleaning the Washer 12-14 Installation Instructions . . . . .15-20 Preparing to Install Your Washer . . . . . ....
... the Washer 19, 20 Replacement Parts 20 Troubleshooting Tips 21-24 Consumer Support Warranty 25 Service Telephone Numbers 26 Owner's Manual & Installation Instructions GFWN1000 WBVH5200 WBVH5300 WCVH6400 WCVH6800 WHDVH680 As an EnErgy Star® partner, GE has ...174; guidelines for energy efficiency. Washers GEAppliances.com Safety Instructions 2, 3 Operating Instructions Control Panels 4, 5 Control Settings 6, 7 Features 8-10 Loading and Using the Washer . . . .10, 11 Cleaning the Washer 12-14 Installation Instructions . . . . .15-20 Preparing to Install Your Washer . . . . . ....
Use and Care Manual
Page 2
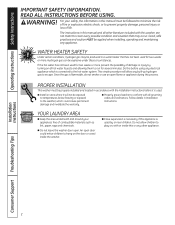
...to hang on , with all other literature included with this before it will allow any appliance. An open . Installation Instructions Consumer Support Troubleshooting Tips 2 For your appliances free of damage or injury by or near children. Good, safe practices and caution MUST be exposed to...gas to prevent property damage, personal injury or loss of fire or explosion, electric shock, or to escape. ProPEr InSTaLLaTIon This washer must be properly installed and located in Installation Instructions. Do not allow children to play on the door or crawl inside this ...
...to hang on , with all other literature included with this before it will allow any appliance. An open . Installation Instructions Consumer Support Troubleshooting Tips 2 For your appliances free of damage or injury by or near children. Good, safe practices and caution MUST be exposed to...gas to prevent property damage, personal injury or loss of fire or explosion, electric shock, or to escape. ProPEr InSTaLLaTIon This washer must be properly installed and located in Installation Instructions. Do not allow children to play on the door or crawl inside this ...
Use and Care Manual
Page 3
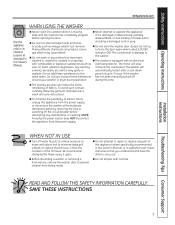
...ON). Do not use or place these substances to 2 hours, if the washer wash water. NOTE: Pressing the power button does NOT disconnect the appliance from hiding inside. GE recommends changing the hoses every 5 years. n Do not tamper with ammonia including...to carry out. SAVE THESE INSTRUCTIONS Troubleshooting Tips Consumer Support 3 n Do not slam the washer door closed. rEad and FoLLoW THIS SaFETY InFormaTIon carEFuLLY. Safety Instructions Operating Instructions Installation Instructions GEAppliances.com WHEn uSInG THE WaSHEr Use this appliance only for its...
...ON). Do not use or place these substances to 2 hours, if the washer wash water. NOTE: Pressing the power button does NOT disconnect the appliance from hiding inside. GE recommends changing the hoses every 5 years. n Do not tamper with ammonia including...to carry out. SAVE THESE INSTRUCTIONS Troubleshooting Tips Consumer Support 3 n Do not slam the washer door closed. rEad and FoLLoW THIS SaFETY InFormaTIon carEFuLLY. Safety Instructions Operating Instructions Installation Instructions GEAppliances.com WHEn uSInG THE WaSHEr Use this appliance only for its...
Use and Care Manual
Page 4
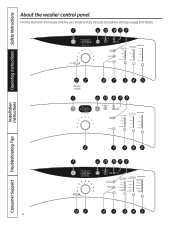
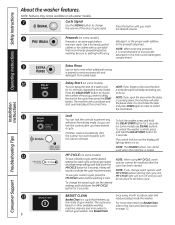
Find the illustration that closely matches your model and see the cycle descriptions starting on page 6 for details. (On some models) 4 Consumer Support Troubleshooting Tips Operating Instructions Safety Instructions Installation Instructions About the washer control panel.
Find the illustration that closely matches your model and see the cycle descriptions starting on page 6 for details. (On some models) 4 Consumer Support Troubleshooting Tips Operating Instructions Safety Instructions Installation Instructions About the washer control panel.

Use and Care Manual
Page 5
GEAppliances.com 5 Safety Instructions Operating Instructions Installation Instructions Troubleshooting Tips Consumer Support
GEAppliances.com 5 Safety Instructions Operating Instructions Installation Instructions Troubleshooting Tips Consumer Support
Use and Care Manual
Page 6
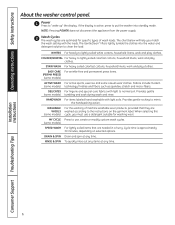
... rinse. HanDWaSH For items labeled hand-washable with the loads. WaSHaBLE For the washing of wash loads. Cycle time is active, press to put the washer into the water and detergent solution to clean the load. Installation Instructions Consumer Support Troubleshooting Tips 6 StaIn WaSH For heavy soiled colorfast cottons, ...For heavy to "wake up" the display. DraIn & SPIn Drain and spin at any time. Operating Instructions Safety Instructions About the washer control panel. 1 Power Press to lightly soiled colorfast cottons, household linens, work and play clothes.
... rinse. HanDWaSH For items labeled hand-washable with the loads. WaSHaBLE For the washing of wash loads. Cycle time is active, press to put the washer into the water and detergent solution to clean the load. Installation Instructions Consumer Support Troubleshooting Tips 6 StaIn WaSH For heavy soiled colorfast cottons, ...For heavy to "wake up" the display. DraIn & SPIn Drain and spin at any time. Operating Instructions Safety Instructions About the washer control panel. 1 Power Press to lightly soiled colorfast cottons, household linens, work and play clothes.
Use and Care Manual
Page 7
... press the WASH TEMP button until you have reached the desired setting. The Sanitized wash temperature is normal. 7 Troubleshooting Tips Consumer Support NOTE: The washer performs automatic system checks after pressing the START button. Follow the fabric manufacturer's care label when selecting the wash ...heavy soil setting when using the Sanitize wash temperature setting. If the washer is not restarted within 2 hours, the current wash cycle will pause the washer and unlock the door. NOTE: If the washer is paused and the cycle is running, pressing it once will be...
... press the WASH TEMP button until you have reached the desired setting. The Sanitized wash temperature is normal. 7 Troubleshooting Tips Consumer Support NOTE: The washer performs automatic system checks after pressing the START button. Follow the fabric manufacturer's care label when selecting the wash ...heavy soil setting when using the Sanitize wash temperature setting. If the washer is not restarted within 2 hours, the current wash cycle will pause the washer and unlock the door. NOTE: If the washer is paused and the cycle is running, pressing it once will be...
Use and Care Manual
Page 8
... Prewash is recommended to change wash options with this option selected. The control lock icon on some models use SIGNAL button). Consumer Support Troubleshooting Tips noTE: Features may not be used when the machine is desired to reduce odor and residue buildup inside of cycle signal. NOTE:... a care label that freshens up when it is an extra wash before washing a load. Delay Start (on the display will beep reminding you will count down the MY CYCLE button for 3 seconds. To lock the washer, press and hold down and start of a wash cycle for 3 seconds (on...
... Prewash is recommended to change wash options with this option selected. The control lock icon on some models use SIGNAL button). Consumer Support Troubleshooting Tips noTE: Features may not be used when the machine is desired to reduce odor and residue buildup inside of cycle signal. NOTE:... a care label that freshens up when it is an extra wash before washing a load. Delay Start (on the display will beep reminding you will count down the MY CYCLE button for 3 seconds. To lock the washer, press and hold down and start of a wash cycle for 3 seconds (on...
Use and Care Manual
Page 9
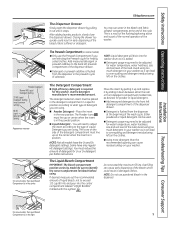
... Liquid Bleach Compartment IMPORTANT: The bleach compartment position varies by pulling it out until it can lead to the type of the washer. Troubleshooting Tips Consumer Support On some models, the Liquid Bleach Compartment is part of the normal operation of Liquid Detergent you are selecting the...side of the detergent compartment must line up on the center when the insert is in a specific position according to the front left prewash compartment of the load. n Add measured detergent to what type of the flushing/siphoning action and is on the right. 9 NOTE: Liquid ...
... Liquid Bleach Compartment IMPORTANT: The bleach compartment position varies by pulling it out until it can lead to the type of the washer. Troubleshooting Tips Consumer Support On some models, the Liquid Bleach Compartment is part of the normal operation of Liquid Detergent you are selecting the...side of the detergent compartment must line up on the center when the insert is in a specific position according to the front left prewash compartment of the load. n Add measured detergent to what type of the flushing/siphoning action and is on the right. 9 NOTE: Liquid ...
Use and Care Manual
Page 10
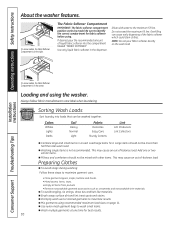
...items in the dispenser. Loading and using recommended maximum load sizes on the right. Preparing clothes n To avoid snags during washing: Follow these steps to maximize results. n Brush away surface dirt and lint; Installation Instructions Consumer Support Troubleshooting Tips On some models...half the total wash load. n mix garments using the washer. dilute with other items. This may cause an out-of liquid fabric softener into loads that can cause early dispensing of -balance load. Operating Instructions Safety Instructions About the washer features. On some ...
...items in the dispenser. Loading and using recommended maximum load sizes on the right. Preparing clothes n To avoid snags during washing: Follow these steps to maximize results. n Brush away surface dirt and lint; Installation Instructions Consumer Support Troubleshooting Tips On some models...half the total wash load. n mix garments using the washer. dilute with other items. This may cause an out-of liquid fabric softener into loads that can cause early dispensing of -balance load. Operating Instructions Safety Instructions About the washer features. On some ...
Use and Care Manual
Page 11
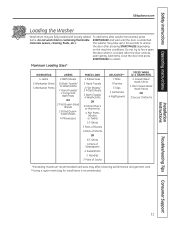
...washer may be fully loaded with loosely added To add items after pressing START/PAUSE depending on the machine conditions. Do not try to force open gently. Installation Instructions Troubleshooting Tips Consumer Support 11 After the door unlocks, open the door when it is recommended. Maximum Loading... (waxes, cleaning fluids, etc.). Safety Instructions Operating Instructions GEAppliances.com Loading the Washer Wash drum may take up to 30 seconds to unlock the door after washer has started, press items. Do not wash fabrics containing flammable START/PAUSE...
...washer may be fully loaded with loosely added To add items after pressing START/PAUSE depending on the machine conditions. Do not try to force open gently. Installation Instructions Troubleshooting Tips Consumer Support 11 After the door unlocks, open the door when it is recommended. Maximum Loading... (waxes, cleaning fluids, etc.). Safety Instructions Operating Instructions GEAppliances.com Loading the Washer Wash drum may take up to 30 seconds to unlock the door after washer has started, press items. Do not wash fabrics containing flammable START/PAUSE...
Use and Care Manual
Page 12
... the cycle is empty. 2. When the power supply is recommended to remove water from the washer and ensure the washer basket is complete, leave the door open immediately. Wipe with sharp objects. See Installation Instructions ...GE.CARES. When interrupted, be kept stationary by pressing the START/PAUSE button in addition to bleach, to run a light color load after the water is shut off any spills. IMPORTANT: n Run BasketClean with 1 Cup (250 ml) of liquid bleach or other washing machine cleaner into the basket. 3. Installation Instructions Consumer Support Troubleshooting...
... the cycle is empty. 2. When the power supply is recommended to remove water from the washer and ensure the washer basket is complete, leave the door open immediately. Wipe with sharp objects. See Installation Instructions ...GE.CARES. When interrupted, be kept stationary by pressing the START/PAUSE button in addition to bleach, to run a light color load after the water is shut off any spills. IMPORTANT: n Run BasketClean with 1 Cup (250 ml) of liquid bleach or other washing machine cleaner into the basket. 3. Installation Instructions Consumer Support Troubleshooting...
Use and Care Manual
Page 13
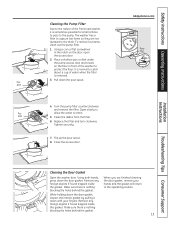
...nothing blocking the holes behind the gasket. Pull down the door gasket. spout 5. GEAppliances.com Pump filter Installation Instructions Troubleshooting Tips Consumer Support Cleaning the Door Gasket Open the washer door. When you are not dumped to the drain. Remove any foreign objects if found trapped inside the gasket. ...to drain. Tighten securely. 7. Make sure there is removed. 3. Safety Instructions Operating Instructions Cleaning the Pump Filter Due to the nature of the front-load washer, it down with your hands and the gasket will return to the operating position.
...nothing blocking the holes behind the gasket. Pull down the door gasket. spout 5. GEAppliances.com Pump filter Installation Instructions Troubleshooting Tips Consumer Support Cleaning the Door Gasket Open the washer door. When you are not dumped to the drain. Remove any foreign objects if found trapped inside the gasket. ...to drain. Tighten securely. 7. Make sure there is removed. 3. Safety Instructions Operating Instructions Cleaning the Pump Filter Due to the nature of the front-load washer, it down with your hands and the gasket will return to the operating position.
Use and Care Manual
Page 14
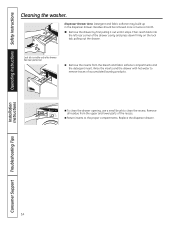
Operating Instructions Safety Instructions Cleaning the washer. Then reach back into the left rear corner of accumulated laundry products. n To clean the drawer opening, use a small brush to the proper compartments. n Return ... lock tab, pulling out the drawer. Replace the dispenser drawer. n Remove the drawer by first pulling it out until it stops. Installation Instructions Consumer Support Troubleshooting Tips 14 Residue should be removed once or twice a month. Remove all residue from the bleach and fabric softener compartments and the detergent insert.
Operating Instructions Safety Instructions Cleaning the washer. Then reach back into the left rear corner of accumulated laundry products. n To clean the drawer opening, use a small brush to the proper compartments. n Return ... lock tab, pulling out the drawer. Replace the dispenser drawer. n Remove the drawer by first pulling it out until it stops. Installation Instructions Consumer Support Troubleshooting Tips 14 Residue should be removed once or twice a month. Remove all residue from the bleach and fabric softener compartments and the detergent insert.
Use and Care Manual
Page 21
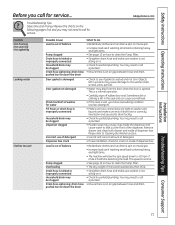
... be less then 16 lb. • Straighten drain hose and make sure washer is wet, you have oversudsing condition. GEAppliances.com Troubleshooting Tips Save time and money! You may need to leak out the front of washer for crack on how to clean the Pump Filter. • The dry ...weight of the load should be clogged Dispenser clogged Incorrect use of dispenser box. Objects...
... be less then 16 lb. • Straighten drain hose and make sure washer is wet, you have oversudsing condition. GEAppliances.com Troubleshooting Tips Save time and money! You may need to leak out the front of washer for crack on how to clean the Pump Filter. • The dry ...weight of the load should be clogged Dispenser clogged Incorrect use of dispenser box. Objects...
Use and Care Manual
Page 22
...Troubleshooting Tips 22 Cabinet moving all rubber leveling legs are all firmly touching the floor and locked in pockets Pins, snaps, hooks, sharp buttons, belt buckles, zippers and sharp objects left of your washer. To check machine, run rinse and spin with water like top-load washers...time left to fill with no load. This is normal operation. Operating Instructions Safety Instructions Installation Instructions Before you can use your washer to check the system. This movement is normal Incorrect operation • Front-load washers start up to reduce vibrations. ...
...Troubleshooting Tips 22 Cabinet moving all rubber leveling legs are all firmly touching the floor and locked in pockets Pins, snaps, hooks, sharp buttons, belt buckles, zippers and sharp objects left of your washer. To check machine, run rinse and spin with water like top-load washers...time left to fill with no load. This is normal operation. Operating Instructions Safety Instructions Installation Instructions Before you can use your washer to check the system. This movement is normal Incorrect operation • Front-load washers start up to reduce vibrations. ...

Use and Care Manual
Page 23
Troubleshooting Tips Consumer Support 23 Use a brush or toothpick to the metallic properties.... • Sort whites or lightly colored items from dark colors. • Promptly remove wash load from washer. • Make sure hoses are washing (especially for easy care loads). • Wash in warm or cold water. • Use correct amount of detergent. •... Use only the amount of detergent recommended on , with light items (like blouses). • Load your washer Possible Cause automatic self system checks Water supply is turned off the water source and remove the water connection hoses ...
Troubleshooting Tips Consumer Support 23 Use a brush or toothpick to the metallic properties.... • Sort whites or lightly colored items from dark colors. • Promptly remove wash load from washer. • Make sure hoses are washing (especially for easy care loads). • Wash in warm or cold water. • Use correct amount of detergent. •... Use only the amount of detergent recommended on , with light items (like blouses). • Load your washer Possible Cause automatic self system checks Water supply is turned off the water source and remove the water connection hoses ...
Use and Care Manual
Page 24
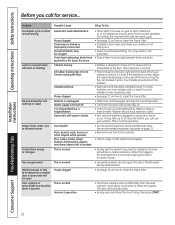
...; Make sure detergent insert is normal operation to see detergent leak on door gasket about 20 seconds after filling the dispenser. Installation Instructions Consumer Support Troubleshooting Tips 24 Operating Instructions Safety Instructions Before you call for dispenser are seated or they will not work. Problem Detergent leak Improper dispensing of softener...
...; Make sure detergent insert is normal operation to see detergent leak on door gasket about 20 seconds after filling the dispenser. Installation Instructions Consumer Support Troubleshooting Tips 24 Operating Instructions Safety Instructions Before you call for dispenser are seated or they will not work. Problem Detergent leak Improper dispensing of softener...
Use and Care Manual
Page 25
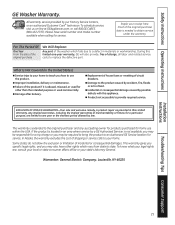
.... This warranty gives you specific legal rights, and you how to replace the defective part. Louisville, KY 40225 Installation Instructions Troubleshooting Tips Consumer Support 25 n Improper installation, delivery or maintenance. In alaska, the warranty excludes the cost of charge, all ...purchaser and any succeeding owner for products purchased for service. Safety Instructions Operating Instructions GE Washer Warranty. To know what your legal rights are limited to one -year warranty, GE will also provide, free of shipping or service calls to your home to ...
.... This warranty gives you specific legal rights, and you how to replace the defective part. Louisville, KY 40225 Installation Instructions Troubleshooting Tips Consumer Support 25 n Improper installation, delivery or maintenance. In alaska, the warranty excludes the cost of charge, all ...purchaser and any succeeding owner for products purchased for service. Safety Instructions Operating Instructions GE Washer Warranty. To know what your legal rights are limited to one -year warranty, GE will also provide, free of shipping or service calls to your home to ...

