

Quick Specs
Page 2
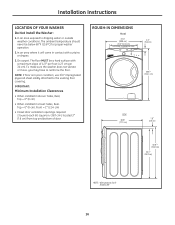
... or closet, it to adjust to 13-3/8" height. 13 80-1/8 27 28-3/4 Listed by Underwriters Laboratories Specification Revised 10/10 360469 in inches) SBSD137HBB - Minimum Clearance other surfaces are: 0" either side, 3" front and rear • Minimum vertical space from floor to your dryer ... at ge.com or call 1-800-GE-CARES. Bathroom or Bedroom Installation: • The dryer MUST be exhausted to combustible surfaces 0" both a washer and a dryer, doors must conform with the local codes, or in the absence of open area equally distributed. Feet on 13" pedestal allow ...
... or closet, it to adjust to 13-3/8" height. 13 80-1/8 27 28-3/4 Listed by Underwriters Laboratories Specification Revised 10/10 360469 in inches) SBSD137HBB - Minimum Clearance other surfaces are: 0" either side, 3" front and rear • Minimum vertical space from floor to your dryer ... at ge.com or call 1-800-GE-CARES. Bathroom or Bedroom Installation: • The dryer MUST be exhausted to combustible surfaces 0" both a washer and a dryer, doors must conform with the local codes, or in the absence of open area equally distributed. Feet on 13" pedestal allow ...
Use and Care Manual
Page 16
... DIMEnSIOnS FRONT 27.0" (68.6 cm) 20.4" (51.9 cm) ELECTRONIC TRANSPARENT VISOR 2.2" (5.6 cm) 40.6"* (103.1 cm) SIDE 30.6" (77.7 cm) 1.6" (3.9 cm) 40.6"* (103.1cm) 39.1" (99.2 cm) *NOTE: With pedestal, 52.6" Stacked, 84" 16 Installation Instructions LOCatIOn OF yOUr WaSHEr Do not Install the Washer: ...1. On carpet. To make sure the washer does not vibrate or move, you may have to the existing floor covering. nOtE: ...
... DIMEnSIOnS FRONT 27.0" (68.6 cm) 20.4" (51.9 cm) ELECTRONIC TRANSPARENT VISOR 2.2" (5.6 cm) 40.6"* (103.1 cm) SIDE 30.6" (77.7 cm) 1.6" (3.9 cm) 40.6"* (103.1cm) 39.1" (99.2 cm) *NOTE: With pedestal, 52.6" Stacked, 84" 16 Installation Instructions LOCatIOn OF yOUr WaSHEr Do not Install the Washer: ...1. On carpet. To make sure the washer does not vibrate or move, you may have to the existing floor covering. nOtE: ...
Use and Care Manual
Page 17
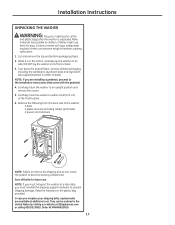
...back side of the washer: 4 bolts 4 plastic spacers (including rubber grommets) 4 power cord... the shipping braces can cause the washer to the installation instructions that come ...use. DO NOT lay the washer on its front or back. 3. Carefully move the washer to children. Order kit #WH49x10039...carefully lay the washer on its side. In case you misplace your shipping bolts, replacements are installing a pedestal, proceed to become...washer to prevent shipping damage. Cartons covered with the pedestal. 4. Cut and remove the top and bottom packaging straps. 2. nOtE: If you must transport the washer...
...back side of the washer: 4 bolts 4 plastic spacers (including rubber grommets) 4 power cord... the shipping braces can cause the washer to the installation instructions that come ...use. DO NOT lay the washer on its front or back. 3. Carefully move the washer to children. Order kit #WH49x10039...carefully lay the washer on its side. In case you misplace your shipping bolts, replacements are installing a pedestal, proceed to become...washer to prevent shipping damage. Cartons covered with the pedestal. 4. Cut and remove the top and bottom packaging straps. 2. nOtE: If you must transport the washer...
