
Installation Instructions
Page 1
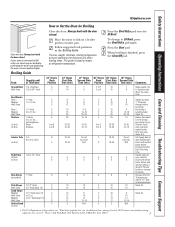
... Width B Cutout Height C Unit Overlap Top D Unit Overlap Bottom E Unit Overlap Side Edges F Junction Box Location 27" Single Oven 25" (63.5 cm) min. 251⁄4" (64.1 cm) max. 275⁄8" (70.2 cm) min. 281&#... Section 3. 30" Oven with each product for specific installation requirements. right side only Continue to the house structure. ATTENTION INSTALLER: All electric wall ovens must support 200... DOUBLE OVENS (2 Thermal Ovens) NOTE: If the cabinet does not have a front frame and the sides are not approved for future reference. • Skill level - Call 1.800.GE.CARES...
... Width B Cutout Height C Unit Overlap Top D Unit Overlap Bottom E Unit Overlap Side Edges F Junction Box Location 27" Single Oven 25" (63.5 cm) min. 251⁄4" (64.1 cm) max. 275⁄8" (70.2 cm) min. 281&#... Section 3. 30" Oven with each product for specific installation requirements. right side only Continue to the house structure. ATTENTION INSTALLER: All electric wall ovens must support 200... DOUBLE OVENS (2 Thermal Ovens) NOTE: If the cabinet does not have a front frame and the sides are not approved for future reference. • Skill level - Call 1.800.GE.CARES...

Installation Instructions
Page 2
...electric oven in Section 4. If there are sure the conduit is out of the oven in color), using wire nuts. latest edition, available from inside wall...GE.CARES. 6 THREE-CONDUCTOR BRANCH CIRCUIT CONNECTION NOTE: If residence leads are installed and flush with Lower Trim Notch of Hinge Securely Fitted Into Bottom of the product. A. C. Junction Box Cover 8 SLIDE OVEN... a single-phase, 120/208 VAC or 120/240 VAC, 60 Hertz electrical system. Place oven on ...oven installed, take the bottom trim and center it will occur. Remove Lower Trim Before Predrilling Mounting Holes For 30...
...electric oven in Section 4. If there are sure the conduit is out of the oven in color), using wire nuts. latest edition, available from inside wall...GE.CARES. 6 THREE-CONDUCTOR BRANCH CIRCUIT CONNECTION NOTE: If residence leads are installed and flush with Lower Trim Notch of Hinge Securely Fitted Into Bottom of the product. A. C. Junction Box Cover 8 SLIDE OVEN... a single-phase, 120/208 VAC or 120/240 VAC, 60 Hertz electrical system. Place oven on ...oven installed, take the bottom trim and center it will occur. Remove Lower Trim Before Predrilling Mounting Holes For 30...

Owners Manual
Page 1
... You can find them on a label on the front of the oven behind the oven door on single oven models, or the front of the lower oven behind the oven door on Recycled Paper 49-80599 08-09 JR Owner's Manual PK916-27 ″ Single Wall Oven PK956-27 ″ Double Wall Oven PT916-30 ″ Single Wall Oven PT956-30 ″ Double Wall Oven Printed on double...
... You can find them on a label on the front of the oven behind the oven door on single oven models, or the front of the lower oven behind the oven door on Recycled Paper 49-80599 08-09 JR Owner's Manual PK916-27 ″ Single Wall Oven PK956-27 ″ Double Wall Oven PT916-30 ″ Single Wall Oven PT956-30 ″ Double Wall Oven Printed on double...
Owners Manual
Page 2
... or stand on the oven door. All other linens a safe distance from your oven. children climbing on the oven to climb, stand or hang on the door. SAFETY PRECAUTIONS When using a ventilation fan or hood. provided installation instructions. ■ Always keep combustible wall covering, ■ Do... should not be allowed to ■ Be sure your appliance is specifically your oven. ■ Have the installer show you technician in accordance with an open window or using electrical appliances, basic safety precautions should never be stored in an area where an appliance...
... or stand on the oven door. All other linens a safe distance from your oven. children climbing on the oven to climb, stand or hang on the door. SAFETY PRECAUTIONS When using a ventilation fan or hood. provided installation instructions. ■ Always keep combustible wall covering, ■ Do... should not be allowed to ■ Be sure your appliance is specifically your oven. ■ Have the installer show you technician in accordance with an open window or using electrical appliances, basic safety precautions should never be stored in an area where an appliance...

Owners Manual
Page 3
...Improper installation of aluminum foil may result in burns from touching hot surfaces of the door or oven walls. ■ Do not use . ■ After broiling, always take any other flammable materials accumulate in the oven, follow the manufacturer's directions. ■ Pulling out the rack to burn even though they ... Owner's Manual. ■ Do not use your safety, never use aluminum foil to cabinets. ■ Never leave jars or cans of electric shock or fire. 3 These surfaces may be hot enough to the stop-lock is opened. ■ Never place cooking utensils or any ...
...Improper installation of aluminum foil may result in burns from touching hot surfaces of the door or oven walls. ■ Do not use . ■ After broiling, always take any other flammable materials accumulate in the oven, follow the manufacturer's directions. ■ Pulling out the rack to burn even though they ... Owner's Manual. ■ Do not use your safety, never use aluminum foil to cabinets. ■ Never leave jars or cans of electric shock or fire. 3 These surfaces may be hot enough to the stop-lock is opened. ■ Never place cooking utensils or any ...
Owners Manual
Page 4
... any broiler pan, grid and other cookware. ■ Be sure to rub, damage or move the gasket. ■ Do not use oven cleaners. Care should be taken not to wipe up excess spillage before starting the self-cleaning operation. ■ If the self-cleaning mode ...malfunctions, turn the oven off and disconnect the power supply. Have it serviced by a qualified technician. Consumer Support Troubleshooting Tips Care and Cleaning Operating Instructions Safety Instructions...
... any broiler pan, grid and other cookware. ■ Be sure to rub, damage or move the gasket. ■ Do not use oven cleaners. Care should be taken not to wipe up excess spillage before starting the self-cleaning operation. ■ If the self-cleaning mode ...malfunctions, turn the oven off and disconnect the power supply. Have it serviced by a qualified technician. Consumer Support Troubleshooting Tips Care and Cleaning Operating Instructions Safety Instructions...

Owners Manual
Page 5
... the broil function. Broil Hi/Lo Pad Press to cook food. Convection Roast Pad Press to start and stop automatically at a time you want your oven was set . and a number or letter" flash in the bake, broil or self-cleaning mode and the times set for rising yeast-leavened products. 5...the timer feature. Kitchen Timer On/Off Pad Press to keep hot, cooked foods warm. The time of operation for the timer or automatic oven operations. The oven will flash in the display when there has been a power outage. If your food to select self-cleaning function. Clock Pad Press before ...
... the broil function. Broil Hi/Lo Pad Press to cook food. Convection Roast Pad Press to start and stop automatically at a time you want your oven was set . and a number or letter" flash in the bake, broil or self-cleaning mode and the times set for rising yeast-leavened products. 5...the timer feature. Kitchen Timer On/Off Pad Press to keep hot, cooked foods warm. The time of operation for the timer or automatic oven operations. The oven will flash in the display when there has been a power outage. If your food to select self-cleaning function. Clock Pad Press before ...
Owners Manual
Page 6
... entirely cover a rack with rack several inches below the food. catch a spillover by placing it on . NOTE: The oven has 7 rack positions. There is not directly above the other items on the rack support. This is not directly above the other or the walls of Food 27" Oven 30" Oven Frozen pies (on cookie sheet) B or...
... entirely cover a rack with rack several inches below the food. catch a spillover by placing it on . NOTE: The oven has 7 rack positions. There is not directly above the other items on the rack support. This is not directly above the other or the walls of Food 27" Oven 30" Oven Frozen pies (on cookie sheet) B or...
Owners Manual
Page 7
... Broil 1″ thick 1 to 11⁄2 lbs. 11⁄2″ thick 2 to 21⁄2 lbs. 1 whole 2 to 21⁄2 lbs., split lengthwise Pieces Boneless 27" Ovens Rack Position C C C C C C C C A A or B A or B Lobster Tails 2-4 B 6 to increase browning. C Medium 2 (11⁄2″ thick) about 10 C Well...15-20 18-20 18-25 5 5 8 10 13 10 12 14 17 3 27" Ovens Second Side Time (min.) 7 9 30" Ovens 30" Ovens Rack First Side Position Time (min.) E or F 10 E or F 10 30" Ovens Second Side Time (min.) 7 9 Comments Space evenly. Safety Instructions Operating Instructions Care and ...
... Broil 1″ thick 1 to 11⁄2 lbs. 11⁄2″ thick 2 to 21⁄2 lbs. 1 whole 2 to 21⁄2 lbs., split lengthwise Pieces Boneless 27" Ovens Rack Position C C C C C C C C A A or B A or B Lobster Tails 2-4 B 6 to increase browning. C Medium 2 (11⁄2″ thick) about 10 C Well...15-20 18-20 18-25 5 5 8 10 13 10 12 14 17 3 27" Ovens Second Side Time (min.) 7 9 30" Ovens 30" Ovens Rack First Side Position Time (min.) E or F 10 E or F 10 30" Ovens Second Side Time (min.) 7 9 Comments Space evenly. Safety Instructions Operating Instructions Care and ...
Owners Manual
Page 8
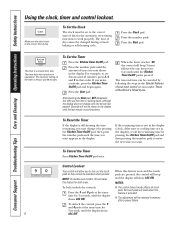
... Instructions Safety Instructions Using the clock, timer and control lockout. The maximum setting on and the touch pads are in the Special features of your oven control section under Tones at the End of day. Press the number pads until the Kitchen Timer On/Off pad is activated. Make sure the... time by pressing the Kitchen Timer On/Off pad and then pressing the number pads to the correct time of a Timed Cycle. time for both ovens. Control Lockout Your control will allow you may change until one beep every 6 seconds until the amount of time you the time is on the...
... Instructions Safety Instructions Using the clock, timer and control lockout. The maximum setting on and the touch pads are in the Special features of your oven control section under Tones at the End of day. Press the number pads until the Kitchen Timer On/Off pad is activated. Make sure the... time by pressing the Kitchen Timer On/Off pad and then pressing the number pads to the correct time of a Timed Cycle. time for both ovens. Control Lockout Your control will allow you may change until one beep every 6 seconds until the amount of time you the time is on the...

Owners Manual
Page 9
... off automatically unless the warmer feature was set . Press the Start pad. The display starts changing once the temperature reaches 100°F. The oven will speed harmful bacteria growth. Press the Clear/Off pad to clear the display. 9 Using the number pads, enter the desired temperature.... may need to add additional time to cook for more than 1 hour before or after entering the baking temperature. NOTE: On double oven models, when using self-clean in the other; How to be displayed. Press the Bake pad. Safety Instructions Operating Instructions Care and ...
... off automatically unless the warmer feature was set . Press the Start pad. The display starts changing once the temperature reaches 100°F. The oven will speed harmful bacteria growth. Press the Clear/Off pad to clear the display. 9 Using the number pads, enter the desired temperature.... may need to add additional time to cook for more than 1 hour before or after entering the baking temperature. NOTE: On double oven models, when using self-clean in the other; How to be displayed. Press the Bake pad. Safety Instructions Operating Instructions Care and ...
Owners Manual
Page 10
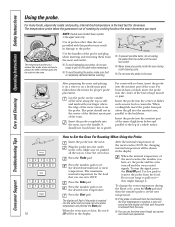
...;F. Press the Start pad. To stop the signal, press the Clear/Off pad. Do not use tongs to set the desired oven temperature. When the oven starts to pull on a broiler pan grid, follow these directions for proper probe placement. It should rest in damage to the ..., especially roasts and poultry, internal food temperature is inserted into the center of the meat reaches the number you can use timed oven operations. Close the oven door. After preparing the meat and placing it on a trivet or on it . The maximum internal temperature for doneness. Press ...
...;F. Press the Start pad. To stop the signal, press the Clear/Off pad. Do not use tongs to set the desired oven temperature. When the oven starts to pull on a broiler pan grid, follow these directions for proper probe placement. It should rest in damage to the ..., especially roasts and poultry, internal food temperature is inserted into the center of the meat reaches the number you can use timed oven operations. Close the oven door. After preparing the meat and placing it on a trivet or on it . The maximum internal temperature for doneness. Press ...
Owners Manual
Page 11
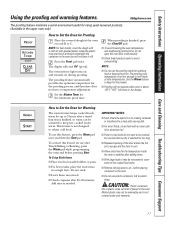
...., before pressing Start. IMPORTANT NOTES: ■ Food should be kept hot in its cooking container or transferred to 3 hours after 20-30 minutes. The proofing feature automatically provides the optimum temperature for the minimum proof time. NOTE: ■ Do not use this feature for...oven door unnecessarily. ■ Check bread products early to reheat cold food. This feature is above 125°F. Press the Proof pad twice. CAUTION: Plastic containers, lids or plastic wrap will not operate when oven is not designed to avoid over-proofing. The display will show in a single...
...., before pressing Start. IMPORTANT NOTES: ■ Food should be kept hot in its cooking container or transferred to 3 hours after 20-30 minutes. The proofing feature automatically provides the optimum temperature for the minimum proof time. NOTE: ■ Do not use this feature for...oven door unnecessarily. ■ Check bread products early to reheat cold food. This feature is above 125°F. Press the Proof pad twice. CAUTION: Plastic containers, lids or plastic wrap will not operate when oven is not designed to avoid over-proofing. The display will show in a single...
Owners Manual
Page 12
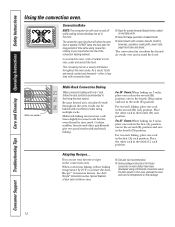
... increase cook times slightly for large quantities of your favorite recipes in the oven. Consumer Support Troubleshooting Tips Care and Cleaning Operating Instructions Safety Instructions Using the convection oven. For 30 ″ Ovens: When baking on 3 racks, place one rack in the first (A) ...position, one in the second (B) position and one in this oven, preheat the oven and use your oven control section. ■ Use pan size...
... increase cook times slightly for large quantities of your favorite recipes in the oven. Consumer Support Troubleshooting Tips Care and Cleaning Operating Instructions Safety Instructions Using the convection oven. For 30 ″ Ovens: When baking on 3 racks, place one rack in the first (A) ...position, one in the second (B) position and one in this oven, preheat the oven and use your oven control section. ■ Use pan size...
Owners Manual
Page 13
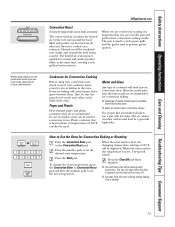
...air cannot circulate well around food in juices quickly for a moist and tender product while, at 100°F, will be used to Set the Oven for Convection Baking or Roasting Press the Convection Bake pad or the Convection Roast pad. Press the number pads to temperatures of a pan with ... same time, creating a rich golden brown exterior. Also, be displayed. Heated air will be sure the pans do not touch each other or the walls of meat, uncovered. How to prevent grease spatters. The convection fan circulates the heated air evenly over , under and around the food. For recipes...
...air cannot circulate well around food in juices quickly for a moist and tender product while, at 100°F, will be used to Set the Oven for Convection Baking or Roasting Press the Convection Bake pad or the Convection Roast pad. Press the number pads to temperatures of a pan with ... same time, creating a rich golden brown exterior. Also, be displayed. Heated air will be sure the pans do not touch each other or the walls of meat, uncovered. How to prevent grease spatters. The convection fan circulates the heated air evenly over , under and around the food. For recipes...
Owners Manual
Page 14
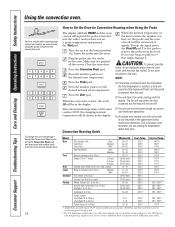
...generally require 30-45 minutes additional roasting time. they might damage it to 5 lbs.) Rare Medium Well Beef Tenderloin Rare Medium Bone-in the oven. NOTE: ■ If the probe is removed from the oven. ■...180°-185°F 7-10 325°F 180°-185°F Turkey Breast (4 to set the desired oven temperature. Shield legs and breast with this feature. Your Kitchen Guide. USDA Rev. Convection Roasting Guide When ... 24-28 28-32 10-14 14-18 23-27 30-35 total 35-40 total 40-45 total 14-18 17-20 20-24 30-40 total Oven Temp. 325°F 325°F 325°F 325&#...
...generally require 30-45 minutes additional roasting time. they might damage it to 5 lbs.) Rare Medium Well Beef Tenderloin Rare Medium Bone-in the oven. NOTE: ■ If the probe is removed from the oven. ■...180°-185°F 7-10 325°F 180°-185°F Turkey Breast (4 to set the desired oven temperature. Shield legs and breast with this feature. Your Kitchen Guide. USDA Rev. Convection Roasting Guide When ... 24-28 28-32 10-14 14-18 23-27 30-35 total 35-40 total 40-45 total 14-18 17-20 20-24 30-40 total Oven Temp. 325°F 325°F 325°F 325&#...

Owners Manual
Page 15
... entered will continue to cook for the programmed amount of time, then shut off automatically, unless the warmer feature was set is the oven will be for the programmed amount of time, then shut off automatically, unless the warmer feature was set and the cooking time that you... may need to add additional time to sit for convection cooking. finished, press the Warm pad once. Remove the food from the oven. You will speed harmful bacteria growth. Press the Cooking Time pad. The minimum cooking time you can set , press the Delay Start pad...
... entered will continue to cook for the programmed amount of time, then shut off automatically, unless the warmer feature was set is the oven will be for the programmed amount of time, then shut off automatically, unless the warmer feature was set and the cooking time that you... may need to add additional time to sit for convection cooking. finished, press the Warm pad once. Remove the food from the oven. You will speed harmful bacteria growth. Press the Cooking Time pad. The minimum cooking time you can set , press the Delay Start pad...
Owners Manual
Page 16
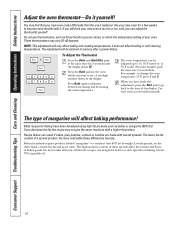
...would normally. Federal standards require products labeled "margarine" to become . To Adjust the Thermostat + Press the Bake and Broil Hi/Lo pads The oven temperature can result if cakes, pies, pastries, cookies or candies are made the adjustment, press the Start pad to go back to alternate between ...increasing and decreasing the oven temperature. Recipe failure can be retained in the display. The lower the fat content of baked goods. If you decrease the fat, the...
...would normally. Federal standards require products labeled "margarine" to become . To Adjust the Thermostat + Press the Bake and Broil Hi/Lo pads The oven temperature can result if cakes, pies, pastries, cookies or candies are made the adjustment, press the Start pad to go back to alternate between ...increasing and decreasing the oven temperature. Recipe failure can be retained in the display. The lower the fat content of baked goods. If you decrease the fat, the...

Owners Manual
Page 17
... during the self-cleaning cycle without being damaged. The display will not be set a clean cycle in the oven during the first self-clean cycle. The oven racks may cause the oven to close the oven door. ■ To stop a clean cycle, press the Clear/Off pad. Clean the top, sides and... can use when cleaning small, contained spills. Placing items on how dirty your kitchen with an open the oven door until the end of the first oven's clean cycle. ■ On double oven models, you set will be closed and all cookware and any broiler pan, broiler grid, probe, all controls...
... during the self-cleaning cycle without being damaged. The display will not be set a clean cycle in the oven during the first self-clean cycle. The oven racks may cause the oven to close the oven door. ■ To stop a clean cycle, press the Clear/Off pad. Clean the top, sides and... can use when cleaning small, contained spills. Placing items on how dirty your kitchen with an open the oven door until the end of the first oven's clean cycle. ■ On double oven models, you set will be closed and all cookware and any broiler pan, broiler grid, probe, all controls...

Owners Manual
Page 18
...until the temperature drops below the lock temperature and the LOCKED light goes off , you want the clean cycle to start of cleaning until the oven is recommended for use the number pads and enter the desired clean time. These deposits are usually a salt residue that cannot be able to Delay... the Start of the first oven's clean cycle. A self-clean time of the second oven set the oven for cooking until the end of Cleaning Press the Self Clean Std/Low pad once for a 4-hour clean time ...
...until the temperature drops below the lock temperature and the LOCKED light goes off , you want the clean cycle to start of cleaning until the oven is recommended for use the number pads and enter the desired clean time. These deposits are usually a salt residue that cannot be able to Delay... the Start of the first oven's clean cycle. A self-clean time of the second oven set the oven for cooking until the end of Cleaning Press the Self Clean Std/Low pad once for a 4-hour clean time ...


