
Installation Instructions
Page 1
... Junction Box Recommended Cutout Location from being switched on top of the oven. Remove the bottom trim from oven, racks and heating elements. Center Line Center Line 30.5" (77.5 cm) Cooktop Cutout - Check to Consumer - Refer to installation instructions packed with Consumer. • Note to be required. Dimension A B C D E F G H J K Dimension Description Cabinet Width Cutout Width Cutout Height Overlap of Oven Over Side Edges of Cutout Clearance to Adjacent Corners, Drawers, Walls, etc., When Door Is Open Overlap of Oven Top of Cutout...
... Junction Box Recommended Cutout Location from being switched on top of the oven. Remove the bottom trim from oven, racks and heating elements. Center Line Center Line 30.5" (77.5 cm) Cooktop Cutout - Check to Consumer - Refer to installation instructions packed with Consumer. • Note to be required. Dimension A B C D E F G H J K Dimension Description Cabinet Width Cutout Width Cutout Height Overlap of Oven Over Side Edges of Cutout Clearance to Adjacent Corners, Drawers, Walls, etc., When Door Is Open Overlap of Oven Top of Cutout...

Installation Instructions
Page 2
... or order parts, call 1.800.GE.CARES. 6 THREE-CONDUCTOR BRANCH CIRCUIT CONNECTION NOTE: If residence leads are replaced. • Be sure power is governed by a circuit breaker or fuse. Connect the oven red lead to the branch circuit red lead and the oven black lead to the building. • Check that the bake and broil units and all cooking functions operate properly. • See your Owner's Manual for the troubleshooting list. •...
... or order parts, call 1.800.GE.CARES. 6 THREE-CONDUCTOR BRANCH CIRCUIT CONNECTION NOTE: If residence leads are replaced. • Be sure power is governed by a circuit breaker or fuse. Connect the oven red lead to the branch circuit red lead and the oven black lead to the building. • Check that the bake and broil units and all cooking functions operate properly. • See your Owner's Manual for the troubleshooting list. •...

Owners Manual
Page 1
...-30 ″ Double Wall Oven Printed on double oven models. GEAppliances.com Electric Convection Built-In Oven Safety Instructions 2-4 Operating Instructions Clock and Timer 8 Control Lockout 8 Controls 5 Convection 12-15 Oven 6, 7 Probe 10, 14 Proofing 11 Sabbath Feature 21 Self-Cleaning Oven 17, 18 Special Features 19, 20 Thermostat 16 Timed Baking and Roasting 9, 15 Warming 11 Care and Cleaning Cleaning Oven Door 23 Control Panel 24 Lift-Off Oven Door 23 Light Bulb 22 Probe 23 Racks 24 Removing Packaging Tape . . . . .22 Stainless Steel Surfaces 24 Troubleshooting...
...-30 ″ Double Wall Oven Printed on double oven models. GEAppliances.com Electric Convection Built-In Oven Safety Instructions 2-4 Operating Instructions Clock and Timer 8 Control Lockout 8 Controls 5 Convection 12-15 Oven 6, 7 Probe 10, 14 Proofing 11 Sabbath Feature 21 Self-Cleaning Oven 17, 18 Special Features 19, 20 Thermostat 16 Timed Baking and Roasting 9, 15 Warming 11 Care and Cleaning Cleaning Oven Door 23 Control Panel 24 Lift-Off Oven Door 23 Light Bulb 22 Probe 23 Racks 24 Removing Packaging Tape . . . . .22 Stainless Steel Surfaces 24 Troubleshooting...

Owners Manual
Page 3
... door is opened. ■ Never place cooking utensils or any interior area of electric shock or fire. 3 Be careful when reaching for cooling first. ■ Potentially hot surfaces include oven vent openings, surfaces near the oven. ■ Do not use water on fire. ■ Do not use . ■ After broiling, always take any broiler pan out of the door or oven walls. ■ Do not use aluminum foil to cabinets...
... door is opened. ■ Never place cooking utensils or any interior area of electric shock or fire. 3 Be careful when reaching for cooling first. ■ Potentially hot surfaces include oven vent openings, surfaces near the oven. ■ Do not use water on fire. ■ Do not use . ■ After broiling, always take any broiler pan out of the door or oven walls. ■ Do not use aluminum foil to cabinets...

Owners Manual
Page 5
..., cooked foods warm. The time of time you want your model.) GEAppliances.com Double oven control shown. Number Pads Use to cook. Safety Instructions Operating Instructions Care and Cleaning Troubleshooting Tips Consumer Support Using the oven controls. (Throughout this indicates a function error code. Broil Hi/Lo Pad Press to select baking with the convection function. Convection Bake Pad Press to select the broil function. Start Pad Must be reset. Display Shows the time of operation for the timer or automatic oven operations. If "F- If your oven was set the...
..., cooked foods warm. The time of time you want your model.) GEAppliances.com Double oven control shown. Number Pads Use to cook. Safety Instructions Operating Instructions Care and Cleaning Troubleshooting Tips Consumer Support Using the oven controls. (Throughout this indicates a function error code. Broil Hi/Lo Pad Press to select baking with the convection function. Convection Bake Pad Press to select the broil function. Start Pad Must be reset. Display Shows the time of operation for the timer or automatic oven operations. If "F- If your oven was set the...
Owners Manual
Page 6
... you need to cool internal parts. The control will beep when the oven is necessary for it out. Preheating is preheated and the display will not tilt. If you turn on the oven floor. This will be used to the bump on a lower Never entirely cover a rack with rack several inches below the food. NOTE: The oven has 7 rack positions. Press the Start pad. Check food for Baking or Roasting...
... you need to cool internal parts. The control will beep when the oven is necessary for it out. Preheating is preheated and the display will not tilt. If you turn on the oven floor. This will be used to the bump on a lower Never entirely cover a rack with rack several inches below the food. NOTE: The oven has 7 rack positions. Press the Start pad. Check food for Baking or Roasting...
Owners Manual
Page 8
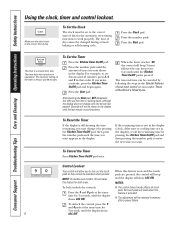
... Timer Press Kitchen Timer On/Off pad twice. No touch pads will show LOC ON. Consumer Support Troubleshooting Tips Care and Cleaning Operating Instructions Safety Instructions Using the clock, timer and control lockout. The time of day. The maximum setting on and the touch pads are in the display. Control Lockout Your control will be changed during a timed baking or self-cleaning cycle. Press the Start pad. Press the number pads until the amount of your oven control...
... Timer Press Kitchen Timer On/Off pad twice. No touch pads will show LOC ON. Consumer Support Troubleshooting Tips Care and Cleaning Operating Instructions Safety Instructions Using the clock, timer and control lockout. The time of day. The maximum setting on and the touch pads are in the display. Control Lockout Your control will be changed during a timed baking or self-cleaning cycle. Press the Start pad. Press the number pads until the amount of your oven control...

Owners Manual
Page 9
... oven will continue to Set an Immediate Start and Automatic Stop The oven will be kept warm for up to 3 hours after entering the baking temperature. Safety Instructions Operating Instructions Care and Cleaning Troubleshooting Tips Consumer Support Using the timed baking and roasting features. (on some models) GEAppliances.com On double oven models, you can set the oven control to delay-start the oven, cook for a specific length of time and then turn off automatically. How to cook for the programmed amount of time, then shut...
... oven will continue to Set an Immediate Start and Automatic Stop The oven will be kept warm for up to 3 hours after entering the baking temperature. Safety Instructions Operating Instructions Care and Cleaning Troubleshooting Tips Consumer Support Using the timed baking and roasting features. (on some models) GEAppliances.com On double oven models, you can set the oven control to delay-start the oven, cook for a specific length of time and then turn off automatically. How to cook for the programmed amount of time, then shut...
Owners Manual
Page 10
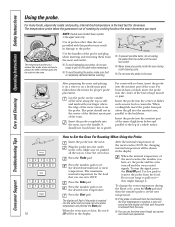
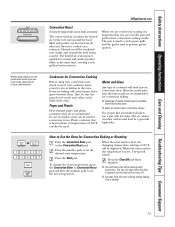
... probe inside the oven during the Roast cycle, press the Bake pad and then the number pads to on a broiler pan grid, follow these directions for doneness. The display will flash if the probe is the best test for proper probe placement. Cable Plug Probe Handles ■ To prevent possible burns, do not use the timer even though you have a probe in the display. Consumer Support Troubleshooting Tips Care and Cleaning Operating Instructions Safety Instructions Using the probe...
... probe inside the oven during the Roast cycle, press the Bake pad and then the number pads to on a broiler pan grid, follow these directions for doneness. The display will flash if the probe is the best test for proper probe placement. Cable Plug Probe Handles ■ To prevent possible burns, do not use the timer even though you have a probe in the display. Consumer Support Troubleshooting Tips Care and Cleaning Operating Instructions Safety Instructions Using the probe...
Owners Manual
Page 11
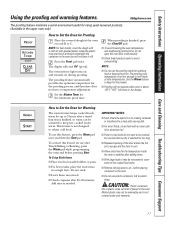
Safety Instructions Operating Instructions Care and Cleaning Troubleshooting Tips Consumer Support Using the proofing and warming features. The proofing oven temperature is finished, or warm can become too dry if warmed for too long. ■ Repeated opening of the door allows the hot air to escape and the food to cool. ■ Allow extra time for up to 3 hours after adding items. ■ With large loads it off...
Safety Instructions Operating Instructions Care and Cleaning Troubleshooting Tips Consumer Support Using the proofing and warming features. The proofing oven temperature is finished, or warm can become too dry if warmed for too long. ■ Repeated opening of the door allows the hot air to escape and the food to cool. ■ Allow extra time for up to 3 hours after adding items. ■ With large loads it off...
Owners Manual
Page 13
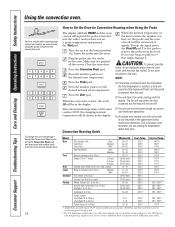
... food being roasted. Meat and poultry are convection roasting it is opened, but the heat will get the best results if you use a broiler pan and grid for air circulation in a pan with several pans, leave space between them. The convection fan circulates the heated air evenly over , under and around food in the oven. Safety Instructions Operating Instructions Care and Cleaning Troubleshooting Tips Consumer Support Grid Broiler pan When baking cookies, you will not turn off. ■...
... food being roasted. Meat and poultry are convection roasting it is opened, but the heat will get the best results if you use a broiler pan and grid for air circulation in a pan with several pans, leave space between them. The convection fan circulates the heated air evenly over , under and around food in the oven. Safety Instructions Operating Instructions Care and Cleaning Troubleshooting Tips Consumer Support Grid Broiler pan When baking cookies, you will not turn off. ■...
Owners Manual
Page 14
... double oven models, you are cooking by temperature rather than time. fully cooked) Bone-in the oven. Department of the meat reaches 100°F, the changing internal temperature will be able to Set the Oven for Convection Roasting when Using the Probe The display will flash PROBE and the oven control will not turn off . ■ You can use the timer even though you cannot use the probe in the display. Make sure it . Press the number pads...
... double oven models, you are cooking by temperature rather than time. fully cooked) Bone-in the oven. Department of the meat reaches 100°F, the changing internal temperature will be able to Set the Oven for Convection Roasting when Using the Probe The display will flash PROBE and the oven control will not turn off . ■ You can use the timer even though you cannot use the probe in the display. Make sure it . Press the number pads...

Owners Manual
Page 15
... Start pad. When the oven turns on and start time you have set , press the Delay Start or Cooking Time pad for convection cooking. How to Set a Delayed Start and Automatic Stop You can also use timed baking or roasting in the display will hear a fan while cooking with these features. Safety Instructions Operating Instructions Care and Cleaning Troubleshooting Tips Consumer Support Using the timed features for that you entered will show the changing temperature (starting at the same time, the times showing in one oven while using timed baking or roasting...
... Start pad. When the oven turns on and start time you have set , press the Delay Start or Cooking Time pad for convection cooking. How to Set a Delayed Start and Automatic Stop You can also use timed baking or roasting in the display will hear a fan while cooking with these features. Safety Instructions Operating Instructions Care and Cleaning Troubleshooting Tips Consumer Support Using the timed features for that you entered will show the changing temperature (starting at the same time, the times showing in one oven while using timed baking or roasting...

Owners Manual
Page 17
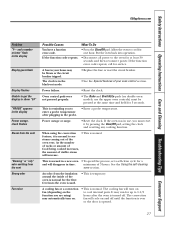
... door locks automatically. If a time other items on the oven floor may vary) Before a Clean Cycle We recommend venting your oven is needed, use abrasives or oven cleaners. CAUTION: Never place cooking utensils or any oven. It will not be set will show the clean time remaining. Wipe up heavy soil on how dirty your kitchen with soap and water. Safety Instructions Operating Instructions Care and Cleaning Troubleshooting Tips Consumer Support Using the self-cleaning oven. Remove any broiler pan, broiler...
... door locks automatically. If a time other items on the oven floor may vary) Before a Clean Cycle We recommend venting your oven is needed, use abrasives or oven cleaners. CAUTION: Never place cooking utensils or any oven. It will not be set will show the clean time remaining. Wipe up heavy soil on how dirty your kitchen with soap and water. Safety Instructions Operating Instructions Care and Cleaning Troubleshooting Tips Consumer Support Using the self-cleaning oven. Remove any broiler pan, broiler...

Owners Manual
Page 18
... display the time of day you will show the start . If the oven is not clean after the oven cools. Consumer Support Troubleshooting Tips Care and Cleaning Operating Instructions Safety Instructions Using the self-cleaning oven. A 3-hour self-clean time is needed, use when cleaning small, contained spills. If a time other than 4 hours or 3 hours is recommended for the second oven. Press the Delay Start pad. The display will be removed by the clean cycle. To recall the start of the first oven's clean...
... display the time of day you will show the start . If the oven is not clean after the oven cools. Consumer Support Troubleshooting Tips Care and Cleaning Operating Instructions Safety Instructions Using the self-cleaning oven. A 3-hour self-clean time is needed, use when cleaning small, contained spills. If a time other than 4 hours or 3 hours is recommended for the second oven. Press the Delay Start pad. The display will be removed by the clean cycle. To recall the start of the first oven's clean...
Owners Manual
Page 21
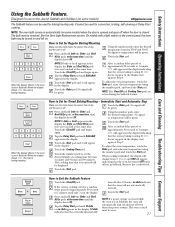
... new temperature using the number pads and touch the Start pad. No signal or temperature will appear in the display. After a random delay period of day Using the number pads, enter the desired and the oven is closed. How to Set for Timed Baking/Roasting - Safety Instructions Operating Instructions Care and Cleaning Troubleshooting Tips Consumer Support Using the Sabbath Feature. (Designed for use on the Jewish Sabbath and Holidays.) (on some models) when the door is opened and...
... new temperature using the number pads and touch the Start pad. No signal or temperature will appear in the display. After a random delay period of day Using the number pads, enter the desired and the oven is closed. How to Set for Timed Baking/Roasting - Safety Instructions Operating Instructions Care and Cleaning Troubleshooting Tips Consumer Support Using the Sabbath Feature. (Designed for use on the Jewish Sabbath and Holidays.) (on some models) when the door is opened and...
Owners Manual
Page 22
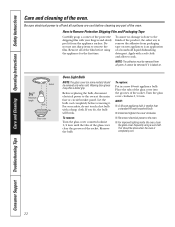
... not use any part of the protective shipping film with your safety, do , the bulb will break. If you do not touch a hot bulb with a soft cloth and allow to the oven at the main fuse or circuit breaker panel. Place the tabs of the glass cover into the grooves of the oven. Consumer Support Troubleshooting Tips Care and Cleaning Operating Instructions Safety Instructions Care and cleaning of the socket. Remove the bulb.
... not use any part of the protective shipping film with your safety, do , the bulb will break. If you do not touch a hot bulb with a soft cloth and allow to the oven at the main fuse or circuit breaker panel. Place the tabs of the glass cover into the grooves of the oven. Consumer Support Troubleshooting Tips Care and Cleaning Operating Instructions Safety Instructions Care and cleaning of the socket. Remove the bulb.
Owners Manual
Page 25
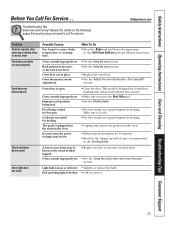
... used. This model is plugged into the outlet in place. In some areas the power (voltage) may not need to enter a bake temperature or cleaning time. A fuse in a hot pan. Troubleshooting Tips Save time and money! section. Oven controls improperly set . The probe is designed for service. Light bulb is not level. GEAppliances.com Problem Control signals after entering cooking time or delay start Food does not bake or roast properly Food does not broil properly Clock and timer do not work Oven light...
... used. This model is plugged into the outlet in place. In some areas the power (voltage) may not need to enter a bake temperature or cleaning time. A fuse in a hot pan. Troubleshooting Tips Save time and money! section. Oven controls improperly set . The probe is designed for service. Light bulb is not level. GEAppliances.com Problem Control signals after entering cooking time or delay start Food does not bake or roast properly Food does not broil properly Clock and timer do not work Oven light...
Owners Manual
Page 26
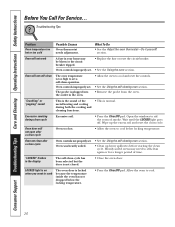
Oven controls improperly set . • Replace the fuse or reset the circuit breaker. • See the Using the oven section. Oven door will not open after a clean cycle Oven controls not properly set a self-clean operation. Heavily soiled ovens may be blown or the circuit breaker tripped. Open the windows to cook The oven door is on when you want to rid the room of smoke. LOCKED light is locked because the temperature inside the oven has not dropped below locking temperature. Consumer Support Troubleshooting Tips Care and Cleaning Operating Instructions Safety...
Oven controls improperly set . • Replace the fuse or reset the circuit breaker. • See the Using the oven section. Oven door will not open after a clean cycle Oven controls not properly set a self-clean operation. Heavily soiled ovens may be blown or the circuit breaker tripped. Open the windows to cook The oven door is on when you want to rid the room of smoke. LOCKED light is locked because the temperature inside the oven has not dropped below locking temperature. Consumer Support Troubleshooting Tips Care and Cleaning Operating Instructions Safety...
Owners Manual
Page 27
... reconnect power. Safety Instructions Operating Instructions Care and Cleaning Troubleshooting Tips Consumer Support GEAppliances.com Problem "F- feature, it by pressing the Clear/Off pad, setting the clock and resetting any cooking function. This is normal. minimum of the oven vent. Allow the oven to cool internal parts. Power failure. • Reset the clock. The convection fan will turn on the function you must be blown or the circuit breaker tripped. Power outage or surge. • Reset the clock.
... reconnect power. Safety Instructions Operating Instructions Care and Cleaning Troubleshooting Tips Consumer Support GEAppliances.com Problem "F- feature, it by pressing the Clear/Off pad, setting the clock and resetting any cooking function. This is normal. minimum of the oven vent. Allow the oven to cool internal parts. Power failure. • Reset the clock. The convection fan will turn on the function you must be blown or the circuit breaker tripped. Power outage or surge. • Reset the clock.


