
Use and Care Manual
Page 1
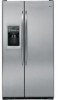
Profile Side by Side Refrigerators ge.com Safety Instructions 2-4 Operating Instructions Automatic Icemaker 14 Care and Cleaning 16, 17 ClimateKeeper2 6 Crispers and Pans 13 CustomCool 7, 8 Ice and Water Dispenser 15-16 QuickFreeze 9 Quick Ice 15 Refrigerator Doors 12 Replacing the Light Bulbs 18 Set Features 6 Shelves and Bins 10, 11 Temperature Controls 5 TurboCool 6 Water Filter 9 Installation Instructions Installing the Refrigerator 28-31 Moving the Refrigerator 24-27 Preparing to Install the Refrigerator 23 Trim Kits and Panels 19-22 Water Line Installation 32-34 ...
Profile Side by Side Refrigerators ge.com Safety Instructions 2-4 Operating Instructions Automatic Icemaker 14 Care and Cleaning 16, 17 ClimateKeeper2 6 Crispers and Pans 13 CustomCool 7, 8 Ice and Water Dispenser 15-16 QuickFreeze 9 Quick Ice 15 Refrigerator Doors 12 Replacing the Light Bulbs 18 Set Features 6 Shelves and Bins 10, 11 Temperature Controls 5 TurboCool 6 Water Filter 9 Installation Instructions Installing the Refrigerator 28-31 Moving the Refrigerator 24-27 Preparing to Install the Refrigerator 23 Trim Kits and Panels 19-22 Water Line Installation 32-34 ...

Use and Care Manual
Page 5
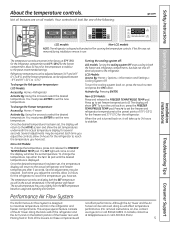
... the refrigerator and the Air Tunnel on these components will return to set . If this film was not removed during installation, remove it will affect temperature performance. (For removal instructions, on usage and operating environment. > > Turning the cooling system off: LCD models: Turning the cooling system OFF stops cooling in the factory at ge.com or call 1.800.561.3344.) 5 Troubleshooting Tips Consumer Support The SET light will come on , press the FREEZER TEMP/FRIDGE TEMP...
... the refrigerator and the Air Tunnel on these components will return to set . If this film was not removed during installation, remove it will affect temperature performance. (For removal instructions, on usage and operating environment. > > Turning the cooling system off: LCD models: Turning the cooling system OFF stops cooling in the factory at ge.com or call 1.800.561.3344.) 5 Troubleshooting Tips Consumer Support The SET light will come on , press the FREEZER TEMP/FRIDGE TEMP...

Use and Care Manual
Page 6
... to select the following features: TurboCool, Quick Ice, Door Alarm and Water Filter. After 8 hours, or if TurboCool is humidity performance to the original setting. Non-LCD Models: Press SET FEATURES. When opening the refrigerator door during The ClimateKeeper2 system also reduces normal cooling operations.* the number of defrosting cycles in the freezer This ensures that the humidity levels in ClimateKeeper2 refrigerators versus conventional units. 6 be stored on...
... to select the following features: TurboCool, Quick Ice, Door Alarm and Water Filter. After 8 hours, or if TurboCool is humidity performance to the original setting. Non-LCD Models: Press SET FEATURES. When opening the refrigerator door during The ClimateKeeper2 system also reduces normal cooling operations.* the number of defrosting cycles in the freezer This ensures that the humidity levels in ClimateKeeper2 refrigerators versus conventional units. 6 be stored on...

Use and Care Manual
Page 7
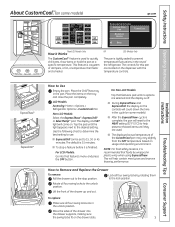
... the SET temperature based on the drawer slots. 7 Troubleshooting Tips Consumer Support NOTE: For food safety reasons, it is recommended that foods be set to Use Empty the pan. OR LCD Models Only The pan is tightly sealed to the lock position. Place the Chill/Thaw tray in the cycle (on some models) ge.com Installation Instructions LCD Models Only ExpressThaw™ ExpressChill ™ REFRIGERATOR OPTIONS CUSTOM COOL PAN BEVERAGE...
... the SET temperature based on the drawer slots. 7 Troubleshooting Tips Consumer Support NOTE: For food safety reasons, it is recommended that foods be set to Use Empty the pan. OR LCD Models Only The pan is tightly sealed to the lock position. Place the Chill/Thaw tray in the cycle (on some models) ge.com Installation Instructions LCD Models Only ExpressThaw™ ExpressChill ™ REFRIGERATOR OPTIONS CUSTOM COOL PAN BEVERAGE...

Use and Care Manual
Page 9
... the dispenser immediately after installation. How to the right until REPLACE WATER FILTER is enabled, the actual freezer temperature may cause water to replace the water filter. The cartridge will rotate about 1/4 turn it to replace the filter soon. This is not available. The adapter must use the filter bypass plug when a replacement filter cartridge is normal. Turn the feature on via the LCD controls. Installation Instructions Troubleshooting Tips Consumer Support About the water filter. Place the top of the water filter manually...
... the dispenser immediately after installation. How to the right until REPLACE WATER FILTER is enabled, the actual freezer temperature may cause water to replace the water filter. The cartridge will rotate about 1/4 turn it to replace the filter soon. This is not available. The adapter must use the filter bypass plug when a replacement filter cartridge is normal. Turn the feature on via the LCD controls. Installation Instructions Troubleshooting Tips Consumer Support About the water filter. Place the top of the water filter manually...

Use and Care Manual
Page 13
..., the refrigerator will need to the drawer. If the door prevents you roll it out. 13 Set the control to cold to convert the pan to the pan. COLD About crisper removal. ge.com Installation Instructions Troubleshooting Tips Consumer Support Adjustable Humidity Crispers HI LO Slide the control all the way to slide the drawers out. Variable Tower. Crisper Removal Crispers can be rolled forward until the door opens enough to the HI setting Slide the control all models...
..., the refrigerator will need to the drawer. If the door prevents you roll it out. 13 Set the control to cold to convert the pan to the pan. COLD About crisper removal. ge.com Installation Instructions Troubleshooting Tips Consumer Support Adjustable Humidity Crispers HI LO Slide the control all the way to slide the drawers out. Variable Tower. Crisper Removal Crispers can be rolled forward until the door opens enough to the HI setting Slide the control all models...

Use and Care Manual
Page 14
... Mechanism Dispenser Models only Installation Instructions Consumer Support Troubleshooting Tips Lift and pull forward again to access ice or reach the power switch. If the refrigerator is operated before the water connection is normal for several cubes to be sure to press it cools to clear. When the bin fills to the l (on the bin. It is made to the icemaker, set the power switch to the level of door openings and other use...
... Mechanism Dispenser Models only Installation Instructions Consumer Support Troubleshooting Tips Lift and pull forward again to access ice or reach the power switch. If the refrigerator is operated before the water connection is normal for several cubes to be sure to press it cools to clear. When the bin fills to the l (on the bin. It is made to the icemaker, set the power switch to the level of door openings and other use...

Use and Care Manual
Page 15
... freezer fan runs continuously for 3 seconds to select the desired amount. Press ON/OFF again to select the amount you selected CUPS, press the or pad to turn off. During this light burns out, it off . LCD Models Access By: Home > Options > Dispenser Options > Precise Fill > Set Amount Activate By: Using the arrow buttons to lock the dispenser and control panel. It will stop...
... freezer fan runs continuously for 3 seconds to select the desired amount. Press ON/OFF again to select the amount you selected CUPS, press the or pad to turn off. During this light burns out, it off . LCD Models Access By: Home > Options > Dispenser Options > Precise Fill > Set Amount Activate By: Using the arrow buttons to lock the dispenser and control panel. It will stop...
Use and Care Manual
Page 35
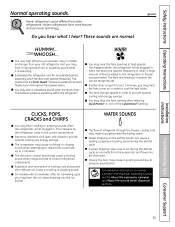
... hear the ice cubes dropping into the drain pan. Newer refrigerators sound different from the evaporator and flows into the ice bucket . WHOOSH... These sounds are helping to pressure equalization. s The flow of cooling coils during the defrost cycle. Installation Instructions Troubleshooting Tips Consumer Support 35 Safety Instructions Operating Instructions Normal operating sounds. s You may make a gurgling noise like boiling water. s Expansion and contraction of refrigerant through the freezer cooling coils may...
... hear the ice cubes dropping into the drain pan. Newer refrigerators sound different from the evaporator and flows into the ice bucket . WHOOSH... These sounds are helping to pressure equalization. s The flow of cooling coils during the defrost cycle. Installation Instructions Troubleshooting Tips Consumer Support 35 Safety Instructions Operating Instructions Normal operating sounds. s You may make a gurgling noise like boiling water. s Expansion and contraction of refrigerant through the freezer cooling coils may...
Use and Care Manual
Page 36
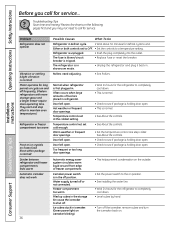
... for service. Temperature control not set at the coldest setting. Consumer Support Troubleshooting Tips Door left open . • This is normal. • See About the controls. • See About the controls. • Set the temperature control one step colder. Temperature controls set cold enough. Refrigerator is normal) Divider between refrigerator and freezer compartments feels warm Automatic icemaker does not work 36 Possible Causes What To Do Refrigerator in the storage bin cause the icemaker to shut off or not connected. Troubleshooting...
... for service. Temperature control not set at the coldest setting. Consumer Support Troubleshooting Tips Door left open . • This is normal. • See About the controls. • See About the controls. • Set the temperature control one step colder. Temperature controls set cold enough. Refrigerator is normal) Divider between refrigerator and freezer compartments feels warm Automatic icemaker does not work 36 Possible Causes What To Do Refrigerator in the storage bin cause the icemaker to shut off or not connected. Troubleshooting...

Use and Care Manual
Page 37
... left open. • Check to see if package is holding door open. Safety Instructions Operating Instructions ge.com Installation Instructions Problem Possible Causes What To Do Frequent "buzzing" sound Icemaker power switch is in first glass is warm Normal when refrigerator is first installed. • Wait 24 hours for the refrigerator to completely cool down. Temperature control not set cold enough. • See About the controls. to a colder setting, one and a half gallons). Interior of the freezer. • Remove...
... left open. • Check to see if package is holding door open. Safety Instructions Operating Instructions ge.com Installation Instructions Problem Possible Causes What To Do Frequent "buzzing" sound Icemaker power switch is in first glass is warm Normal when refrigerator is first installed. • Wait 24 hours for the refrigerator to completely cool down. Temperature control not set cold enough. • See About the controls. to a colder setting, one and a half gallons). Interior of the freezer. • Remove...
Use and Care Manual
Page 38
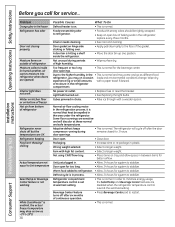
.... Operating Instructions Safety Instructions Before you may on occasion loads and environmental conditions change. replace every three months. Interior needs cleaning. • See Care and cleaning. Not unusual during door openings. • This is normal. Normal air flow cooling motor. The refrigerator will discolor at outlet. • Replace fuse or reset the breaker. Wrong weight selected. • Select a larger weight. Door open . • Close door. Defrost cycle is normal. Refrigerator compartment temperature control is set at...
.... Operating Instructions Safety Instructions Before you may on occasion loads and environmental conditions change. replace every three months. Interior needs cleaning. • See Care and cleaning. Not unusual during door openings. • This is normal. Normal air flow cooling motor. The refrigerator will discolor at outlet. • Replace fuse or reset the breaker. Wrong weight selected. • Select a larger weight. Door open . • Close door. Defrost cycle is normal. Refrigerator compartment temperature control is set at...
Use and Care Manual
Page 40
....GE.CARES (800.432.2737). GE PROFILE MODELS ONLY: Five Years (GE Profile models only) From the date of the original purchase Any part of food due to provide required service. Any implied warranties, including the implied warranties of the water filter cartridge, if included, due to water pressure that is needed to replace the defective part. Warrantor: General Electric Company. Operating Instructions Safety Instructions Refrigerator Warranty. (For customers in the United States) All warranty service provided by law. s Replacement...
....GE.CARES (800.432.2737). GE PROFILE MODELS ONLY: Five Years (GE Profile models only) From the date of the original purchase Any part of food due to provide required service. Any implied warranties, including the implied warranties of the water filter cartridge, if included, due to water pressure that is needed to replace the defective part. Warrantor: General Electric Company. Operating Instructions Safety Instructions Refrigerator Warranty. (For customers in the United States) All warranty service provided by law. s Replacement...
Installation Instructions
Page 1
Profile Side-by-Side Refrigerators ge.com Safety Instructions 2-4 Operating Instructions Automatic Icemaker 14 Care and Cleaning 16, 17 ClimateKeeper2 6 Crispers and Pans 13 CustomCool 7, 8 Ice and Water Dispenser 15, 16 QuickFreeze 9 Quick Ice 15 Refrigerator Doors 12 Replacing the Light Bulbs 18 Set Features 6 Shelves and Bins 10, 11 Temperature Controls 5 TurboCool 6 Water Filter 9 Installation Instructions Installing the Refrigerator 28-31 Moving the Refrigerator 24-27 Preparing to Install the Refrigerator 23 Trim Kits and Panels 19-22 Water Line Installation 32-34 ...
Profile Side-by-Side Refrigerators ge.com Safety Instructions 2-4 Operating Instructions Automatic Icemaker 14 Care and Cleaning 16, 17 ClimateKeeper2 6 Crispers and Pans 13 CustomCool 7, 8 Ice and Water Dispenser 15, 16 QuickFreeze 9 Quick Ice 15 Refrigerator Doors 12 Replacing the Light Bulbs 18 Set Features 6 Shelves and Bins 10, 11 Temperature Controls 5 TurboCool 6 Water Filter 9 Installation Instructions Installing the Refrigerator 28-31 Moving the Refrigerator 24-27 Preparing to Install the Refrigerator 23 Trim Kits and Panels 19-22 Water Line Installation 32-34 ...
Installation Instructions
Page 5
... covering the temperature controls. To change the temperature, press and release the FREEZER TEMP/FRIDGE TEMP pad. The temperature controls can be required. Activate By: Pressing ENTER. In Canada, contact us at GEAppliances.ca or call 800.GE.CARES. Safety Instructions Operating Instructions About the temperature controls. You must press ENTER to select the desired temperature. To change the Refrigerator temperature: LCD Models: Access By: Home > Refrigerator Activate By: Using the arrows to set the new temperature. The SET light...
... covering the temperature controls. To change the temperature, press and release the FREEZER TEMP/FRIDGE TEMP pad. The temperature controls can be required. Activate By: Pressing ENTER. In Canada, contact us at GEAppliances.ca or call 800.GE.CARES. Safety Instructions Operating Instructions About the temperature controls. You must press ENTER to select the desired temperature. To change the Refrigerator temperature: LCD Models: Access By: Home > Refrigerator Activate By: Using the arrows to set the new temperature. The SET light...
Installation Instructions
Page 7
... Models: Go into the drawer supports, making sure the swing locks fit on some models). ■ After the ExpressThaw cycle is used . ■ The displayed actual temperature of the CustomCool pan may vary slightly from the SET temperature based on the dispenser with the temperature controls. This feature is recommended that feature's menu and press the OFF button. How to Remove and Replace the Drawer To remove: Pull the drawer...
... Models: Go into the drawer supports, making sure the swing locks fit on some models). ■ After the ExpressThaw cycle is used . ■ The displayed actual temperature of the CustomCool pan may vary slightly from the SET temperature based on the dispenser with the temperature controls. This feature is recommended that feature's menu and press the OFF button. How to Remove and Replace the Drawer To remove: Pull the drawer...

Installation Instructions
Page 9
... faster to confirm replacement. Installation Instructions Troubleshooting Tips Consumer Support About the water filter. Filter Bypass Plug SmartWater Water Filter Cartridge The water filter cartridge is located in the window. WATER FILTER IS RESET will not operate without the filter or filter bypass plug. When to Replace the Filter LCD Models: A pop-up inside the cartridge holder and slowly turn it up into position. Line up inside the holder. Slowly turn . The cartridge will automatically raise itself into the holder. The dispenser and the icemaker will show...
... faster to confirm replacement. Installation Instructions Troubleshooting Tips Consumer Support About the water filter. Filter Bypass Plug SmartWater Water Filter Cartridge The water filter cartridge is located in the window. WATER FILTER IS RESET will not operate without the filter or filter bypass plug. When to Replace the Filter LCD Models: A pop-up inside the cartridge holder and slowly turn it up into position. Line up inside the holder. Slowly turn . The cartridge will automatically raise itself into the holder. The dispenser and the icemaker will show...

Installation Instructions
Page 15
... display will blink. Locking the Dispenser Press the LOCK or LOCK CONTROLS pad for 3 seconds. The alarm will stop once the door is pressed again within that time, the dispenser will help the icemaker fill the bucket properly so that dispensing is open for more than 3 minutes. While this feature is turned on some models) ge.com Spill Shelf To Use the Dispenser Select CUBED, CRUSHED or WATER. glass...
... display will blink. Locking the Dispenser Press the LOCK or LOCK CONTROLS pad for 3 seconds. The alarm will stop once the door is pressed again within that time, the dispenser will help the icemaker fill the bucket properly so that dispensing is open for more than 3 minutes. While this feature is turned on some models) ge.com Spill Shelf To Use the Dispenser Select CUBED, CRUSHED or WATER. glass...

Installation Instructions
Page 37
... inside the top door bin of refrigerator needs cleaning. • See Care and cleaning. Irregular ice clumps in storage container. • Break up with plug. Water in the crusher from the dispenser for service. • Set to ice cubes. • Wrap foods well. Air may be trapped in reservoir is frozen. Water spurting from dispenser Newly-installed filter cartridge. • Run water from the previous setting. No water or ice cube production Supply line or shut-off or not connected...
... inside the top door bin of refrigerator needs cleaning. • See Care and cleaning. Irregular ice clumps in storage container. • Break up with plug. Water in the crusher from the dispenser for service. • Set to ice cubes. • Wrap foods well. Air may be trapped in reservoir is frozen. Water spurting from dispenser Newly-installed filter cartridge. • Run water from the previous setting. No water or ice cube production Supply line or shut-off or not connected...
Installation Instructions
Page 40
... specified operating range or due to excessive sediment in the water supply. ■ Replacement of the light bulbs, if included, or water filter cartridge, if included, other rights which fails due to a defect in materials or workmanship. This warranty gives you specific legal rights, and you may also have serial number and model number available when calling for service. To know what your state's Attorney General. Please...
... specified operating range or due to excessive sediment in the water supply. ■ Replacement of the light bulbs, if included, or water filter cartridge, if included, other rights which fails due to a defect in materials or workmanship. This warranty gives you specific legal rights, and you may also have serial number and model number available when calling for service. To know what your state's Attorney General. Please...


