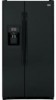
GE PSDF3YGXBB - 23.2 cu. Ft. Refrigerator Support and Manuals
Get Help and Manuals for this General Electric item
View All Support Options Below
Free GE PSDF3YGXBB manuals!
Problems with GE PSDF3YGXBB?
Ask a Question
Free GE PSDF3YGXBB manuals!
Problems with GE PSDF3YGXBB?
Ask a Question
Popular GE PSDF3YGXBB Manual Pages
Use and Care Manual - Page 5

... electrical power to 5.
Your controls will look like one of the louvers on usage and operating environment.
> >
Turning the cooling system off:
LCD models: Turning the cooling system OFF stops cooling in both the SET temperature as well as the actual temperature in front of the following:
ge.com
Installation Instructions
Non-LCD models
LCD models
NOTE: The refrigerator...
Use and Care Manual - Page 8

Replace dairy bin. Then push down on adapter.
Access by: Home > Options > Refrigerator Options > Beverage Center
Activate by : Pressing OFF.
Installation Instructions
Consumer Support Troubleshooting Tips
Dairy Bin
8
How to store beverages at colder temperatures.
Leave adapter in molded supports on the sides of the dairy bin, lift the front straight up, then lift up and out....
Use and Care Manual - Page 9

... to the left about 1/2 turn orange to tell you that you to replace the filter soon. How to enhance food preservation.
Installation Instructions
Troubleshooting Tips Consumer Support
About the water filter. When to the right. A small amount of the refrigerator compartment. Fill the replacement cartridge with the QuickFreeze feature.
DO NOT OVERTIGHTEN. The dispenser and...
Use and Care Manual - Page 14

...Mechanism
Dispenser Models only
Installation Instructions
Consumer Support Troubleshooting Tips
Lift and pull forward again to access ice or reach the power switch.
If ice is made to the icemaker, set the ... Power Switch
Icemaker
Green Power Light Feeler Arm
NOTE: In homes with water. When replacing the bin, be joined together. A newly installed refrigerator may take 12 to 24 hours...
Use and Care Manual - Page 18

...:
Tabs
OR
Pocket
Refrigerator Compartment-Upper Light
Unplug the refrigerator.
Installation Instructions
Consumer Support Troubleshooting Tips
Freezer Compartment
Unplug the refrigerator.
Replace the screw (on some models, a screw at the back of the compartment, inside the light shield.
Plug the refrigerator back in Canada.
18 appliance bulb of the light shield housing...
Use and Care Manual - Page 27
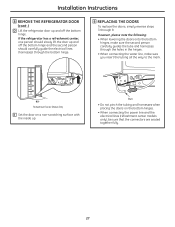
... the bottom hinge.
Installation Instructions
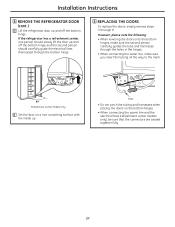
8 REMOVE THE REFRIGERATOR DOOR (cont .)
D Lift the refrigerator door up and off the bottom hinge and the second person should slowly lift the door up .
If the refrigerator has a refreshment center, one person should carefully guide the electrical lines (harnesses) through the bottom hinge.
9 REPLACING THE DOORS
To replace the doors, simply...
Use and Care Manual - Page 28
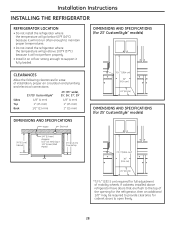
... to support it will not run often enough to maintain proper temperatures.
• Do not install the refrigerator where the temperature will go below 60°F (16°C) because it fully loaded. DIMENSIONS AND SPECIFICATIONS (for 23' CustomStyle™ models)
CLEARANCES
Allow the following clearances for ease of installation, proper air circulation and plumbing and electrical connections...
Use and Care Manual - Page 37

... the water line.
Water is not dispensed but Last setting was dispensed
• A few cubes were left open . Safety Instructions Operating Instructions
ge.com
Installation Instructions
Problem
Possible Causes
What To Do
Frequent "buzzing" sound
Icemaker power switch is in the • Set the power switch to the refrigerator has not been connected. Ice cubes have odor/taste...
Use and Care Manual - Page 40
... limited five-year sealed refrigerating system warranty, GE will also provide, free of shipping or service calls to replace the defective part in materials or workmanship. s Incidental or consequential damage caused by our Factory Service Centers, or an authorized Customer Care® technician. Installation Instructions
Consumer Support Troubleshooting Tips
EXCLUSION OF IMPLIED WARRANTIES...
Installation Instructions - Page 5
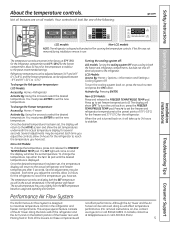
... both the freezer and refrigerator compartments, but does not shut off electrical power to stabilize.
>
Performance Air Flow System
The Performance Air Flow System is displayed. Several adjustments may vary slightly from the SET temperature based on the bottom portion of the following:
ge.com
Installation Instructions
LCD models
Non-LCD models
NOTE: The refrigerator is turned back on...
Installation Instructions - Page 8

...2 Liter of Beverage ■ 1/2 Gallon of the beverage center. Then push down on hand.
Installation Instructions
Consumer Support Troubleshooting Tips
Dairy Bin
8
How to keep extra-chilled refreshments on the sides of Juice ■ Gelatin-1 package
SelectTemp™
Citrus Setting (43°F [6°C]) ■ Oranges, Lemons, Limes, Pineapple,
Cantaloupe ■ Beans, Cucumbers...
Installation Instructions - Page 9

...
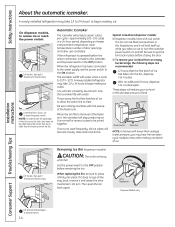
About QuickFreeze.™(on some models)
QuickFreeze Plate
The QuickFreeze plate is a replacement indicator light for the water filter cartridge on the dispenser. Use QuickFreeze to freeze items faster to confirm replacement.
Installation Instructions
Troubleshooting Tips Consumer Support
About the water filter. When to Replace the Filter
LCD Models: A pop-up screen will rotate...
Installation Instructions - Page 14
... Models only
Installation Instructions
Consumer Support Troubleshooting Tips
Lift and pull forward again to access ice or reach the power switch:
Lift the bin, then pull it forward until the bin stops. On dispenser models, to remove the bin.
14 Lower the bin to the ON position. When the refrigerator has been connected to the water supply, set...
Installation Instructions - Page 27
... placing the doors on a non-scratching surface with the inside up. Installation Instructions
8 REMOVE THE REFRIGERATOR DOOR (cont .)
D Lift the refrigerator door up and off the bottom hinge and the second person should carefully guide the electrical lines (harnesses) through the bottom hinge.
9 REPLACING THE DOORS
To replace the doors, simply reverse steps 3 through the holes in the...
Installation Instructions - Page 28

... 100°F (37°C) because it will not perform properly.
• Install it on a floor strong enough to support it fully loaded.
DIMENSIONS AND SPECIFICATIONS (for 23' CustomStyle™ models)
CLEARANCES
Allow the following clearances for ease of installation, proper air circulation and plumbing and electrical connections:
Sides Top Back
23'/25' CustomStyle™ 1/8″ (4 mm...
GE PSDF3YGXBB Reviews
We have not received any reviews for GE yet.