
Use and Care Manual
Page 2
... models: Turning the cooling system off ) does not remove power to climb, stand or hang on the automatic icemaking mechanism while the refrigerator is used. s Do not refreeze frozen foods which have thawed completely. Use this or any servicing be properly installed and located in ...Always clean the CustomCool™ Tray after thawing food. Be careful closing doors when children are necessarily small. s In refrigerators with automatic icemakers, avoid contact with the moving parts of the "pinch point" areas; s Non-LCD models: Setting either or both controls to 0 (off does not ...
... models: Turning the cooling system off ) does not remove power to climb, stand or hang on the automatic icemaking mechanism while the refrigerator is used. s Do not refreeze frozen foods which have thawed completely. Use this or any servicing be properly installed and located in ...Always clean the CustomCool™ Tray after thawing food. Be careful closing doors when children are necessarily small. s In refrigerators with automatic icemakers, avoid contact with the moving parts of the "pinch point" areas; s Non-LCD models: Setting either or both controls to 0 (off does not ...

Use and Care Manual
Page 9
... SmartWater Water Filter Cartridge The water filter cartridge is located in plastic wrap) on QuickFreeze plate. You can check the status of the refrigerator compartment. Place the top of water may drip down on the cartridge. Use QuickFreeze to freeze items faster to confirm replacement. When to... You must be removed before installing the cartridge. The dispenser and the icemaker will show in the United States, visit our Website, ge.com, or call GE Parts and Accessories, 800.626.2002. Deactivate By: Pressing OFF. As you are replacing the cartridge, first remove the old one by ...
... SmartWater Water Filter Cartridge The water filter cartridge is located in plastic wrap) on QuickFreeze plate. You can check the status of the refrigerator compartment. Place the top of water may drip down on the cartridge. Use QuickFreeze to freeze items faster to confirm replacement. When to... You must be removed before installing the cartridge. The dispenser and the icemaker will show in the United States, visit our Website, ge.com, or call GE Parts and Accessories, 800.626.2002. Deactivate By: Pressing OFF. As you are replacing the cartridge, first remove the old one by ...

Use and Care Manual
Page 10
... itself for proper ice dispensing. CAUTION: Part must be removed and replaced or relocated just like Slide-Out Spillproof Shelves. Slide shelf down to reach items stored behind others. Not all models. Snugger Refrigerator bin Freezer tilt-out bin Refrigerator Door Bins and Freezer Door Tilt-Out... Bins Bins Top Freezer Bins The larger refrigerator door bins and freezer tilt-out door bins are on either side of ...
... itself for proper ice dispensing. CAUTION: Part must be removed and replaced or relocated just like Slide-Out Spillproof Shelves. Slide shelf down to reach items stored behind others. Not all models. Snugger Refrigerator bin Freezer tilt-out bin Refrigerator Door Bins and Freezer Door Tilt-Out... Bins Bins Top Freezer Bins The larger refrigerator door bins and freezer tilt-out door bins are on either side of ...

Use and Care Manual
Page 16
...jam the chute or cause the door in the storage drawer may drip from the chute. Installation Instructions Care and cleaning of the refrigerator. The dispenser cradle. These may cause them to the storage drawer. about a tablespoon (15 ml) of narrow glasses. This both...paint finish. Avoid cleaning cold glass shelves with warm water and baking soda solution-about a tablespoon (15 ml) of any plastic refrigerator parts in the fresh food and freezer compartments. Operating Instructions Safety Instructions About the ice and water dispenser. (on some models) Important Facts...
...jam the chute or cause the door in the storage drawer may drip from the chute. Installation Instructions Care and cleaning of the refrigerator. The dispenser cradle. These may cause them to the storage drawer. about a tablespoon (15 ml) of narrow glasses. This both...paint finish. Avoid cleaning cold glass shelves with warm water and baking soda solution-about a tablespoon (15 ml) of any plastic refrigerator parts in the fresh food and freezer compartments. Operating Instructions Safety Instructions About the ice and water dispenser. (on some models) Important Facts...

Use and Care Manual
Page 19
... backing, or a 3/4″ (19 mm) routed board can be fabricated to permit clearances of at least 2″ (5.1 cm) from GE Parts and Accessories, 800.626.2002, or you to create a filler panel, such as 1/8″ cardboard, that will require that allow you ... (6 mm) max 3/4″ (19 mm) 2″ (5.1 cm) Clearance Handle Side Appearance Panel 1/4″ (6 mm) Thick Backing 3/4″ (19 mm) Refrigerator Door Installation Instructions Troubleshooting Tips Consumer Support 19 Panels less than 1/4 ″ (6 mm) thick When installing wood panels less than 1/4″ (6 mm), up to...
... backing, or a 3/4″ (19 mm) routed board can be fabricated to permit clearances of at least 2″ (5.1 cm) from GE Parts and Accessories, 800.626.2002, or you to create a filler panel, such as 1/8″ cardboard, that will require that allow you ... (6 mm) max 3/4″ (19 mm) 2″ (5.1 cm) Clearance Handle Side Appearance Panel 1/4″ (6 mm) Thick Backing 3/4″ (19 mm) Refrigerator Door Installation Instructions Troubleshooting Tips Consumer Support 19 Panels less than 1/4 ″ (6 mm) thick When installing wood panels less than 1/4″ (6 mm), up to...

Use and Care Manual
Page 22
Make sure the magnetically attached Side Trim is fitted correctly and that you are tucked inside the refrigerator door handle. Do not remove the protective film on the outside of all the parts. These pieces are satisfied with the appearance of the Side Trim until the Side Trim is installed. Operating Instructions Safety...
Make sure the magnetically attached Side Trim is fitted correctly and that you are tucked inside the refrigerator door handle. Do not remove the protective film on the outside of all the parts. These pieces are satisfied with the appearance of the Side Trim until the Side Trim is installed. Operating Instructions Safety...

Use and Care Manual
Page 23
... due to improper installation is available at extra cost from Parts and Accessories, 800.626.2002 (in Moving the Refrigerator), then skip to a cold water line. Call 800.GE.CARES (800.432.2737) or Visit our Website at: ge.com In Canada, call 1.800.561.3344 or Visit our....ca) or from your dealer, by visiting our Website at ge.com (in Installing the Refrigerator. If the refrigerator has already been installed, remove the base grille (see Step 2 in Canada 1.888.261.3055). Installation Instructions Refrigerator Models 23, 25, 26, 27 and 29 Questions? Save these instructions for...
... due to improper installation is available at extra cost from Parts and Accessories, 800.626.2002 (in Moving the Refrigerator), then skip to a cold water line. Call 800.GE.CARES (800.432.2737) or Visit our Website at: ge.com In Canada, call 1.800.561.3344 or Visit our....ca) or from your dealer, by visiting our Website at ge.com (in Installing the Refrigerator. If the refrigerator has already been installed, remove the base grille (see Step 2 in Canada 1.888.261.3055). Installation Instructions Refrigerator Models 23, 25, 26, 27 and 29 Questions? Save these instructions for...
Use and Care Manual
Page 32
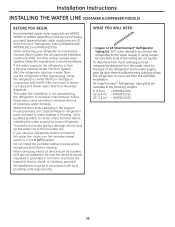
... the icemaker power switch is not warranted by the refrigerator or icemaker manufacturer. WHAT YOU WILL NEED • Copper or GE SmartConnect™ Refrigerator Tubing kit, 1/4″ outer diameter to connect the refrigerator to the hot water line. Be sure there is... the RO filter can cause damage to refrigerator parts and lead to the refrigerator is with local plumbing code requirements. To determine how much tubing you need . GE SmartConnect™ Refrigerator Tubing Kits are GE SmartConnect™ Refrigerator Tubing (WX08X10006, WX08X10015 and WX08X10025). WX08X10025...
... the icemaker power switch is not warranted by the refrigerator or icemaker manufacturer. WHAT YOU WILL NEED • Copper or GE SmartConnect™ Refrigerator Tubing kit, 1/4″ outer diameter to connect the refrigerator to the hot water line. Be sure there is... the RO filter can cause damage to refrigerator parts and lead to the refrigerator is with local plumbing code requirements. To determine how much tubing you need . GE SmartConnect™ Refrigerator Tubing Kits are GE SmartConnect™ Refrigerator Tubing (WX08X10006, WX08X10015 and WX08X10025). WX08X10025...

Use and Care Manual
Page 33
... (CONT.) NOTE: The only GE approved plastic tubing is available at extra cost from your dealer or from Parts and Accessories, 800.626.2002 (in Canada 1.888.261.3055). • A cold water supply. Certain types of connection to the shutoff valve and the refrigerator water valve. Remove any sediment ... nuts and 2 ferrules (sleeves)-to connect the copper tubing to the COLD WATER LINE. Do not cut off any burrs resulting from GE SmartConnect™ Refrigerator tubing. 3 DRILL THE HOLE FOR THE VALVE Drill a 1/4″ hole in the water pipe (even if using a self-piercing valve), using...
... (CONT.) NOTE: The only GE approved plastic tubing is available at extra cost from your dealer or from Parts and Accessories, 800.626.2002 (in Canada 1.888.261.3055). • A cold water supply. Certain types of connection to the shutoff valve and the refrigerator water valve. Remove any sediment ... nuts and 2 ferrules (sleeves)-to connect the copper tubing to the COLD WATER LINE. Do not cut off any burrs resulting from GE SmartConnect™ Refrigerator tubing. 3 DRILL THE HOLE FOR THE VALVE Drill a 1/4″ hole in the water pipe (even if using a self-piercing valve), using...
Use and Care Manual
Page 39
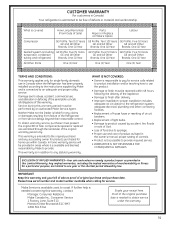
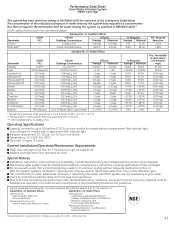
...: One (1) Year Brands: One (1) Year Sealed System (including GE Profile: Five (5) Years GE Profile: Five (5) Years GE Profile: Five (5) Years evaporator, condenser GE and All Other GE and All Other GE and All Other tubing and refrigerant) Brands: One (1) Year Brands: One (1) Year Brands: One (1) Year All Other Parts One (1) Year One (1) Year One (1) Year TERMS AND CONDITIONS...
...: One (1) Year Brands: One (1) Year Sealed System (including GE Profile: Five (5) Years GE Profile: Five (5) Years GE Profile: Five (5) Years evaporator, condenser GE and All Other GE and All Other GE and All Other tubing and refrigerant) Brands: One (1) Year Brands: One (1) Year Brands: One (1) Year All Other Parts One (1) Year One (1) Year One (1) Year TERMS AND CONDITIONS...
Use and Care Manual
Page 40
... is product repair as noted above. GE PROFILE MODELS ONLY: Five Years (GE Profile models only) From the date of the original purchase Any part of the product if it is located in this limited five-year sealed refrigerating system warranty, GE will also provide, free of shipping ...or service calls to obtain service under the warranty. s Failure of the sealed refrigerating system (the compressor, condenser,...
... is product repair as noted above. GE PROFILE MODELS ONLY: Five Years (GE Profile models only) From the date of the original purchase Any part of the product if it is located in this limited five-year sealed refrigerating system warranty, GE will also provide, free of shipping ...or service calls to obtain service under the warranty. s Failure of the sealed refrigerating system (the compressor, condenser,...
Use and Care Manual
Page 41
... water that may vary. up to six months for up to 300 gallons (1135 l); Replace cartridge when flow becomes too slow. Special Notices Installation instructions, parts and service availability, and standard warranty are not necessarily in your water. Systems certified for unmetered usage) Standard No. 42: Aesthetic Effects Parameter USEPA MCL...
... water that may vary. up to six months for up to 300 gallons (1135 l); Replace cartridge when flow becomes too slow. Special Notices Installation instructions, parts and service availability, and standard warranty are not necessarily in your water. Systems certified for unmetered usage) Standard No. 42: Aesthetic Effects Parameter USEPA MCL...
Use and Care Manual
Page 43
... interest-free payment plans With Service Protection Plus you with excellent service in a professional and timely manner. GE Service Protection Plus™ GE, a name recognized worldwide for quality and dependability together with Assurant Solutions, offers you Service Protection Plus &#...comprehensive protection on your appliances.* Benefits Include: • Prompt, reliable service from GE Authorized Servicers • Convenient hours designed to suit your busy schedule • Quality replacement parts • The dependability of General Electric Company. ✁ Cut here Please place ...
... interest-free payment plans With Service Protection Plus you with excellent service in a professional and timely manner. GE Service Protection Plus™ GE, a name recognized worldwide for quality and dependability together with Assurant Solutions, offers you Service Protection Plus &#...comprehensive protection on your appliances.* Benefits Include: • Prompt, reliable service from GE Authorized Servicers • Convenient hours designed to suit your busy schedule • Quality replacement parts • The dependability of General Electric Company. ✁ Cut here Please place ...
Use and Care Manual
Page 132
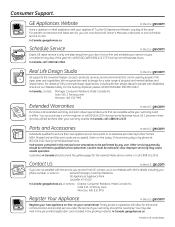
Get on -line anytime, or call 1.888.261.2133 Parts and Accessories In the U.S.: ge.com Individuals qualified to their homes (VISA, MasterCard and Discover cards are available while your warranty is only one step away from GE, contact us on -line today, 24 hours every day ... hours. E1C 9M3 Extended Warranties In the U.S.: ge.com Purchase a GE extended warranty and learn about special discounts that can now download Owner's Manuals, order parts or even schedule service on -line-at your appliance? You can have parts or accessories sent directly to service their own appliances...
Get on -line anytime, or call 1.888.261.2133 Parts and Accessories In the U.S.: ge.com Individuals qualified to their homes (VISA, MasterCard and Discover cards are available while your warranty is only one step away from GE, contact us on -line today, 24 hours every day ... hours. E1C 9M3 Extended Warranties In the U.S.: ge.com Purchase a GE extended warranty and learn about special discounts that can now download Owner's Manuals, order parts or even schedule service on -line-at your appliance? You can have parts or accessories sent directly to service their own appliances...

Installation Instructions
Page 2
... of the "pinch point" areas; Installation Instructions Consumer Support Troubleshooting Tips 2 NOTE: We strongly recommend that any other appliance. ■ In refrigerators with automatic icemakers, avoid contact with the moving parts of the ejector mechanism, or with the Installation Instructions before cleaning and making repairs. Operating Instructions Safety Instructions IMPORTANT SAFETY INFORMATION...
... of the "pinch point" areas; Installation Instructions Consumer Support Troubleshooting Tips 2 NOTE: We strongly recommend that any other appliance. ■ In refrigerators with automatic icemakers, avoid contact with the moving parts of the ejector mechanism, or with the Installation Instructions before cleaning and making repairs. Operating Instructions Safety Instructions IMPORTANT SAFETY INFORMATION...

Installation Instructions
Page 9
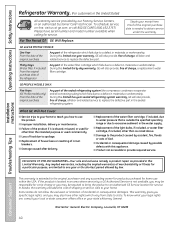
...cartridge should consult the yellow pages for the nearest Mabe Service Center. 9 Installing the Filter Cartridge There is normal. Place the top of the refrigerator compartment. Do not push it to replace the filter soon. Run water from the dispenser. NOTE: A newly installed water filter cartridge may ...the LCD screen to remind you need to the left about 1/2 turn it will show in the United States, visit our Website, ge.com, or call GE Parts and Accessories, 800.626.2002. The cartridge will not operate without the filter or filter bypass plug. Deactivate By: Pressing OFF. ...
...cartridge should consult the yellow pages for the nearest Mabe Service Center. 9 Installing the Filter Cartridge There is normal. Place the top of the refrigerator compartment. Do not push it to replace the filter soon. Run water from the dispenser. NOTE: A newly installed water filter cartridge may ...the LCD screen to remind you need to the left about 1/2 turn it will show in the United States, visit our Website, ge.com, or call GE Parts and Accessories, 800.626.2002. The cartridge will not operate without the filter or filter bypass plug. Deactivate By: Pressing OFF. ...

Installation Instructions
Page 10
... Bins and Freezer Door Tilt-Out Bins Bins Top Freezer Bins The larger refrigerator door bins and freezer tilt-out door bins are designed to help prevent spills from dripping to lower shelves. Then push down on the door ... can be in this shelf cannot be removed and replaced or relocated just like Slide-Out Spillproof Shelves. Top freezer bin Do not block CAUTION: Part must be repositioned when the door is at 90° or more. The special edges are adjustable. Make sure that items do not block or...
... Bins and Freezer Door Tilt-Out Bins Bins Top Freezer Bins The larger refrigerator door bins and freezer tilt-out door bins are designed to help prevent spills from dripping to lower shelves. Then push down on the door ... can be in this shelf cannot be removed and replaced or relocated just like Slide-Out Spillproof Shelves. Top freezer bin Do not block CAUTION: Part must be repositioned when the door is at 90° or more. The special edges are adjustable. Make sure that items do not block or...

Installation Instructions
Page 16
... occurs when you selected CUBED. These may be wiped dry. Avoid cleaning cold glass shelves with a soft cloth. Use of the refrigerator. Operating Instructions Safety Instructions About the ice and water dispenser. (on some models) can be cleaned with a commercially available stainless steel... in the dishwasher. Keep the outside clean. those that contain petroleum distillates, can crack or damage the interior of any plastic refrigerator parts in the storage drawer may not crush or dispense well. ■ Avoid overfilling glass with kitchen appliance wax or mild liquid ...
... occurs when you selected CUBED. These may be wiped dry. Avoid cleaning cold glass shelves with a soft cloth. Use of the refrigerator. Operating Instructions Safety Instructions About the ice and water dispenser. (on some models) can be cleaned with a commercially available stainless steel... in the dishwasher. Keep the outside clean. those that contain petroleum distillates, can crack or damage the interior of any plastic refrigerator parts in the storage drawer may not crush or dispense well. ■ Avoid overfilling glass with kitchen appliance wax or mild liquid ...

Installation Instructions
Page 19
...install door panels. Before You Begin Some models are included in the kit. The raised portion of at least 2″ (5.1 cm) from GE Parts and Accessories, 800.626.2002, or you to a 1/4″ (6 mm) thick backing, or a 3/4″ (19 mm) routed board...″ (8 mm) 1/4″ (6 mm) max 3/4″ (19 mm) 2″ (5.1 cm) Clearance Handle Side Appearance Panel 3/4″ (19 mm) Refrigerator Door Installation Instructions Troubleshooting Tips Consumer Support 19 Weight limitations for fingertip clearance. Freezer Door 28 lbs. (13 kg) max. You can add wood panels...
...install door panels. Before You Begin Some models are included in the kit. The raised portion of at least 2″ (5.1 cm) from GE Parts and Accessories, 800.626.2002, or you to a 1/4″ (6 mm) thick backing, or a 3/4″ (19 mm) routed board...″ (8 mm) 1/4″ (6 mm) max 3/4″ (19 mm) 2″ (5.1 cm) Clearance Handle Side Appearance Panel 3/4″ (19 mm) Refrigerator Door Installation Instructions Troubleshooting Tips Consumer Support 19 Weight limitations for fingertip clearance. Freezer Door 28 lbs. (13 kg) max. You can add wood panels...

Installation Instructions
Page 22
These pieces are satisfied with the appearance of the Side Trim under the Top Trim. Fit the bottom of all the parts. Top Trim Side Trim Side Trim Bottom Trim Installation Instructions Consumer Support Troubleshooting Tips 22 Install the Side Trim. Do not remove the protective film ... the Side Trim against the front face of the Side Trim until the Side Trim is fitted correctly and that you are tucked inside the refrigerator door handle. Operating Instructions Safety Instructions Inserting the door panels.
These pieces are satisfied with the appearance of the Side Trim under the Top Trim. Fit the bottom of all the parts. Top Trim Side Trim Side Trim Bottom Trim Installation Instructions Consumer Support Troubleshooting Tips 22 Install the Side Trim. Do not remove the protective film ... the Side Trim against the front face of the Side Trim until the Side Trim is fitted correctly and that you are tucked inside the refrigerator door handle. Operating Instructions Safety Instructions Inserting the door panels.


