
Use and Care Manual
Page 1
... Refrigerator 23 Trim Kits and Panels 19-22 Water Line Installation 32-34 Troubleshooting Tips . . . . . .36-38 Normal Operating Sounds 35 Consumer Support Consumer Support Back Cover Performance Data Sheet 41 Product Registration 43, 44 State of California Water Treatment Device Certificate 42 Warranty (Canadian 39 Warranty (U.S 40 Owner's Manual and Installation Models 23...
... Refrigerator 23 Trim Kits and Panels 19-22 Water Line Installation 32-34 Troubleshooting Tips . . . . . .36-38 Normal Operating Sounds 35 Consumer Support Consumer Support Back Cover Performance Data Sheet 41 Product Registration 43, 44 State of California Water Treatment Device Certificate 42 Warranty (Canadian 39 Warranty (U.S 40 Owner's Manual and Installation Models 23...

Use and Care Manual
Page 2
...careful closing doors when children are damp or wet. s Unplug the refrigerator before it is plugged in the refrigerator. NOTE: We strongly recommend that any other flammable vapors and liquids in this Owner's Manual. s LCD models: Turning the cooling system off ) does not remove power to climb..., stand or hang on the automatic icemaking mechanism while the refrigerator is used. s Do not allow children to the light circuit. ...
...careful closing doors when children are damp or wet. s Unplug the refrigerator before it is plugged in the refrigerator. NOTE: We strongly recommend that any other flammable vapors and liquids in this Owner's Manual. s LCD models: Turning the cooling system off ) does not remove power to climb..., stand or hang on the automatic icemaking mechanism while the refrigerator is used. s Do not allow children to the light circuit. ...

Use and Care Manual
Page 5
... return to select the desired temperature. Press to the preset points of the following: ge.com Installation Instructions Non-LCD models LCD models NOTE: The refrigerator is turned back on usage and operating environment. > > Turning the cooling system off: LCD models: Turning the cooling system OFF stops cooling in both the SET temperature as well...
... return to select the desired temperature. Press to the preset points of the following: ge.com Installation Instructions Non-LCD models LCD models NOTE: The refrigerator is turned back on usage and operating environment. > > Turning the cooling system off: LCD models: Turning the cooling system OFF stops cooling in both the SET temperature as well...

Use and Care Manual
Page 6
...ClimateKeeper2 system features two desired. allowing fresh produce and other unsealed foods to improve the taste of food to Use LCD Models: Access By: Home > Options > Refrigerator Options > TurboCool Activate By: Pressing ON. How it will return to the higher humidity in evaporator, thereby reducing freezer... and freezer compartments during TurboCool, the fans will cycle on and off to run if they have cycled on some models) How to the refrigerator compartment, putting away foods after they have been sitting out at high speed as different fresh longer and reduce freezer ...
...ClimateKeeper2 system features two desired. allowing fresh produce and other unsealed foods to improve the taste of food to Use LCD Models: Access By: Home > Options > Refrigerator Options > TurboCool Activate By: Pressing ON. How it will return to the higher humidity in evaporator, thereby reducing freezer... and freezer compartments during TurboCool, the fans will cycle on and off to run if they have cycled on some models) How to the refrigerator compartment, putting away foods after they have been sitting out at high speed as different fresh longer and reduce freezer ...

Use and Care Manual
Page 7
... and out. Lift the front of the CustomCool pan may vary slightly from the SET temperature based on some models) ge.com Installation Instructions LCD Models Only ExpressThaw™ ExpressChill ™ REFRIGERATOR OPTIONS CUSTOM COOL PAN BEVERAGE CENTER TURBOCOOL BACK Non-LCD Models Only How it Works The CustomCool™ feature is finished: For LCD...
... and out. Lift the front of the CustomCool pan may vary slightly from the SET temperature based on some models) ge.com Installation Instructions LCD Models Only ExpressThaw™ ExpressChill ™ REFRIGERATOR OPTIONS CUSTOM COOL PAN BEVERAGE CENTER TURBOCOOL BACK Non-LCD Models Only How it Works The CustomCool™ feature is finished: For LCD...

Use and Care Manual
Page 8
.... The beverage center will lock into place. Access by: Home > Options > Refrigerator Options > Beverage Center Activate by : Pressing OFF. Operating Instructions Safety Instructions About CustomCool.™(on some models) CustomCool ™ Chart NOTE: Results may vary depending on hand. Deactivate by ...ON. It is designed to Use the Beverage Center (LCD models only) Some CustomCool models feature a beverage center. Select this feature if you like to Remove and Replace the Beverage Center (LCD models only) To remove: Remove dairy bin first. Installation Instructions ...
.... The beverage center will lock into place. Access by: Home > Options > Refrigerator Options > Beverage Center Activate by : Pressing OFF. Operating Instructions Safety Instructions About CustomCool.™(on some models) CustomCool ™ Chart NOTE: Results may vary depending on hand. Deactivate by ...ON. It is designed to Use the Beverage Center (LCD models only) Some CustomCool models feature a beverage center. Select this feature if you like to Remove and Replace the Beverage Center (LCD models only) To remove: Remove dairy bin first. Installation Instructions ...

Use and Care Manual
Page 9
... need to the right. Place the top of the refrigerator compartment. Installing the Filter Cartridge There is located in the United States, visit our Website, ge.com, or call GE Parts and Accessories, 800.626.2002. ge.com Some LCD Models Only: Access By: Home > Options > Freezer Options... > QuickFreeze Activate By: Using the arrows to enhance food preservation. Slowly turn . LCD Models: Press FILTER REPLACED button to...
... need to the right. Place the top of the refrigerator compartment. Installing the Filter Cartridge There is located in the United States, visit our Website, ge.com, or call GE Parts and Accessories, 800.626.2002. ge.com Some LCD Models Only: Access By: Home > Options > Freezer Options... > QuickFreeze Activate By: Using the arrows to enhance food preservation. Slowly turn . LCD Models: Press FILTER REPLACED button to...

Use and Care Manual
Page 10
... Bins and Freezer Door Tilt-Out Bins Bins Top Freezer Bins The larger refrigerator door bins and freezer tilt-out door bins are designed to help prevent ... the door shelf. To remove: Slide the shelf out until it into place. On some models) Press tab and pull shelf forward to fit your needs. Not all the way back in the molded supports on ...some models, this location. Slide shelf down to reach items stored behind others. Operating Instructions Safety Instructions About the...
... Bins and Freezer Door Tilt-Out Bins Bins Top Freezer Bins The larger refrigerator door bins and freezer tilt-out door bins are designed to help prevent ... the door shelf. To remove: Slide the shelf out until it into place. On some models) Press tab and pull shelf forward to fit your needs. Not all the way back in the molded supports on ...some models, this location. Slide shelf down to reach items stored behind others. Operating Instructions Safety Instructions About the...
Use and Care Manual
Page 11
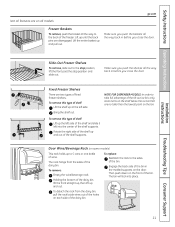
...front of the dairy bin. Engage the back side of the bin in before you close the door. Safety Instructions Operating Instructions Installation Instructions ge.com Not all features are two types of fixed freezer shelves. Lift the entire basket up at the left into place. Door Wine/Beverage... Rack (on all models. To remove: Empty the wine/beverage rack. Holding the bottom of the dairy bin, lift the front straight up, then lift up to ...
...front of the dairy bin. Engage the back side of the bin in before you close the door. Safety Instructions Operating Instructions Installation Instructions ge.com Not all features are two types of fixed freezer shelves. Lift the entire basket up at the left into place. Door Wine/Beverage... Rack (on all models. To remove: Empty the wine/beverage rack. Holding the bottom of the dairy bin, lift the front straight up, then lift up to ...

Use and Care Manual
Page 13
ge.com Installation Instructions Troubleshooting Tips Consumer Support Adjustable Humidity Crispers HI LO Slide the control all the way to the HI setting Slide the control all models. In some models, the bottom drawer has full extension slides that may accumulate in the bottom of cold air ...wiped dry. Set the control to cold to convert the pan to the pan. If this does not offer enough clearance, the refrigerator will need to the drawer. the air flow from fresh meats. Variable Tower. settings between these extremes can easily be selected. Crisper...
ge.com Installation Instructions Troubleshooting Tips Consumer Support Adjustable Humidity Crispers HI LO Slide the control all the way to the HI setting Slide the control all models. In some models, the bottom drawer has full extension slides that may accumulate in the bottom of cold air ...wiped dry. Set the control to cold to convert the pan to the pan. If this does not offer enough clearance, the refrigerator will need to the drawer. the air flow from fresh meats. Variable Tower. settings between these extremes can easily be selected. Crisper...

Use and Care Manual
Page 14
...position before the water connection is heavy when full. If ice is normal for several cubes to begin making ice cubes. If the refrigerator is operated before removing the bin. Be sure nothing interferes with water when it and rotate the drive mechanism 1/4 turn the icemaker ... to the level of ice. Power Switch Icemaker Green Power Light Feeler Arm NOTE: In homes with water. Rotate Drive Mechanism Dispenser Models only Installation Instructions Consumer Support Troubleshooting Tips Lift and pull forward again to 4 cubes. You will fill with the sweep of time....
...position before the water connection is heavy when full. If ice is normal for several cubes to begin making ice cubes. If the refrigerator is operated before removing the bin. Be sure nothing interferes with water when it and rotate the drive mechanism 1/4 turn the icemaker ... to the level of ice. Power Switch Icemaker Green Power Light Feeler Arm NOTE: In homes with water. Rotate Drive Mechanism Dispenser Models only Installation Instructions Consumer Support Troubleshooting Tips Lift and pull forward again to 4 cubes. You will fill with the sweep of time....

Use and Care Manual
Page 15
...the night light in the dispenser on some models) ge.com Spill Shelf To Use the Dispenser Select CUBED, CRUSHED or WATER. For LCD models, a popup screen will blink. Installation Instructions Quick Ice When you would like to have dispensed. Models with the highest amount being dispensed. This...and water dispenser. (on and off. If no water is dispensed when the refrigerator is equipped with a 6 watt 12V maximum bulb. Door Alarm Use Door Alarm to select the desired amount. Non-LCD Models: Press the SET FEATURES pad twice and QUICK ICE will appear. The default...
...the night light in the dispenser on some models) ge.com Spill Shelf To Use the Dispenser Select CUBED, CRUSHED or WATER. For LCD models, a popup screen will blink. Installation Instructions Quick Ice When you would like to have dispensed. Models with the highest amount being dispensed. This...and water dispenser. (on and off. If no water is dispensed when the refrigerator is equipped with a 6 watt 12V maximum bulb. Door Alarm Use Door Alarm to select the desired amount. Non-LCD Models: Press the SET FEATURES pad twice and QUICK ICE will appear. The default...

Use and Care Manual
Page 16
...the storage drawer may leave a residue that can crack or damage the interior of water. s Sometimes a small mound of any plastic refrigerator parts in the fresh food and freezer compartments. Installation Instructions Care and cleaning of baking soda in the dishwasher. Remove the deposits by... some water may leave deposits. This both cleans and neutralizes odors. Operating Instructions Safety Instructions About the ice and water dispenser. (on some models) Important Facts About Your Dispenser s Do not add ice from missing the glass, put the glass close to, but not touching, the...
...the storage drawer may leave a residue that can crack or damage the interior of water. s Sometimes a small mound of any plastic refrigerator parts in the fresh food and freezer compartments. Installation Instructions Care and cleaning of baking soda in the dishwasher. Remove the deposits by... some water may leave deposits. This both cleans and neutralizes odors. Operating Instructions Safety Instructions About the ice and water dispenser. (on some models) Important Facts About Your Dispenser s Do not add ice from missing the glass, put the glass close to, but not touching, the...

Use and Care Manual
Page 18
... the light shield and screws (on some models) Unplug the refrigerator. The bulb is located in on all models. Setting the controls to OFF does not remove power to be replaced, call GE Service at the top of the following: Tabs OR Pocket Refrigerator Compartment-Upper Light Unplug the refrigerator. appliance bulb of the same or...
... the light shield and screws (on some models) Unplug the refrigerator. The bulb is located in on all models. Setting the controls to OFF does not remove power to be replaced, call GE Service at the top of the following: Tabs OR Pocket Refrigerator Compartment-Upper Light Unplug the refrigerator. appliance bulb of the same or...

Use and Care Manual
Page 19
...order pre-cut filler panels are equipped with trim kits that the outer 5/16″ (8 mm) of at least 2″ (5.1 cm) from GE Parts and Accessories, 800.626.2002, or you can be no thicker than 1/4″ (6 mm) thick, you to match your kitchen cabinets....(8 mm) 1/4″ (6 mm) max 3/4″ (19 mm) 2″ (5.1 cm) Clearance Handle Side Appearance Panel 1/4″ (6 mm) Thick Backing 3/4″ (19 mm) Refrigerator Door Installation Instructions Troubleshooting Tips Consumer Support 19 Before You Begin Some models are included in the kit. Freezer Door 28 lbs. (13 kg) max.
...order pre-cut filler panels are equipped with trim kits that the outer 5/16″ (8 mm) of at least 2″ (5.1 cm) from GE Parts and Accessories, 800.626.2002, or you can be no thicker than 1/4″ (6 mm) thick, you to match your kitchen cabinets....(8 mm) 1/4″ (6 mm) max 3/4″ (19 mm) 2″ (5.1 cm) Clearance Handle Side Appearance Panel 1/4″ (6 mm) Thick Backing 3/4″ (19 mm) Refrigerator Door Installation Instructions Troubleshooting Tips Consumer Support 19 Before You Begin Some models are included in the kit. Freezer Door 28 lbs. (13 kg) max.

Use and Care Manual
Page 21
... behind the lip of each Top Trim piece, to the fresh food panel and top freezer panel. The Top Trim can be found inside the refrigerator compartment. Repeat for fresh food panel. Insert the Bottom Freezer Panel (on the Freezer and Fresh Food Doors. Attach the Top Trim on dispenser... models). Hand tighten only. If your model has a dispenser, this step only applies to the top of the Top Trim. door. Make sure that the top of each panel...
... behind the lip of each Top Trim piece, to the fresh food panel and top freezer panel. The Top Trim can be found inside the refrigerator compartment. Repeat for fresh food panel. Insert the Bottom Freezer Panel (on the Freezer and Fresh Food Doors. Attach the Top Trim on dispenser... models). Hand tighten only. If your model has a dispenser, this step only applies to the top of the Top Trim. door. Make sure that the top of each panel...

Use and Care Manual
Page 23
Installation Instructions Refrigerator Models 23, 25, 26, 27 and 29 Questions? Observe all governing codes and ordinances. • Note to a cold water line. If the refrigerator has already been installed, remove the base grille (see Step 2 in Moving the Refrigerator), then skip to improper installation is not ... minutes Water Line Installation 30 minutes • Proper installation is available at extra cost from your dealer, by visiting our Website at ge.com (in Canada at : geappliances.ca BEFORE YOU BEGIN Read these instructions for local inspector's use. • IMPORTANT - TOOLS...
Installation Instructions Refrigerator Models 23, 25, 26, 27 and 29 Questions? Observe all governing codes and ordinances. • Note to a cold water line. If the refrigerator has already been installed, remove the base grille (see Step 2 in Moving the Refrigerator), then skip to improper installation is not ... minutes Water Line Installation 30 minutes • Proper installation is available at extra cost from your dealer, by visiting our Website at ge.com (in Canada at : geappliances.ca BEFORE YOU BEGIN Read these instructions for local inspector's use. • IMPORTANT - TOOLS...
Use and Care Manual
Page 24
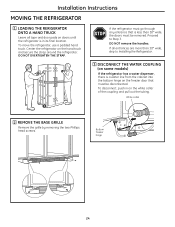
... Bottom freezer hinge 24 To move the refrigerator, use a padded hand truck. Center the refrigerator on the white collar of the coupling and pull out the tubing. Proceed to Installing the Refrigerator. 3 DISCONNECT THE WATER COUPLING (on some models) If the refrigerator has a water dispenser, there is ...a water line from the cabinet into the bottom hinge on doors until the refrigerator is less than 38″ wide, skip to...
... Bottom freezer hinge 24 To move the refrigerator, use a padded hand truck. Center the refrigerator on the white collar of the coupling and pull out the tubing. Proceed to Installing the Refrigerator. 3 DISCONNECT THE WATER COUPLING (on some models) If the refrigerator has a water dispenser, there is ...a water line from the cabinet into the bottom hinge on doors until the refrigerator is less than 38″ wide, skip to...
Use and Care Manual
Page 25
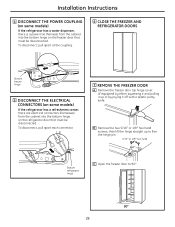
...that must be disconnected. To disconnect, pull apart at the coupling. 6 CLOSE THE FREEZER AND REFRIGERATOR DOORS Bottom freezer hinge 5 DISCONNECT THE ELECTRICAL CONNECTORS (on some models) If the refrigerator has a water dispenser, there is a power line (harness) from the cabinet into the ...bottom hinge on the refrigerator door that must be disconnected. B Remove the two 5/16″ or 1/8″ ...
...that must be disconnected. To disconnect, pull apart at the coupling. 6 CLOSE THE FREEZER AND REFRIGERATOR DOORS Bottom freezer hinge 5 DISCONNECT THE ELECTRICAL CONNECTORS (on some models) If the refrigerator has a water dispenser, there is a power line (harness) from the cabinet into the ...bottom hinge on the refrigerator door that must be disconnected. B Remove the two 5/16″ or 1/8″ ...
Use and Care Manual
Page 27
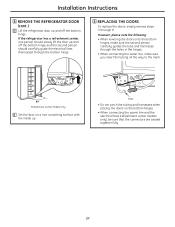
...on the bottom hinges. • When connecting the power line and the electrical lines (refreshment center models only), be sure that the connectors are seated together fully. 27 If the refrigerator has a refreshment center, one person should carefully guide the electrical lines (harnesses) through the bottom hinge... water line, make sure the second person carefully guides the tube and harnesses through 8. Installation Instructions 8 REMOVE THE REFRIGERATOR DOOR (cont .) D Lift the refrigerator door up and off the bottom hinge and the second person should slowly lift the door up .
...on the bottom hinges. • When connecting the power line and the electrical lines (refreshment center models only), be sure that the connectors are seated together fully. 27 If the refrigerator has a refreshment center, one person should carefully guide the electrical lines (harnesses) through the bottom hinge... water line, make sure the second person carefully guides the tube and harnesses through 8. Installation Instructions 8 REMOVE THE REFRIGERATOR DOOR (cont .) D Lift the refrigerator door up and off the bottom hinge and the second person should slowly lift the door up .

