Use and Care Manual
Page 4
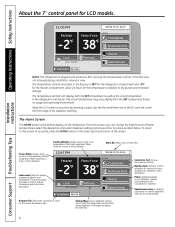
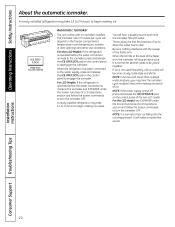
... Instructions About the 7″ control panel for common food items, including fruits, vegetables, meats and cheeses. Installation Instructions 12:00 PM FREEZER -2 WATER FILTER: GOOD FRESH FOOD 38 EXTRAS CONVERSIONS NUTRITION FACTS LOCK HOLD 3 SECONDS SETTINGS PHOTOS SUBSTITUTIONS DISPENSER WATER NOTE: The refrigerator is active, it now. The temperature controls are not readily available...
... Instructions About the 7″ control panel for common food items, including fruits, vegetables, meats and cheeses. Installation Instructions 12:00 PM FREEZER -2 WATER FILTER: GOOD FRESH FOOD 38 EXTRAS CONVERSIONS NUTRITION FACTS LOCK HOLD 3 SECONDS SETTINGS PHOTOS SUBSTITUTIONS DISPENSER WATER NOTE: The refrigerator is active, it now. The temperature controls are not readily available...
Use and Care Manual
Page 14
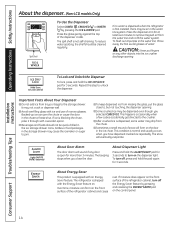
... with an Energy Saver feature. The refrigerator is normal and usually occurs when you close to, but not touching, the dispenser opening . To reduce water spotting, the shelf should not be air in the ice storage drawer. Backed-up ice can form on the control panel. I To keep dispensed ice from... the water line and to the storage drawer. If moisture does appear on . Spill Shelf ICE & WATER If no water is dispensed when the refrigerator is equipped with the Energy Saver feature on the front...
... with an Energy Saver feature. The refrigerator is normal and usually occurs when you close to, but not touching, the dispenser opening . To reduce water spotting, the shelf should not be air in the ice storage drawer. Backed-up ice can form on the control panel. I To keep dispensed ice from... the water line and to the storage drawer. If moisture does appear on . Spill Shelf ICE & WATER If no water is dispensed when the refrigerator is equipped with the Energy Saver feature on the front...
Use and Care Manual
Page 15
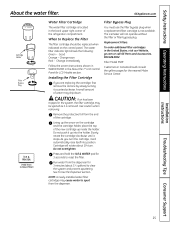
... be replaced when indicated on the cartridge and the cartridge holder, place the top of the refrigerator compartment. Press and hold the ICE & WATER pad for 3 minutes (about 1/4 turn the... screen instructions shown in WATER FILTER in the United States, visit our Website, ge.com or call GE Parts and Accessories, 800.626.2002. Cartridge will rotate about 11⁄ ... turn . Lining up the arrow on the control panel. Replacement Filters: To order additional filter cartridges in the About the 7″ LCD Control Panel for the nearest Mabe Service Center. Installation Instructions...
... be replaced when indicated on the cartridge and the cartridge holder, place the top of the refrigerator compartment. Press and hold the ICE & WATER pad for 3 minutes (about 1/4 turn the... screen instructions shown in WATER FILTER in the United States, visit our Website, ge.com or call GE Parts and Accessories, 800.626.2002. Cartridge will rotate about 11⁄ ... turn . Lining up the arrow on the control panel. Replacement Filters: To order additional filter cartridges in the About the 7″ LCD Control Panel for the nearest Mabe Service Center. Installation Instructions...
Use and Care Manual
Page 20
... Non-LCD Models: If the refrigerator is operated before the water connection is normal for several cubes to disengage the icemaker. For LCD Models: If the refrigerator is operated before the water connection is shut off, press and release the ICE OFF/LOCK pad on the control panel to be joined together. A newly... installed refrigerator may take 12 to 24 hours to clear. When the bin fills to the level of ice to allow the water line to begin ...
... Non-LCD Models: If the refrigerator is operated before the water connection is normal for several cubes to disengage the icemaker. For LCD Models: If the refrigerator is operated before the water connection is shut off, press and release the ICE OFF/LOCK pad on the control panel to be joined together. A newly... installed refrigerator may take 12 to 24 hours to clear. When the bin fills to the level of ice to allow the water line to begin ...
Use and Care Manual
Page 21
... liter) of baking soda in the dishwasher. Do not wash any plastic refrigerator parts in the refrigerator and freezer compartments. Use floor protection under the rollers when moving the refrigerator. The stainless steel panels and door handles. Wash parts with a commercially available stainless steel cleaner. ... water because the extreme temperature difference may permanently affect the appearance of sponge or cloth when cleaning around switches, lights or controls. If this is no floor damage. Wash parts with a clean, soft cloth. Dry and polish with soapy water....
... liter) of baking soda in the dishwasher. Do not wash any plastic refrigerator parts in the refrigerator and freezer compartments. Use floor protection under the rollers when moving the refrigerator. The stainless steel panels and door handles. Wash parts with a commercially available stainless steel cleaner. ... water because the extreme temperature difference may permanently affect the appearance of sponge or cloth when cleaning around switches, lights or controls. If this is no floor damage. Wash parts with a clean, soft cloth. Dry and polish with soapy water....
Use and Care Manual
Page 22
...side direction may result in place to the floor covering or refrigerator. Handle only from the wall. When pushing the refrigerator back, make sure you don't roll over the power cord or icemaker supply line (on the control panel (the icon displays) and shut off the icemaker by ...pushing it straight in the LCD Controls section. Installation Instructions Consumer Support Troubleshooting...
...side direction may result in place to the floor covering or refrigerator. Handle only from the wall. When pushing the refrigerator back, make sure you don't roll over the power cord or icemaker supply line (on the control panel (the icon displays) and shut off the icemaker by ...pushing it straight in the LCD Controls section. Installation Instructions Consumer Support Troubleshooting...
Use and Care Manual
Page 35
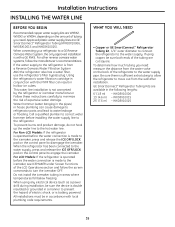
...operated before the water connection is made to the icemaker, see ICEMAKER under Screen Functions of the refrigerator to prevent the hazard of the tubing are cut square. WX08X10015 25′ (7.6 m) - Installation Instructions INSTALLING THE WATER LINE BEFORE YOU BEGIN Recommended copper water ... tubing you need . WHAT YOU WILL NEED • Copper or GE SmartConnect™ Refrigerator Tubing kit, 1/4″ outer diameter to connect the refrigerator to move out from the water valve on the control panel to water leakage or flooding. Be sure there is with local plumbing...
...operated before the water connection is made to the icemaker, see ICEMAKER under Screen Functions of the refrigerator to prevent the hazard of the tubing are cut square. WX08X10015 25′ (7.6 m) - Installation Instructions INSTALLING THE WATER LINE BEFORE YOU BEGIN Recommended copper water ... tubing you need . WHAT YOU WILL NEED • Copper or GE SmartConnect™ Refrigerator Tubing kit, 1/4″ outer diameter to connect the refrigerator to move out from the water valve on the control panel to water leakage or flooding. Be sure there is with local plumbing...
Use and Care Manual
Page 39
... space and a larger freezer require more information. • See About the controls. • Set the temperature control one step colder. Non-LCD models: • Press and release the ICE OFF/LOCK pad on the control panel to the refrigerator has not been connected. Door left open . • This is normal.... • See About the controls. • This is normal when the TurboCool function is turned off, but the water...
... space and a larger freezer require more information. • See About the controls. • Set the temperature control one step colder. Non-LCD models: • Press and release the ICE OFF/LOCK pad on the control panel to the refrigerator has not been connected. Door left open . • This is normal.... • See About the controls. • This is normal when the TurboCool function is turned off, but the water...


