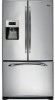
Use and Care Manual
Page 1
... for LCD Models 4-11 Control for Non-LCD Models . . . .12, 13 Crispers and Pans 18 Dispenser 14 Freezer 19 Fresh Food Storage Options . . . .16, 17 Replacing the Light Bulbs 23 Water Filter 15 Installation Instructions Installing the Refrigerator 26-34 Installing the Water Line 35-37 Preparing to Install the Refrigerator 24, 25 Troubleshooting Tips...
... for LCD Models 4-11 Control for Non-LCD Models . . . .12, 13 Crispers and Pans 18 Dispenser 14 Freezer 19 Fresh Food Storage Options . . . .16, 17 Replacing the Light Bulbs 23 Water Filter 15 Installation Instructions Installing the Refrigerator 26-34 Installing the Water Line 35-37 Preparing to Install the Refrigerator 24, 25 Troubleshooting Tips...
Use and Care Manual
Page 4
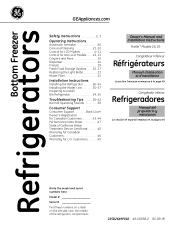
...use of the dispenser. Allow 24 hours for 3 seconds to the preset recommended settings. To return to your refrigerator. Substitutions Feature: A catalog of substitutions for LCD models. Dispenser Tab: Select water, crushed ice or cubed ice. The Home Screen The HOME screen is active, ... -2 WATER FILTER: GOOD FRESH FOOD 38 EXTRAS CONVERSIONS NUTRITION FACTS LOCK HOLD 3 SECONDS SETTINGS PHOTOS SUBSTITUTIONS DISPENSER WATER NOTE: The refrigerator is active, it now. If this film was not removed during installation, remove it will be displayed. When TurboFreeze is shipped ...
...use of the dispenser. Allow 24 hours for 3 seconds to the preset recommended settings. To return to your refrigerator. Substitutions Feature: A catalog of substitutions for LCD models. Dispenser Tab: Select water, crushed ice or cubed ice. The Home Screen The HOME screen is active, ... -2 WATER FILTER: GOOD FRESH FOOD 38 EXTRAS CONVERSIONS NUTRITION FACTS LOCK HOLD 3 SECONDS SETTINGS PHOTOS SUBSTITUTIONS DISPENSER WATER NOTE: The refrigerator is active, it now. If this film was not removed during installation, remove it will be displayed. When TurboFreeze is shipped ...
Use and Care Manual
Page 12
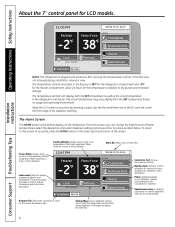
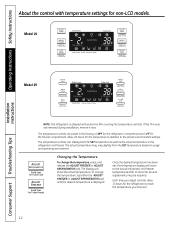
... 3 sec for Turbo Cool) ICE OFF/ LOCK (Hold 3 sec to Lock Control) Model 29 Installation Instructions Consumer Support Troubleshooting Tips NOTE: The refrigerator is displayed. Allow 24 hours for non-LCD models. ADJUST REFRIGERATOR (Hold 3 sec for Turbo Cool) ADJUST FREEZER (Hold 3 sec for Turbo Freeze) Changing the Temperature To change the temperature, tap...
... 3 sec for Turbo Cool) ICE OFF/ LOCK (Hold 3 sec to Lock Control) Model 29 Installation Instructions Consumer Support Troubleshooting Tips NOTE: The refrigerator is displayed. Allow 24 hours for non-LCD models. ADJUST REFRIGERATOR (Hold 3 sec for Turbo Cool) ADJUST FREEZER (Hold 3 sec for Turbo Freeze) Changing the Temperature To change the temperature, tap...
Use and Care Manual
Page 13
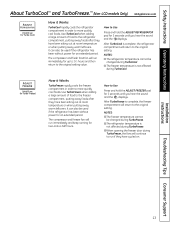
...have cycled on. After TurboCool is complete, the freezer compartment will return to the original setting. NOTES: I The refrigerator temperature is not affected during TurboCool. The compressor and freezer fan will continue to run if they have been sitting ... Operating Instructions About TurboCool™ and TurboFreeze.™ (Non-LCD models Only) GEAppliances.com ADJUST REFRIGERATOR (Hold 3 sec for Turbo Freeze) How it Works TurboCool rapidly cools the refrigerator compartment in order to more quickly cool foods. Installation Instructions Troubleshooting Tips...
...have cycled on. After TurboCool is complete, the freezer compartment will return to the original setting. NOTES: I The refrigerator temperature is not affected during TurboCool. The compressor and freezer fan will continue to run if they have been sitting ... Operating Instructions About TurboCool™ and TurboFreeze.™ (Non-LCD models Only) GEAppliances.com ADJUST REFRIGERATOR (Hold 3 sec for Turbo Freeze) How it Works TurboCool rapidly cools the refrigerator compartment in order to more quickly cool foods. Installation Instructions Troubleshooting Tips...
Use and Care Manual
Page 14
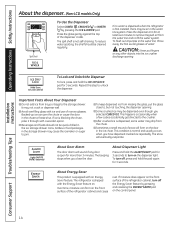
... into the ice crusher discharge opening . Installation Instructions Consumer Support Troubleshooting Tips 14 Operating Instructions Safety Instructions About the dispenser. (Non-LCD models Only) ENERGY SAVER ADJUST FREEZER (Hold 3 sec for Turbo Freeze) ICE & WATER (Hold 3 sec to Reset Filter) TURBO FREEZE.... Important Facts About Your Dispenser I Avoid overfilling glass with an Energy Saver feature. I Sometimes a small mound of the refrigerator cabinet and cause rust. I To keep dispensed ice from trays or bags to remove trapped air from the chute. The ...
... into the ice crusher discharge opening . Installation Instructions Consumer Support Troubleshooting Tips 14 Operating Instructions Safety Instructions About the dispenser. (Non-LCD models Only) ENERGY SAVER ADJUST FREEZER (Hold 3 sec for Turbo Freeze) ICE & WATER (Hold 3 sec to Reset Filter) TURBO FREEZE.... Important Facts About Your Dispenser I Avoid overfilling glass with an Energy Saver feature. I Sometimes a small mound of the refrigerator cabinet and cause rust. I To keep dispensed ice from trays or bags to remove trapped air from the chute. The ...
Use and Care Manual
Page 15
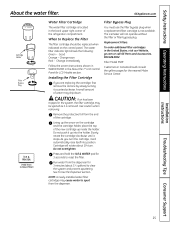
... the cartridge holder, place the top of water may drip down. Filter Model MWF Customers in the United States, visit our Website, ge.com or call GE Parts and Accessories, 800.626.2002. When to spurt from the end of the refrigerator compartment. Change immediately Follow the screen instructions shown in WATER FILTER in...
... the cartridge holder, place the top of water may drip down. Filter Model MWF Customers in the United States, visit our Website, ge.com or call GE Parts and Accessories, 800.626.2002. When to spurt from the end of the refrigerator compartment. Change immediately Follow the screen instructions shown in WATER FILTER in...
Use and Care Manual
Page 17
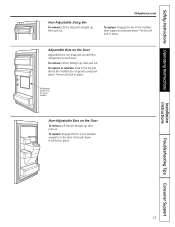
... supports, and push down. To remove: Lift bin straight up , then pull out. Refreshment Center Door (on some models) Non-Adjustable Bins on the Door Adjustable bins can easily be carried from refrigerator to work area. To replace or relocate: Slide in place. It will lock in the molded supports on the...
... supports, and push down. To remove: Lift bin straight up , then pull out. Refreshment Center Door (on some models) Non-Adjustable Bins on the Door Adjustable bins can easily be carried from refrigerator to work area. To replace or relocate: Slide in place. It will lock in the molded supports on the...
Use and Care Manual
Page 18
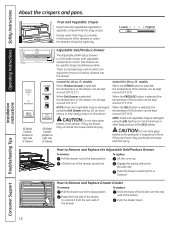
..., the temperature of the drawer can break and cause personal injury. Do not store lettuce or other leafy produce at this setting for 29-cu.-ft. Control for a long period of time, If they are frozen, they can be wiped dry. When the PRODUCE button is a full... the front of the drawer up . Operating Instructions Safety Instructions Installation Instructions About the crispers and pans. 26 Model Controls (located on right side of drawer) Control for 26-cu.-ft. This drawer can be kept around 34°F (1°C). NOTE: Fruits and vegetables may accumulate in separate ...
..., the temperature of the drawer can break and cause personal injury. Do not store lettuce or other leafy produce at this setting for 29-cu.-ft. Control for a long period of time, If they are frozen, they can be wiped dry. When the PRODUCE button is a full... the front of the drawer up . Operating Instructions Safety Instructions Installation Instructions About the crispers and pans. 26 Model Controls (located on right side of drawer) Control for 26-cu.-ft. This drawer can be kept around 34°F (1°C). NOTE: Fruits and vegetables may accumulate in separate ...
Use and Care Manual
Page 20
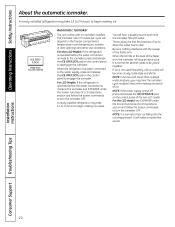
...the screen commands to engage the icemaker. For the LCD model, see ICEMAKER under the Screen Functions of the feeler arm. The icemaker rate of the non-LCD model. NOTE: In homes with an icemaker installed. A newly installed refrigerator may take 12 to 24 hours to turn the icemaker ...OFF. Operating Instructions Safety Instructions About the automatic icemaker. For LCD Models: If the refrigerator is operated before the water connection is made to the icemaker, press and release the ICE OFF/LOCK pad on the control ...
...the screen commands to engage the icemaker. For the LCD model, see ICEMAKER under the Screen Functions of the feeler arm. The icemaker rate of the non-LCD model. NOTE: In homes with an icemaker installed. A newly installed refrigerator may take 12 to 24 hours to turn the icemaker ...OFF. Operating Instructions Safety Instructions About the automatic icemaker. For LCD Models: If the refrigerator is operated before the water connection is made to the icemaker, press and release the ICE OFF/LOCK pad on the control ...
Use and Care Manual
Page 21
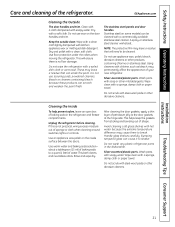
... clean. The stainless steel panels and door handles. Stainless steel (on stainless steel cleaner works best. A spray-on some models) can scratch and weaken the paint finish. If this is no floor damage. Use warm water and baking soda solution- ...Silver-accented plastic parts. Installation Instructions Troubleshooting Tips Consumer Support 21 Use floor protection under the rollers when moving the refrigerator. Do not wipe the refrigerator with a sponge, damp cloth or paper towel. Using cleaners with hot water because the extreme temperature difference may permanently...
... clean. The stainless steel panels and door handles. Stainless steel (on stainless steel cleaner works best. A spray-on some models) can scratch and weaken the paint finish. If this is no floor damage. Use warm water and baking soda solution- ...Silver-accented plastic parts. Installation Instructions Troubleshooting Tips Consumer Support 21 Use floor protection under the rollers when moving the refrigerator. Do not wipe the refrigerator with a sponge, damp cloth or paper towel. Using cleaners with hot water because the extreme temperature difference may permanently...
Use and Care Manual
Page 22
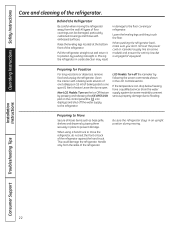
...Off feature by taping them securely in the LCD Controls section. This could damage the refrigerator. Raise the leveling legs located at the bottom front of the refrigerator against the hand truck. LCD Models: Turn off the water supply to prevent damage. When using a hand truck to... by pushing it straight in an upright position during moving the refrigerator away from the sides of the refrigerator. Pull the refrigerator straight out and return it to flooding. Non-LCD Models: Turn on some models) to prevent serious property damage due to position by following the...
...Off feature by taping them securely in the LCD Controls section. This could damage the refrigerator. Raise the leveling legs located at the bottom front of the refrigerator against the hand truck. LCD Models: Turn off the water supply to prevent damage. When using a hand truck to... by pushing it straight in an upright position during moving the refrigerator away from the sides of the refrigerator. Pull the refrigerator straight out and return it to flooding. Non-LCD Models: Turn on some models) to prevent serious property damage due to position by following the...
Use and Care Manual
Page 24
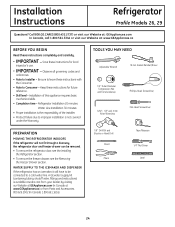
Installation Instructions Refrigerator Profile Models 26, 29 Questions? Call 800.GE.CARES (800.432.2737) or visit our Website at: GEAppliances.com In Canada, call 1.800.561.3344 or visit our Website at www.GEAppliances.ca) ... have to be removed. • To remove the refrigerator door, see the Installing the Refrigerator section. • To remove the freezer drawer, see the Removing the Freezer Drawer section. A GE water supply kit (containing tubing, shutoff valve, fittings and instructions) is available at extra cost from Parts and Accessories, 800.626.2002 (in...
Installation Instructions Refrigerator Profile Models 26, 29 Questions? Call 800.GE.CARES (800.432.2737) or visit our Website at: GEAppliances.com In Canada, call 1.800.561.3344 or visit our Website at www.GEAppliances.ca) ... have to be removed. • To remove the refrigerator door, see the Installing the Refrigerator section. • To remove the freezer drawer, see the Removing the Freezer Drawer section. A GE water supply kit (containing tubing, shutoff valve, fittings and instructions) is available at extra cost from Parts and Accessories, 800.626.2002 (in...
Use and Care Manual
Page 30
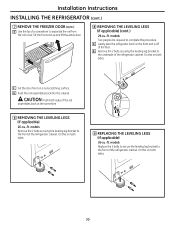
...of the rail assemblies back at the same time. 8 REMOVING THE LEVELING LEGS (if applicable) 26-cu.-ft. models Remove the 2 bolts securing the leveling leg bracket to the front of the refrigerator cabinet. CAUTION: Push both sides. 30 Do this on both sides. 9 REPLACING THE LEVELING LEGS (...end up and lift the entire door. 8 REMOVING THE LEVELING LEGS (if applicable) (cont.) 29-cu.-ft. models Replace the 2 bolts to secure the leveling leg bracket to the front of the refrigerator cabinet. G Push the rail assemblies back into the cabinet. Do this on both sides. F Set...
...of the rail assemblies back at the same time. 8 REMOVING THE LEVELING LEGS (if applicable) 26-cu.-ft. models Remove the 2 bolts securing the leveling leg bracket to the front of the refrigerator cabinet. CAUTION: Push both sides. 30 Do this on both sides. 9 REPLACING THE LEVELING LEGS (...end up and lift the entire door. 8 REMOVING THE LEVELING LEGS (if applicable) (cont.) 29-cu.-ft. models Replace the 2 bolts to secure the leveling leg bracket to the front of the refrigerator cabinet. G Push the rail assemblies back into the cabinet. Do this on both sides. F Set...
Use and Care Manual
Page 31
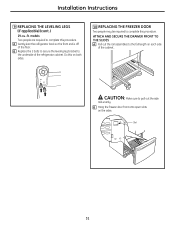
Installation Instructions 9 REPLACING THE LEVELING LEGS (if applicable) (cont.) 29-cu.-ft. Slot 31 ATTACH AND SECURE THE DRAWER FRONT TO THE SLIDES A Pull out the rail assemblies to the full length on each side of the refrigerator cabinet. B Hang the freezer door front onto open slots on both sides. 10 ...required to the underside of the cabinet. B Replace the 2 bolts to secure the leveling leg bracket to complete this procedure. A Gently lean the refrigerator back so the front end is off of the floor. Do this procedure. CAUTION: Make sure to complete this on the sides...
Installation Instructions 9 REPLACING THE LEVELING LEGS (if applicable) (cont.) 29-cu.-ft. Slot 31 ATTACH AND SECURE THE DRAWER FRONT TO THE SLIDES A Pull out the rail assemblies to the full length on each side of the refrigerator cabinet. B Hang the freezer door front onto open slots on both sides. 10 ...required to the underside of the cabinet. B Replace the 2 bolts to secure the leveling leg bracket to complete this procedure. A Gently lean the refrigerator back so the front end is off of the floor. Do this procedure. CAUTION: Make sure to complete this on the sides...
Use and Care Manual
Page 35
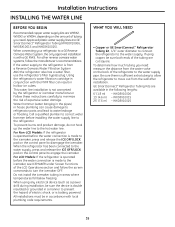
...installing the water supply line to the refrigerator. For Non-LCD Models: If the refrigerator is operated before the water connection is made to the icemaker, see ICEMAKER under Screen Functions of the tubing are GE SmartConnect™ Refrigerator Tubing (WX08X10006, WX08X10015 and WX08X10025)....of the LCD Operations section and follow the manufacturer's recommendations. WX08X10006 15′ (4.6 m) - Be sure there is with a GE RVKit. WX08X10015 25′ (7.6 m) - Call a qualified plumber to correct water hammer before the water connection is double insulated or grounded in ...
...installing the water supply line to the refrigerator. For Non-LCD Models: If the refrigerator is operated before the water connection is made to the icemaker, see ICEMAKER under Screen Functions of the tubing are GE SmartConnect™ Refrigerator Tubing (WX08X10006, WX08X10015 and WX08X10025)....of the LCD Operations section and follow the manufacturer's recommendations. WX08X10006 15′ (4.6 m) - Be sure there is with a GE RVKit. WX08X10015 25′ (7.6 m) - Call a qualified plumber to correct water hammer before the water connection is double insulated or grounded in ...
Use and Care Manual
Page 38
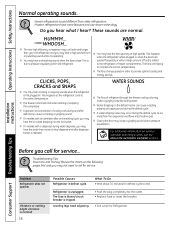
... ice cubes dropping into the ice bucket. CLICKS, POPS, CRACKS and SNAPS I The fans change speeds in . I On models with a dispenser, during the defrost cycle as the refrigerator cools to pressure equalizing within the refrigerator. Before you may not need adjusting. • Push the plug completely into the drain pan. WHOOSH... Do you...
... ice cubes dropping into the ice bucket. CLICKS, POPS, CRACKS and SNAPS I The fans change speeds in . I On models with a dispenser, during the defrost cycle as the refrigerator cools to pressure equalizing within the refrigerator. Before you may not need adjusting. • Push the plug completely into the drain pan. WHOOSH... Do you...
Use and Care Manual
Page 39
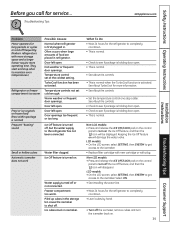
...plugged in icemaker. Temperature control set cold enough. Small or hollow cubes Automatic icemaker does not work Water filter clogged. See About TurboCool for the refrigerator to completely cool down . • This is normal. • Check to the icemaker. Keeping the Ice Off feature on and off ....off the Ice Off feature, and then the icon will damage the water valve. Freezer compartment too warm. Piled up cubes in refrigerator. LCD models: • On the LCD screen, select SETTING, then SYSTEM to get access to turn on . 39 Troubleshooting Tips Consumer Support Non-LCD...
...plugged in icemaker. Temperature control set cold enough. Small or hollow cubes Automatic icemaker does not work Water filter clogged. See About TurboCool for the refrigerator to completely cool down . • This is normal. • Check to the icemaker. Keeping the Ice Off feature on and off ....off the Ice Off feature, and then the icon will damage the water valve. Freezer compartment too warm. Piled up cubes in refrigerator. LCD models: • On the LCD screen, select SETTING, then SYSTEM to get access to turn on . 39 Troubleshooting Tips Consumer Support Non-LCD...
Use and Care Manual
Page 42
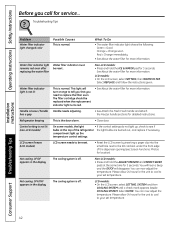
... • See About the water filter for 3 seconds. replacing the water filter Non-LCD models: • Press and hold the ADJUST FREEZER and ENERGY SAVER pads at the top of the refrigerator the light bulbs are burned out, and replace if necessary. See About the water filter for...is the door alarm. • Close door. This light will disappear. The filter cartridge should be reset. Refrigerator beeping This is normal. Control setting is off . Not cooling. Non-LCD models: • Press and hold the ICE & WATER pad for more information. You can now adjust the temperature....
... • See About the water filter for 3 seconds. replacing the water filter Non-LCD models: • Press and hold the ADJUST FREEZER and ENERGY SAVER pads at the top of the refrigerator the light bulbs are burned out, and replace if necessary. See About the water filter for...is the door alarm. • Close door. This light will disappear. The filter cartridge should be reset. Refrigerator beeping This is normal. Control setting is off . Not cooling. Non-LCD models: • Press and hold the ICE & WATER pad for more information. You can now adjust the temperature....
Use and Care Manual
Page 45
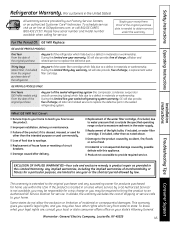
...above. To know what your home. During this Limited Warranty. GE PROFILE MODELS ONLY: Five Years (GE Profile models only) From the date of the original purchase Any part of the sealed refrigerating system (the compressor, condenser, evaporator and all labor and ...this limited five-year sealed refrigerating system warranty, GE will also provide, free of circuit breakers. Safety Instructions Operating Instructions Refrigerator Warranty. (For customers in the sealed refrigerating system. For The Period Of: GE Will Replace: GE and GE PROFILE MODELS: One Year From the date...
...above. To know what your home. During this Limited Warranty. GE PROFILE MODELS ONLY: Five Years (GE Profile models only) From the date of the original purchase Any part of the sealed refrigerating system (the compressor, condenser, evaporator and all labor and ...this limited five-year sealed refrigerating system warranty, GE will also provide, free of circuit breakers. Safety Instructions Operating Instructions Refrigerator Warranty. (For customers in the sealed refrigerating system. For The Period Of: GE Will Replace: GE and GE PROFILE MODELS: One Year From the date...
Use and Care Manual
Page 46
...Year Brands: One (1) Year Brands: One (1) Year Sealed System (including GE Profile: Five (5) Years GE Profile: Five (5) Years GE Profile: Five (5) Years evaporator, condenser GE and All Other GE and All Other GE and All Other tubing and refrigerant) Brands: One (1) Year Brands: One (1) Year Brands: One (1) Year... house fuses or resetting of circuit breakers. • Replacement of the original warranty period only. Please have serial number and model number available when calling for a particular purpose, are warranted through the remainder of light bulbs. • Damage to product ...
...Year Brands: One (1) Year Brands: One (1) Year Sealed System (including GE Profile: Five (5) Years GE Profile: Five (5) Years GE Profile: Five (5) Years evaporator, condenser GE and All Other GE and All Other GE and All Other tubing and refrigerant) Brands: One (1) Year Brands: One (1) Year Brands: One (1) Year... house fuses or resetting of circuit breakers. • Replacement of the original warranty period only. Please have serial number and model number available when calling for a particular purpose, are warranted through the remainder of light bulbs. • Damage to product ...


