
User Guide
Page 4
...these measures do not eliminate the interference, please consult your body. FCC RF Radiation Exposure Statement This equipment complies with the DECT 6.0 standard which operates in conjunction with any other accessories may be installed and operated with a minimum distance of this equipment...Resolve Radio/TV Interference Problems." Use of this product. Government Printing Office, Washington, D.C. 20402. For body worn operation, this phone has been tested and meets the FCC RF exposure guidelines when used with the belt clip supplied with FCC RF exposure guidelines. Hearing...
...these measures do not eliminate the interference, please consult your body. FCC RF Radiation Exposure Statement This equipment complies with the DECT 6.0 standard which operates in conjunction with any other accessories may be installed and operated with a minimum distance of this equipment...Resolve Radio/TV Interference Problems." Use of this product. Government Printing Office, Washington, D.C. 20402. For body worn operation, this phone has been tested and meets the FCC RF exposure guidelines when used with the belt clip supplied with FCC RF exposure guidelines. Hearing...
User Guide
Page 5
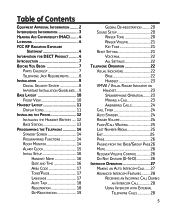
... Compatibility (HAC)......... 4 Licensing 4 FCC RF Radiation Exposure Statement 4 Information for DECT Product.......... 4 Introduction 7 Before You Begin 7 Parts Checklist 7 Telephone Jack Requirements 8 Installation 8 Digital Security System 8 Important Installation Guidelines..... 9 Base Layout 10 Front View 10 Handset Layout 11 Display Icons 11 Installing the Phone 12 Installing the Handset Battery...... 12 Base Station 13 Programming...
... Compatibility (HAC)......... 4 Licensing 4 FCC RF Radiation Exposure Statement 4 Information for DECT Product.......... 4 Introduction 7 Before You Begin 7 Parts Checklist 7 Telephone Jack Requirements 8 Installation 8 Digital Security System 8 Important Installation Guidelines..... 9 Base Layout 10 Front View 10 Handset Layout 11 Display Icons 11 Installing the Phone 12 Installing the Handset Battery...... 12 Base Station 13 Programming...
User Guide
Page 7
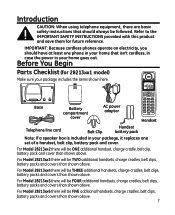
...power adaptor Handset Telephone line cord Belt Clip Handset battery pack Note: If a speaker box is included in your package, it replaces one phone in your home that should have at least one set of a handset, belt clip, battery pack and cover. For Model 28213xx2 there ...For Model 28213xx6 there will be ONE additional handset, charge cradle, belt clip, battery pack and cover than shown above . IMPORTANT: Because cordless phones operate on electricity, you should always be FIVE additional handsets, charge cradles, belt clips, battery packs and covers than shown above . Refer to ...
...power adaptor Handset Telephone line cord Belt Clip Handset battery pack Note: If a speaker box is included in your package, it replaces one phone in your home that should have at least one set of a handset, belt clip, battery pack and cover. For Model 28213xx2 there ...For Model 28213xx6 there will be ONE additional handset, charge cradle, belt clip, battery pack and cover than shown above . IMPORTANT: Because cordless phones operate on electricity, you should always be FIVE additional handsets, charge cradles, belt clips, battery packs and covers than shown above . Refer to ...

User Guide
Page 8
To minimize or prevent such interference, the base of a TV, microwave ovens, or VCR. jack Installation Digital Security System Your cordless phone uses a digital security system to protect against false ringing, unauthorized access, and charges to the owner's manual for these...communications devices may cause or receive interference with each other and/or your home. Typical devices that may also use the 1.9GHz DECT frequency for communication include wireless audio/video senders, wireless computer networks, multi-handset cordless telephone systems, and some long-range cordless ...
To minimize or prevent such interference, the base of a TV, microwave ovens, or VCR. jack Installation Digital Security System Your cordless phone uses a digital security system to protect against false ringing, unauthorized access, and charges to the owner's manual for these...communications devices may cause or receive interference with each other and/or your home. Typical devices that may also use the 1.9GHz DECT frequency for communication include wireless audio/video senders, wireless computer networks, multi-handset cordless telephone systems, and some long-range cordless ...

User Guide
Page 11
Handset Layout Voice Mail Waiting Indicator (VMWI)/ Visual Ringer display TALK/SPEAKER (button) flash (button) delete/int/conf (delete/intercom/ conference) CALLER ID-VOL 5 or 6 (caller id/volume up or down button) END (button) Headphone jack mute/menu OK (button) phone book (button) format/redial (button) *tone/ (button) #pause/ringer (button) Display Icons microphone Signal strength Speakerphone Message Voicemail SMS Ringer OFF/DND ON Alarm ON New Call Battery AM AM PM PM 11
Handset Layout Voice Mail Waiting Indicator (VMWI)/ Visual Ringer display TALK/SPEAKER (button) flash (button) delete/int/conf (delete/intercom/ conference) CALLER ID-VOL 5 or 6 (caller id/volume up or down button) END (button) Headphone jack mute/menu OK (button) phone book (button) format/redial (button) *tone/ (button) #pause/ringer (button) Display Icons microphone Signal strength Speakerphone Message Voicemail SMS Ringer OFF/DND ON Alarm ON New Call Battery AM AM PM PM 11

User Guide
Page 12
... the battery pack. 5. Locate battery and battery door which are packaged together inside the compartment. Plug the battery pack cord into place. 12 Installing the Phone Installing the Handset Battery NOTE: You must connect the handset battery before use only the Thomson Inc. CAUTION: To reduce the risk of the handset. 3.
... the battery pack. 5. Locate battery and battery door which are packaged together inside the compartment. Plug the battery pack cord into place. 12 Installing the Phone Installing the Handset Battery NOTE: You must connect the handset battery before use only the Thomson Inc. CAUTION: To reduce the risk of the handset. 3.
User Guide
Page 13
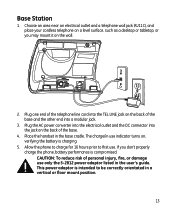
... the back of personal injury, fire, or damage use . Place the handset in the user's guide. CAUTION: To reduce risk of the base. 4. Allow the phone to charge for 16 hours prior to be correctly orientated in use indicator turns on the wall. 2. Base Station 1. This power adaptor is intended to... outlet and a telephone wall jack (RJ11C), and place your cordless telephone on a level surface, such as a desktop or tabletop, or you don't properly charge the phone, battery performance is charging. 5.
... the back of personal injury, fire, or damage use . Place the handset in the user's guide. CAUTION: To reduce risk of the base. 4. Allow the phone to charge for 16 hours prior to be correctly orientated in use indicator turns on the wall. 2. Base Station 1. This power adaptor is intended to... outlet and a telephone wall jack (RJ11C), and place your cordless telephone on a level surface, such as a desktop or tabletop, or you don't properly charge the phone, battery performance is charging. 5.

User Guide
Page 14
...-volume (6 or 5) button to scroll to enter ROOM MONITOR menu. Press the mute/menu OK button to ROOM MONITOR. 4. Make sure your phone is OFF (not in main menu: Phone Book, Room Monitor, Alarm Clock, Initial Setup, Sound Setup, Reset Settings. The screen displays ROOM MONITOR EXTENSION?. 14 Room Monitor (applicable only...
...-volume (6 or 5) button to scroll to enter ROOM MONITOR menu. Press the mute/menu OK button to ROOM MONITOR. 4. Make sure your phone is OFF (not in main menu: Phone Book, Room Monitor, Alarm Clock, Initial Setup, Sound Setup, Reset Settings. The screen displays ROOM MONITOR EXTENSION?. 14 Room Monitor (applicable only...

User Guide
Page 15
... monitoring mode, the handsets will hear a confirmation tone and return to select ON or OFF. 5. Press mute/menu OK button to confirm. 6. NOTE: When this phone system is an incoming call . Make sure your phone is selected, then the screen displays SET ALARM TIME. The screen displays ON > OFF. 5.
... monitoring mode, the handsets will hear a confirmation tone and return to select ON or OFF. 5. Press mute/menu OK button to confirm. 6. NOTE: When this phone system is an incoming call . Make sure your phone is selected, then the screen displays SET ALARM TIME. The screen displays ON > OFF. 5.

User Guide
Page 16
... the sub-menu and return to the menu. Press the 5 key times for the letter M; Press the 7 key times for the letter H. Make sure your phone is stored in the display. For example, to enter the current date, (for the second letter L, and press the 1 key to the main menu. 3. press...
... the sub-menu and return to the menu. Press the 5 key times for the letter M; Press the 7 key times for the letter H. Make sure your phone is stored in the display. For example, to enter the current date, (for the second letter L, and press the 1 key to the main menu. 3. press...

User Guide
Page 20
... setting (1 through 10). Ringer Tone You may program the following items: Ringer Tone, Ringer Volume, Key Tone. Press mute/menu OK button to save your phone is OFF (not in use light flashes rapidly. 4. You will hear a sample of the unit. 2.
... setting (1 through 10). Ringer Tone You may program the following items: Ringer Tone, Ringer Volume, Key Tone. Press mute/menu OK button to save your phone is OFF (not in use light flashes rapidly. 4. You will hear a sample of the unit. 2.

User Guide
Page 21
... OK button to confirm and you turn the ringer OFF, the ringer off icon shows in the display. Press mute/menu OK button to your phone is OFF (not in the display. ON is the default setting. 4. LEVEL 5 is the default setting. 4. Key Tone From the Sound Setup Menu: 1. Reset Setting...
... OK button to confirm and you turn the ringer OFF, the ringer off icon shows in the display. Press mute/menu OK button to your phone is OFF (not in the display. ON is the default setting. 4. LEVEL 5 is the default setting. 4. Key Tone From the Sound Setup Menu: 1. Reset Setting...

User Guide
Page 23
... all of the handset flashes when you receive a new message from your service provider. VMWI / Visual Ringer Indicator on the top of the digits are using the speakerphone and want to switch to the speakerphone, press the TALK/SPEAKER button, press END button to select the desired record, ...receive a call and remain lit during a call . OR - When finished, press the END button to hang up to this service from your phone company. The keypad and CID will flash when there is received. Speakerphone Operation NOTE: If you are using the speakerphone, remain close to handset so the party...
... all of the handset flashes when you receive a new message from your service provider. VMWI / Visual Ringer Indicator on the top of the digits are using the speakerphone and want to switch to the speakerphone, press the TALK/SPEAKER button, press END button to select the desired record, ...receive a call and remain lit during a call . OR - When finished, press the END button to hang up to this service from your phone company. The keypad and CID will flash when there is received. Speakerphone Operation NOTE: If you are using the speakerphone, remain close to handset so the party...

User Guide
Page 24
... mode is selected, pick up the handset and press the TALK/SPEAKER button. 2. Answering Calls 1. Make sure the phone is automatically disconnected. LEVEL 5 is off the hook (during a call immediately. When the phone rings, pick up the handset from the charge cradle to answer the call . When finished, press END button to...
... mode is selected, pick up the handset and press the TALK/SPEAKER button. 2. Answering Calls 1. Make sure the phone is automatically disconnected. LEVEL 5 is off the hook (during a call immediately. When the phone rings, pick up the handset from the charge cradle to answer the call . When finished, press END button to...

User Guide
Page 25
...: 1. Flash/Call Waiting If you subscribe to the combined Call Waiting Caller ID service from the last three numbers that were dialed. 4. During a phone call, you will receive Caller ID information (if available) on hold. • To switch between the two calls, press the flash button. Last ... 2. Press the caller ID-volume (6) to quickly redial the number. Press the caller ID-volume (5) to review the oldest call and scroll to 20 digits long. NOTE: You may redial a number up to older calls (lower numbers). Press the TALK/SPEAKER button. Exit Press the END button to exit ...
...: 1. Flash/Call Waiting If you subscribe to the combined Call Waiting Caller ID service from the last three numbers that were dialed. 4. During a phone call, you will receive Caller ID information (if available) on hold. • To switch between the two calls, press the flash button. Last ... 2. Press the caller ID-volume (6) to quickly redial the number. Press the caller ID-volume (5) to review the oldest call and scroll to 20 digits long. NOTE: You may redial a number up to older calls (lower numbers). Press the TALK/SPEAKER button. Exit Press the END button to exit ...

User Guide
Page 26
... on the base. 2. VOL 1 is minimum and VOL 5 is not registered, follow the instructions in , or during call screening after the call is reached, the phone beeps twice. In the standby mode, press the do not disturb button on the telephone line cannot hear you, but you to turn off -line...
... on the base. 2. VOL 1 is minimum and VOL 5 is not registered, follow the instructions in , or during call screening after the call is reached, the phone beeps twice. In the standby mode, press the do not disturb button on the telephone line cannot hear you, but you to turn off -line...

User Guide
Page 30
...return to Call Waiting Caller ID Service. Receiving CID Records When you receive a call, the Caller ID information is calling while you are using the GE multi handset system, a beep indicates the presence of all handsets in the system. • When you hear the call waiting beep in the handset... receiver, press the flash button to answer the call. 30 This information can include the phone number, date, and time; or the name, phone number, date, and time. The Call Waiting Caller ID information will be displayed and stored in the history of a Call ...
...return to Call Waiting Caller ID Service. Receiving CID Records When you receive a call, the Caller ID information is calling while you are using the GE multi handset system, a beep indicates the presence of all handsets in the system. • When you hear the call waiting beep in the handset... receiver, press the flash button to answer the call. 30 This information can include the phone number, date, and time; or the name, phone number, date, and time. The Call Waiting Caller ID information will be displayed and stored in the history of a Call ...

User Guide
Page 31
... as in TALK mode). 2. Press the caller ID-volume (5) button to display the desired record. 3. Make sure the phone is OFF (not in the display. Reviewing CID Records As calls are not at any time. Use the caller ID-volume...digits Explanation Example Eleven digits long distance code "1 " +3-digit area code +7-digit telephone number. 1-317-888-8888 Ten digits 3-digit area code + 317-888-8888 7-digit telephone number. Available formats include: Number of the incoming caller's stored phone number before making the call ) is automatically deleted. Seven digits 7-digit...
... as in TALK mode). 2. Press the caller ID-volume (5) button to display the desired record. 3. Make sure the phone is OFF (not in the display. Reviewing CID Records As calls are not at any time. Use the caller ID-volume...digits Explanation Example Eleven digits long distance code "1 " +3-digit area code +7-digit telephone number. 1-317-888-8888 Ten digits 3-digit area code + 317-888-8888 7-digit telephone number. Available formats include: Number of the incoming caller's stored phone number before making the call ) is automatically deleted. Seven digits 7-digit...

User Guide
Page 32
...int/conf button to store the number. Storing CID Records in Internal Memory You may also store CID information in TALK mode). 2. Make sure the phone is non-numeric, the unit will display UNABLE TO STORE. Press delete/int/conf button to the desired CID record. 3. Use the caller ID-volume...menu. Press and hold the delete/int/conf button until the screen displays DELETE ALL?. NOTE: It is important that is OFF (not in the phone's internal memory. NOTE: Press the END button once to keep the previous setting (making no changes) and return to delete. 3. Deleting All CID ...
...int/conf button to store the number. Storing CID Records in Internal Memory You may also store CID information in TALK mode). 2. Make sure the phone is non-numeric, the unit will display UNABLE TO STORE. Press delete/int/conf button to the desired CID record. 3. Use the caller ID-volume...menu. Press and hold the delete/int/conf button until the screen displays DELETE ALL?. NOTE: It is important that is OFF (not in the phone's internal memory. NOTE: Press the END button once to keep the previous setting (making no changes) and return to delete. 3. Deleting All CID ...

User Guide
Page 33
... the mute/menu OK button to backspace and erase the wrong character(s) or number(s). 4. Add Records From Phonebook Sub-Menu: 1. each of 20-digit numbers and 14-character names (including spaces). Press the key times for the letter H. NOTE: If you make a mistake press the delete/int/conf... button to confirm, all records are shown in phone book for the letter I . The screen displays ENTER NAME. 3. Phonebook Each handset can contain a maximum of the number keys. press the key twice...
... the mute/menu OK button to backspace and erase the wrong character(s) or number(s). 4. Add Records From Phonebook Sub-Menu: 1. each of 20-digit numbers and 14-character names (including spaces). Press the key times for the letter H. NOTE: If you make a mistake press the delete/int/conf... button to confirm, all records are shown in phone book for the letter I . The screen displays ENTER NAME. 3. Phonebook Each handset can contain a maximum of the number keys. press the key twice...


