User Guide
Page 5
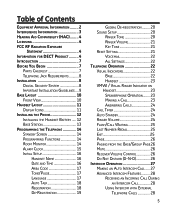
... for DECT Product.......... 4 Introduction 7 Before You Begin 7 Parts Checklist 7 Telephone Jack Requirements 8 Installation 8 Digital Security System 8 Important Installation Guidelines..... 9 Base Layout 10 Front View 10 Handset Layout 11 Display Icons 11 Installing the Phone 12 Installing the Handset Battery...... 12 Base Station 13 Programming the Telephone 14 Standby Screen 14 Programming Functions 14...
... for DECT Product.......... 4 Introduction 7 Before You Begin 7 Parts Checklist 7 Telephone Jack Requirements 8 Installation 8 Digital Security System 8 Important Installation Guidelines..... 9 Base Layout 10 Front View 10 Handset Layout 11 Display Icons 11 Installing the Phone 12 Installing the Handset Battery...... 12 Base Station 13 Programming the Telephone 14 Standby Screen 14 Programming Functions 14...
User Guide
Page 6
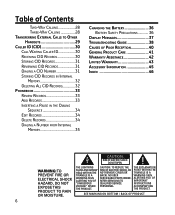
... Add Records 33 Inserting a Pause in the Dialing Sequence 34 Edit Records 34 Delete Records 34 Dialing a Number from Internal Memory 35 Changing the Battery 36 Battery Safety Precautions 36 Display Messages 37 Troubleshooting Guide 38 Causes of Poor Reception 40 General Product Care 41 Warranty Assistance 42 Limited Warranty 43 Accessory...
... Add Records 33 Inserting a Pause in the Dialing Sequence 34 Edit Records 34 Delete Records 34 Dialing a Number from Internal Memory 35 Changing the Battery 36 Battery Safety Precautions 36 Display Messages 37 Troubleshooting Guide 38 Causes of Poor Reception 40 General Product Care 41 Warranty Assistance 42 Limited Warranty 43 Accessory...
User Guide
Page 7
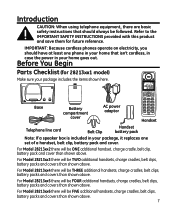
...cordless phones operate on electricity, you should have at least one set of a handset, belt clip, battery pack and cover. For Model 28213xx4 there will be followed. Before You Begin Parts Checklist (for future reference. For Model 28213xx3 there will be ONE additional handset, charge cradle, belt clip, battery...product and save them for 28213xx1 model) Make sure your package, it replaces one phone in your home that should always be TWO additional handsets, charge cradles, belt clips, battery packs and covers than shown above. For Model 28213xx5 there will be FIVE additional ...
...cordless phones operate on electricity, you should have at least one set of a handset, belt clip, battery pack and cover. For Model 28213xx4 there will be followed. Before You Begin Parts Checklist (for future reference. For Model 28213xx3 there will be ONE additional handset, charge cradle, belt clip, battery...product and save them for 28213xx1 model) Make sure your package, it replaces one phone in your home that should always be TWO additional handsets, charge cradles, belt clips, battery packs and covers than shown above. For Model 28213xx5 there will be FIVE additional ...
User Guide
Page 11
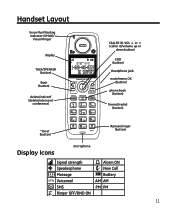
Handset Layout Voice Mail Waiting Indicator (VMWI)/ Visual Ringer display TALK/SPEAKER (button) flash (button) delete/int/conf (delete/intercom/ conference) CALLER ID-VOL 5 or 6 (caller id/volume up or down button) END (button) Headphone jack mute/menu OK (button) phone book (button) format/redial (button) *tone/ (button) #pause/ringer (button) Display Icons microphone Signal strength Speakerphone Message Voicemail SMS Ringer OFF/DND ON Alarm ON New Call Battery AM AM PM PM 11
Handset Layout Voice Mail Waiting Indicator (VMWI)/ Visual Ringer display TALK/SPEAKER (button) flash (button) delete/int/conf (delete/intercom/ conference) CALLER ID-VOL 5 or 6 (caller id/volume up or down button) END (button) Headphone jack mute/menu OK (button) phone book (button) format/redial (button) *tone/ (button) #pause/ringer (button) Display Icons microphone Signal strength Speakerphone Message Voicemail SMS Ringer OFF/DND ON Alarm ON New Call Battery AM AM PM PM 11
User Guide
Page 12
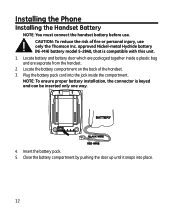
... it snaps into the jack inside a plastic bag and are separate from the handset. 2. Insert the battery pack. 5. Installing the Phone Installing the Handset Battery NOTE: You must connect the handset battery before use only the Thomson Inc. Locate the battery compartment on the back of fire or personal injury, use . NOTE: To ensure proper...
... it snaps into the jack inside a plastic bag and are separate from the handset. 2. Insert the battery pack. 5. Installing the Phone Installing the Handset Battery NOTE: You must connect the handset battery before use only the Thomson Inc. Locate the battery compartment on the back of fire or personal injury, use . NOTE: To ensure proper...
User Guide
Page 13
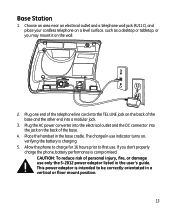
...the DC connector into a modular jack. 3. If you may mount it on , verifying the battery is compromised. This power adaptor is intended to first use indicator turns on the wall. 2. Allow the phone to charge for 16 hours prior to be correctly orientated in use . Plug one end of the...back of the base and the other end into the jack on a level surface, such as a desktop or tabletop, or you don't properly charge the phone, battery performance is charging. 5. Base Station 1. The charge/in a vertical or floor mount position. 13 Choose an area near an electrical outlet and a telephone...
...the DC connector into a modular jack. 3. If you may mount it on , verifying the battery is compromised. This power adaptor is intended to first use indicator turns on the wall. 2. Allow the phone to charge for 16 hours prior to be correctly orientated in use . Plug one end of the...back of the base and the other end into the jack on a level surface, such as a desktop or tabletop, or you don't properly charge the phone, battery performance is charging. 5. Base Station 1. The charge/in a vertical or floor mount position. 13 Choose an area near an electrical outlet and a telephone...
User Guide
Page 36
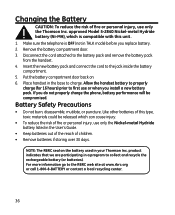
...• Do not burn, disassemble, mutilate, or puncture. approved Model 5-2840 Nickel-metal Hydride battery (Ni-MH), which is OFF (not in TALK mode) before you do not properly charge the phone, battery performance will be released which can cause injury. • To reduce the risk of fire or ...personal injury, use only the Nickel-metal Hydride battery listed in your Thomson Inc. Allow the handset battery to properly charge (for 16 hours) ...
...• Do not burn, disassemble, mutilate, or puncture. approved Model 5-2840 Nickel-metal Hydride battery (Ni-MH), which is OFF (not in TALK mode) before you do not properly charge the phone, battery performance will be released which can cause injury. • To reduce the risk of fire or ...personal injury, use only the Nickel-metal Hydride battery listed in your Thomson Inc. Allow the handset battery to properly charge (for 16 hours) ...
User Guide
Page 38
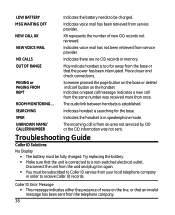
... is connected to a non-switched electrical outlet. Troubleshooting Guide Caller ID Solutions No Display • The battery must be subscribed to Caller ID service from your local telephone company in memory. Try replacing the battery. • Make sure that the power has been interrupted. Disconnect the unit from the wall and plug... delete/ int/conf button on the line, or that an invalid message has been sent from the base or that the unit is established. LOW BATTERY Indicates the battery needs to be fully charged.
... is connected to a non-switched electrical outlet. Troubleshooting Guide Caller ID Solutions No Display • The battery must be subscribed to Caller ID service from your local telephone company in memory. Try replacing the battery. • Make sure that the power has been interrupted. Disconnect the unit from the wall and plug... delete/ int/conf button on the line, or that an invalid message has been sent from the base or that the unit is established. LOW BATTERY Indicates the battery needs to be fully charged.
User Guide
Page 39
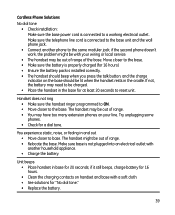
Make sure base is connected to a working electrical outlet. Cordless Phone Solutions No dial tone • Check installation: Make sure the base power cord is installed correctly. • The handset should beep when you press the .... • Move closer to reset unit. Unit beeps • Place handset in base for a dial tone. if it still beeps, charge battery for "No dial tone." • Replace the battery. 39 Make sure the telephone line cord is not plugged into an electrical outlet with a soft cloth. • See solutions for 16...
Make sure base is connected to a working electrical outlet. Cordless Phone Solutions No dial tone • Check installation: Make sure the base power cord is installed correctly. • The handset should beep when you press the .... • Move closer to reset unit. Unit beeps • Place handset in base for a dial tone. if it still beeps, charge battery for "No dial tone." • Replace the battery. 39 Make sure the telephone line cord is not plugged into an electrical outlet with a soft cloth. • See solutions for 16...

User Guide
Page 40
... Foil backing on insulation. • Heating ducts and other electronic devices. • Baby monitor is using the same frequency. • Handset battery is no communication between the handset and base • Unplug the power adaptor from the electrical outlet and the back of the base. 40 ...Memory Dialing doesn't work • Make sure you programmed the memory location keys correctly. • Did you may need to replace the battery pack: • Short talk time • Poor sound quality. • Limited Range • Charge indicator fails to appliances such as microwaves, ...
... Foil backing on insulation. • Heating ducts and other electronic devices. • Baby monitor is using the same frequency. • Handset battery is no communication between the handset and base • Unplug the power adaptor from the electrical outlet and the back of the base. 40 ...Memory Dialing doesn't work • Make sure you programmed the memory location keys correctly. • Did you may need to replace the battery pack: • Short talk time • Poor sound quality. • Limited Range • Charge indicator fails to appliances such as microwaves, ...

User Guide
Page 43
... obtain warranty service." Any additional information, should be shipped to you freight prepaid. Limited Warranty What your dealer.) • Installation and setup service adjustments. • Batteries. • Damage from misuse or neglect. • Products which have been modified or incorporated into other products. • Products purchased or serviced outside the USA...
... obtain warranty service." Any additional information, should be shipped to you freight prepaid. Limited Warranty What your dealer.) • Installation and setup service adjustments. • Batteries. • Damage from misuse or neglect. • Products which have been modified or incorporated into other products. • Products purchased or serviced outside the USA...
User Guide
Page 45
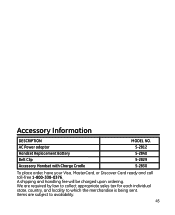
Accessory Information DESCRIPTION MODEL NO. Items are required by law to collect appropriate sales tax for each individual state, country, and locality to availability. 45 We are subject to which the merchandise is being sent. A shipping and handling fee will be charged upon ordering. AC Power adaptor 5-2812 Handset Replacement Battery 5-2840 Belt Clip Accessory Handset with Charge Cradle 5-2829 5-2830 To place order, have your Visa, MasterCard, or Discover Card ready and call toll-free 1-800-338-0376.
Accessory Information DESCRIPTION MODEL NO. Items are required by law to collect appropriate sales tax for each individual state, country, and locality to availability. 45 We are subject to which the merchandise is being sent. A shipping and handling fee will be charged upon ordering. AC Power adaptor 5-2812 Handset Replacement Battery 5-2840 Belt Clip Accessory Handset with Charge Cradle 5-2829 5-2830 To place order, have your Visa, MasterCard, or Discover Card ready and call toll-free 1-800-338-0376.
User Guide
Page 46
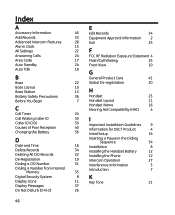
... Time 16 Delete Records 34 Deleting All CID Records 32 De-Registration 19 Dialing a CID Number 31 Dialing a Number from Internal Memory 35 Digital Security System 8 Display Icons 11 Display Messages 37 Do Not Disturb (D-N-D) 26 46 E Edit Records 34 Equipment Approval Information 2 Exit 25...Important Installation Guidelines 9 Information for DECT Product 4 Initial Setup 16 Inserting a Pause in the Dialing Sequence 34 Installation 8 Installing the Handset Battery 12 Installing the Phone 12 Intercom Operation 27 Interference Information 3 Introduction 7 K Key Tone 21
... Time 16 Delete Records 34 Deleting All CID Records 32 De-Registration 19 Dialing a CID Number 31 Dialing a Number from Internal Memory 35 Digital Security System 8 Display Icons 11 Display Messages 37 Do Not Disturb (D-N-D) 26 46 E Edit Records 34 Equipment Approval Information 2 Exit 25...Important Installation Guidelines 9 Information for DECT Product 4 Initial Setup 16 Inserting a Pause in the Dialing Sequence 34 Installation 8 Installing the Handset Battery 12 Installing the Phone 12 Intercom Operation 27 Interference Information 3 Introduction 7 K Key Tone 21


