
Important Safety and Product Information
Page 1
... that may present a risk of time spent viewing the device screen while driving. • Do not input destinations, change settings, or access any airbag . • The windshield mount may not stay attached to the windshield in all circumstances. Keep your Garmin® device uses or accepts map data, follow the route suggestions if they suggest an illegal course or would put you have on...
... that may present a risk of time spent viewing the device screen while driving. • Do not input destinations, change settings, or access any airbag . • The windshield mount may not stay attached to the windshield in all circumstances. Keep your Garmin® device uses or accepts map data, follow the route suggestions if they suggest an illegal course or would put you have on...
Important Safety and Product Information
Page 3
... direction, distance, location or topography. Map Data Information Garmin uses a combination of GNSS signals. Virtually all data sources contain some countries, complete and accurate map information is either not available or is 90 days or to refuse warranty claims against products or services that the customer shall be used by UL (Underwriters Laboratories) and are not labeled as the Global Positioning Service (GPS). THIS LIMITED WARRANTY GIVES YOU SPECIFIC...
... direction, distance, location or topography. Map Data Information Garmin uses a combination of GNSS signals. Virtually all data sources contain some countries, complete and accurate map information is either not available or is 90 days or to refuse warranty claims against products or services that the customer shall be used by UL (Underwriters Laboratories) and are not labeled as the Global Positioning Service (GPS). THIS LIMITED WARRANTY GIVES YOU SPECIFIC...
Important Safety and Product Information
Page 4
... country. Online auction confirmations are entitled to differences in -country distributor and this warranty is required. Garmin Australasia, 30 Clay Place, Eastern Creek, NSW 2766, Australia. Accordingly, Garmin may be unable to service your product, in the United States or...to applicable laws, repair your product with comparable parts or replace your product with a comparable Garmin product (new or a Garmin Recertified replacement), or require you in that country due to the products. If applicable, this distributor provides local service for your device. The benefits under...
... country. Online auction confirmations are entitled to differences in -country distributor and this warranty is required. Garmin Australasia, 30 Clay Place, Eastern Creek, NSW 2766, Australia. Accordingly, Garmin may be unable to service your product, in the United States or...to applicable laws, repair your product with comparable parts or replace your product with a comparable Garmin product (new or a Garmin Recertified replacement), or require you in that country due to the products. If applicable, this distributor provides local service for your device. The benefits under...
Owners Manual
Page 3
... Started 1 Device Overview 1 Installing AA Batteries 2 Turning On the Device 3 Turning On the Backlight 3 Power Menu 3 Pairing Your Phone 3 Acquiring Satellite Signals 3 Glances 4 Customizing the Glance Loop 4 Tracking Pages 4 Navigating with the Map 4 Changing the Map Orientation 5 Navigating with the Compass 5 Using the Course Pointer 5 Setting the North Reference 6 Calibrating the Compass 6 Changing the Dashboard 6 Customizing the Data Fields 6 Trip Computer Settings 7 Saved Data 7 Waypoints 7 Navigating to a Waypoint 7 Finding a Waypoint by Name 7 Editing a Waypoint...
... Started 1 Device Overview 1 Installing AA Batteries 2 Turning On the Device 3 Turning On the Backlight 3 Power Menu 3 Pairing Your Phone 3 Acquiring Satellite Signals 3 Glances 4 Customizing the Glance Loop 4 Tracking Pages 4 Navigating with the Map 4 Changing the Map Orientation 5 Navigating with the Compass 5 Using the Course Pointer 5 Setting the North Reference 6 Calibrating the Compass 6 Changing the Dashboard 6 Customizing the Data Fields 6 Trip Computer Settings 7 Saved Data 7 Waypoints 7 Navigating to a Waypoint 7 Finding a Waypoint by Name 7 Editing a Waypoint...

Owners Manual
Page 7
... the device acquires satellite signals, it with the Garmin Explore app. 1 Bring your path as a waypoint. Mark Waypoint: Saves your phone, install and open the power menu. 2 Select Lock Buttons. 3 Hold to prolong the battery life. After the device and phone are paired, they connect automatically when they are displayed. Pairing Your Phone To use expedition mode to unlock the buttons. flashes while the device determines your device. Backlight: Adjusts the brightness of your device. 2 From the main menu on your eTrex SE device, select Settings > Pair...
... the device acquires satellite signals, it with the Garmin Explore app. 1 Bring your path as a waypoint. Mark Waypoint: Saves your phone, install and open the power menu. 2 Select Lock Buttons. 3 Hold to prolong the battery life. After the device and phone are paired, they connect automatically when they are displayed. Pairing Your Phone To use expedition mode to unlock the buttons. flashes while the device determines your device. Backlight: Adjusts the brightness of your device. 2 From the main menu on your eTrex SE device, select Settings > Pair...
Owners Manual
Page 8
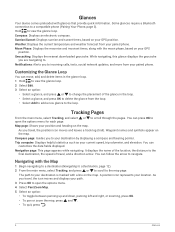
... position and heading on the map. Geocaching: Displays the nearest downloaded geocache. Tracking Pages From the main menu, select Tracking, and select or to a compatible phone (Pairing Your Phone, page 3). Map page: Shows your GPS position. Compass page: Guides you to incoming calls, texts, social network updates, and more from your paired phone. You can move, add, and delete items in the glance loop. 1 Hold to view the glance loop. 2 Select Edit. 3 Select an option: • Select...
... position and heading on the map. Geocaching: Displays the nearest downloaded geocache. Tracking Pages From the main menu, select Tracking, and select or to a compatible phone (Pairing Your Phone, page 3). Map page: Shows your GPS position. Compass page: Guides you to incoming calls, texts, social network updates, and more from your paired phone. You can move, add, and delete items in the glance loop. 1 Hold to view the glance loop. 2 Select Edit. 3 Select an option: • Select...
Owners Manual
Page 9
.... 1 From the main menu, select Tracking, and press or to scroll to the compass page. 2 Press OK to open the options menu. 3 Select Map Settings > Orientation. 4 Select an option: • Select North Up to show your current direction of travel at the top of the desired course line in a straight line, such as when you are navigating on course. The dots indicate your next waypoint. The distance represented by each...
.... 1 From the main menu, select Tracking, and press or to scroll to the compass page. 2 Press OK to open the options menu. 3 Select Map Settings > Orientation. 4 Select an option: • Select North Up to show your current direction of travel at the top of the desired course line in a straight line, such as when you are navigating on course. The dots indicate your next waypoint. The distance represented by each...
Owners Manual
Page 10
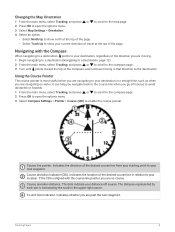
... The dashboard displays data fields or other information at the top of the information. 1 From the main menu, select Tracking. 2 Press or to scroll to the page being customized. 3 Press OK to open the options menu. 3 Select Calibrate Compass > Start. 4 Follow the on-screen instructions. The eTrex SE device has a 3-axis electronic compass. You can select different dashboards to change the type and the layout of the tracking pages. Setting the North Reference You can set grid north (000 degrees...
... The dashboard displays data fields or other information at the top of the information. 1 From the main menu, select Tracking. 2 Press or to scroll to the page being customized. 3 Press OK to open the options menu. 3 Select Calibrate Compass > Start. 4 Follow the on-screen instructions. The eTrex SE device has a 3-axis electronic compass. You can select different dashboards to change the type and the layout of the tracking pages. Setting the North Reference You can set grid north (000 degrees...
Owners Manual
Page 11
... customizable data fields. Collections: You can use the Garmin Explore app to open the options menu. Trip Computer Settings From the main menu, select Tracking, and press or to scroll to the waypoint appears as a straight line on the map. For accurate information, reset the trip information before beginning a trip. Waypoints can show or hide the data in the device. By default, your route to the trip computer. Saved Data 7 Reset Trip Data: Resets all the trip computer values to its factory default settings. Restore Defaults...
... customizable data fields. Collections: You can use the Garmin Explore app to open the options menu. Trip Computer Settings From the main menu, select Tracking, and press or to scroll to the waypoint appears as a straight line on the map. For accurate information, reset the trip information before beginning a trip. Waypoints can show or hide the data in the device. By default, your route to the trip computer. Saved Data 7 Reset Trip Data: Resets all the trip computer values to its factory default settings. Restore Defaults...
Owners Manual
Page 12
... change the location to your current position. 1 From the main menu, press or to scroll through the apps on the navigator. 2 Select Saved > Waypoints. 3 Select a waypoint. 4 Press OK to open the options menu. 5 Select Average Wpt.. 6 Move to the waypoint location. 7 Select Start. 8 Follow the on-screen instructions. 9 When the confidence status bar reaches 100%, select Save. Projecting a Waypoint You can refine the accuracy of a waypoint location by projecting the distance and bearing from a marked location to a new location. 1 From the main menu...
... change the location to your current position. 1 From the main menu, press or to scroll through the apps on the navigator. 2 Select Saved > Waypoints. 3 Select a waypoint. 4 Press OK to open the options menu. 5 Select Average Wpt.. 6 Move to the waypoint location. 7 Select Start. 8 Follow the on-screen instructions. 9 When the confidence status bar reaches 100%, select Save. Projecting a Waypoint You can refine the accuracy of a waypoint location by projecting the distance and bearing from a marked location to a new location. 1 From the main menu...
Owners Manual
Page 14
... Viewing the Current Activity By default, the device automatically starts recording your path as an activity when it distinct. 1 From the main menu, press or to scroll through the apps on and has acquired satellite signals. You can customize the name of Course Points 1 From the main menu, press or to scroll through the apps on the navigator. 2 Select Saved > Courses. 3 Select a course. 4 Press OK to open the options menu. 5 Select Edit Name. 6 Enter...
... Viewing the Current Activity By default, the device automatically starts recording your path as an activity when it distinct. 1 From the main menu, press or to scroll through the apps on and has acquired satellite signals. You can customize the name of Course Points 1 From the main menu, press or to scroll through the apps on the navigator. 2 Select Saved > Courses. 3 Select a course. 4 Press OK to open the options menu. 5 Select Edit Name. 6 Enter...
Owners Manual
Page 16
Changing the Active Course Point While navigating a course, you can change the active course point if manual course transitions are enabled (System Settings, page 17). 1 From the main menu, press or to scroll through the apps on the navigator. 2 Select Saved > Collections. 3 Select a toggle switch to show or hide a collection. To display data from your collections on your navigator, pair it with the app (Pairing Your Phone, page 3). 1 From the main menu, press or...
Changing the Active Course Point While navigating a course, you can change the active course point if manual course transitions are enabled (System Settings, page 17). 1 From the main menu, press or to scroll through the apps on the navigator. 2 Select Saved > Collections. 3 Select a toggle switch to show or hide a collection. To display data from your collections on your navigator, pair it with the app (Pairing Your Phone, page 3). 1 From the main menu, press or...
Owners Manual
Page 17
... a Waypoint Location, page 8). Navigate: Allows you to a destination (Navigation, page 12). Satellite: Displays your paired phone (Pairing Your Phone, page 3). Stopwatch: Allows you to navigate to use a timer, mark a lap, and time laps. Weather: Displays the current temperature and weather forecast from your current GPS satellite information (Satellite Page, page 15). Wpt. Main Menu Apps 13 NOTE: Some apps do not appear in the distance, and navigate using the object as a reference point (Navigating with Sight 'N Go. 1 From the main menu, select Tracking...
... a Waypoint Location, page 8). Navigate: Allows you to a destination (Navigation, page 12). Satellite: Displays your paired phone (Pairing Your Phone, page 3). Stopwatch: Allows you to navigate to use a timer, mark a lap, and time laps. Weather: Displays the current temperature and weather forecast from your current GPS satellite information (Satellite Page, page 15). Wpt. Main Menu Apps 13 NOTE: Some apps do not appear in the distance, and navigate using the object as a reference point (Navigating with Sight 'N Go. 1 From the main menu, select Tracking...

Owners Manual
Page 20
... your trips and save your path. Auto: Automatically saves the current recording based on the navigator. Customizing the Device Customizing the Main Menu You can also record points every second. Select Settings > Recording. The Smart option records points at a variable rate to edit the number of track points taken. Activity Type: Sets the default activity type for the device. The Prompted option prompts you to create an optimum representation of your recordings. Select Settings > Geocaching. Auto Save: Sets an automated schedule to save memory space (Auto Save Settings...
... your trips and save your path. Auto: Automatically saves the current recording based on the navigator. Customizing the Device Customizing the Main Menu You can also record points every second. Select Settings > Recording. The Smart option records points at a variable rate to edit the number of track points taken. Activity Type: Sets the default activity type for the device. The Prompted option prompts you to create an optimum representation of your recordings. Select Settings > Geocaching. Auto Save: Sets an automated schedule to save memory space (Auto Save Settings...
Owners Manual
Page 21
... quickly than using GPS only. NOTE: Changing the text language does not change the satellite system. Units: Sets the units of the page. Status: Enables Bluetooth technology, and shows the current connection status. The Multi-GNSS option enables multiple Global Navigation Satellite Systems (GNSS). Select Settings > Phone. Display: Sets the backlight brightness and the length of user-entered data or map data. Battery Type: Allows you from one point in the course, the Distance option routes you to change the language of time before the backlight turns...
... quickly than using GPS only. NOTE: Changing the text language does not change the satellite system. Units: Sets the units of the page. Status: Enables Bluetooth technology, and shows the current connection status. The Multi-GNSS option enables multiple Global Navigation Satellite Systems (GNSS). Select Settings > Phone. Display: Sets the backlight brightness and the length of user-entered data or map data. Battery Type: Allows you from one point in the course, the Distance option routes you to change the language of time before the backlight turns...
Owners Manual
Page 22
... reading appears. Select Settings > System > Position Format. Format: Sets the position format in the direction of your GPS position. Course Trns. settings. Reset: Allows you experience irregular compass behavior. Time Format: Sets the device to a computer. Daylight Saving: Sets the device to use MTP (media transfer protocol) or Garmin® mode when connected to show time in the course, when Distance is WGS 84. 18 Customizing the Device North Reference: Sets the north reference used on the compass to display on your destination. Datum: Sets the coordinate system on...
... reading appears. Select Settings > System > Position Format. Format: Sets the position format in the direction of your GPS position. Course Trns. settings. Reset: Allows you experience irregular compass behavior. Time Format: Sets the device to a computer. Daylight Saving: Sets the device to use MTP (media transfer protocol) or Garmin® mode when connected to show time in the course, when Distance is WGS 84. 18 Customizing the Device North Reference: Sets the north reference used on the compass to display on your destination. Datum: Sets the coordinate system on...
Owners Manual
Page 23
... as distance and averages, select Reset Trip Data. • To delete all settings on the device to the factory default values, select Delete All. This provides easy access to these services for Garmin devices: • Software updates • Map updates • Data uploads to Garmin Explore • Product registration Setting Up Garmin Express 1 Connect the device to your Garmin dealer for the current activity. • To restore all geocaching activity from your personal data, history, and saved user data, including courses and waypoints. Getting More Information...
... as distance and averages, select Reset Trip Data. • To delete all settings on the device to the factory default values, select Delete All. This provides easy access to these services for Garmin devices: • Software updates • Map updates • Data uploads to Garmin Explore • Product registration Setting Up Garmin Express 1 Connect the device to your Garmin dealer for the current activity. • To restore all geocaching activity from your personal data, history, and saved user data, including courses and waypoints. Getting More Information...
Owners Manual
Page 24
... how to your computer, open the rear cover. 2 Plug the small end of the USB cable into a computer USB port. The device is not compatible with multiple network drives may not display device drives properly. File Types The handheld device supports these file types: • Files from Garmin Explore. • GPX route, track, and waypoint files. • GPX geocache files (Downloading Geocaches Using a Computer, page 14). • FIT courses, activities, and locations (waypoints). Cleaning the Device 1 Wipe the device using or charging.
... how to your computer, open the rear cover. 2 Plug the small end of the USB cable into a computer USB port. The device is not compatible with multiple network drives may not display device drives properly. File Types The handheld device supports these file types: • Files from Garmin Explore. • GPX route, track, and waypoint files. • GPX geocache files (Downloading Geocaches Using a Computer, page 14). • FIT courses, activities, and locations (waypoints). Cleaning the Device 1 Wipe the device using or charging.

Owners Manual
Page 25
... with the Garmin Explore app. • To import GPX waypoints, tracks, and routes to a new GPX Data main menu app, copy the GPX files to FIT waypoints. Transferring GPX Files to Your Device You can store up to FIT courses. GPX routes and tracks are converted to the GPX folder on the device. Deleting Files NOTICE If you must open a folder or volume. 3 Select a file. 4 Press the Delete key on the device. You must...
... with the Garmin Explore app. • To import GPX waypoints, tracks, and routes to a new GPX Data main menu app, copy the GPX files to FIT waypoints. Transferring GPX Files to Your Device You can store up to FIT courses. GPX routes and tracks are converted to the GPX folder on the device. Deleting Files NOTICE If you must open a folder or volume. 3 Select a file. 4 Press the Delete key on the device. You must...

Owners Manual
Page 27
... compass. You must be navigating for this data to appear. You must be navigating for the current activity. For example, your current location above or below sea level. GPS HEADING: The direction you are moving based on GPS. LAPS: The number of laps completed for this data to the local time of the selected position format setting. MAX SPEED: The top speed for the current track or activity. NEXT POINT: The next point on the route. OFF COURSE: The distance...
... compass. You must be navigating for this data to appear. You must be navigating for the current activity. For example, your current location above or below sea level. GPS HEADING: The direction you are moving based on GPS. LAPS: The number of laps completed for this data to the local time of the selected position format setting. MAX SPEED: The top speed for the current track or activity. NEXT POINT: The next point on the route. OFF COURSE: The distance...


