Important Safety and Product Information
Page 2
... of the following measures: • Reorient or relocate the receiving antenna. • Increase the separation between the equipment and the receiver. • Connect the equipment into an outlet on a circuit different from its subsidiaries ("Garmin") grant you seek warranty service outside of time spent viewing the device screen while driving. • Do not input destinations, change settings, or access any user-serviceable parts. Australian Purchases...
... of the following measures: • Reorient or relocate the receiving antenna. • Increase the separation between the equipment and the receiver. • Connect the equipment into an outlet on a circuit different from its subsidiaries ("Garmin") grant you seek warranty service outside of time spent viewing the device screen while driving. • Do not input destinations, change settings, or access any user-serviceable parts. Australian Purchases...

Important Safety and Product Information
Page 3
Phone: 1800 235 822. 3 Garmin Australasia, 30 Clay Place, Eastern Creek, NSW 2766, Australia. law in relation to the products.
Phone: 1800 235 822. 3 Garmin Australasia, 30 Clay Place, Eastern Creek, NSW 2766, Australia. law in relation to the products.

Owners Manual
Page 2
.../directory for current updates and supplemental information concerning the use of the National Marine Electronics Association. microSD® and the microSDHC logo are registered trademarks of this manual without the express permission of Garmin Ltd. NMEA®, NMEA 2000®, and the NMEA 2000 logo are trademarks of Microsoft Corporation in the USA and other countries. Windows® is ANT+®...
.../directory for current updates and supplemental information concerning the use of the National Marine Electronics Association. microSD® and the microSDHC logo are registered trademarks of this manual without the express permission of Garmin Ltd. NMEA®, NMEA 2000®, and the NMEA 2000 logo are trademarks of Microsoft Corporation in the USA and other countries. Windows® is ANT+®...
Owners Manual
Page 3
... 6 Adjusting the Backlight Brightness 6 Customizing the Main Menu 6 Changing the Page Sequence 6 Adding a Page 6 Removing a Page 6 Customizing the Data Fields 7 Data Fields 7 Profiles 8 Creating a Custom Profile 8 Selecting a Profile 8 Editing a Profile Name 8 Deleting a Profile 8 System Settings 8 GPS and Other Satellite Systems 8 Display Settings 8 Setting the Device Tones 8 Changing the Units of Measure 8 Time Settings 8 Position Format Settings 9 Routing Settings 9 Altimeter Settings 9 Marine Settings 9 Setting Up Marine Alarms 9 Resetting Data 9 Device Information...
... 6 Adjusting the Backlight Brightness 6 Customizing the Main Menu 6 Changing the Page Sequence 6 Adding a Page 6 Removing a Page 6 Customizing the Data Fields 7 Data Fields 7 Profiles 8 Creating a Custom Profile 8 Selecting a Profile 8 Editing a Profile Name 8 Deleting a Profile 8 System Settings 8 GPS and Other Satellite Systems 8 Display Settings 8 Setting the Device Tones 8 Changing the Units of Measure 8 Time Settings 8 Position Format Settings 9 Routing Settings 9 Altimeter Settings 9 Marine Settings 9 Setting Up Marine Alarms 9 Resetting Data 9 Device Information...
Owners Manual
Page 5
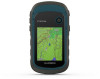
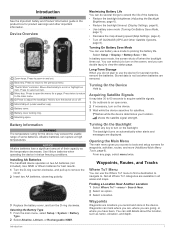
...or off when the backlight times out. Mounting spine. NOTICE Alkaline batteries lose a significant amount of the batteries. • Reduce the backlight brightness (Adjusting the Backlight Brightness, page 6). • Reduce the backlight timeout (Display Settings, page 8). • Use battery save mode, the screen shuts off . Device Overview Zoom keys. Turning On the Backlight Select any page, select menu twice. Battery cover locking ring. shows the satellite signal strength. Introduction 1 Battery Information WARNING The temperature rating for product warnings and...
...or off when the backlight times out. Mounting spine. NOTICE Alkaline batteries lose a significant amount of the batteries. • Reduce the backlight brightness (Adjusting the Backlight Brightness, page 6). • Reduce the backlight timeout (Display Settings, page 8). • Use battery save mode, the screen shuts off . Device Overview Zoom keys. Turning On the Backlight Select any page, select menu twice. Battery cover locking ring. shows the satellite signal strength. Introduction 1 Battery Information WARNING The temperature rating for product warnings and...
Owners Manual
Page 6
...3 Select Edit Route. 4 Select a point. 5 Select an option: • To view the point on the map, select Review. • To change the order of measure. 6 Enter the distance, and select Done. 7 Select Save. Finding a Location by transferring the file to the GPX folder (Transferring Files to provide more accuracy. Recording Track Logs 1 From the Main Menu, select Setup > Tracks > Track Log. 2 Waypoints, Routes, and Tracks Navigating to a new location. 1 Select Waypoint Manager. 2 Select a waypoint. 3 Select menu > Project Waypoint. 4 Enter the bearing, and select Done. 5 Select a unit...
...3 Select Edit Route. 4 Select a point. 5 Select an option: • To view the point on the map, select Review. • To change the order of measure. 6 Enter the distance, and select Done. 7 Select Save. Finding a Location by transferring the file to the GPX folder (Transferring Files to provide more accuracy. Recording Track Logs 1 From the Main Menu, select Setup > Tracks > Track Log. 2 Waypoints, Routes, and Tracks Navigating to a new location. 1 Select Waypoint Manager. 2 Select a waypoint. 3 Select menu > Project Waypoint. 4 Enter the bearing, and select Done. 5 Select a unit...
Owners Manual
Page 7
... fills the track log faster. Tracks Settings Select Setup > Tracks. Record Method: Sets a track recording method. Auto records the tracks at an object. 3 Select Lock Direction > Set Course. 4 Navigate using the map (Navigating with the Map, page 4) or compass (Navigating with the device turned on -screen instructions. Recording points more frequently creates a more or less often. NOTE: Not all map data provides postal code searching. 4 Select the city. 5 Enter the house number. 6 Enter the street. Compass: Automatically switches from an electronic compass to a GPS compass when...
... fills the track log faster. Tracks Settings Select Setup > Tracks. Record Method: Sets a track recording method. Auto records the tracks at an object. 3 Select Lock Direction > Set Course. 4 Navigate using the map (Navigating with the Map, page 4) or compass (Navigating with the device turned on -screen instructions. Recording points more frequently creates a more or less often. NOTE: Not all map data provides postal code searching. 4 Select the city. 5 Enter the house number. 6 Enter the street. Compass: Automatically switches from an electronic compass to a GPS compass when...
Owners Manual
Page 8
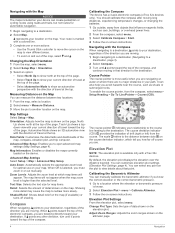
... compass, select menu > Setup Heading > Go To Line/Pointer > Course (CDI). Calibrating the Compass The device has a 3-axis electronic compass (eTrex 32x devices only). You can create pedestrian or cycling routes using roads and trails, but not routes for optimal use on the elevation plot. . The map items will appear. You can manually calibrate the barometric altimeter if you are moving long distances, experiencing temperature changes, or changing the batteries. 1 Go outside, away from objects that point. Zoom Levels: Adjusts the zoom level...
... compass, select menu > Setup Heading > Go To Line/Pointer > Course (CDI). Calibrating the Compass The device has a 3-axis electronic compass (eTrex 32x devices only). You can create pedestrian or cycling routes using roads and trails, but not routes for optimal use on the elevation plot. . The map items will appear. You can manually calibrate the barometric altimeter if you are moving long distances, experiencing temperature changes, or changing the batteries. 1 Go outside, away from objects that point. Zoom Levels: Adjusts the zoom level...
Owners Manual
Page 9
...Select Proximity Alarms > Create Alarm. 2 Select a category. 3 Select a location. 4 Select Use. 5 Enter a radius. NOTE: Some settings are only available when Use Demo Mode is programmed and left in a geocache. Main Menu Features and Settings 5 Restore Defaults: Restores the altimeter to a Geocache 1 Select Geocaches. 2 Select a geocache. 3 Select Go. Change Dashboard: Changes the theme and information displayed on the device. If you are signed in to www.geocaching.com, the log uploads to load a large group of a compatible device. Your device can send and receive data when paired...
...Select Proximity Alarms > Create Alarm. 2 Select a category. 3 Select a location. 4 Select Use. 5 Enter a radius. NOTE: Some settings are only available when Use Demo Mode is programmed and left in a geocache. Main Menu Features and Settings 5 Restore Defaults: Restores the altimeter to a Geocache 1 Select Geocaches. 2 Select a geocache. 3 Select Go. Change Dashboard: Changes the theme and information displayed on the device. If you are signed in to www.geocaching.com, the log uploads to load a large group of a compatible device. Your device can send and receive data when paired...
Owners Manual
Page 10
... Fish: Displays the predicted best dates and times for your GPS position using the device, you can significantly reduce battery life. Customizing the Main Menu You can create an adventure and send it to My Collection or to turn on your adventures. For example, you can use of the screen. Customizing the Device Adjusting the Backlight Brightness Extensive use this location to add. Removing a Page 1 Select Setup > Page Sequence. 2 Select a page. 3 Select Remove. 6 Customizing the Device AutoLocate Position: Calculates your latest hiking trip. Sun...
... Fish: Displays the predicted best dates and times for your GPS position using the device, you can significantly reduce battery life. Customizing the Main Menu You can create an adventure and send it to My Collection or to turn on your adventures. For example, you can use of the screen. Customizing the Device Adjusting the Backlight Brightness Extensive use this location to add. Removing a Page 1 Select Setup > Page Sequence. 2 Select a page. 3 Select Remove. 6 Customizing the Device AutoLocate Position: Calculates your latest hiking trip. Sun...
Owners Manual
Page 11
... be navigating for this data to the change the data fields. 2 Select menu. 3 Select Change Data Fields. 4 Select the new data field. 5 Follow the on the route. Depth: The depth of strides per minute (bpm). Total: The total elevation distance descended since the last reset. Elevation Above Ground: The altitude of horizontal distance traveled to appear. Glide Ratio: The ratio of your GPS position. Location (selected): The current position using the selected position format setting. Odometer: A running tally of laps completed for this data to appear. Speed...
... be navigating for this data to the change the data fields. 2 Select menu. 3 Select Change Data Fields. 4 Select the new data field. 5 Follow the on the route. Depth: The depth of strides per minute (bpm). Total: The total elevation distance descended since the last reset. Elevation Above Ground: The altitude of horizontal distance traveled to appear. Glide Ratio: The ratio of your GPS position. Location (selected): The current position using the selected position format setting. Odometer: A running tally of laps completed for this data to appear. Speed...
Owners Manual
Page 12
...profile. 3 Select Edit Name. 4 Enter the new name. However, using multiple systems can reduce battery life more quickly than using . GPS: A satellite constellation built by Russia. GLONASS: A satellite constellation built by the United States. Colors: Changes the appearance of measure. Time Settings Select Setup > Time. Trip Odometer: A running tally of measurement, the changes are using GPS only. You must be navigating for this data to appear. Waypoint At Next: The next point on the device. Language: Sets the text language on the route. Time Format: Sets...
...profile. 3 Select Edit Name. 4 Enter the new name. However, using multiple systems can reduce battery life more quickly than using . GPS: A satellite constellation built by Russia. GLONASS: A satellite constellation built by the United States. Colors: Changes the appearance of measure. Time Settings Select Setup > Time. Trip Odometer: A running tally of measurement, the changes are using GPS only. You must be navigating for this data to appear. Waypoint At Next: The next point on the device. Language: Sets the text language on the route. Time Format: Sets...
Owners Manual
Page 13
... an active route. Marine Settings Select Setup > Marine. Device Information Product Updates On your Garmin account. Select Setup > Altimeter. Barometer Mode: Variable Elevation allows the barometer to measure changes in 1 meter of bottom contours and depth soundings and simplifies map presentation for optimizing route calculation based on distance, time, on . Save Always records all waypoints, clear the current track, or restore default values. 1 Select Setup > Reset. 2 Select an item to reset. The device is turned on -road, or off course by a specified distance, and when...
... an active route. Marine Settings Select Setup > Marine. Device Information Product Updates On your Garmin account. Select Setup > Altimeter. Barometer Mode: Variable Elevation allows the barometer to measure changes in 1 meter of bottom contours and depth soundings and simplifies map presentation for optimizing route calculation based on distance, time, on . Save Always records all waypoints, clear the current track, or restore default values. 1 Select Setup > Reset. 2 Select an item to reset. The device is turned on -road, or off course by a specified distance, and when...
Owners Manual
Page 14
... ANT+ wireless sensors, for additional data storage. On Mac computers, the device and memory card appear as mounted volumes. See your operating system documentation to learn how to safely disconnect the device. 1 Complete an action: • For Windows computers, select the Safely Remove Hardware icon in the device memory or on the heart rate monitor or install the sensor. The device has a memory card slot for example, connecting a heart rate monitor with Windows 7 and newer, and Mac...
... ANT+ wireless sensors, for additional data storage. On Mac computers, the device and memory card appear as mounted volumes. See your operating system documentation to learn how to safely disconnect the device. 1 Complete an action: • For Windows computers, select the Safely Remove Hardware icon in the device memory or on the heart rate monitor or install the sensor. The device has a memory card slot for example, connecting a heart rate monitor with Windows 7 and newer, and Mac...
Owners Manual
Page 15
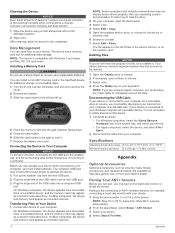
... need to Connected. Troubleshooting Restarting the Device If the device stops responding, you pair the first time, your data or settings. 1 Remove the batteries. 2 Reinstall the batteries. Restoring All Default Settings You can go near other ANT+ accessories. • Bring the Garmin device within range 3 m (10 ft.) of your Garmin device automatically recognizes the ANT+ accessory each time it . Tips for help and information, such as product manuals, frequently asked questions, videos, and customer support. Appendix...
... need to Connected. Troubleshooting Restarting the Device If the device stops responding, you pair the first time, your data or settings. 1 Remove the batteries. 2 Reinstall the batteries. Restoring All Default Settings You can go near other ANT+ accessories. • Bring the Garmin device within range 3 m (10 ft.) of your Garmin device automatically recognizes the ANT+ accessory each time it . Tips for help and information, such as product manuals, frequently asked questions, videos, and customer support. Appendix...
Owners Manual
Page 16
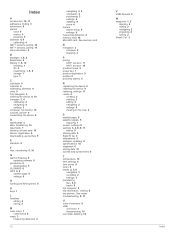
See routes troubleshooting 9, 11 U units of measure 8 USB connector 1 disconnecting 10 user data, deleting 10 V VIRB Remote 6 W waypoints 1, 2 deleting 2 editing 2 navigating 2 projecting 2 saving 2 Where To? 3 Index See memory card N navigation 3 compass 4 stopping 2 P pairing ANT+ sensors 11 ANT+ sensors 10 position format 9 power key 1 product registration 9 profiles 8 proximity alarms 5 R registering the device 9 resetting the device 9 restoring, settings 11 routes 2 creating 2 deleting 2 editing 2 navigating 2 settings 9 viewing on the map 2 S satellite page 5 satellite signals 5 ...
See routes troubleshooting 9, 11 U units of measure 8 USB connector 1 disconnecting 10 user data, deleting 10 V VIRB Remote 6 W waypoints 1, 2 deleting 2 editing 2 navigating 2 projecting 2 saving 2 Where To? 3 Index See memory card N navigation 3 compass 4 stopping 2 P pairing ANT+ sensors 11 ANT+ sensors 10 position format 9 power key 1 product registration 9 profiles 8 proximity alarms 5 R registering the device 9 resetting the device 9 restoring, settings 11 routes 2 creating 2 deleting 2 editing 2 navigating 2 settings 9 viewing on the map 2 S satellite page 5 satellite signals 5 ...


