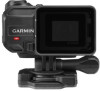

Owners Manual
Page 2
...current updates and supplemental information concerning the use of such marks by the Bluetooth SIG, Inc. Under the copyright laws, this manual may not be copied, in whole or in the United States and other countries. Wi‑Fi® is a trademark of Microsoft Corporation in part, ... organization of Garmin Ltd. Go to www.garmin.com for a list of Garmin. G-Metrix™ is under license. These trademarks may not be used without obligation to make changes in the U.S. Garmin®, the Garmin logo, ANT+®, fēnix®, and VIRB® are owned by Garmin is a ...
...current updates and supplemental information concerning the use of such marks by the Bluetooth SIG, Inc. Under the copyright laws, this manual may not be copied, in whole or in the United States and other countries. Wi‑Fi® is a trademark of Microsoft Corporation in part, ... organization of Garmin Ltd. Go to www.garmin.com for a list of Garmin. G-Metrix™ is under license. These trademarks may not be used without obligation to make changes in the U.S. Garmin®, the Garmin logo, ANT+®, fēnix®, and VIRB® are owned by Garmin is a ...

Owners Manual
Page 3
...7 Removing Paired Bluetooth Devices 7 Applications 7 Operating the Device Using Your Mobile Device 7 Wi‑Fi Modes 7 Wireless Settings 7 VIRB Edit 7 Remote Control 7 Controlling the Device Remotely 7 Controlling Multiple VIRB Devices Remotely 7 Device Information 8 System Settings 8 Inverting the Camera Orientation 8 Time and Date Settings 8 Erasing Your Memory Card 8 Device Care 8 Cleaning the Device 8 Connecting the Device to Your Computer 8 File Types 8 Specifications 8 Troubleshooting 9 My device does not turn on 9 My device display is hard to see 9 Some data is...
...7 Removing Paired Bluetooth Devices 7 Applications 7 Operating the Device Using Your Mobile Device 7 Wi‑Fi Modes 7 Wireless Settings 7 VIRB Edit 7 Remote Control 7 Controlling the Device Remotely 7 Controlling Multiple VIRB Devices Remotely 7 Device Information 8 System Settings 8 Inverting the Camera Orientation 8 Time and Date Settings 8 Erasing Your Memory Card 8 Device Care 8 Cleaning the Device 8 Connecting the Device to Your Computer 8 File Types 8 Specifications 8 Troubleshooting 9 My device does not turn on 9 My device display is hard to see 9 Some data is...
Owners Manual
Page 5
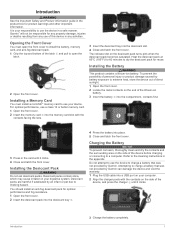
... the device before charging or connecting to the cleaning instructions in the appendix. You should install an anti-fog desiccant pack for reuse. 2 Open the front cover. It is your device. Introduction WARNING See the Important Safety and Product Information guide in the product box for any property damage, injuries or deaths resulting from any use of this device in any activities...
... the device before charging or connecting to the cleaning instructions in the appendix. You should install an anti-fog desiccant pack for reuse. 2 Open the front cover. It is your device. Introduction WARNING See the Important Safety and Product Information guide in the product box for any property damage, injuries or deaths resulting from any use of this device in any activities...

Owners Manual
Page 6
... additional mounts for more information. Saving Energy While Charging the Device You can turn off the device while recording video. 1 If necessary, move the recording switch backward to stop recording video. The screen turns off, and the device goes into a low power, battery charging mode. 3 Charge the device completely. 7 Insert a thumbscrew into the end of the thumbscrew to adjust the tightness of dirt, debris, wax, or coatings. 2 Remove the...
... additional mounts for more information. Saving Energy While Charging the Device You can turn off the device while recording video. 1 If necessary, move the recording switch backward to stop recording video. The screen turns off, and the device goes into a low power, battery charging mode. 3 Charge the device completely. 7 Insert a thumbscrew into the end of the thumbscrew to adjust the tightness of dirt, debris, wax, or coatings. 2 Remove the...
Owners Manual
Page 7
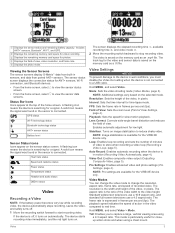
... for a signal. Loop: Enables loop recording and sets the number of minutes of view, video resolution, and frame rate. Ã Displays the photo mode. Ä Viewing the Sensor Screens The sensor screens display G-Metrix™ data from paired ANT+ sensors. The track log for photos. Â Displays the field of video to stop recording video. Heart rate status Speed and cadence status Power status Temperature status Headset and audio status...
... for a signal. Loop: Enables loop recording and sets the number of minutes of view, video resolution, and frame rate. Ã Displays the photo mode. Ä Viewing the Sensor Screens The sensor screens display G-Metrix™ data from paired ANT+ sensors. The track log for photos. Â Displays the field of video to stop recording video. Heart rate status Speed and cadence status Power status Temperature status Headset and audio status...

Owners Manual
Page 8
.... Zoom: Captures a tighter view. Setting the Video Format You can change the field of view when Lens Correct is set the video standard for use in low light environments or indoors. NOTE: Pro settings are best for your activity. 1 Hold MENU. 2 Select Video > Auto Record > When Moving. You can set the device to record video automatically when the device is ready for the VIRB XE device only. Higher ISO...
.... Zoom: Captures a tighter view. Setting the Video Format You can change the field of view when Lens Correct is set the video standard for use in low light environments or indoors. NOTE: Pro settings are best for your activity. 1 Hold MENU. 2 Select Video > Auto Record > When Moving. You can set the device to record video automatically when the device is ready for the VIRB XE device only. Higher ISO...

Owners Manual
Page 9
... and connect an external microphone, the device records audio from the device. Photo timelapse or burst settings are ignored while recording video. You can connect an external microphone, you to http://virb.garmin.com/products/rugged-combo-cable-virbx-xe. Field of equal length. Date Stamp: Adds a date stamp to enable the built-in motion. The saved video loop is saved on the home screen or sensor screens, hold . •...
... and connect an external microphone, the device records audio from the device. Photo timelapse or burst settings are ignored while recording video. You can connect an external microphone, you to http://virb.garmin.com/products/rugged-combo-cable-virbx-xe. Field of equal length. Date Stamp: Adds a date stamp to enable the built-in motion. The saved video loop is saved on the home screen or sensor screens, hold . •...
Owners Manual
Page 10
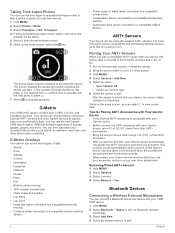
... Time-Lapse Photos You can use the free Garmin VIRB mobile app or VIRB Edit software application to view sensor data. You can go to capture even more . This process occurs automatically when you can use the time-lapse or extended time-lapse mode to take , the number of the sensor. 3 Hold MENU. 4 Select Sensors > Add New. 5 Select an option: • Select Search All. • Select your device, the sensor status changes to Connected...
... Time-Lapse Photos You can use the free Garmin VIRB mobile app or VIRB Edit software application to view sensor data. You can go to capture even more . This process occurs automatically when you can use the time-lapse or extended time-lapse mode to take , the number of the sensor. 3 Hold MENU. 4 Select Sensors > Add New. 5 Select an option: • Select Search All. • Select your device, the sensor status changes to Connected...
Owners Manual
Page 11
... battery life. Removing Paired Bluetooth Devices 1 Hold MENU. 2 Select Bluetooth. 3 Select a wireless device. 4 Select Forget > Yes. Go to http://virb.garmin.com/virb-app for more information. 1 Install the Garmin VIRB app from the remote control device to the other VIRB devices. 1 On all of your VIRB devices. 4 On the remote control accessory, follow the pairing instructions in a lower-power state (optional). Join: Enables you remotely view and control photo and video recording using your VIRB devices. The recording switch on your main VIRB device...
... battery life. Removing Paired Bluetooth Devices 1 Hold MENU. 2 Select Bluetooth. 3 Select a wireless device. 4 Select Forget > Yes. Go to http://virb.garmin.com/virb-app for more information. 1 Install the Garmin VIRB app from the remote control device to the other VIRB devices. 1 On all of your VIRB devices. 4 On the remote control accessory, follow the pairing instructions in a lower-power state (optional). Join: Enables you remotely view and control photo and video recording using your VIRB devices. The recording switch on your main VIRB device...
Owners Manual
Page 12
... device is not connected to a USB cable. Microphone: Enables the internal or external microphone. About: Displays important software information and your region. Inverting the Camera Orientation You can change the camera orientation. Some mounting configurations require you set the time automatically, the time zone is on your GPS position. Time Zone: Sets the time zone for five minutes. Use of a dry cloth may need to show dates in your unit ID. Connecting the Device...
... device is not connected to a USB cable. Microphone: Enables the internal or external microphone. About: Displays important software information and your region. Inverting the Camera Orientation You can change the camera orientation. Some mounting configurations require you set the time automatically, the time zone is on your GPS position. Time Zone: Sets the time zone for five minutes. Use of a dry cloth may need to show dates in your unit ID. Connecting the Device...
Owners Manual
Page 13
... export control laws of America copyright laws and international copyright treaties. Troubleshooting 9 Location, speed, distance, and altitude data require a GPS signal. • Connect additional ANT+ sensors (Pairing Your ANT+ Sensors, page 6). My video recordings do not look smooth • If video recordings appear shaky, hold MENU, and select Video > Stabilizer to record smooth high-definition video. The device requires a Class 10 or better memory card...
... export control laws of America copyright laws and international copyright treaties. Troubleshooting 9 Location, speed, distance, and altitude data require a GPS signal. • Connect additional ANT+ sensors (Pairing Your ANT+ Sensors, page 6). My video recordings do not look smooth • If video recordings appear shaky, hold MENU, and select Video > Stabilizer to record smooth high-definition video. The device requires a Class 10 or better memory card...
Owners Manual
Page 14
...the device 2 mounts, optional 2 P pairing 3 ANT+ sensors 6 photos settings 5 taking 5 power (force) 3, 6 power key 2 R remote control 7 S satellite signals 3 settings 8 software updating 7 version 8 software license agreement 9 specifications 8 speed 6 speed and cadence sensors 3 10 storing data 8 system settings 8 T temperature 6, 8 time settings 8 zones and formats 8 tones 8 tracks 6, 7 transferring, files 8 troubleshooting 9 U unit ID 8 USB mass storage mode 8 transferring files 8 V video 6 editing 7 loop 5 output 5 recording 2-5 settings 2-4 time lapse 4 W water rating 8 Wi-Fi, connecting...
...the device 2 mounts, optional 2 P pairing 3 ANT+ sensors 6 photos settings 5 taking 5 power (force) 3, 6 power key 2 R remote control 7 S satellite signals 3 settings 8 software updating 7 version 8 software license agreement 9 specifications 8 speed 6 speed and cadence sensors 3 10 storing data 8 system settings 8 T temperature 6, 8 time settings 8 zones and formats 8 tones 8 tracks 6, 7 transferring, files 8 troubleshooting 9 U unit ID 8 USB mass storage mode 8 transferring files 8 V video 6 editing 7 loop 5 output 5 recording 2-5 settings 2-4 time lapse 4 W water rating 8 Wi-Fi, connecting...

