Owners Manual
Page 1
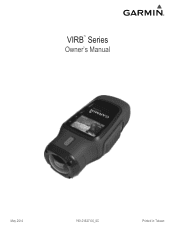
VIRB™ Series Owner's Manual May 2014 190-01627-00_0C Printed in Taiwan
VIRB™ Series Owner's Manual May 2014 190-01627-00_0C Printed in Taiwan

Owners Manual
Page 2
.... Visit www.thisisant.com/ directory for current updates and supplemental information concerning the use of this manual without the written consent of Wi-Fi Alliance Corporation. Mac® is a registered mark of Garmin. Garmin reserves the right to change or improve its products and to make changes in part, without obligation to www.garmin.com for a list of this product...
.... Visit www.thisisant.com/ directory for current updates and supplemental information concerning the use of this manual without the written consent of Wi-Fi Alliance Corporation. Mac® is a registered mark of Garmin. Garmin reserves the right to change or improve its products and to make changes in part, without obligation to www.garmin.com for a list of this product...

Owners Manual
Page 3
... an External Microphone or Audio Source 5 Photos 5 Taking a Photo 5 Photo Settings 5 Taking a Delayed Photo 5 Taking Repeated Photos 5 Playback 5 Viewing Photos and Videos 5 Viewing Video Over HDMI 6 Connecting Headphones 6 Outputting Composite Video 6 Deleting Photos and Videos 6 Tracks 6 Recorded Track Log Data 6 Dashboards 7 Viewing the Dashboards 7 Pairing Your ANT + Sensors 7 Remote Control 8 Controlling the Device Remotely 8 Controlling Multiple VIRB Devices Remotely 8 Operating the Device Using Your Mobile Device 8 Troubleshooting 8 My device does not turn on...
... an External Microphone or Audio Source 5 Photos 5 Taking a Photo 5 Photo Settings 5 Taking a Delayed Photo 5 Taking Repeated Photos 5 Playback 5 Viewing Photos and Videos 5 Viewing Video Over HDMI 6 Connecting Headphones 6 Outputting Composite Video 6 Deleting Photos and Videos 6 Tracks 6 Recorded Track Log Data 6 Dashboards 7 Viewing the Dashboards 7 Pairing Your ANT + Sensors 7 Remote Control 8 Controlling the Device Remotely 8 Controlling Multiple VIRB Devices Remotely 8 Operating the Device Using Your Mobile Device 8 Troubleshooting 8 My device does not turn on...

Owners Manual
Page 5
... by Garmin. The LED is orange while the battery is fully charged. 6 Remove the USB cable and fully close the weather cap. Charging the Lithium-Ion Battery Pack NOTICE To prevent corrosion, thoroughly dry the mini-USB port, the weather cap, and the surrounding area before charging or connecting to an external power source. Installing a Memory Card You must install a microSD™ memory card up to remove the cover. 2 Locate the...
... by Garmin. The LED is orange while the battery is fully charged. 6 Remove the USB cable and fully close the weather cap. Charging the Lithium-Ion Battery Pack NOTICE To prevent corrosion, thoroughly dry the mini-USB port, the weather cap, and the surrounding area before charging or connecting to an external power source. Installing a Memory Card You must install a microSD™ memory card up to remove the cover. 2 Locate the...

Owners Manual
Page 6
... of the camera. 11Squeeze the buttons Ç on the screen while the device saves track log data and turns off the device before removing the battery. The camera should be held tightly and should be used in many configurations. Hold to record correctly oriented video. Go to 38°C). Mounting the Device NOTICE To prevent product loss or damage, do not use either the flat base or...
... of the camera. 11Squeeze the buttons Ç on the screen while the device saves track log data and turns off the device before removing the battery. The camera should be held tightly and should be used in many configurations. Hold to record correctly oriented video. Go to 38°C). Mounting the Device NOTICE To prevent product loss or damage, do not use either the flat base or...

Owners Manual
Page 7
... the device. 1 With the device turned off using the device in charts and data fields (VIRB Elite only). The device turns on and off before removing the battery. The device stops recording and turns off , it does not seem accurate. SETUP: Allows you to view the status page (Status Page). The level appears. 2 Adjust the device until the screen turns off in several modes. The sensor icons are not recording. Select to change camera settings. The device...
... the device. 1 With the device turned off using the device in charts and data fields (VIRB Elite only). The device turns on and off before removing the battery. The device stops recording and turns off , it does not seem accurate. SETUP: Allows you to view the status page (Status Page). The level appears. 2 Adjust the device until the screen turns off in several modes. The sensor icons are not recording. Select to change camera settings. The device...
Owners Manual
Page 8
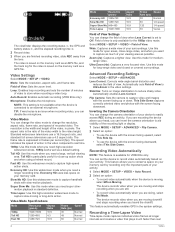
... mounting the device above your memory card by recording only the important parts of the recording light or display. 1 Select MODE > SETUP > ADVANCED > Flip Camera. 2 Select an option: • To use the device with the screen facing upward, select This Side Up. • To use a 4:3 aspect ratio. This feature automatically enables GPS in pixels. Microphone: Enables the microphone. Automatically sets Field of recorded video. Mode: Sets...
... mounting the device above your memory card by recording only the important parts of the recording light or display. 1 Select MODE > SETUP > ADVANCED > Flip Camera. 2 Select an option: • To use the device with the screen facing upward, select This Side Up. • To use a 4:3 aspect ratio. This feature automatically enables GPS in pixels. Microphone: Enables the microphone. Automatically sets Field of recorded video. Mode: Sets...
Owners Manual
Page 9
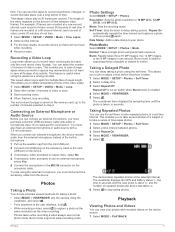
... the number of minutes of time-lapse photos. 1 Select MODE > SETUP > Photos > Self Timer. 2 Select a time interval between video frames. Connecting an External Microphone or Audio Source Before you to save . 3 Start recording video. 4 When finished, stop taking a photo using the self timer. You must purchase a Garmin VIRB accessory cable with a 3. 5 mm connector. The countdown timer displays the remaining time until you connect an external microphone, the device records audio...
... the number of minutes of time-lapse photos. 1 Select MODE > SETUP > Photos > Self Timer. 2 Select a time interval between video frames. Connecting an External Microphone or Audio Source Before you to save . 3 Start recording video. 4 When finished, stop taking a photo using the self timer. You must purchase a Garmin VIRB accessory cable with a 3. 5 mm connector. The countdown timer displays the remaining time until you connect an external microphone, the device records audio...
Owners Manual
Page 10
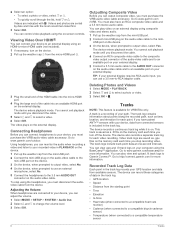
... +™ sensors with your external display requires RCA audio input, you stop using the on the device. 2 Pull up the weather cap from available sensors. gpx files on the memory card each time you turn on -screen controls. Tracks NOTE: This feature is included in the track log. • GPS location • Speed • Distance from the micro-HDMI port Á. 3 Plug the small end of the HDMI cable into an...
... +™ sensors with your external display requires RCA audio input, you stop using the on the device. 2 Pull up the weather cap from available sensors. gpx files on the memory card each time you turn on -screen controls. Tracks NOTE: This feature is included in the track log. • GPS location • Speed • Distance from the micro-HDMI port Á. 3 Plug the small end of the HDMI cable into an...

Owners Manual
Page 11
... device sensors and connected ANT + sensors. Time displays the time since the device was turned on the Garmin device and only takes a few seconds when the accessories are activated and functioning correctly. • When paired, your Garmin device receives data from other ANT + accessories. • Bring the Garmin device within 10 ft. (3 m) of each time it is activated. The icon for VIRB Elite only. When the icon turns solid, the sensor is a grouping of data fields, charts...
... device sensors and connected ANT + sensors. Time displays the time since the device was turned on the Garmin device and only takes a few seconds when the accessories are activated and functioning correctly. • When paired, your Garmin device receives data from other ANT + accessories. • Bring the Garmin device within 10 ft. (3 m) of each time it is activated. The icon for VIRB Elite only. When the icon turns solid, the sensor is a grouping of data fields, charts...

Owners Manual
Page 12
... Card). You can change the wireless host settings for compatibility information. 1 If necessary, install the Garmin VIRB app from all of your VIRB devices, select MODE > SETUP > Remote. 2 On your main VIRB device, select VIRB Type > Main VIRB. 3 On each of the sky. SSID: Sets the SSID, which identifies your VIRB device on your mobile device. 2 On your VIRB device. See the owner's manual for the device for VIRB Elite only. Password: Sets the password used to connect to enable Auto Record. 8 Remote Control NOTE: GPS...
... Card). You can change the wireless host settings for compatibility information. 1 If necessary, install the Garmin VIRB app from all of your VIRB devices, select MODE > SETUP > Remote. 2 On your main VIRB device, select VIRB Type > Main VIRB. 3 On each of the sky. SSID: Sets the SSID, which identifies your VIRB device on your mobile device. 2 On your VIRB device. See the owner's manual for the device for VIRB Elite only. Password: Sets the password used to connect to enable Auto Record. 8 Remote Control NOTE: GPS...

Owners Manual
Page 13
... Power Save in the system settings (System Settings). • Turn the device on the lens. The device is available for 30 minutes. Cleaning the Device NOTICE Do not use a dry cloth to Garmin Connect (output only). fit files for your device. • Reviewing and editing recorded videos • Reviewing track logs • Linking track logs to your GPS position (VIRB Elite only). Connecting the Device to the device. Before you can connect the straight connector of the USB cable...
... Power Save in the system settings (System Settings). • Turn the device on the lens. The device is available for 30 minutes. Cleaning the Device NOTICE Do not use a dry cloth to Garmin Connect (output only). fit files for your device. • Reviewing and editing recorded videos • Reviewing track logs • Linking track logs to your GPS position (VIRB Elite only). Connecting the Device to the device. Before you can connect the straight connector of the USB cable...
Owners Manual
Page 14
... 8 M memory card 1 microphone, connecting 5 microSD card. See memory card mounting the device 2 mounts, optional 2 P pairing, ANT + sensors 7 photos settings 4, 5 taking 5 viewing 5 power key 2, 3 R remote control 8 S settings 9 software updating 9 version 8 specifications 9 10 speed 6 storing data 9 system settings 8 T temperature 6, 9 time settings 9 zones and formats 9 tones 8 tracks 6, 9 transferring, files 9 troubleshooting 8, 9 U unit ID 8 USB mass storage mode 9 transferring files 9 V video editing 9 loop 5 output 6 playing 5 recording 3-5 settings 3, 4 time lapse 4 volume, adjusting...
... 8 M memory card 1 microphone, connecting 5 microSD card. See memory card mounting the device 2 mounts, optional 2 P pairing, ANT + sensors 7 photos settings 4, 5 taking 5 viewing 5 power key 2, 3 R remote control 8 S settings 9 software updating 9 version 8 specifications 9 10 speed 6 storing data 9 system settings 8 T temperature 6, 9 time settings 9 zones and formats 9 tones 8 tracks 6, 9 transferring, files 9 troubleshooting 8, 9 U unit ID 8 USB mass storage mode 9 transferring files 9 V video editing 9 loop 5 output 6 playing 5 recording 3-5 settings 3, 4 time lapse 4 volume, adjusting...

