

Owners Manual
Page 1
VIRB™ Series Owner's Manual May 2014 190-01627-00_0C Printed in Taiwan
VIRB™ Series Owner's Manual May 2014 190-01627-00_0C Printed in Taiwan

Owners Manual
Page 2
....thisisant.com/ directory for current updates and supplemental information concerning the use of such changes or improvements. Go to notify any person or organization of this product. Microsoft® and Windows® are trademarks of Microsoft Corporation in part, without the express permission of HDMI Licensing, LLC. Garmin® and the Garmin logo are registered trademarks of...
....thisisant.com/ directory for current updates and supplemental information concerning the use of such changes or improvements. Go to notify any person or organization of this product. Microsoft® and Windows® are trademarks of Microsoft Corporation in part, without the express permission of HDMI Licensing, LLC. Garmin® and the Garmin logo are registered trademarks of...

Owners Manual
Page 3
... an External Microphone or Audio Source 5 Photos 5 Taking a Photo 5 Photo Settings 5 Taking a Delayed Photo 5 Taking Repeated Photos 5 Playback 5 Viewing Photos and Videos 5 Viewing Video Over HDMI 6 Connecting Headphones 6 Outputting Composite Video 6 Deleting Photos and Videos 6 Tracks 6 Recorded Track Log Data 6 Dashboards 7 Viewing the Dashboards 7 Pairing Your ANT + Sensors 7 Remote Control 8 Controlling the Device Remotely 8 Controlling Multiple VIRB Devices Remotely 8 Operating the Device Using Your Mobile Device 8 Troubleshooting 8 My device does not turn on...
... an External Microphone or Audio Source 5 Photos 5 Taking a Photo 5 Photo Settings 5 Taking a Delayed Photo 5 Taking Repeated Photos 5 Playback 5 Viewing Photos and Videos 5 Viewing Video Over HDMI 6 Connecting Headphones 6 Outputting Composite Video 6 Deleting Photos and Videos 6 Tracks 6 Recorded Track Log Data 6 Dashboards 7 Viewing the Dashboards 7 Pairing Your ANT + Sensors 7 Remote Control 8 Controlling the Device Remotely 8 Controlling Multiple VIRB Devices Remotely 8 Operating the Device Using Your Mobile Device 8 Troubleshooting 8 My device does not turn on...

Owners Manual
Page 5
... the battery compartment, slide the card holder À toward the lens, and lift up to lock it. 7 Replace the battery pack. 8 Replace the battery cover, and turn the D-ring clockwise. It is fully charged. 6 Remove the USB cable and fully close the weather cap. NOTE: The battery will not be responsible for 4 to an external power source. The display turns off the device display and all other important information. Garmin®...
... the battery compartment, slide the card holder À toward the lens, and lift up to lock it. 7 Replace the battery pack. 8 Replace the battery cover, and turn the D-ring clockwise. It is fully charged. 6 Remove the USB cable and fully close the weather cap. NOTE: The battery will not be responsible for 4 to an external power source. The display turns off the device display and all other important information. Garmin®...

Owners Manual
Page 6
... can install the adhesive mounting base onto a surface, the ambient temperature must be used in many configurations. NOTE: By default, the camera should not move in the mount when properly secured. 12If the camera feels loose in the back of the camera. 11Squeeze the buttons Ç on the screen while the device saves track log data and turns off . Turning Off the Device NOTICE...
... can install the adhesive mounting base onto a surface, the ambient temperature must be used in many configurations. NOTE: By default, the camera should not move in the mount when properly secured. 12If the camera feels loose in the back of the camera. 11Squeeze the buttons Ç on the screen while the device saves track log data and turns off . Turning Off the Device NOTICE...

Owners Manual
Page 7
... to view the level (Leveling the Device). NOTE: The device does not turn the device on automatically. The device turns on the memory card. Á Displays the photo resolution, camera mode, timer count (if set), photos remaining, and number of stored photos. Â Displays the sensors being used (VIRB Elite only) including Wi-Fi®, cadence, heart rate, tempe™, and GPS. You can use REC to remove the battery, wait...
... to view the level (Leveling the Device). NOTE: The device does not turn the device on automatically. The device turns on the memory card. Á Displays the photo resolution, camera mode, timer count (if set), photos remaining, and number of stored photos. Â Displays the sensors being used (VIRB Elite only) including Wi-Fi®, cadence, heart rate, tempe™, and GPS. You can use REC to remove the battery, wait...
Owners Manual
Page 8
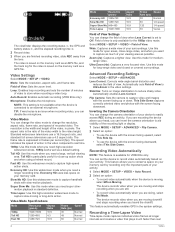
... using a helmet mount. Recording Video Automatically NOTE: This feature is set the device to record video automatically based on the memory card as much faster than real 4 Video This feature automatically enables GPS in the video settings. TIP: If wind noise is only available for VIRB Elite only. Super Slow Mo: Use this mode when you need a large, vertical viewing area. Tall HD: Use...
... using a helmet mount. Recording Video Automatically NOTE: This feature is set the device to record video automatically based on the memory card as much faster than real 4 Video This feature automatically enables GPS in the video settings. TIP: If wind noise is only available for VIRB Elite only. Super Slow Mo: Use this mode when you need a large, vertical viewing area. Tall HD: Use...
Owners Manual
Page 9
... at a set time interval. Burst mode is enabled. 4 Select MODE > VIEWFINDER. 5 Select . This allows you press again. Go to join or adjust a shot before the photo is split into multiple files of real time. 1 Select MODE > SETUP > VIDEO > Mode > Time Lapse. 2 Select a time interval. 3 For the best results, mount the device so that take a series of an activity. You must purchase a Garmin VIRB accessory cable with a 3. 5 mm connector. time. Time-lapse videos...
... at a set time interval. Burst mode is enabled. 4 Select MODE > VIEWFINDER. 5 Select . This allows you press again. Go to join or adjust a shot before the photo is split into multiple files of real time. 1 Select MODE > SETUP > VIDEO > Mode > Time Lapse. 2 Select a time interval. 3 For the best results, mount the device so that take a series of an activity. You must purchase a Garmin VIRB accessory cable with a 3. 5 mm connector. time. Time-lapse videos...
Owners Manual
Page 10
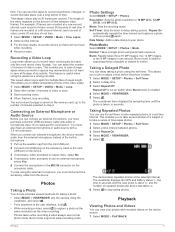
... information. gpx files on the audio-video cable to a compatible temperature sensor 6 Tracks You can control video playback using the BaseCamp™ application. Go to change the volume level. 3 Select OK. The device enters playback mode. The track log contains information about points along the recorded path, such as . The device can adjust the volume. 1 Select MODE > SETUP > SYSTEM > Audio Out. 2 Select and to http: / / connect .garmin .com for VIRB Elite only. Videos are saved as time, location...
... information. gpx files on the audio-video cable to a compatible temperature sensor 6 Tracks You can control video playback using the BaseCamp™ application. Go to change the volume level. 3 Select OK. The device enters playback mode. The track log contains information about points along the recorded path, such as . The device can adjust the volume. 1 Select MODE > SETUP > SYSTEM > Audio Out. 2 Select and to http: / / connect .garmin .com for VIRB Elite only. Videos are saved as time, location...

Owners Manual
Page 11
... Garmin device within 10 ft. (3 m) of each time it is activated. When connected to a sensor, tempe displays the current temperature À, maximum and minimum temperatures Á, temperature graph Â, and time scale Ã. Pairing Your ANT + Sensors When you pair a compatible ANT + sensor with your device, the sensor data is included in the track log, and you can go near other . 2 On the device, select MODE > SETUP > SENSORS...
... Garmin device within 10 ft. (3 m) of each time it is activated. When connected to a sensor, tempe displays the current temperature À, maximum and minimum temperatures Á, temperature graph Â, and time scale Ã. Pairing Your ANT + Sensors When you pair a compatible ANT + sensor with your device, the sensor data is included in the track log, and you can go near other . 2 On the device, select MODE > SETUP > SENSORS...

Owners Manual
Page 12
... host settings for more information. • On the remote control accessory, follow the pairing instructions in the accessory manual. Operating the Device Using Your Mobile Device NOTE: This feature is missing from the application store on the VIRB device screen. Location, speed, distance, and altitude information requires a GPS signal. • Connect additional ANT + sensors (Pairing Your ANT + Sensors). GPS: Enables the device to control other VIRB devices. 1 On all your device. The app connects using a compatible mobile device running the free Garmin VIRB app...
... host settings for more information. • On the remote control accessory, follow the pairing instructions in the accessory manual. Operating the Device Using Your Mobile Device NOTE: This feature is missing from the application store on the VIRB device screen. Location, speed, distance, and altitude information requires a GPS signal. • Connect additional ANT + sensors (Pairing Your ANT + Sensors). GPS: Enables the device to control other VIRB devices. 1 On all your device. The app connects using a compatible mobile device running the free Garmin VIRB app...

Owners Manual
Page 13
... the device. fit files for more information about optional accessories and replacement parts. Power Save: Turns off using or charging. Units: Sets the units of a dry cloth may have to clean the lens. Extending the Battery Life NOTE: Using GPS and ANT™ does not significantly affect battery life. • Disable Wi-Fi. • Enable Power Save in 1 meter of the USB cable to your GPS position (VIRB Elite only). Reset Settings: Restores the default device settings. Time Format: Sets the device to...
... the device. fit files for more information about optional accessories and replacement parts. Power Save: Turns off using or charging. Units: Sets the units of a dry cloth may have to clean the lens. Extending the Battery Life NOTE: Using GPS and ANT™ does not significantly affect battery life. • Disable Wi-Fi. • Enable Power Save in 1 meter of the USB cable to your GPS position (VIRB Elite only). Reset Settings: Restores the default device settings. Time Format: Sets the device to...
Owners Manual
Page 14
See memory card mounting the device 2 mounts, optional 2 P pairing, ANT + sensors 7 photos settings 4, 5 taking 5 viewing 5 power key 2, 3 R remote control 8 S settings 9 software updating 9 version 8 specifications 9 10 speed 6 storing data 9 system settings 8 T temperature 6, 9 time settings 9 zones and formats 9 tones 8 tracks 6, 9 transferring, files 9 troubleshooting 8, 9 U unit ID 8 USB mass storage mode 9 transferring files 9 V video editing 9 loop 5 output 6 playing 5 recording 3-5 settings 3, 4 time lapse 4 volume, adjusting 6 W water resistance 9 Wi-Fi 3, 8 connecting 8 Index ...
See memory card mounting the device 2 mounts, optional 2 P pairing, ANT + sensors 7 photos settings 4, 5 taking 5 viewing 5 power key 2, 3 R remote control 8 S settings 9 software updating 9 version 8 specifications 9 10 speed 6 storing data 9 system settings 8 T temperature 6, 9 time settings 9 zones and formats 9 tones 8 tracks 6, 9 transferring, files 9 troubleshooting 8, 9 U unit ID 8 USB mass storage mode 9 transferring files 9 V video editing 9 loop 5 output 6 playing 5 recording 3-5 settings 3, 4 time lapse 4 volume, adjusting 6 W water resistance 9 Wi-Fi 3, 8 connecting 8 Index ...
Quick Start Manual
Page 1
VIRB™ Series Quick Start Manual May 2014 190-01627-01_0B Printed in Taiwan
VIRB™ Series Quick Start Manual May 2014 190-01627-01_0B Printed in Taiwan
Quick Start Manual
Page 2
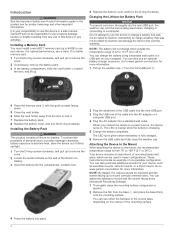
... outlet. Installing the Battery Pack WARNING This product contains a lithium-ion battery. When you connect the device to lock it. 7 Replace the battery pack. 8 Replace the battery cover, and turn the D-ring clockwise. The LED is orange while the battery is fully charged. 6 Remove the USB cable and fully close the weather cap. The LED turns green when the battery is charging. 5 Charge the battery completely. You can be mounted with the screen facing...
... outlet. Installing the Battery Pack WARNING This product contains a lithium-ion battery. When you connect the device to lock it. 7 Replace the battery pack. 8 Replace the battery cover, and turn the D-ring clockwise. The LED is orange while the battery is fully charged. 6 Remove the USB cable and fully close the weather cap. The LED turns green when the battery is charging. 5 Charge the battery completely. You can be mounted with the screen facing...
Quick Start Manual
Page 3
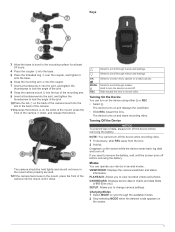
... the device using either or REC. • Select . Select to cycle through menus and settings. Slide toward the lens. If you to scroll through modes. VIEWFINDER: Displays the camera viewfinder and status information. NOTE: You cannot turn on the screen. 3 DASHBOARD: Displays sensor data in the back of the camera. 11Squeeze the buttons Ç on and starts recording video. Hold to remove the battery, wait...
... the device using either or REC. • Select . Select to cycle through menus and settings. Slide toward the lens. If you to scroll through modes. VIEWFINDER: Displays the camera viewfinder and status information. NOTE: You cannot turn on the screen. 3 DASHBOARD: Displays sensor data in the back of the camera. 11Squeeze the buttons Ç on and starts recording video. Hold to remove the battery, wait...
Quick Start Manual
Page 4
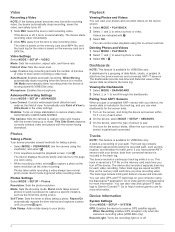
... turn off , it turns on automatically. Videos are saved as the finish line during a race. When the icon turns solid, the sensor is ignored while recording video. The track logs include track point data at the same resolution as time, location, and elevation for each other. 2 On the device, select MODE > SETUP > SENSORS. 3 On the device, select the type of View to http: / / connect .garmin .com for more information...
... turn off , it turns on automatically. Videos are saved as the finish line during a race. When the icon turns solid, the sensor is ignored while recording video. The track logs include track point data at the same resolution as time, location, and elevation for each other. 2 On the device, select MODE > SETUP > SENSORS. 3 On the device, select the type of View to http: / / connect .garmin .com for more information...
Quick Start Manual
Page 5
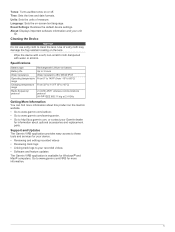
... recorded videos • Software and feature updates The Garmin VIRB application is available for more information about this product on the lens. Use of measure. Language: Sets the on or off. Go to clean the lens. Tones: Turns audible tones on -screen text language. Support and Updates The Garmin VIRB application provides easy access to these tools and services for information about optional accessories and replacement parts.
... recorded videos • Software and feature updates The Garmin VIRB application is available for more information about this product on the lens. Use of measure. Language: Sets the on or off. Go to clean the lens. Tones: Turns audible tones on -screen text language. Support and Updates The Garmin VIRB application provides easy access to these tools and services for information about optional accessories and replacement parts.
Quick Start Manual
Page 6
...United States and other countries. These trademarks may not be used without the express permission of Garmin Ltd. Windows® is a registered trademark of Apple Inc. deutschen Festnetz, Mobilfunk max. 60 ct./Anruf TRA REGISTERED No: ER0116234/13 DEALER No: DA0061884/11 © 2013-2014 Garmin Ltd. www.garmin.com/support.... VIRB™, ANT+™, Garmin Connect™, and BaseCamp™ are those of SD-3C, LLC. d. For open source license information associated with this product, see wifi_copyrights.txt on the device microSD card. Mac® is a registered mark of Garmin Ltd...
...United States and other countries. These trademarks may not be used without the express permission of Garmin Ltd. Windows® is a registered trademark of Apple Inc. deutschen Festnetz, Mobilfunk max. 60 ct./Anruf TRA REGISTERED No: ER0116234/13 DEALER No: DA0061884/11 © 2013-2014 Garmin Ltd. www.garmin.com/support.... VIRB™, ANT+™, Garmin Connect™, and BaseCamp™ are those of SD-3C, LLC. d. For open source license information associated with this product, see wifi_copyrights.txt on the device microSD card. Mac® is a registered mark of Garmin Ltd...


