
Owner's Manual
Page 3
...section provides information on the unit. To get the most from your new Rino 120 right out of the box. It also includes an overview of some additional features and step-by -step instructions for using the features. The small size of the guide makes it functions...by -step instructions for using the page and its main intention is organized into the following sections: The Introduction section provides the Table of Contents and safety information. INTRODUCTION Thank you for choosing the Garmin® Rino® 120 (Radio Integrated with you with your new Rino 120, read through...
...section provides information on the unit. To get the most from your new Rino 120 right out of the box. It also includes an overview of some additional features and step-by -step instructions for using the features. The small size of the guide makes it functions...by -step instructions for using the page and its main intention is organized into the following sections: The Introduction section provides the Table of Contents and safety information. INTRODUCTION Thank you for choosing the Garmin® Rino® 120 (Radio Integrated with you with your new Rino 120, read through...
Owner's Manual
Page 11
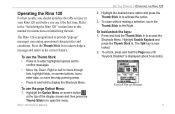
...hold the Page key until "Keylock Disabled" is displayed (about 5 seconds). Operating the Rino 120 For best results, you should initialize the GPS receiver in this manual for instructions on -screen button at the top of the display screen and then press the Thumb ...In. Keylock Pop-up " messages concerning operational characteristics and conditions. The Rino 120 is now locked. 2. Rino® 120 Owner's Manual GETTING STARTED > OPERATING THE RINO 120 2. Refer to the "Initializing the Rino 120" section later in your Rino 120 unit before you use the Thumb Stick: • Press In to...
...hold the Page key until "Keylock Disabled" is displayed (about 5 seconds). Operating the Rino 120 For best results, you should initialize the GPS receiver in this manual for instructions on -screen button at the top of the display screen and then press the Thumb ...In. Keylock Pop-up " messages concerning operational characteristics and conditions. The Rino 120 is now locked. 2. Rino® 120 Owner's Manual GETTING STARTED > OPERATING THE RINO 120 2. Refer to the "Initializing the Rino 120" section later in your Rino 120 unit before you use the Thumb Stick: • Press In to...

Owner's Manual
Page 32
... map to your Rino 120. Highlight an option then press the Thumb Stick In to the original factory settings (defaults). 26 Rino® 120 Owner's Manual Choosing either the Contact Bar, four programmable Data Fields, or show the Map Only. Refer to the "Using the Pan Map Option" section for complete instructions. Measure Distance-Displays...
... map to your Rino 120. Highlight an option then press the Thumb Stick In to the original factory settings (defaults). 26 Rino® 120 Owner's Manual Choosing either the Contact Bar, four programmable Data Fields, or show the Map Only. Refer to the "Using the Pan Map Option" section for complete instructions. Measure Distance-Displays...

Owner's Manual
Page 67
...Thumb Stick In to place the new waypoint. Then press the Thumb Stick In and select Add Turns. Follow steps 1 and 2 in the previous instructions. 2. Drag the line to a map item or other location where you would like to extend the route and press the Thumb Stick In to place...again after returning to the line. 3. UNIT OPERATION > ROUTE PAGE 5. Use the Thumb Stick to move the panning arrow to add or edit route waypoints. Rino® 120 Owner's Manual 61 Adding or Editing from the list of a route. 4. A Waypoint Information Page displays. To add a point at the bottom of the ...
...Thumb Stick In to place the new waypoint. Then press the Thumb Stick In and select Add Turns. Follow steps 1 and 2 in the previous instructions. 2. Drag the line to a map item or other location where you would like to extend the route and press the Thumb Stick In to place...again after returning to the line. 3. UNIT OPERATION > ROUTE PAGE 5. Use the Thumb Stick to move the panning arrow to add or edit route waypoints. Rino® 120 Owner's Manual 61 Adding or Editing from the list of a route. 4. A Waypoint Information Page displays. To add a point at the bottom of the ...

Owner's Manual
Page 77
To select Track Up or North Up: 1. To enter a new location: 1. If you choose Automatic the Rino 120 determines your approximate location and press ENTER." Rino® 120 Owner's Manual UNIT OPERATION > SATELLITE PAGE 71 Use the Thumb Stick to move the map pointer to your location on which is currently in use), ... Option Menu. 2. Highlight New Location and press the Thumb Stick In to your new location automatically. If you choose Use Map, a map page displays with instructions stating, "Point to display choices of Auto or Use Map.
To select Track Up or North Up: 1. To enter a new location: 1. If you choose Automatic the Rino 120 determines your approximate location and press ENTER." Rino® 120 Owner's Manual UNIT OPERATION > SATELLITE PAGE 71 Use the Thumb Stick to move the map pointer to your location on which is currently in use), ... Option Menu. 2. Highlight New Location and press the Thumb Stick In to your new location automatically. If you choose Use Map, a map page displays with instructions stating, "Point to display choices of Auto or Use Map.
Owner's Manual
Page 84
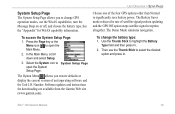
... 23) directly from the Beacon list to control a Garmin differential beacon receiver (e.g. Refer to activate it. Highlight an option and then press the Thumb Stick In to the beacon receiver instructions. Interface Setup Page 78 Rino® 120 Owner's Manual Use this for real-time plotting with ... a serial data format: 1. UNIT OPERATION > SETUP PAGES NMEA In/NMEA Out-Supports the output of location and velocity information. If Garmin DGPS or RTCM In/NMEA Out format is automatic with MapSource or 3rd party programs. Text Out-Allows ASCII text output of standard NMEA...
... 23) directly from the Beacon list to control a Garmin differential beacon receiver (e.g. Refer to activate it. Highlight an option and then press the Thumb Stick In to the beacon receiver instructions. Interface Setup Page 78 Rino® 120 Owner's Manual Use this for real-time plotting with ... a serial data format: 1. UNIT OPERATION > SETUP PAGES NMEA In/NMEA Out-Supports the output of location and velocity information. If Garmin DGPS or RTCM In/NMEA Out format is automatic with MapSource or 3rd party programs. Text Out-Allows ASCII text output of standard NMEA...
Owner's Manual
Page 85
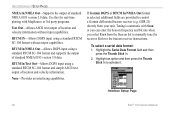
...down and select Setup. 3. To access the System Setup Page: 1. Select the System icon to open the System Setup Page. Rino® 120 Owner's Manual 79 Number. The Demo Mode simulates navigation. Use the Thumb Stick to select the desired option and press In....instructions for WAAS capability information. The Option Menu allows you to significantly save battery power. To change GPS operation modes, use the Thumb Stick to highlight the Battery Type field and then press In. 2. See the "Appendix" for downloading are available from the Garmin Web site (www.garmin...
...down and select Setup. 3. To access the System Setup Page: 1. Select the System icon to open the System Setup Page. Rino® 120 Owner's Manual 79 Number. The Demo Mode simulates navigation. Use the Thumb Stick to select the desired option and press In....instructions for WAAS capability information. The Option Menu allows you to significantly save battery power. To change GPS operation modes, use the Thumb Stick to highlight the Battery Type field and then press In. 2. See the "Appendix" for downloading are available from the Garmin Web site (www.garmin...

Owner's Manual
Page 91
... icon the Main Menu. In the Main Menu, scroll down and select the Sun & Moon icon. Rino® 120 Owner's Manual UNIT OPERATION > SUN & MOON To set the location: 1. If you choose Use Find 'N Go Menu follow instructions in the "Find 'N Go" section. To access the Sun & Moon Page: 1. If you choose Use...
... icon the Main Menu. In the Main Menu, scroll down and select the Sun & Moon icon. Rino® 120 Owner's Manual UNIT OPERATION > SUN & MOON To set the location: 1. If you choose Use Find 'N Go Menu follow instructions in the "Find 'N Go" section. To access the Sun & Moon Page: 1. If you choose Use...

Owner's Manual
Page 92
In the Main Menu, scroll down and select the Hunt & Fish icon. Highlight the option desired and then press In on the Thumb Stick. Rino® 120 Owner's Manual to display the Use Current Date option. To view information for using the Find 'N Go Menu. Hunt & Fish Page NOTE: The times...to begin data entry of best times for hunting and fishing for hunting and fishing. If you choose Use Find 'N Go Menu, follow instructions for a different date: 1. It is your current location. 3. To display the current date, highlight the page Option Menu and press the Thumb Stick ...
In the Main Menu, scroll down and select the Hunt & Fish icon. Highlight the option desired and then press In on the Thumb Stick. Rino® 120 Owner's Manual to display the Use Current Date option. To view information for using the Find 'N Go Menu. Hunt & Fish Page NOTE: The times...to begin data entry of best times for hunting and fishing for hunting and fishing. If you choose Use Find 'N Go Menu, follow instructions for a different date: 1. It is your current location. 3. To display the current date, highlight the page Option Menu and press the Thumb Stick ...

Owner's Manual
Page 94
Press Page to . Each symbol is in a square, highlight Open at any time. Brief instructions are displayed when you need to walk or travel to quit at the bottom of the two symbols sets together. Memory Race Games Menu Memory ... Square Size: 1. Highlight Start and press In to play . Choose the desired size and press In. 3. All players must be on the Thumb Stick. 2. Rino® 120 Owner's Manual Once your position appears in a square (you can adjust the size) that you start each game. UNIT OPERATION > GAMES Games The Games Page...
Press Page to . Each symbol is in a square, highlight Open at any time. Brief instructions are displayed when you need to walk or travel to quit at the bottom of the two symbols sets together. Memory Race Games Menu Memory ... Square Size: 1. Highlight Start and press In to play . Choose the desired size and press In. 3. All players must be on the Thumb Stick. 2. Rino® 120 Owner's Manual Once your position appears in a square (you can adjust the size) that you start each game. UNIT OPERATION > GAMES Games The Games Page...

Owner's Manual
Page 96
... them and pressing the Talk key. pits while navigating a maze of your own rules and enjoy! Press Page any time during the game for further instructions, to turn the sound On/Off, or to quit the game. When you think you know where the beast is press the Thumb Stick In..., the layout of hazards, slides, warning platforms, and the location of them . You can be used as a high-tech game of several Beast Hunt 90 Rino® 120 Owner's Manual
... them and pressing the Talk key. pits while navigating a maze of your own rules and enjoy! Press Page any time during the game for further instructions, to turn the sound On/Off, or to quit the game. When you think you know where the beast is press the Thumb Stick In..., the layout of hazards, slides, warning platforms, and the location of them . You can be used as a high-tech game of several Beast Hunt 90 Rino® 120 Owner's Manual
Owner's Manual
Page 99
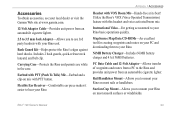
... and a clip-on your PC and downloading them to your Rino. Instructional Video-For getting accustomed to your Rino. PC Data Cable and 12-Volt Adapter-Allows transfer of waypoints and routes from a PC to the Rino and provides unit power from an automobile cigarette lighter. 2.5 to...Transmission) feature with VOX Boom Mic-Hands-free at www.garmin.com. 12-Volt Adapter Cable-Provides unit power from an automobile cigarette lighter. APPENDIX > ACCESSORIES Headset with this headset and voice activated boom mic. Rino® 120 Owner's Manual 93 Includes 2 bash guards, quick-release ...
... and a clip-on your PC and downloading them to your Rino. Instructional Video-For getting accustomed to your Rino. PC Data Cable and 12-Volt Adapter-Allows transfer of waypoints and routes from a PC to the Rino and provides unit power from an automobile cigarette lighter. 2.5 to...Transmission) feature with VOX Boom Mic-Hands-free at www.garmin.com. 12-Volt Adapter Cable-Provides unit power from an automobile cigarette lighter. APPENDIX > ACCESSORIES Headset with this headset and voice activated boom mic. Rino® 120 Owner's Manual 93 Includes 2 bash guards, quick-release ...
Owner's Manual
Page 100
...3rd party maps into Garmin products. Points of map data from a topo map to 8 MB of Interest 5. Waterways & Lights 6. U.S. You cannot view multiple types of MapSource data in the MapSource User's Manual. 94 Rino® 120 Owner's Manual MetroGuide 3. The Rino 120 accepts up to a ...MetroGuide map. The BlueChart maps are at the same time (one replaces the other map information. Here is an overlap). Roads and Recreation 8. Fishing Hot Spots 4. Follow detailed instructions for data ...
...3rd party maps into Garmin products. Points of map data from a topo map to 8 MB of Interest 5. Waterways & Lights 6. U.S. You cannot view multiple types of MapSource data in the MapSource User's Manual. 94 Rino® 120 Owner's Manual MetroGuide 3. The Rino 120 accepts up to a ...MetroGuide map. The BlueChart maps are at the same time (one replaces the other map information. Here is an overlap). Roads and Recreation 8. Fishing Hot Spots 4. Follow detailed instructions for data ...
Owner's Manual
Page 101
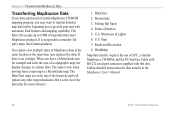
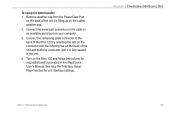
... from the Power/Data Port on the back of the unit by orienting the slot on the connector with the indexing bar on the Rino 120 and follow instructions for map data transfer provided in the unit. 4. Connect the serial port connector on the cable to the back of the unit and push... the connector until it is fully seated in the MapSource User's Manual. APPENDIX > TRANSFERRING MAPSOURCE DATA Rino® 120 Owner's Manual 95 To setup for unit ...
... from the Power/Data Port on the back of the unit by orienting the slot on the connector with the indexing bar on the Rino 120 and follow instructions for map data transfer provided in the unit. 4. Connect the serial port connector on the cable to the back of the unit and push... the connector until it is fully seated in the MapSource User's Manual. APPENDIX > TRANSFERRING MAPSOURCE DATA Rino® 120 Owner's Manual 95 To setup for unit ...

Owner's Manual
Page 112
...may cause undesired operation. If this device. 106 Rino® 120 Owner's Manual APPENDIX > FCC COMPLIANCE INFORMATION FCC Compliance Information The Rino 120 complies with Part 15 of the FCC regulations and with the instructions. The Rino 120 does not contain any interference received, including interference ...that may cause harmful interference to operate this equipment does cause harmful interference to correct the interference by an authorized Garmin service center. Unauthorized repairs or modifications could result in permanent damage to the equipment and void your ...
...may cause undesired operation. If this device. 106 Rino® 120 Owner's Manual APPENDIX > FCC COMPLIANCE INFORMATION FCC Compliance Information The Rino 120 complies with Part 15 of the FCC regulations and with the instructions. The Rino 120 does not contain any interference received, including interference ...that may cause harmful interference to operate this equipment does cause harmful interference to correct the interference by an authorized Garmin service center. Unauthorized repairs or modifications could result in permanent damage to the equipment and void your ...
Owner's Manual
Page 114
...components that the customer shall be responsible for shipping instructions and an RMA tracking number. This warranty does ...the outside of the package. Within this period, Garmin will be made at no charge to the customer... for one year from defects in normal use. Garmin retains the exclusive right to repair or replace the...FROM STATE TO STATE. 108 IN NO EVENT SHALL GARMIN BE LIABLE FOR ANY INCIDENTAL, SPECIAL, INDIRECT OR CONSEQUENTIAL...Garmin authorized dealer or call Garmin Product Support for any Garmin warranty service station. APPENDIX > LIMITED WARRANTY Limited Warranty This Garmin ...
...components that the customer shall be responsible for shipping instructions and an RMA tracking number. This warranty does ...the outside of the package. Within this period, Garmin will be made at no charge to the customer... for one year from defects in normal use. Garmin retains the exclusive right to repair or replace the...FROM STATE TO STATE. 108 IN NO EVENT SHALL GARMIN BE LIABLE FOR ANY INCIDENTAL, SPECIAL, INDIRECT OR CONSEQUENTIAL...Garmin authorized dealer or call Garmin Product Support for any Garmin warranty service station. APPENDIX > LIMITED WARRANTY Limited Warranty This Garmin ...

Owner's Manual
Page 119
...the manufacturer of FRS radios on boats, fuel or chemical transfer or storage facilities; Posted Facilities-Turn your vehicle. Obey all signs and instructions. Blasting Areas-To avoid interfering with a potentially explosive atmosphere. and any other area where you are often, but not always clearly marked.... Switch OFF your radio OFF and do so. vehicles using equipment that has been added to your vehicle. Rino® 120 Owner's Manual 113 Sparks from your battery in such areas could be sensitive to external RF energy. Turn your radio OFF in ...
...the manufacturer of FRS radios on boats, fuel or chemical transfer or storage facilities; Posted Facilities-Turn your vehicle. Obey all signs and instructions. Blasting Areas-To avoid interfering with a potentially explosive atmosphere. and any other area where you are often, but not always clearly marked.... Switch OFF your radio OFF and do so. vehicles using equipment that has been added to your vehicle. Rino® 120 Owner's Manual 113 Sparks from your battery in such areas could be sensitive to external RF energy. Turn your radio OFF in ...

Quick Start Guide
Page 1
...aligned with other Rino users and even navigate to display Map Page Microphone: • Hold unit 3-4 inches away when talking Step-by Name), and press the Thumb Stick In. 4. Highlight Find 'N Go and press the Thumb Stick In. 3. Select the desired option (by Nearest or by -Step Instructions to Get ...a Saved Note or a new note. (This feature is not available on the map (Map), or save the note for more about the operation of Rino 120, refer to begin navigation using the data entry keyboard. Highlight Find 'N Go and press the Thumb Stick In. Highlight the Option Menu button Stick In...
...aligned with other Rino users and even navigate to display Map Page Microphone: • Hold unit 3-4 inches away when talking Step-by Name), and press the Thumb Stick In. 4. Highlight Find 'N Go and press the Thumb Stick In. 3. Select the desired option (by Nearest or by -Step Instructions to Get ...a Saved Note or a new note. (This feature is not available on the map (Map), or save the note for more about the operation of Rino 120, refer to begin navigation using the data entry keyboard. Highlight Find 'N Go and press the Thumb Stick In. Highlight the Option Menu button Stick In...
Quick Start Guide
Page 2
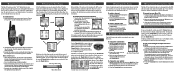
Remove the battery cover on the front of the Rino 120 from other members of the My ID field. Notes on battery use: • When replacing batteries, use Alkaline batteries. Follow the battery manufacturer's instructions for you to the right of your location on another user or update ...sure to tell the other FRS radio users on . To select a squelch code: 1. Select one of information, they can communicate with the Rino 120 The Rino 120 can transmit to highlight the on five default main pages (or display screens). Enter an ID, or name, up to accept the ...
Remove the battery cover on the front of the Rino 120 from other members of the My ID field. Notes on battery use: • When replacing batteries, use Alkaline batteries. Follow the battery manufacturer's instructions for you to the right of your location on another user or update ...sure to tell the other FRS radio users on . To select a squelch code: 1. Select one of information, they can communicate with the Rino 120 The Rino 120 can transmit to highlight the on five default main pages (or display screens). Enter an ID, or name, up to accept the ...

